Dividing a Pass into Zones When Machining Long Flat Surfaces
Dividing a pass into zones helps finish a long flat surface on a housing more cleanly: fewer burn marks, less cutter deflection, and easier size control.
Why a long flat surface gets worse near the end of the pass
On a long flat surface, the defect is rarely visible in the first few millimeters. Usually the beginning looks clean, and toward the end of the pass you get a band, a slight wave, or the size drifts. Most often there are two reasons: heat builds up as cutting continues, and the tool deflects more and more under load.
When the cutter travels along one path for a long time, it heats both the metal and the cutting edge. Even with a light stock removal, the heat does not disappear right away. It accumulates as the tool moves, and by the end of the pass the conditions are no longer the same as at the start. The metal expands slightly, chip evacuation gets worse, and the mark on the surface becomes more noticeable.
This is especially easy to see on housing parts with a long open side. In the first 200–300 mm, the cutter cuts calmly. Then the sound changes, and on the last sections a more shiny or, on the contrary, matte band often appears. This is a typical burn mark in milling: the tool is already working in a different thermal state.
The second reason is cutter stick-out. The longer it is, the easier it is for the tool to push sideways. On a short section, this is almost invisible. On a long surface, the deviation has time to build up. The cutter moves a little, comes back, and moves again. That creates a wave that is easiest to see near the end of the travel.
If you remove the full length in one go, the size drifts much more easily. The program sets one toolpath, but the actual machining of long flat surfaces happens under different conditions. At the start, the part is cooler and the tool is stiffer. Closer to the end, there is already heat, the risk of micro-vibration is higher, and the long stick-out starts to matter more.
Usually, the end of a long pass shows the same signs: feed marks along the direction of travel, a slight wave in the reflection, a flatness drift on the last centimeters, and a different cutter trace at the beginning and at the end.
If the surface is long and the tolerance is tight, one continuous pass often looks good only on the screen. On the actual part, the most visible defect often remains exactly where the pass ends.
When one long pass is no longer worth it
A long single pass stops working once the cutter can no longer maintain the same cutting conditions along the full length. At the beginning the surface is clean, but by the end the tool heats up, the load changes, and the size starts to drift.
The first clear sign is that the surface is much longer than the section where the cutter cuts calmly and predictably. If everything is fine on a short travel, but on a long side of the housing the quality drops after the middle, the problem is usually not one point but the length of the pass itself.
You can hear this in the sound. Up to the middle the cut is even, then a different tone appears: hissing, a light ring, or a drier sound. The operator often notices this before the inspection shows numbers. And that is no accident. By that point the tool has already heated up, the stick-out has begun to affect the cut more strongly, and chip evacuation is less stable.
On the part, this looks like alternating matte and shiny bands. A shiny area often appears where the cutter is no longer cutting evenly across the full width. A matte one appears where friction increased or slight vibration started. If such bands run along a long surface without a clear link to stock allowance, it is better to rethink the continuous pass.
Another sign comes from flatness inspection. At the beginning of the pass, the indicator or coordinate measurement shows normal values, but toward the end a gradual drift appears. It may be small, but on housing parts even a few hundredths over a long base can later interfere with assembly, cover fit, or the parallelism of the neighboring surface.
Usually the solution is simple: do not try to process the whole long flat surface in one pass, but divide it into zones. Then the cutter works on a shorter section, heats up less, and the effect of stick-out does not have time to build up.
If the sound changes after the middle, matte and shiny bands appear on the surface, the measurement drifts toward the end, and the same cutter leaves a cleaner trace on short passes, the long pass should already be split up.
On the long side of a gearbox housing or pump body, this is especially easy to see. The first 200–300 mm come out clean, then a slight band appears, and the size starts to drift. In such a situation, a long pass only looks faster on paper. In practice, it usually adds an extra pass, rework, and a questionable result.
How to decide where to split the surface into zones
It is better to divide a long flat surface not by the nice geometry on the drawing, but by how the part and the tool behave during cutting. If heat, noise, and surface marks grow toward the end of the travel, a continuous pass is already working against the result.
First, look at two things: the surface length and the rigidity of the whole system. It matters not only what cutter you use, but also its stick-out, the clamping of the part, the height of the housing, and the support under the machining area. A long surface on a stiff, heavy housing can still be done in one pass. The same length on a part with high stick-out, a thin bottom, or weak clamping usually needs to be split.
A good rule of thumb is simple: if the cutting sound changes after the middle of the pass, the temperature rises, and the burn mark in milling becomes more noticeable, you should look for the zone boundary before that point. It is better not to wait until the defect affects the size.
You also need to consider the housing geometry. Windows, pockets, cavities, and thin walls change rigidity along the length. Because of that, the cutter may move smoothly on one section and then start to pull the surface slightly 150–200 mm later. The zone joint is better moved away from such places. If you place it directly over a pocket or next to a thin wall, a step or a band often appears at the transition.
Usually the boundaries are chosen where the tool can enter smoothly, without a sharp load change, and where the surface has proper support. Good spots are sections before a window or pocket, on the solid part of the housing, in an area without a sharp toolpath turn, and where it is easy to leave a small overlap.
Overlap between zones is needed almost every time. A small extra length smooths out the difference in heating and helps remove any visible mark at the joint. Too much overlap is also not ideal: the surface only heats up more, and you may get a matte band.
A simple test is useful. Take the long side of the housing, mentally divide it into three parts, and estimate where the part loses rigidity. If the middle goes smoothly, but the problems start closer to the edge because of tool stick-out or a thin wall, place the joint not at the worst spot, but a little earlier, on a more stable section. Then zone-based pass division gives a smoother trace and fewer surprises already from the first part.
How to machine a long flat surface by zones
If you drag one pass across the whole side of the housing, by the end the tool is often working under different conditions. The spindle and cutter heat up, chips stay in the cutting zone longer, and with a large stick-out the tool deflects more. That is why the end of the surface often looks worse than the beginning.
Dividing the work into zones helps keep the load more even. For housing parts, this is especially useful on long sides where rigidity changes along the length and clamping does not act the same everywhere.
First, level the base and check the clamping. If the housing sits at an angle or one point is clamped harder than the others, zones will not save you. The error will simply be copied neatly across the whole surface.
Usually the length is split into 2–4 sections. Splitting it more only makes sense rarely: it increases time spent on approach moves, inspection, and joint correction. It is better to divide it so that the cutter removes about the same amount of metal in each zone, instead of moving from light cutting to heavy cutting and back again.
It is better to move from the stiffer part of the housing toward the less rigid part. If there are ribs, bosses, or a thick wall near one side, it makes sense to start there. The main load is removed where the part breathes less, and the cutter approaches the weak area in a more predictable state.
Working method
First mark 2–4 zones along the length with similar loads. Then set a small overlap between neighboring zones. If the material and stock allowance do not change, it is better not to touch the cutting conditions. After each zone, it helps to check the tool temperature and the trace on the surface.
At the joint, do not stop the pass abruptly. It is better to use overlap so the next zone takes a few millimeters of already machined surface. That way the boundary between sections is smoothed out, and the risk of a step is much lower. The exact overlap depends on the cutter diameter, stock allowance, and finish quality, but the principle itself almost always works better than a hard stop.
After each zone, a short check is useful. Look for darkening, changes in cutting sound, and a matte band toward the end of the section. Small details like that show the burn mark early, before the defect becomes obvious.
For example, on a long side of a housing about 900 mm long, it is convenient to first machine the first 300–400 mm near the stiffer part, then the middle zone, and only then the edge with lower rigidity. If heat rises on the second section, it is easier to reduce the feed or adjust the stick-out right away than to ruin the whole pass to the end of the part.
What to adjust to reduce heat and deflection
On a long flat surface, the mark often appears not because of the toolpath itself, but because of settings that seem minor at first. The cutter heats up, the housing has different stock in different places, and with a large stick-out the tool shifts slightly to the side. By the end of the zone, this is already visible on the surface.
If zone-based pass division is already in place, do not keep the same conditions just out of habit. For a long side of a housing, it is better to remove everything that adds extra heat and makes the tool unstable.
First of all, check the cutter stick-out. Keep only the minimum needed for a safe pass. Every extra millimeter makes the tool softer. In long finishing work, that quickly leads to deflection, and the burn mark becomes more visible near the edge of the zone.
Feed at the zone entry and exit should also not be too high. At those points, the tool enters the material less smoothly than in the middle of the pass. If the machine suddenly adds load, the edge heats up more and the cutter may deflect slightly. A smooth transition is more reliable.
Before a finishing pass, a short check is enough: the stock across the full width should be roughly even, there should be no local step left after the previous operation, the cutting edge should be inspected even if the tool is still supposed to be fine, and coolant or air should reach the cutting zone steadily along the full travel.
Uneven stock removal hurts the surface more than it seems. If the cutter removes 0.15 mm on one side and 0.35 mm next to it, the load changes throughout the pass. That is why a different sheen, a slight wave, or a thin thermal mark appears at the zone joint.
The edge is the same story. For roughing it may still be acceptable, but in finishing it starts rubbing instead of cutting. Then the surface darkens and the temperature rises even at a normal feed. On housing parts, this is especially noticeable on long side surfaces.
Coolant or air supply also needs to stay even along the whole path. If the stream hits the cutting zone sometimes and then moves away, the temperature changes within a single pass. After that, the joint between zones looks as if different tools were used.
It all comes down to simple things: minimal stick-out, smooth entry and exit, even stock, a sharp edge, and steady coolant flow. That is what most often removes heat and deflection without changing the machining strategy completely.
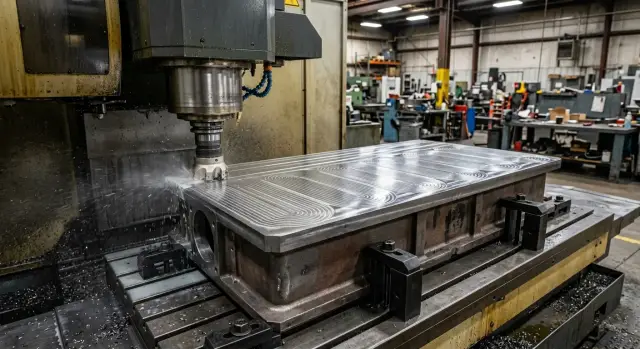
Example on a long side of a housing
On a gearbox housing, the long side surface often looks simple only on the drawing. In reality, there are windows, pockets, and thin walls nearby, so rigidity changes along the length. At the start of the pass, the cutter cuts calmly, and closer to the far edge the part and tool behave differently.
On one such housing, the operator first chose a single continuous finishing pass along the entire side. Almost the full length came out acceptable, but a noticeable band remained near the far edge. This kind of trace usually appears when heat, elastic tool deflection, and the effect of cutter stick-out all increase by the end of the travel. The surface does not fail, but the line is immediately visible in the light.
The part itself also added problems. Internal windows weakened the middle of the housing, so under load it no longer held as rigidly as a solid wall. While the cutter moved along the long toolpath, heat had time to build up, and on the last millimeters the tool was no longer working as it had at the start.
The pass was then split into three sections along the length. Each section was machined separately, with a small overlap between neighboring zones so no visible step would remain. The scheme was simple: the first zone went from the base edge to the middle with extra overlap, the second covered the center, where the housing was weaker because of the windows, and the third machined the far edge, where the band had appeared before.
After that, a light finishing pass with a small stock removal was made across the full length. It removed only a tiny amount of metal and mainly smoothed the joints between zones, reducing differences in the tool trace. This often works better than trying to get a perfect surface in one long pass right away.
The repeat inspection showed a more even result along the length. The band near the far edge became much weaker, and the transitions between sections almost disappeared. If a defect on a long side of a housing gets worse toward the end of the pass, the cause is usually not one setting, but a combination of heat, cutter stick-out, and changing part rigidity.
Mistakes that remain at zone joints
On a long flat surface, the zone joint shows up quickly. In angled light you can see a thin line, a fingernail catches a barely noticeable step, and after assembly the surface no longer feels flat. The problem is usually not the idea of dividing the pass, but how it is done on the machine.
One common mistake is to bring neighboring sections together exactly to zero, with no overlap. Then any small factor, from heat at the end of the pass to tool deflection, leaves a mark. A small overlap gives the cutter a chance to smooth the transition instead of running straight into a hard boundary.
Uneven feed within the same surface also hurts just as much. If the cutter runs calmly in the first zone and the operator increases feed in the second zone to save time, the cutting force and surface sheen change right at the joint. The line appears even when the size is still acceptable.
People also often leave the cutter stick-out too long “just in case.” On paper that seems convenient: the tool will definitely reach everywhere. In practice, a long stick-out flexes more, and by the end of the zone the cutter removes metal differently than at the beginning. On a long side of a housing part, this quickly turns into a wave and a visible band at the joint.
The zone boundary should not be placed near a thin wall, a window, or a pocket. That part of the component itself moves slightly under load and heats up faster. As a result, the program is the same, but the actual surface position on either side of the joint is already different.
There is also a simple reason that is often noticed too late: the finishing pass is started with a worn cutter. The first zone may still come out acceptable, but in the second zone the cutting edge starts rubbing, heating, and changing the trace. After that, it is easy to look for a path error, even though the problem is in the tool.
Before another run, it is enough to check four things: is there a small overlap between zones, is the feed the same across the finishing surface, can unnecessary tool stick-out be reduced, and does the joint fall on a weak section of the part. It is also worth honestly deciding whether the cutter should be replaced.
If the joint is placed on a stiff section, overlap is kept, and the settings are not changed in the middle, the line almost disappears. If you skip even a couple of points, the joint usually remains even after careful finishing.
Quick check before starting
Before the first pass, it is better to spend a few minutes checking than to later look for the reason behind a band across the whole surface. On a long surface, the error is rarely visible right away. More often it shows up near the end of machining: a burn mark appears, the size drifts, and a step remains at the zone joint.
For housing parts, this check is especially useful because even a small clamping tilt quickly creates a difference along the full length. If zone-based pass division has already been chosen, you need to check not only the program but also the part setup itself.
The housing should sit evenly in the clamp, without tilt. If one corner hangs free or one support point takes more load than the others, the cutter will remove too much in one zone and too little in another. The cutter should not stick out more than needed for this surface: extra stick-out creates more vibration and damages the surface more strongly at the far end of the pass.
The program should clearly mark the zones and overlaps. The operator should immediately see where the first zone ends, how many millimeters overlap there are, and where the joint will be. Cutting conditions are best kept the same unless there is a clear reason to change them. Random differences in feed or speed between zones leave a more visible mark than the transition itself.
Before starting, it also helps to decide what to watch on the first part: the first band after the cutter enters, the heat at the end of the zone, the cutting sound, and the joint between passes. Then, after the first part, you do not have to guess where the band came from. The cause is usually clear right away: clamping, extra stick-out, an overlap error, or a sudden change in settings.
On a machining center, this discipline saves not minutes but hours of rework. If a long flat surface on a housing has to come out clean on the first run, this short check almost always pays off.
What to do after the first parts
The first 2–3 parts are often more useful than long calculations at the control panel. Compare the beginning, middle, and end of the surface under the same light and after the same cleaning. If a darker trace appears toward the end, the cutting sound changes, or a wave grows, heat and cutter stick-out are still affecting the pass.
Look at more than just the overall appearance. On a long flat surface, it often happens that the beginning of the zone comes out clean, the middle still holds, and the end shows slight dullness or bands. That already means the setup works in principle, but the margin is too small.
What to check on the first parts
It helps to keep a short note for each part. Usually four points are enough: the cutter trace at the beginning, middle, and end of the surface; the difference in size or flatness between zones; noticeable heating of the tool and the part after the pass; and the appearance of the joint between zones after finishing.
If one zone heats up more than the others, do not try to fix it only with feed right away. It is often faster to shorten that zone or move the boundary a little. The cutter spends less time with built-up heat, and the end of the section stops drifting.
Sometimes a very simple adjustment helps: leave the first zone as it is, shorten the second one by 15–20%, and increase overlap between them by a few millimeters. After that, zone-based pass division often starts giving a smooth result without any noticeable difference in shine or tool trace.
If the scheme works well, it should be saved immediately. Do not rely on the setup technician’s memory. Write down the length of each zone, the overlap, the tool, cutter stick-out, feed, stock allowance, and which part finally produced a stable surface. A month later, that note will save a lot of time on a similar housing.
For similar housing parts, a simple table is useful: material, surface length, clamping rigidity, and zone breakdown. Then, for a new batch, you do not have to start from zero — you can use a proven scheme and only adjust the small details.
If similar tasks come up regularly, it is sometimes useful to compare your approach with the experience of the equipment supplier. EAST CNC, a company from ТОО Метиз and the official representative of Taizhou Eastern CNC Technology Co., Ltd. in Kazakhstan, has practical experience with CNC machines for housing parts and metalworking. And on the east-cnc.kz blog, you can find equipment reviews and practical advice that help you understand when the problem can be solved by adjusting the pass and when it is time to rethink the machine or the fixturing.
FAQ
When is it time to divide a long surface into zones?
Divide the pass when the cutting sound changes after the middle of the surface and a band, matte finish, or gradual size drift appears near the end. If the same cutter cuts evenly on a short pass but starts to heat up and deflect at the end of a long one, a single continuous pass will only create more rework.
How can you tell from the part that one long pass is not working?
Look at the end of the pass under the same lighting. If the beginning shows a smooth trace, but the end has shiny or matte bands, a slight wave in the reflection, or a different surface tone, the cutter is already working under different conditions.
Where is the best place to put the boundary between zones?
Place the joint where the part has support and the cutter can enter smoothly. Do not put it over a window, pocket, thin wall, or near a place where rigidity drops sharply. It is better to move the boundary a little earlier to a calmer area than to catch a step in a weak zone.
Do I need overlap between zones?
A small overlap almost always helps because the cutter removes the transition more smoothly. Too little overlap leaves a line, while too much overheats the surface and can create a matte band. Use a moderate allowance and check the joint on the first part.
How many zones are usually used on a long side of a housing?
Most often, 2–4 zones along the length are enough. If you split it more, you lose time on approach moves and inspection, and you create more joints. Divide it so each zone removes roughly the same load.
Where should I start machining the zones?
Start from the stiffer part of the housing and move toward the less rigid area. That way the part handles the first load better, and the cutter reaches the weaker edge in a more stable mode. On a long side with ribs or a thick wall, this usually leaves a more even trace.
What affects deflection and heat the most?
First remove any unnecessary tool stick-out. Every extra millimeter makes the cutter more flexible, and deflection shows up faster by the end of the zone. After that, keep a steady allowance, smooth entry and exit, and stable coolant or air flow.
Does it make sense to do a light finishing pass over the full length after zoning?
Yes, such a pass often helps. It removes only a tiny amount of metal and smooths the difference at the joints if the zones were already machined evenly and without excess heat. Do not expect it to fix a bad clamp or a worn edge; it will not save that.
Why does a visible line remain at the zone joint?
The joint is usually ruined by four things: no overlap, different feed rates in adjacent zones, too much tool stick-out, and placing the boundary on a weak section of the part. People also often forget about the edge, and then the second zone is no longer cutting cleanly but rubbing.
What should I check after the first parts to fine-tune the setup quickly?
Compare the beginning, middle, and end of the surface after cleaning it the same way each time. If one zone heats up more, move the boundary or shorten that section instead of changing the whole setup at once. Once the scheme gives an even trace, write down the zone lengths, overlap, stick-out, and feed.