Y Axis on a Turning Center: When It Eliminates the Second Setup
We explain which operations the Y axis moves into one setup on a turning center, how to calculate time savings and when the option pays off.
Why a second setup costs more than it seems
On paper a second setup looks harmless: remove the part, flip it, clamp again and continue the cycle. In the shop it’s different. Those “a couple of minutes” quickly turn into lost time, extra inspections and scrap risk.
When a part is machined in a single setup the flow is simple: clamp the blank, run the program, remove the part. As soon as a re‑setup appears, additional actions come between these steps. The operator stops the process, removes the part, cleans the jaws, reestablishes the datum, checks the clamp and verifies dimensions.
Separately these are small things. On a batch of 10–20 parts they add up to hours. Time is lost on reclamping, the machine waits, the first part after reclamping almost always needs measurement, and if theres doubt about runout the cycle is slowed down or repeated.
There is a second problem — accuracy. On reclamping the datum changes even with careful work. A bit of swarf on the seating, slight jaw misalignment or a different clamping force is enough to create an error. For a simple part this may be tolerable. For side holes, slots, flats and dimensions tied between different surfaces the risk is noticeably higher.
So a cycle with a re‑setup differs not only in length. It introduces a manual operation and with it more scatter in results. Sometimes the cutting tool works for 4 minutes, but the whole part takes 9 minutes because another 5 minutes go to the second setup and its inspection.
This is most noticeable on small batches and with frequent changeovers. In a large series losses can be spread across volume. When orders are many, batches short and parts constantly change, every extra setup is felt immediately. That’s where the Y axis often produces an effect — not because the machine cuts much faster, but because the part doesn’t need reclamping.
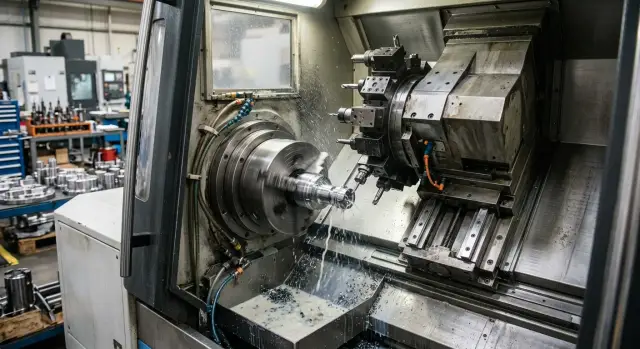
Which operations the Y axis moves into one setup
The Y axis on a turning center shifts the tool up and down relative to the spindle axis. Thanks to that the machine works not only on the center of the part, but also on its side surface or at an offset point. This is where the second setup often disappears.
The most common example is a transverse hole off the center. If you need a side hole in a shaft or bushing, without a Y axis the part is often transferred to another machine or flipped in a fixture. With the Y axis the driven tool reaches the required point in the same clamping.
The same applies to flats and slots on a cylindrical surface. When you need to cut a flat for a wrench, make a longitudinal keyway or clear a spot for a fastener, the Y axis allows you to do this immediately after turning. The part stays clamped, the datum remains the same, and it’s easier to keep the dimension between the OD and the milled surface.
It also helps when several sides need processing without reclamping. The machine indexes the spindle on the C axis and brings the tool in with the required Y offset. The operator does not have to reclamp the part and manually align the sides.
Most often these operations can be combined in one setup:
- transverse holes offset from center;
- flats and shallow slots on the side surface;
- groups of holes on different faces of the part;
- simple milling after turning within a single cycle.
A good example is a stepped shaft with OD turning, two flats and a side hole for a pin. Without a Y axis such a part is often turned first and then taken to a milling or drilling area. With the Y axis the whole set of operations can be done consecutively in one cycle. That removes not only minutes, but also some of the scrap that appears after re‑datuming.
We are not talking about complex 5‑axis machining. In many jobs the Y axis covers ordinary tasks: drill from the side, make a flat, pick a slot, machine several sides without removing the part. If such features occur regularly, two operations turn into one clearer and more stable flow.
When the Y axis changes almost nothing
Sometimes the Y axis looks useful on paper, but in practice it hardly affects the result. This happens where the part simply does not require side machining. If all operations run on the spindle axis, the machine closes the job fine without Y.
A typical case is parts with axial operations: facing, center drilling, boring, threading along the axis. Here machine rigidity, proper tooling and easy setup are more important. If the part has no offset holes, side clearances or off‑center milling, the second setup is often not needed at all.
A similar situation applies to long simple shafts. If the shop primarily makes stepped shafts, fits, grooves and threads, the Y axis is idle most of the time. For such parts it’s better to look at spindle bore, support for long blanks, steady rests, power and stability during long cycles.
There is another case: cutting time is already very long. Suppose a part requires 25 minutes of cutting and the reposition takes 1–2 minutes. There will be saving, but buying a more complex machine won’t change throughput as much as expected. In heavy turning productivity often limits on cutting parameters, insert life and chip evacuation.
Sometimes the required operation is already performed by a driven tool without Y offset. If the hole or slot is on the centerline, the extra axis brings no new capability. It remains a reserve for the future but does not give a quick return on current part mix.
The check is simple: pull the last 20 parts and see how many really have off‑center side features. If such positions are rare and the main load is shafts, bushings and axial operations, the Y axis payback will stretch. In that case it may be wiser to invest in a stiffer package, a proper set of driven tools or loading automation.
How to calculate the effect on your part
It’s better to calculate not from a catalog or someone else’s experience, but from one of your own parts. That quickly shows whether the Y axis is needed in your workflow.
First break the route into steps. Write down what the machine does first, what comes next, where inspection happens and where the operator removes the part. With the whole route in front of you the extra re‑setup is usually obvious.
Then mark the places where the part is flipped, moved to other jaws or redatumed. Usually this is where most time is lost. The re‑setup may take a minute or two, but it almost always adds measurement and a trial cut.
For the calculation five actions are enough:
- list operations in real order;
- mark steps that currently include a second setup;
- separately measure removal, reclamping, datum setup and inspection;
- multiply this time by the output per shift and per month;
- compare the monthly saving with the option surcharge.
Count not only the time of the second setup but also the addition to the machine cycle. Sometimes the Y axis removes a manual reposition, but the program itself adds 20–40 seconds. The formula is simple: saving per part equals time of the second setup minus the added cycle time.
Example: the second setup currently takes 2 minutes 40 seconds. After moving to a single setup the cycle on the machine becomes 35 seconds longer. Net saving = 2 minutes 5 seconds per part.
If you make 40 parts per shift and run 22 shifts a month, that’s about 30 hours saved per month. Convert that to money using your machine hour rate and operator cost. At a rate of 18,000 tenge per hour this is roughly 550,000 tenge per month.
After that the calculation becomes honest. If the option surcharge pays off in 8–10 months of work, it makes sense. If such parts are rare, in small batches, or the second setup takes only 20–30 seconds, the effect may be too weak.
It’s better to check not one convenient position but 3–5 typical parts. Then the decision is based on real loading, not a lucky isolated example.
Example calculation on a simple part
Take a simple part: a steel bushing, 42 mm diameter and 70 mm long. The drawing requires three operations: OD turning, an 8 mm side hole and a 12 mm wide flat. Volume — 1,000 pieces per month.
Without the Y axis the route often looks like this: first the turning center performs turning in the first clamp. Then the operator removes the part, moves it to the second operation, sets position and only then drills the side hole and mills the flat.
With the Y axis the whole cycle runs in one setup. The part is clamped once; after turning the machine brings the driven tool and drills the hole and mills the flat in the same datum.
| Route | Time per part |
|---|---|
| Without Y: turning in the first clamp | 3 min 40 s |
| Without Y: remove, transfer, reclamp | 1 min 20 s |
| Without Y: set part for second operation | 2 min 10 s |
| Without Y: hole and flat | 1 min 50 s |
| Without Y: inspection after second setup | 40 s |
| Total without Y | 9 min 40 s |
| Full cycle with Y in one clamp | 5 min 50 s |
| Removal and inspection | 30 s |
| Total with Y | 6 min 20 s |
Difference — 3 minutes 20 seconds per piece. On monthly volume that is 55.5 hours of machine time. If the machine hour costs 18,000 tenge, the saving is about 999,000 tenge per month.
There is a second effect — less scrap. The side hole shifts more often after a second setup, the flat angle or dimension can drift. If scrap without Y is 2% and with one setup drops to 0.5%, on 1,000 pieces that is 15 fewer scrap parts. At a loss of 4,000 tenge per part that is another 60,000 tenge per month.
The operator is also freed up. The second setup consumes about 3 minutes 40 seconds of manual work per part. For 1,000 pieces that is over 36 hours per month that can be used on another batch, setup or inspection.
In total this yields about 1,059,000 tenge per month without stretched assumptions. If the Y axis option adds 12 million tenge to the machine price, the payback on this part is roughly 11 months. If there are several similar parts, the payback usually becomes even shorter.
What to look at besides the Y axis itself
The Y axis alone does not make a turning center a good purchase. If the machine cannot withstand milling loads, the driven tool lacks power or setup takes an extra hour, the benefit of a single setup quickly diminishes.
First check overall machine rigidity. For drilling and light milling this is often sufficient in many classes, but when milling side slots, pockets and flats the difference is noticeable. On a soft machine vibration grows, dimensions wander and surface finish worsens. The operator reduces feed and loses the time saved by the Y axis.
Driven tool strength matters as well. Requirements for aluminum and brass differ from those for steel and stainless. If your parts often need off‑center drilling, flat milling and threading, a weak driven tool will quickly hit limits. On paper the Y axis exists, but in practice complex transitions go slowly.
Also check the available Y travel. A common mistake: people look at the presence of the axis but don’t compare its range with real part geometry. If you need a 35 mm offset but available travel is smaller once tool and safe clearances are considered, some operations will still require a second setup.
Ease of setup affects payback too. The simpler it is to reach the cutting area, set the tool and check the first part, the faster the machine reaches normal rhythm. Extra movements during each changeover quickly eat up the benefit, especially on short runs.
Service should be checked as strictly as specs. Who does commissioning? How long to wait for an engineer? Is there after‑sales support? For a supplier like EAST CNC this is part of the full cycle: the company works with selection, delivery, commissioning and servicing of CNC turning centers. In practice this reduces the risk of long downtime after machine introduction.
Common mistakes when choosing
Mistakes start at the request stage. Often people look at a catalog, see a Y axis and immediately count it as a universal way to remove the second setup. But the option solves nothing if you don’t open drawings and routes for the parts the shop runs every week.
The same function yields different effects on different parts. If you have many side holes, offset slots and off‑center milling, the benefit will be visible. If parts are mostly simple and the second setup is rare, an expensive option may sit idle for months.
The most frequent miscalculation is evaluating payback only by cutting time. On paper it looks like a saving of two–three minutes and the figure seems modest. But the second setup consumes not only cutting time. The operator removes the part, flips it, redatumes, brings the tool in, makes a trial cut and later checks the dimension.
Post‑reclamp inspection is most often underestimated. That’s where time goes for measurement, coaxiality checks and troubleshooting if dimensions shifted after reclamping. Because of this initial underestimation the calculation looks too optimistic or too rough.
Another mistake is using one comfortable part for the calculation. Much fairer is to check several typical positions from the last month. Then you see how often the Y axis really removes the second setup rather than helping in a single nice example.
A quick check before deciding
Before buying it’s useful to do a short check on your parts from the last month. If drawings regularly show off‑axis holes, slots or flats, the chance to remove the second setup is already high.
Quick checks to run:
- how many typical parts have features offset from the axis;
- how often per shift the operator reclamps and redatums the part;
- how much time goes not only to the second clamp but also to inspection after it;
- how often scrap or rework appears specifically after re‑datuming.
A simple rule of thumb: if the second clamp on one part costs 6 minutes and there are 12 such parts per shift, you lose 72 minutes of pure time — without counting trial parts, measurements and dimension drift.
But the opposite can also be true. If a part is almost entirely axial and off‑axis features are rare, a turning center without a Y axis can be cheaper and simpler. Paying extra for an option just because it’s in the spec usually isn’t worth it.
In practice two–three real drawings and honest time measurement at the machine are enough. From them you can quickly see whether the Y axis gives a noticeable saving or the second setup doesn’t yet harm production.
What to do next
If doubts remain, don’t argue theory. Take your parts and check the facts. Usually 5–10 typical positions that are most often processed or consume the most machine time are enough.
For each part collect a short route: material, blank size, set of operations, point of the second setup, cycle time, setup time and annual volume. That list quickly shows where the Y axis yields results and where it changes almost nothing.
Then compare two variants: with Y and without it. Look not only at machine time but also at setup, commissioning, tool set and post‑sale service. Price comparison alone is not enough. A machine without Y can be cheaper to buy but more expensive in operation if the operator constantly reclamps, redatums and checks dimensions after a second setup.
If you need a calculation not “on average” but for specific operations, it makes sense to discuss this with a supplier who handles not only sales but also commissioning. For manufacturers in Kazakhstan and other CIS countries EAST CNC is often considered in this format: based on real parts, machining routes and service requirements.
A good decision looks simple. You understand on which parts the second setup disappears, how many minutes it saves per month and how long it takes to pay back the Y axis surcharge. If the numbers add up, take the option. If not, don’t overpay.
FAQ
What does the Y axis give on a turning center in practice?
The Y axis lets the tool shift off the spindle center and perform side operations in the same clamping. Most often it eliminates the second setup and the extra time spent on repositioning, inspection and reestablishing the datum.
Which operations does the Y axis most often move into one setup?
Usually you can combine side holes outside the center, flats, shallow slots and simple milling after turning into a single cycle. If these features occur often, the operator doesn’t have to remove the part between operations.
When is the Y axis almost unnecessary?
If the part is almost entirely axial, there’s little benefit. Facing, center drilling, boring and threading along the axis rely more on machine rigidity, tooling and easy setup than on a Y axis.
How to understand that the second setup really interferes?
Look at the last 20 parts and mark where the operator removes the part, flips it or reestablishes the datum. If off-center holes, slots and flats appear regularly, you already have a reason to estimate the Y axis effect.
How to quickly calculate the payback of the Y axis?
Take one typical part and separately measure time for removal, re-clamping, datum setup and inspection. Subtract any added machine cycle time with the Y axis and multiply the result by your monthly output.
Does the Y axis really help accuracy or is it only about time?
Yes — because the part stays in the same datum. When turning, drilling and cutting a flat are done in one clamping, it’s easier to keep the dimension relationships between surfaces and the risk of shift after re-clamping decreases.
What to check besides the Y axis itself?
Don’t look only at the Y axis presence. Check machine rigidity, power of the driven tool, actual Y travel, ease of setup and service speed — otherwise part of the benefit will be lost to slow operation and downtime.
Is the Y axis suitable for long simple shafts?
Usually no. If the shop mainly turns long stepped shafts, seats, grooves and threads, the Y axis will be idle most of the time. Money is better spent on spindle bore, steady rests and stability for long cycles.
When is the surcharge for the Y axis usually justified?
The surcharge makes sense when the second setup on a typical part takes at least a couple of minutes and such parts are produced regularly. If the option pays back within a reasonable period given your volumes, it’s a sensible purchase.
How many parts should I check before buying a machine with a Y axis?
Better to take not one ideal part but 3–5 typical parts from the last month. That shows the real picture of time, scrap and frequency of second setups instead of one convenient example.