Where to Place a Measurement Station: Three Shop-Floor Layouts
Where to place a measurement station: we compare three shop-floor layouts, looking at feedback speed, dirt risk, and conditions for accurate control.
Why the measurement location affects scrap and the pace of work
The same area can lose parts not because of the machine, but because of how quickly the first part gets checked. If inspection comes too late, the size may already have drifted, while the machine keeps making the same mistake. In serial production, that can easily turn one issue into ten identical parts out of tolerance.
The delay often looks minor. The operator walks to the station, waits in line, comes back, mounts the part again, and starts the cycle again. But even an extra 3-5 minutes between machining and inspection slows the response, especially when the tool wears quickly or the size drifts during warm-up.
That is why the distance between the machine and the station affects more than convenience. It affects the speed of feedback in metalworking. The later people see the true result, the longer the machine works blind.
There is another extreme too. If the measurement station next to the machine is too close to the cutting area and not separated from it, the clean measurement zone will not stay clean for long. Chips, coolant, and fine metal dust get onto the table, the fixtures, and the part itself. After that, even a good instrument starts showing more spread, because the problem is no longer the gauge, but the dirty surface.
That is why arguments start quickly on the shop floor. The operator measures the part right after machining, while it is still warm. Inspection checks the same part later, under calmer conditions, and gets a different size. Both numbers may be correct for their moment, but the decision on the part still gets stuck.
In practice, this hurts two things at once: scrap and pace. When people keep rechecking the same parts, the machine waits, the batch builds up, and the cause of the deviation takes longer to find. If the station is placed well, the first check comes quickly, the area stays clean, and there are far fewer questionable measurements.
So the question of where to place the measurement station is really a simple choice: what matters more for the area to lose - minutes of response time or the stability of a clean measurement zone. A good layout does not remove every risk, but it makes one of them manageable.
Three layouts without complicated terms
When people decide where to place the measurement station, they usually do not argue about furniture or partitions. They argue about two things: how quickly people will notice a size drift and how much dirt will get into the place where precision matters.
The first option is the measurement station next to the machine. It gives the fastest feedback in metalworking. The operator removes the first part, checks the size, and immediately knows whether the correction needs to be adjusted. This approach holds the pace well, especially in serial turning. But near the machine there is almost always chips, coolant mist, vibration, and temperature swings. That is fine for rough and in-process checks, but for very precise measurements it is more difficult.
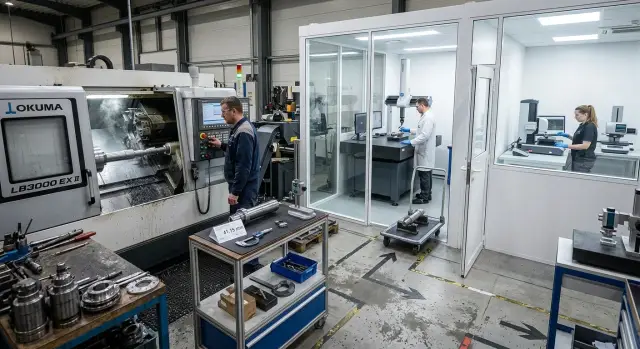
The second option is a separate inspection room in the shop. There it is easier to keep things clean, orderly, and stable. There is less risk of dirtying the instruments or bringing chips into the clean measurement zone. Such a station is suitable for final acceptance, complex dimensions, and parts where an error of a few microns is already noticeable. The downside is obvious: the part has to be carried, wait its turn, and then the answer has to be brought back to the area. If the size has drifted, the machine may make several more bad parts in the meantime.
The third option is an intermediate zone between the machines and a separate clean room. It is a compromise. The part gets to the station quickly, but the station itself is separated from the main flow of dirt and splashes. In areas with CNC lathes, this format is often the calmest: inspection does not slow the shift, and the instruments last longer and show more stable results.
If you compare the layouts very briefly, the picture is usually this:
- Next to the machine - the fastest response and the highest risk of dirt.
- In the inspection room - the cleanest environment and the slowest response.
- In the buffer zone - moderate speed and moderate risk.
The same shop can use two layouts at once. Fast checks are done next to the machine, while questionable or final dimensions are taken farther away, to a cleaner place.
When the station is next to the machine
If the batch is short or setup changes happen several times a shift, measuring next to the machine is convenient. The operator removes the first part, checks it immediately, and quickly sees where the diameter, length, or runout has moved. The setter does not wait for the part to be carried somewhere else and can correct the offset almost at once.
On a CNC turning area, this is especially noticeable at the start of a batch. While the machine is still settling into size after startup, an extra 10-15 minutes to move the part can easily turn into several parts outside tolerance. When the station is nearby, feedback is almost instant, and the work pace does not drop.
This layout works well if:
- the area makes short batches
- the operator is responsible for the first checks
- the setter changes tools and corrections often
- an error at the start of the batch is expensive
But this convenience has a price. Near the machine there is almost always more chips, oil mist, and dust than in a separate clean measurement zone. Even if the station is shielded, dirt still gets onto the surface plate, supports, jaws, and measuring tools. Because of that, the instruments need more frequent cleaning, and housekeeping becomes part of the operation itself.
There is another problem too - the environment around the machine is rarely calm. Vibration from the spindle, carts, and neighboring equipment interferes with precise checks. Temperature also shifts: it is cooler in the morning, then the machine and part are warmer after lunch. For rough operational control that is acceptable, but for very exact dimensions it is not the most comfortable setup.
The layout of the area also becomes an issue quickly. A measurement station next to the machine is often placed wherever a little free space remains. In the end, it blocks the walkway, the supply of blanks, access to the enclosure doors, and tool changes. If the operator has to walk around a cabinet or move boxes, the station starts slowing the work, even though it was installed for speed in the first place.
In practice, this layout works best when only quick checks are kept next to the machine, not the full set of precise measurements. For the first part, fine-tuning, and fast checks, it is a sensible option. For especially sensitive dimensions, it is better to plan a calmer place from the start, otherwise the time saved will be eaten up by repeated checks and extra cleaning.
When measurements are moved to an inspection room
An inspection room gives you what is almost never available next to the machine: quiet, cleaner air, and fewer random disturbances. It is easier for the inspector to focus, and the instruments suffer less from dust, coolant mist, and the constant movement of people and carts.
Another plus is a more stable temperature. For precise measurements, this often matters a lot. When the metal, air, and instruments are not constantly changing temperature during the shift, repeatability is usually better and there are fewer disputed results.
But this layout has a cost for all that order. The part travels to inspection more slowly than with a station next to the machine. If the operator has already started the next blank, and then another one, the mistake may be repeated several times before anyone says: the size has drifted.
On a turning area, it looks very simple. The operator removes the first part, takes it to the inspection room or hands it to the inspector, waits for the result for a few minutes, and only then realizes that the tool offset should have been corrected right away. By that time, the machine has already made several more parts with the same deviation.
There is also a practical risk people often forget. Every time a part is carried, there are extra hands, containers, tables, and a route between them. Along that route, the part is easier to scratch, confuse with another batch, or return to the wrong machine. If similar parts are being made, mix-ups happen more often than people expect.
An inspection room usually works better in these cases:
- when tolerances are tight and a calm measurement environment is needed;
- when the instruments are sensitive to dust and temperature;
- when the batch is small and a delay of a few minutes does not hurt output;
- when the area already has clear part labeling and a route to inspection.
This layout disciplines inspection, but it requires good communication between the inspector and the operator. If the result travels slowly, the shop pays for the clean zone with extra parts, repeat checks, and unnecessary carrying.
When the station is placed in a buffer zone
If you are deciding where to place the measurement station, a buffer zone often gives the most balanced result. The part does not travel across the entire shop, but it also does not land on a table right next to chips, coolant mist, and the constant shaking from the machine.
Usually such a station is set up a few steps from the area. The operator removes the part, wipes it, brings it to the station in a minute, and gets the size result right away. Feedback stays fast, and the risk of bringing dirt into the clean measurement zone is much lower.
The station itself is not in an open walkway, but behind simple protection. It can be a curtain, a small vestibule, or a lightweight partition. These do not make the room sterile, but they do a good job of cutting down dust, splashes, and drafts. It is also quieter inside. Vibration and noise from the machines are lower, and that helps people measure more calmly and without rushing.
This layout has another advantage: it is easier for people to agree on the work order. When the station sits between the line and the inspection room, the team quickly understands who brings the first part, who performs the repeat check, and who calls the setter if the size has drifted. Fewer arguments, less walking, and fewer situations where the part sits on the table while everyone thinks someone else has already checked it.
But without rules, this option starts to fail quickly. A buffer zone works well when there is simple discipline:
- the route is marked clearly on the floor
- there is a designated place for clean parts and waiting parts
- the operator knows after which operations the part must be measured
- the inspector and setter know who makes the decision when there is a deviation
- the team keeps a short record of disputed parts
A good sign of this layout is simple: the part gets to the station quickly, the station is not hit by dirt directly, and people do not argue about roles. For many turning areas, this is the most practical compromise. Especially where a separate inspection room already slows the work down, and the measurement station next to the machine is too affected by dust, noise, and hustle.
How to choose the layout step by step
It is better to decide where to place the measurement station based on facts, not habit. In one shop, a table next to the machine gives a quick response and prevents extra scrap. In another, it only collects chips and makes normal inspection harder.
First, map the usual path of the part. Not in words, but step by step: removed from the machine, wiped, carried, waited, measured, result recorded, feedback returned to the operator, machining started again. Even at this stage you can often see where minutes are lost and who is waiting for whom.
It helps to go through this sequence:
- Track one part from the machine to the result record.
- Time the carrying, the queue, the measurement itself, and the return of the information.
- Assess the area near the station: how much chips, coolant splash, and dust are there.
- Decide who does the first check and who adjusts the correction on the machine.
- Run a trial week and compare the numbers.
It is better to measure not just one good cycle, but at least 10-15 parts at different times in the shift. Then you will see the real picture. For example, in the morning the station next to the machine works fast, but after lunch chips, containers, and tools start piling up there, and accuracy drops.
Also check the roles separately. If the inspector measures and the operator makes the corrections, there should be no unnecessary back-and-forth between them. When one person measures the part and another person makes the decision 15 minutes later, the advantage of a fast station disappears.
Then run a short test. For one week, work according to the chosen layout and record three things: how many parts became scrap, how many minutes the machine stood waiting, and how many times the part was moved between zones. These numbers quickly clear up the picture. Sometimes the inspection room gives better cleanliness but adds 8-10 minutes to the cycle. Sometimes the buffer zone turns out to be the calmest option.
If you are torn between two layouts, choose the one with the shorter feedback path and the easier way to keep the inspection area clean. A nice-looking table by itself solves nothing. Minutes, cleanliness, and clear responsibility are what matter.
Example for a turning area
Imagine a turning area where stainless steel shafts are made in small batches of 15-30 pieces. Tight tolerance? Need simple Russian. After startup, the setter checks the first parts often because the material does not always behave the same, and an error on a shaft can quickly turn the whole batch into scrap.
If you look at the question of where to place the measurement station without theory, three different scenarios become visible right away in such an area. Next to the machine, the check happens almost without pause: remove the part, measure it, and adjust the correction immediately. In terms of time, that is convenient, but there is one old problem - oil mist and fine metal dust settle on the instrument and on the part itself.
Because of that, the first measurements can drift by a few microns. For rough checks that is acceptable, but for a finishing operation it is already unpleasant. The setter seems to be working fast, but trust in the numbers drops, and the same part gets checked again and again.
An inspection room gives a cleaner and calmer result. There it is easier to keep a stable temperature, wipe the part, and work without dirt. But on a small turning area another loss appears: while the part is carried over, while someone waits for a free slot, measures it, and returns the result, the machine either waits or keeps turning with a risk of going out of tolerance.
In practice, even a 10-15 minute delay often hurts more than it seems. If the size started drifting after the second part, several more shafts can be ruined in that time, and stainless steel is not cheap.
A buffer zone near the area often looks like the most reasonable choice. It is a small station off the main stream of chips and aerosol, but not on the other end of the shop. The setter gets there in a minute, wipes the part, measures it in cleaner conditions, and quickly sends the correction back to the machine.
For such an example, the choice usually depends on two things:
- how many parts are in the batch
- how much one mistake costs
- how tight the tolerance is on the finished size
- how quickly the size drifts after a tool change
If the batch is small and mistakes are expensive, the buffer zone often gives the best balance. If the tolerances are looser, the measurement station next to the machine may work well enough. And the inspection room is best kept for final checks and for dimensions that require maximum measurement cleanliness.
Common mistakes when choosing the location
The most expensive mistake looks harmless: the measurement station is placed wherever a free corner was available. On the drawing it seems convenient. On the shift it turns out differently: it is hard to get to the table, a cart keeps passing by, and the operator has to take an extra lap with every part.
When people decide where to place the measurement station, they often look only at cleanliness. That is only half the job. If feedback arrives after 15-20 minutes, the machine has already made a new batch with the same size drift. A clean table does not help if the signal about the problem arrives too late.
Another common mistake is connected to the part itself. After turning, it may be warm, oily, or covered with chips on the surface. If there is no planned container, route, and short holding area, people start improvising. One person carries the part by hand, another puts it on the first cart they see, and a third sets it on the table next to clean tools. That is how dirt quickly moves into the precise area, and the measurement gets extra error.
Work is also confused by vague responsibility. The operator thinks the inspector is measuring. The inspector thinks the operator already checked the size at the machine. In the end, the part sits there, time passes, and there is no shared rule. It is better to decide three simple things in advance: who measures, when they measure, and where the result is recorded right away.
Even a good area often gets tripped up by small things. The station may be in the right place, but still work poorly because of a base you cannot see at a glance.
- Poor or uneven lighting
- A wobbly table
- No space for a logbook, tablet, or form
- No separate area for dirty and prepared parts
- Measuring tools stored together with regular fixtures
In practice, this becomes obvious quickly. The part takes longer to carry than to measure. People wipe the table before every check. The record is made "later," and then forgotten. If this repeats, the problem is not discipline. The station was simply placed without considering the real path of the part and the pace of the area.
Short checklist
If you are deciding where to place the measurement station, look not at the empty corner, but at the path of the first part. If the operator has to cross half the area just to check a size, you are already losing time on every start-up.
A good location is easy to spot from simple things. People do not argue about where to bring the part. The setter gets the number quickly and adjusts the machine right away. At the same time, the instrument is not living under a shower of coolant and chips.
Before launching a new layout, it is useful to walk the part route with your feet, without drawings or nice diagrams on paper. That kind of walk often shows more than a meeting in an office.
- The first part reaches measurement in minutes, not after extra walking around the area.
- Splashes, dust, and fine chips do not fly onto the table, the gauge, or the master.
- The part is not carried through cart traffic, loading, and narrow aisles.
- The size is seen immediately by the person who changes the machine correction.
- The team has one clear place for the part, the protocol, and the result mark.
If even two points do not line up, the layout will already fail. First people will start putting off measurement "for later," then extra runs will appear, and after that there will be an argument about where the size drifted.
On a turning area, this is especially noticeable. The operator removed the first part, carried it far away, waited in line for the gauge, came back to the machine ten minutes later, and only then changed the correction. By that time, the machine may have produced several more parts with the same deviation.
For shops with CNC lathes where fast feedback matters, the layout that wins is usually the one where measurement is close to the process, but does not end up in the dirty zone. That balance is what usually gives a normal pace without extra scrap.
What to do next
Do not change the whole area at once. Take one machine and one group of dimensions that most often send parts to rework. That way you will understand faster where to place the measurement station for your process specifically, rather than by a general rule.
Run a short test for 3-5 shifts. Compare not impressions, but simple numbers:
- how many minutes pass from part removal to the result
- how many parts go to repeat inspection
- how clean the station remains by the end of the shift
This kind of test quickly shows the balance between speed and cleanliness. A measurement station next to the machine can give fast feedback, but near chips and coolant the clean measurement zone does not last long. The inspection room, on the other hand, keeps order better, but the size response sometimes comes too late.
After the trial period, lock in one part transfer rule for each shift. Who carries the part, what it is carried in, when it is wiped, who records the result, and who stops the batch if there is a deviation. If parts are carried in a tray during the day, but at night are moved by hand straight from the machine, the layout will not work even with good equipment.
On a new area with CNC lathes, it is better to solve this before arranging the workstations. Later, moving the table, lighting, air supply, and part route is inconvenient and expensive. It is easier to decide right away which dimensions are checked next to the machine and which are sent to a separate area.
For such tasks, EAST CNC can take the inspection layout into account when choosing equipment, during commissioning, and in service. This is especially useful when the area is just being launched and you need to plan not only the machine, but the entire path of the part to measurement.
One practical step for tomorrow: choose one machine, one group of dimensions, and start measuring the time from part removal to the size decision in the very next shift.