What Determines Tolerance on a CNC Lathe Besides the Machine
We look at what affects tolerance on a CNC lathe: tooling, measurement, cutting parameters and setup procedure matter as much as the machine itself.
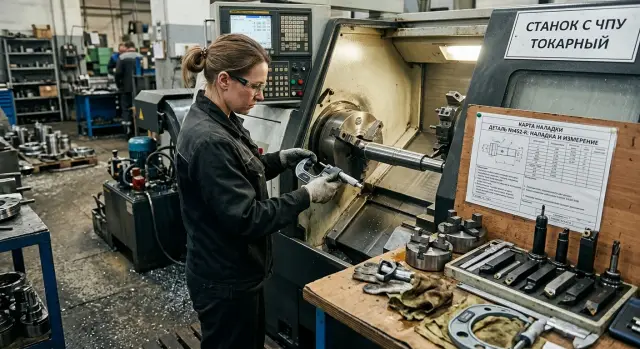
Why a new machine doesn't hold size by itself
A new machine provides stiffness, true geometry and a stable spindle. That's a good base, but on its own it doesn't guarantee tolerance. Size is held by the whole chain: the blank, the clamping, the references, the tool, measurement and the setup procedure.
So even an expensive machine won't fix a poor clamping. If the jaws pull the part skewed, if a thin-walled blank is crushed by too much force, or if the reference was chosen poorly, the machine will simply reproduce that error accurately. It doesn't argue with how the part has been mounted.
Problems often start from small things. Chips on the reference, a film of oil with dust, a burr on a support, a dirty tool taper — and the part no longer sits as it did on the previous setup. When tolerances are in hundredths, that's enough.
Worn tooling adds its own scatter. Damaged jaws, a tired collet, play in the chuck or a runout in the arbor give an unstable seat from part to part. The machine itself may be new and in perfect order.
Rushed setup makes things worse. Skipped cleaning of references, not checking tool overhang, after one measurement immediately applying a correction and starting the run — the process becomes accidental. One part hits the size, the next doesn't.
You usually see it by simple signs:
- the first part is close to size, then the spread appears;
- the size changes more after re-clamping than after a correction;
- the same tool on identical blanks gives different results;
- a re-measurement or a new setup shows different numbers.
A good machine is still necessary. Without it, stability is hard to get. But it doesn't cure a weak process. If clamping, tooling and setup are messy, an expensive machine just shows the same errors faster.
Where size is lost before the first cut
Size often goes wrong even before the program runs. The usual culprits are the blank, clamping, excessive overhang and an un-warmed machine.
First they check the blank. If the allowance varies across diameter or face, the tool takes different cuts and the part behaves differently on the first pass. A crooked blank with runout is worse: you can set zero carefully, but the real reference still shifts.
Next they check clamping. A dirty collet, worn jaws, an arbor with runout or a burr on the seat displaces the part before cutting even starts. On a lathe it's obvious quickly: the first part can sometimes be corrected and pass, then size begins to live apart from the program.
A common reason is excessive overhang. A long overhang of the part reduces clamping stiffness. A long tool or drill overhang adds deflection. Even a 10–15 mm difference can affect the result more than a small tweak of cutting parameters. If the setup can be shortened, it should be.
Don't skip warm-up. The spindle, ball screws, guides and hydraulics don't reach working conditions immediately. In the morning the machine cuts differently than after half an hour. If you chase hundredths right after power-up, the first batch can easily go out.
Before finishing cuts a short check is usually enough: look at allowance in several points, check chuck runout, reduce overhang and let the machine run to warm up.
In the shop this looks very simple. A shaft is clamped in soft jaws after a quick changeover, they don't bore them to the new diameter and immediately start the finishing pass. The indicator shows small runout, but the part sits unevenly and a long tool overhang adds deflection. The operator applies a correction, hits the size on one part, and the next part goes off. The problem wasn't the machine, it was the skipped preparation.
How tooling affects tolerance
Tooling affects tolerance at least as much as the machine. Weak clamping, a long adapter or a damaged seat quickly push size off even on a new machine.
The first thing good tooling gives is stiffness. When the part is clamped calmly and securely, the tool cuts more evenly, the edge deflects the material less, and size varies less from pass to pass. With weak clamping the first part may still pass, then the spread begins.
The second factor is repeatability. If the part seats slightly differently in the chuck each time, the machine honestly repeats that displacement. In a series you see it right away: the program is the same, the tool is the same, but size wanders by several hundredths.
On turning operations, soft jaws often give better results than a universal chuck. They are bored to the specific shape, so contact is tighter and more even. This helps especially with thin-walled parts and blanks with a short reference.
Extra spacers and long adapters almost always harm. They reduce stiffness and increase the lever arm. Even a small deflection in such an assembly becomes a noticeable error on diameter or face.
There is also a quiet source of problems — wear. Play in screws, tired seats, marks on jaws, dirt under a support first give small scatter that is easy to blame on parameters or the tool. Then these small things add up and setup becomes constant trimming of offsets.
In practice size most often drifts for one of four reasons: small contact area in the chuck, too long an assembly, jaws not re-bored for the current batch, or unnoticed wear of seating locations.
A simple example: a shaft is clamped through a long arbor to reach the machining zone. The machine is fine, the spindle is OK, but on the finish pass the part deflects slightly and the diameter comes out larger than calculated. Shortening the assembly and redoing the clamping often fixes the problem without changing the machine.
How not to err with measurement
People remember measurement too late. A good machine will show poor results if the operator measures inconsistently.
The first mistake is simple. One measurement was taken at the edge, the next closer to the middle. On a shaft, bushing or housing these can already be different numbers. If the process specifies a specific control point, measure only there.
Temperature is also easily confusing. A part after machining is often warmer than it feels by hand. If you measure a hot part as if it were cold, apply an extra correction and spoil the next blank. It's better to wait for ambient shop temperature or at least always measure after the same pause.
Another common mistake is switching instruments mid-run. The first part checked with a micrometer on a clean table, the tenth quickly glanced at with calipers at the machine — you can't compare such results. The error is in the measurement method, not the cutting.
One measurement routine
Size should be checked not only against the drawing but also against the setup sheet. Sometimes an operator remembers an older revision, while the sheet has a different allowance, a different reference or a different control value. Parts look close but the series goes the wrong way.
Referencing has the same story. One part measured from one reference, the next from another, and a dispute with the machine is ready. One person sees a good part, another sees scrap. In fact people are just comparing different things.
Before a shift change it's useful to do a short instrument check: look at zero, wipe measuring surfaces and verify the micrometer or bore gauge against a standard. It takes a few minutes but often saves half an hour of searching.
Good measurement requires discipline: one instrument for its range, one control point, one reference, one record in the setup sheet. If the number on the part doesn't match the setup sheet, recheck the measurement first and only then change the correction.
How to structure setup steps
Size often goes off before cutting. A part clamped on chips, a missed drawing error, two corrections applied at once — and tolerance starts to wander. So setup should follow the same route each time.
-
First, study the drawing. Mark dimensions that affect assembly, fits and coaxiality. Decide which reference you'll use, how you'll measure the first part and where you leave allowance for trial.
-
Prepare the chuck and references. Clean the chuck, jaws, arbor, stops and the blank. A thin layer of chips or oil changes seating more than you think.
-
Don't cut to size on the first pass. Leave a safe allowance and see how the part behaves after the first pass. This helps check reference, clamping stiffness and tool behavior without risking immediate scrap.
-
Measure the first part calmly and consistently. Use the same instrument, measure the same places and don't change several parameters at once. Correct one thing only: a tool offset, overhang or a mode.
-
Record all working settings immediately. You need offsets, tool number, insert radius, overhang, cutting parameters and clamping notes. These records save not minutes but a whole shift on the next batch.
This order is especially useful in series work where one small mistake repeats across dozens of parts. A simple rule is convenient here: one drawing, one reference, one trial cut, one measurement, one correction. When steps don't mix, holding tolerance is much easier.
Why cutting parameters move size
Even a precise machine won't save you if you choose aggressive parameters. Heat, cutting forces and uneven allowance before the finishing pass shift size.
The first reason is heating of the part. After heavy cutting the metal heats and changes size slightly. If you measure a blank immediately, you'll get one number; after cooling you'll get another. This is most visible on external diameters.
Too high feed causes its own issue. A more pronounced lay appears on the surface and the measurement result starts to depend on the contact point. In one place the micrometer hits a peak, in another a valley. The difference is small, but within a tight tolerance it's enough.
A dull tool spoils things worse. It no longer cuts cleanly but rubs the material. Heat and cutting force grow, the tool edge pushes the part more. As a result size drifts part to part even though the program didn't change.
Another source of scatter is uneven allowance before finishing. If one area has 0.2 mm left and another 0.8 mm, the finishing cut sees different loads. When allowance is even, the tool behaves noticeably more consistently.
Simple discipline helps here: don't measure immediately after a hot cut, reduce feed for finishing, change the tool before clear wear, and even out allowance before the finish pass.
On the shop floor you feel it quickly. Feed was raised slightly to save time and the cycle was shortened by 15 seconds. Then size drifted, extra checks and rework appeared. In the end they lost more than they gained.
Errors that make tolerance wander
When size starts to drift, the machine is often blamed first. It's convenient, but the reason is usually simpler.
The most common mistake is changing several things at once. Swapped an insert, immediately applied an X correction, then adjusted overhang. Size may return or go further off, but the cause can't be determined. A good habit is one action — one recorded result.
The second mistake is searching only in the spindle and guides. Yes, they affect accuracy. But dirt under the jaws, a weak stop, a wrong reference, play in the arbor or inconsistent clamping force are far more common causes. This is especially noticeable on thin-walled parts and long shafts.
The third mistake is not watching the tool after the first parts. The first piece hit size and it seems the process is set. After a few parts the edge has worn, temperature rose and size drifted. So control is needed not only at the start but during the early part of the run while the tool shows its real behavior.
Another problem is shift handover. One setter established the reference, another continued without records. The new person doesn't know the tool overhang, what offset was applied and why clamping force was changed. Passing information by word of mouth almost always brings back the same error.
Usually size wanders not because of one big cause but several small ones together. Tidy up the setup, check tool wear, inspect tooling — and the process calms down.
Shop example
In one shop they installed a new CNC lathe and expected stable size from the first parts. The part was simple: an outer diameter with a tight tolerance. But after the first passes a spread appeared. One part came near the middle of the tolerance, the next drifted by several hundredths, then the size returned.
The operator's first thought was natural: if the machine is new, the problem must be the spindle, guides or assembly. People often think this way when they expect absolute predictability from new equipment.
They checked in order. The spindle ran true, warm-up showed nothing strange. But they found small chips and dirt in the jaws, causing the blank to seat slightly differently each time. Then they looked at the tool: the overhang was longer than required for the operation. On the drawing it wasn't obvious, but in practice that overhang caused noticeable deflection.
The fix was routine: remove and clean the jaws, replace some tooling, reduce tool overhang, re-reference the tool and repeat trial passes with consistent measurement. It took less time than arguing about the machine's condition.
Size returned to normal on the next parts. Nothing happened by itself. They removed the spread by hands and order. That's how it usually goes in real work.
Quick checks before a run
Spend five minutes checking before a batch rather than an hour chasing size later. Even a good machine won't help if references are dirty, the chuck is full of chips, and the first and tenth part are measured differently.
A short pre-run check can be reduced to a few actions:
- remove chips and oil from references, jaws, arbors and support surfaces;
- let the machine run in normal mode rather than just switching it on;
- inspect the tool and don't start a run with a chipped or suspect edge;
- measure the first part with the same instrument and the same scheme you'll use for mid-batch parts;
- record offsets, corrections and parameters so they can be quickly verified.
Cleanliness seems minor, but it's where hundredths are often lost. A chip between the reference and the part changes the seating and people then look for the spindle.
Warm-up is skipped just as often. A cold machine and one after 20–30 minutes of work behave differently. If the first good part was taken immediately after switching on and the run started, size may slowly drift with no failure.
With tooling the rule is simple: if the condition is unclear, don't start the batch. Precision machining needs an insert with a known remaining life, not one that's just barely alive.
What to do when size drifts again
When size drifts again, don't change everything at once. That only hides the cause. It's more useful to divide the process into parts and check them one by one.
First separate the machine from everything else. Check warm-up, axis repeatability and spindle performance. Then move to tooling: chuck, jaws, arbor, tool overhang, clamping stiffness. After that check measurement: who measures, with what instrument and when after machining. Only then look at setup, zero points and offsets.
A practical order: verify repeatability on a control part, inspect tooling and remove excessive overhang, re-measure the part the same way or with another correct instrument, pull up records from the last successful setup and only then change parameters or dig into machine geometry.
This approach saves time. Sometimes very simple actions suffice: secure a base, change a worn tool, let the machine warm up 15–20 minutes — and the run is back on track.
It's useful to lock in one setup routine for both changeovers and series work. Not verbally, but in the work card: who mounts the tool, who checks the reference, when the first part is measured, after which piece a repeat check is made. With a clear routine the size wanders less.
If you're choosing a new CNC lathe, it's worth discussing not only the machine but also startup, tooling and service. EAST CNC works with that full cycle: consultation, selection, delivery, commissioning and service for CNC turning machines used in metalworking. That helps look at tolerance not only through the spindle and guides, but through the whole process.
The best way to return size to tolerance is not to guess but to follow your clear inspection route. With such a route the cause is found faster and you need fewer corrections.
FAQ
Why doesn't a new machine hold size by itself?
Because tolerance is maintained by the whole process, not just the machine. If the part sits crooked in the jaws, the reference is dirty, the tool overhang is excessive, or the operator measures inconsistently, a new machine will simply reproduce that error precisely.
What should I check first if the size drifts?
Start with the simple checks: cleanliness of the references, the clamping, runout, tool overhang and the measurement method. Only after that should you touch corrections, cutting parameters or investigate the machine itself.
How can I tell if the chucking is to blame and not the program?
If size changes more after re-clamping than after a correction, look at the clamping. The same sign appears when the program is identical but two identical blanks give different results.
Do I need to warm up the machine before precision work?
Yes. In the morning the spindle, guides, ball screws and hydraulics behave differently than after 20–30 minutes of running. Chasing hundredths on a cold machine often makes the first batch go out of tolerance.
Is it true that extra overhang strongly affects tolerance?
Excessive overhang quickly reduces stiffness. The longer the part or tool sticks out, the more bending and deflection occurs, so size can start to wander even with otherwise correct cutting parameters.
Why is the first part OK but the spread starts afterwards?
Often the first part lands by chance, then the spread appears. The tool edge may seat, temperature rises, or the part may seat slightly differently each time. The first piece can be OK while the true state of the setup shows up on subsequent parts.
How not to make mistakes when measuring a part?
Use one instrument, one control point and one reference for the entire batch. Don't measure a hot part immediately after the cut and don't compare micrometer readings with caliper checks if you want a real picture.
When should I change a correction, and when should I stop and check the process?
Don't rush to change settings. First re-check the size the same way, then inspect the clamping, overhang and tool condition, and only after that apply a single correction to one parameter.
What should I record after a successful setup?
Record offsets, tool number, overhang, insert radius, cutting parameters and clamping notes. These records help quickly repeat a successful setup instead of guessing on the next batch.
When should I start checking the machine itself rather than tooling and setup?
When you have already cleaned references, checked tooling and measurement, warmed up the machine and the size still drifts, then test the machine: axis repeatability, spindle behavior and machine geometry.