Water for Coolant: How Hardness Affects Smell and Tool Life
We explain how water for coolant affects emulsion smell, tool life, and machine condition, and which tests to do before filling the tank.
Where the problem starts
Usually everything begins with a simple question: why does the same coolant behave differently on two neighboring machines. The concentrate is the same, the working conditions are similar, the parts are made of the same material, but the result is different. On one machine the emulsion stays stable, while on the other it changes smell, foams more, or leaves marks on the metal after just a few days.
Very often the cause is not the coolant itself, but the water used to mix it. Water sets the foundation for the whole blend even before the first start-up. If it contains a lot of hardness salts, the emulsion is less stable from the very beginning. It can turn cloudy quickly, separate, wash away fine chips poorly, and leave deposits on the tank walls.
You can often see this without a lab. The operator usually notices the first signs before any test results come in:
- a sour or stale smell appears;
- the foam lasts longer than usual;
- spots or a whitish film remain on the parts;
- scale appears in the tank and on the hoses.
These little things are often treated as a coincidence. In reality, they show that the water is already changing how the emulsion behaves. And this can happen even in the same shop if the machines were filled from different points, at different times, or after topping up with water of different quality.
Because of this, many people draw the wrong conclusion: they drain the old coolant, wash the tank, pour in a new batch, and expect improvement. Sometimes it feels better for a week or two, but then everything repeats. The reason is simple: if the water stayed the same, the mixture will end up in the same conditions again.
A good example is familiar to many shops. After replacing the emulsion, the smell disappeared, the foam went away, and production became steady. A few days later everything came back. In such a situation, looking only at the coolant brand makes no sense. First, check the water, especially hardness and total salt content.
In practice, water for coolant often matters more than it seems on the day of the first fill. If you miss this step, problems start quietly, and you pay for them later with tool wear, poorer surface quality, and extra machine downtime.
Why hard water ruins the emulsion
The most common mistake is thinking any clear water will work for coolant. It may look fine, but calcium and magnesium salts quickly change how the emulsion behaves in the tank.
Hard water makes it harder for the emulsion to stay uniform. Some coolant components bind with the salts, and the liquid mixes poorly, turns cloudy faster, and loses stability. As a result, the concentration may still look right, but the mixture works worse.
This does not show up right away. At first, the operator sees a thin film, a light deposit on the tank walls, or marks on the hoses. Then flakes, a soap-like sediment, and a dirty ring at the liquid level appear. At this stage, the shop often starts adding more concentrate, even though the cause is not weak coolant, but the water.
Hard water also disrupts the usual top-up logic. If you mixed the emulsion at one ratio, that does not mean it will keep the same working concentration a few days later. Salts, heat, and evaporation all change the blend. That means the tank may need more adjustments, and concentrate use rises without an obvious reason.
When the risk is higher
The problem gets worse in a few situations:
- top-ups come from different sources, for example from the city water supply today and from a storage tank later
- the machine runs hot and the water evaporates faster
- the emulsion sits still for a long time
- the tank is cleaned rarely, so old sediment stays inside
Under these conditions, salts build up faster. Even a normal coolant starts behaving unpredictably: foaming, separating, or leaving deposits on parts and inside the system.
A simple rule of thumb: if the emulsion changes appearance after top-ups and concentrate use rises, check the water first, not the coolant brand. The same concentrate can work smoothly with prepared water and create constant problems with hard water.
That is why, before the first fill and before regular top-ups, it is better to keep at least hardness and water-source consistency under control. That costs less than cleaning the tank later, replacing the emulsion early, and searching for a problem in the tool or the machine.
Where the smell comes from
The smell does not appear on its own. Usually it starts when the water for coolant prevents the emulsion from staying stable. If the water contains a lot of hardness salts, the emulsion separates faster, some additives work worse, and conditions for decay and fermentation build up in the tank.
At first it seems harmless. The liquid turns slightly cloudy, a film remains on the tank walls, and an oil layer collects on top. A few days later the coolant smell becomes heavy, sour, or soapy. This is a common sign that the problem started at the water-preparation stage.
A dirty tank makes everything much worse. Old sludge, fine chips, leftover coolant, and stray oil mix with the new fill and feed the microbes. If the tank also heats up, the process speeds up. In summer or during long machine runs, the liquid loses freshness much faster than its color suggests.
How to tell water smell from microbial smell
With poor water, the smell often appears early, almost right after the mix is prepared. It is usually even throughout the tank, without a sharp rotten note. It often comes with foam, scale, flakes, or unstable concentration.
A microbial smell is usually stronger. It is easy to recognize by a sulfur-like, swampy, or rotten tone. You often see slime, dark deposits in dead zones of the tank, a drop in pH, and a thick film of foreign oil on top. In practice, the causes often overlap: hard water weakens the emulsion first, and then microbes quickly take advantage of the rest.
You should not wait for the tank to sort itself out. If the smell has just started, these simple steps usually help:
- remove sludge and old residue from the tank
- skim the oil film off the surface
- check the concentration and adjust the mix
- top up with prepared water instead of random tap water
- reduce overheating and restore normal circulation
If the smell stays after that, and slime and deposits come back quickly, partial top-ups are no longer enough. Then it is better to stop, flush the system, and prepare a new emulsion with proper water. Otherwise, not only the liquid will suffer, but also tool life, surface quality, and the machine itself.
How water affects the tool and the machine
When the water in the emulsion is unstable, the cutting zone shows the problem first. The coolant removes heat less effectively, the protective film at the edge holds worse, and the tool starts running "dry" more often than it should. At first it seems minor: the tool gets a little hotter, the chips darken, and the part surface loses its clean shine.
Then wear speeds up. The cutting edge dulls sooner, small chips appear on it, and heavy cuts can even cause breakage. Often the reason is not the tool itself or the cutting parameters, but the fact that water hardness is breaking the normal performance of the emulsion.
What happens in the cutting zone
Hard water prevents the emulsion from staying uniform. Some components bind with calcium and magnesium salts, and the mixture no longer cools the way it should. In the contact zone, temperature rises, metal sticks to the edge more strongly, and the cut becomes rougher.
If the machine feeds coolant through narrow channels or nozzles, deposits add another problem. Scale narrows the passage, changes the jet shape, and throws off the direction of the flow. On paper, the flow rate is the same, but in reality the liquid does not reach the cutting point correctly. The tool heats up, and the operator starts looking for the problem in the insert, holder, or spindle speed.
On lathes, this is especially noticeable in long runs. The first parts come out fine, but then dimensions start to drift, surface roughness increases, and the insert lasts less time than usual.
What marks remain on the machine and part
Poor water leaves marks not only inside the tank. A whitish deposit appears on the chuck, jaws, guards, and nozzle area. If the emulsion dries on the part, spots and streaks remain on the surface. For finishing work, that is unpleasant; for parts going to coating or inspection, it becomes a clear defect.
The most common signs are:
- the tool loses life for no clear reason
- small chips and burn marks appear on the cutting edge
- nozzles start spraying unevenly or more weakly
- a light deposit remains on the chuck and the part
- surface quality becomes more inconsistent after each shift
The machine suffers too. Deposits clog filters, overload the pump, and collect in the supply channels. If you do not check the coolant water in time, the shop spends more on inserts, machine cleaning, and reworking parts, even though the problem started with a simple tank fill.
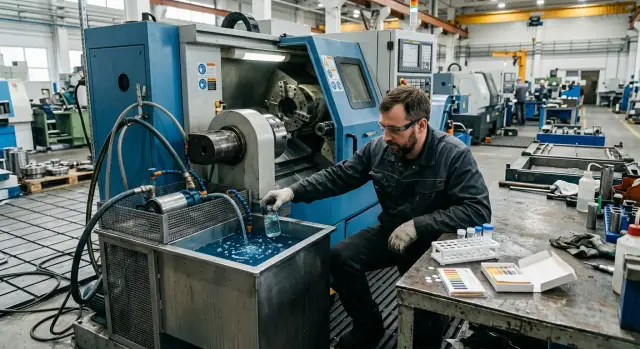
How to check the water before filling
Take the sample from the exact point where water is actually fed into the tank. If the operator draws it from a hose next to the machine, then that hose is what needs testing, not water from another tap in the utility area. In one shop, the readings can differ more than you would expect, especially if part of the line is old or there is a storage tank after the filter.
It is better to let the first portion run off. Usually 1–2 minutes is enough to clear out water that has been sitting in the pipe. Use a clean, clear container without oil, detergent, or rust. A plastic bottle or glass jar works if it is truly clean.
Next, do not look at just one parameter, but several at once. For a quick check, it is enough to measure total hardness, pH, and electrical conductivity. Hardness shows how much calcium and magnesium salt is in the water. pH helps you understand whether the emulsion will move into an unstable range in the first days of use. Electrical conductivity shows the total amount of dissolved salts. The higher it is, the greater the risk that the emulsion will behave unevenly.
After measuring, do not throw the sample away immediately. First, check its color and clarity, then let the water sit for 10–15 minutes. If cloudiness, flakes, or visible sediment appears, that is already a warning sign. Such water can cause problems even before the first start-up: bad smell, deposits in the tank, and weak tool protection.
Even if the coolant water seems "ordinary," the results should still be compared with the data sheet for the specific coolant. Different formulas have different acceptable ranges for hardness and pH. What is fine for one emulsion may cause instability in another.
Record at least:
- the date and time of sampling
- the point where the sample was taken
- hardness, pH, and electrical conductivity
- the appearance of the water right away and after 10–15 minutes
- the coolant brand you will use
This kind of log pays for itself quickly. When a smell appears in the tank or tool life drops, you do not have to guess. You can open the records and see when the water started changing.
Which tests to do regularly
If coolant water comes from different sources or its quality changes with the season, one good measurement is not enough. You need a short set of checks that helps catch a problem before smell, rust, and extra tool wear appear.
Minimum set
Total hardness should be checked before the first fill and every time the shop switches to another water source. Even if the supplier is the same, the water composition can change noticeably. When hardness rises, the emulsion is more likely to leave deposits, hold stability poorly, and lose working properties faster.
pH is best checked after starting a new batch and after major top-ups. It is a simple signal: the mix is still in the normal range, or it is already drifting away from it. If pH drops, bacteria get a more favorable environment, and the coolant smell returns faster.
Electrical conductivity is useful where water quality changes from week to week. This test does not replace a composition analysis, but it quickly shows whether there are more or fewer salts in the water. For a shop, it is a handy early marker: if the number jumps up sharply, hardness and emulsion condition should be rechecked.
Iron and chlorides make sense to test when symptoms appear. If rust shows up on parts or in the tank, if deposits remain on components, and if the smell becomes sharper, these two indicators often give the answer. Chlorides speed up corrosion, and iron can come from the water itself or from the old system.
When to check microbiology
If the tank was cleaned, a fresh mix was filled, and the bad smell came back after a few days, do a simple microbial test. It is inexpensive and often saves much more in refills, downtime, and tool costs.
A practical rhythm is:
- hardness — before the first fill and when the source changes
- pH — after start-up and after noticeable top-ups
- electrical conductivity — once a week if the water is unstable
- iron and chlorides — if there is rust, deposits, or a strange smell
- microbial test — if the smell returns quickly
Keep the results in one log. After a month, it becomes clear where the problem starts: in the water, in the top-ups, or in tank maintenance.
Where people most often go wrong
Coolant problems rarely start with the coolant itself. More often, the shop creates them before start-up: during water preparation, mixing, and tank top-up. The mistake may seem small, but after a few shifts it leads to smell, deposits on equipment, and faster tool wear.
One of the most common causes is mixing water from different sources in the same tank. In the morning, water is added from the main supply; in the evening, from a well because it is more convenient. To the tank, these are not the same. The water has different hardness and salt content, so the emulsion starts behaving unevenly: it turns cloudy, foams, and loses stability.
Another common problem is focusing only on coolant concentration. A refractometer is useful, but it does not show whether the water itself is suitable for coolant. If the water is too hard, a mixture that looks normal may quickly lose its working properties. Then the concentrate gets blamed, even though the cause was the water from the start.
Another frequent mistake is pouring water into the concentrate. The right way is usually the opposite: add concentrate to water. Otherwise, the mix blends poorly, some components distribute unevenly, and the emulsion separates faster. On the machine, this shows up simply: worse lubrication, more deposits, and shorter tool life.
A separate issue is topping up without cleaning the tank. When the operator does not clean filters, screens, and the settling area, fresh mix goes straight into old dirt, fine chips, and bacterial buildup. After that, the coolant smell comes back very quickly, even if the new batch was prepared correctly.
The same mistakes repeat often:
- mixing supply water and well water without checking them
- measuring only concentration and not checking water hardness
- preparing the mix in the wrong order
- topping up a tank over a dirty sump and clogged filters
- running one test and not coming back to it for months
Checking the water once is not enough. Its composition can change with the season, after a network repair, or when switching to another source. In shops with lathes, this shows up quickly: the emulsion lasts less time, and tool life drops sooner than expected.
The normal practice is simple: use one water source, mix in the correct order, keep the tank clean, and repeat the coolant water analysis on schedule. That costs less than replacing the emulsion unexpectedly and losing time looking for the cause at the machine.
Short checklist before start-up
Before the first fill, it is better to spend 10 minutes checking than to later hunt for the cause of smell, foam, or rapid tool wear. Very often, the problem starts not with the coolant itself, but with the water and the condition of the system.
Below is the minimum worth checking every time before mixing:
- Take water from one source for the whole batch. If part of the mix was made with tap water and then topped up from another line, the emulsion may behave very differently.
- Record three numbers right away: hardness, pH, and electrical conductivity. Without these, it is hard to understand why coolant water worked normally yesterday but today the emulsion is cloudy or smells.
- Clean the tank, filters, and hoses before filling. Leftover old mix, scale, and dirt quickly spoil the new emulsion.
- Make sure the operator knows the mixing order. In most cases, concentrate is added to water, not the other way around.
- Set top-up and recheck dates in advance. If there is no schedule, people start judging the mix by eye, and that almost always leads to a late response.
After start-up, do not look only at color or smell. Sometimes the emulsion looks normal, but water hardness is already changing pH, leaving deposits, and speeding up tool wear.
A simple example: in the morning, the operator mixed emulsion from one line, and after lunch topped up the tank with water from another. A few days later, a smell appears, deposits build up on the parts, and the concentrate gets blamed. In reality, the problem began the moment of the top-up.
One sheet with measurements next to the machine is often more useful than trying to remember everything. This kind of routine helps keep the mix stable and avoid losing tool life for no obvious reason.
A simple shop example
A new CNC lathe was installed in a small production area, and the emulsion was prepared as usual. The coolant water came from the main line, without any testing. In the first few days, everything looked normal: the foam was moderate, cutting went smoothly, and the operator saw no obvious issues.
About a week later, the smell became noticeable. At first, it was blamed on the heat in the shop and the infrequent washing of the cutting zone, but by the end of the shift the smell was clearly coming from the tank. At the same time, a thin film appeared on the surface, and a light deposit remained on the tank walls.
When the water was checked with a simple hardness strip and the sediment was observed after settling, the cause became clearer. The hardness was high, and there was noticeable sediment in the bucket after mixing. The emulsion still looked like it was working, but its composition was already unstable.
The team did not waste time guessing. They completely cleaned the tank, drained the old mix, flushed the system, and prepared a new emulsion using water from another source. They also set up a simple rule: check hardness and see whether any sediment remains after mixing before each new fill.
The difference showed up quickly. The smell became weaker within the first few days, and the emulsion kept a smoother appearance for longer, without flakes or cloudy deposits. The operator no longer had to top up concentrate "by eye" as often just to restore normal operation.
After a while, another effect was noticed. The tool lasted longer, and the part surface came out smoother, without a sudden drop in quality halfway through the shift. This kind of case shows something simple: if the water is hard, the problem rarely starts with a breakdown. It usually starts with smell, sediment, and the "small things" that quickly turn into extra costs.
What to do next
After the first measurements, you need to make a simple decision: is the current water suitable for your coolant or not. If hardness and other basic values stay within the coolant manufacturer’s recommendations and do not swing from batch to batch, you can keep using this water. If the numbers vary, it is better not to argue with the tank and the tool, and instead change the control routine right away.
Usually, one clear shop procedure is enough. You do not need a thick manual. You need the same actions, one log, and one person responsible for checking.
- choose one water source for preparing the emulsion
- set the checking frequency and write down the acceptable limits
- assign who does the measurement on each shift
- state right away what to do if values go out of range: top up, change the water, or adjust the emulsion
This routine quickly removes chaos. When the morning shift mixes coolant with one water source and the evening shift uses another, smell and unstable concentration are almost inevitable. The problem often looks like "bad emulsion," although it starts with the water.
When launching a new machine, the water should be checked before commissioning. This is especially important if the shop has just been connected to a new line or the equipment has been moved to another area. A machine can be set up accurately and started correctly, but poor coolant water will ruin the result within the first few days: smell will appear, deposits will form, and tool life will drop below what it should be.
If you are choosing new equipment, it is better to connect three things from the start: the machine, the coolant, and the water. EAST CNC works with the full cycle — from selection and delivery to commissioning and service. That means water requirements can be discussed before the first tank problem, not after it. It saves shop time and lowers the risk that a new machine will start life with someone else’s old mistake.