Two-Route Machining for a Long Base Surface
When a long base surface starts pulling a part out of flatness, two-route machining often reduces scrap risk and wasted time.
Where the problem appears
A long base surface only looks simple on the drawing. In reality, it is what holds the geometry of the entire part: it is used to set the next setup, to calculate hole coordinates, and later to seat the part in assembly. If that surface drifts even a little, the error does not stay local.
This is most often seen on long workpieces that are not very rigid: plates, housing parts, guides, and bases with a row of holes. While the blank is clamped, everything may look fine. But the clamp pulls the part, internal stress releases on one side, and heat from cutting adds a little more movement.
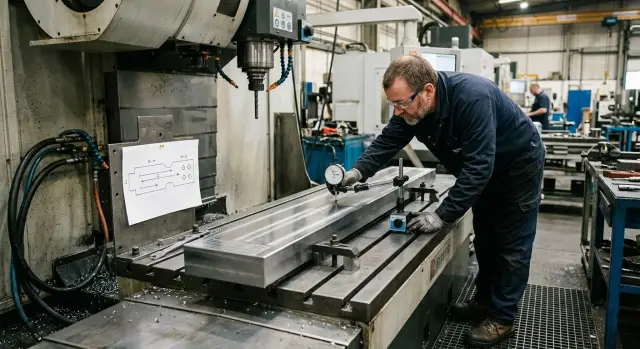
Because of that, the edges move faster than it seems. In the center, the indicator may show an acceptable value, but at the ends a noticeable bend already appears. Sometimes we are talking about only a few hundredths, but for a long base that is enough. The part is still on the table, and flatness is already starting to drift along the full length.
From there, the error affects everything built from that base. Holes shift in height, seating surfaces lose alignment, and a slot or pocket ends up nowhere near where assembly expects it. The worst situation is simple: each dimension passes on its own, but the part will not fit into the assembly. Often the problem is not the hole or the slot at all, but the fact that the base surface gave a poor reference from the very beginning.
The problem does not show up right away. At first the part looks normal, then it starts sitting differently on the inspection plate, holes seem to "drift" relative to the base, and assembly needs extra fitting. That is the moment when it becomes clear that a long base surface does not forgive too simple a route.
Why one setup often loses
One setup seems like the convenient choice. Fewer repositionings, fewer touches, a shorter route. But for a long, weak part, this scheme often works only until the first serious inspection.
The first trap is clamping. Even if the force seems moderate, a long blank bends slightly under the supports and clamps. While it is clamped, the surface looks flat. Once the part is removed from the table, the plane can move by hundredths, and sometimes more.
The second problem appears during material removal. The top layer comes off, internal stress redistributes, and the part no longer behaves the same as it did at the start of the cycle. The base the operator relied on in the first half of the program may change shape noticeably by the end of machining. This is especially common on long plates, housing parts, and thin walls.
Heat is another factor. A long pass in one area heats the part unevenly. The metal expands, then cools, and the size shifts. On a short part, that sometimes passes with little effect. On a long base, even a small thermal drift quickly turns into a questionable inspection result.
A common situation looks like this: the operator squares up the base, then in the same setup makes the finishing pass, pockets, and holes along the full length. By the middle of the program, the blank has already partially released stress, warmed up, and changed shape a little. The final pass is running against a base that was accurate half an hour ago, but no longer is.
It seems that one setup is always faster. In practice, it often increases machine time. The operator slows the feed, adds check passes, and becomes extra cautious with stock allowance so the part is not ruined. If the base starts to drift, there is almost nothing to correct it with: the whole reference is already built on a shape that kept changing during the process.
Then the expensive part begins. The part is checked again, re-referenced, sometimes extra stock is left "just in case," and another cycle follows. The time savings disappear, and the scrap risk goes up.
That is why two-route machining often gives a calmer result. The first route removes the main instability, and the second one relies on a part that has already taken a more honest shape.
When a base stops being reliable
A long base has an unpleasant trait: it may look reliable only in one state, while the part is clamped and has not yet gone through most of the cycle. After roughing and unloading, the shape is already different.
This is easy to see on plates, housings, and parts with thin walls or openings. As long as the metal still holds its overall volume, the blank behaves calmly. Once part of the material is removed, the geometry starts to "breathe." If you keep following the same route as if nothing changed, the finishing base is effectively being built on a temporary shape.
That is where one setup starts to lose not only in accuracy, but also in predictability. Two blanks that look identical can behave differently. The first one may pass without questions, while on the fifth or tenth part the edges start to drift. That kind of variation is especially annoying in production runs, because the program looks correct, but the result keeps changing from part to part.
When two routes give better results
Two routes usually win where a long base surface changes after rough machining. While the part is clamped, everything looks flat. Once it is removed from the table, the metal redistributes stress, and the plane moves by hundredths or even more.
That happens with long and relatively thin parts: plates, strips, housings with openings, and guide elements. One setup may seem faster, but often it gives a nice result only on the machine. After unclamping, inspection, touch-off, and sometimes scrap, begin.
In such cases, roughing and finishing should not be mixed. On the first route, it makes sense to remove most of the stock, form clear process references, and keep as much rigidity as possible. The part should survive this stage without too much freedom. Otherwise the finishing plane is built from the start on unstable geometry.
On the second route, it is much easier to work to size and flatness. After the first stage, you can see how the blank behaved, where internal stress remains, and how to position the part again. The finishing pass then gives a more honest geometry, because it removes not only stock, but also the remaining deformation that showed up after roughing.
This scheme is especially useful in a few cases: when the part length is much greater than its thickness, most of the material is removed from one side, there are pockets or deep cutouts near the base, and flatness varies from batch to batch even with the same cutting conditions and tool.
There is a simple sign that the route should be reconsidered. If the operator keeps changing clamping force, slowing the feed, and adding another finishing pass, but the result is still unstable, the problem is usually not the tool. The problem is the machining logic itself.
Two routes do not always mean more time. On paper there are more operations, but in real production the shop spends fewer hours on repeat measurements, restarts, and fixing parts. For a series run, that is especially noticeable: one extra stage often costs less than a constant fight for flatness in one setup.
How to split the machining steps
If a part has a long base surface, the route should be built not around clamping convenience, but around which base can survive the first cut without noticeable drift. Otherwise the first setup seems fast, but by the time of finishing the part has already changed shape.
First, choose the surface that can reliably support the part after the first route. That is not always the final finishing base. Sometimes it is smarter to keep the more "calm" side as a temporary support, and finish the surface with the highest risk of warping later, when stress in the metal has already partly been relieved.
The working scheme is usually simple. On the first route, remove the main rough stock and leave allowance in the places where the metal most often pulls the part. Do not take the long plane all the way to final size if pockets, ribs, or deep cutouts remain nearby after the cut. After that, measure the part not just formally, but at the support points and across the full base. On the second route, remove the remaining small allowance and check the plane again.
The idea is straightforward: the first stage relieves stress and shows how the part really behaves. The second stage is no longer fighting a large amount of metal, only correcting the remainder. That is why two-route machining often gives both a flatter surface and fewer unnecessary passes.
It is better not to use stock allowance by habit. It is not always useful to spread it evenly along the whole length. If you know the edge rises more, leave a little extra there, and do not keep extra material in calm areas. Then, on the second route, the tool removes exactly what is needed, without extra heat and without a long finishing pass.
It is better to add the post-first-route check to the process sheet as a separate operation right away. You should check not only the overall flatness, but also how the part sits on the base. If it already rocks on three points, the second setup will repeat the error instead of correcting it. In that case, it is better to adjust the support scheme immediately or slightly change the order of cuts.
On a simple part, it looks like this: first, the rough side is milled, 0.3-0.5 mm is left on the long plane, and the deviation is measured. If, after unloading, the metal lifts the center, the part is set up on a new base on the second route, the remaining stock is removed, and the result is checked right away. That order is usually more reliable than trying to do everything at once.
If the first measurement is already close to the tolerance, do not try to "kill" the plane with a large finishing removal. A small remainder works better. It heats the part less and less often pulls it again.
A simple part example
Take a regular housing with a long support foot on the bottom and a row of holes on the top and sides. On the drawing, everything looks simple: one long base surface, several fits, and a couple of threaded holes. On the machine, the picture is often different. After most of the stock is removed, one edge may lift by several hundredths, and the plane starts to drift.
If you run such a part in one setup, the problem shows up closer to finishing. The operator clamps the blank, removes the rough layer, machines pockets or holes, and then sees that the long base surface no longer stays flat. The blank seems to "breathe": there is still support in the center, but the edge is already hanging free.
Then the extra work starts. You have to choose shims, loosen the clamp, tighten the part again, and measure it once more. Then you check the height at the edges again, because the picture changes after the new clamping. On one part, that is manageable. In a series, these pauses eat more time than the program suggests.
With two routes, the same part usually behaves more calmly. On the first stage, most of the stock is removed, part of the holes is roughed, and a small allowance is left on the long support foot. On the second stage, the part is set up on a more stable scheme, then the base is finished and the holes are brought in from that reference.
On this kind of part, it works especially well when the long plane is sensitive to reclamping. After the first route, the blank has already "shown" how it behaves. It is easier to support it correctly, and the finishing pass is not fighting the internal stress of the material at the same time.
In production, the difference shows up quickly. The first part may take a little longer to dial in, but the next ones come out within tolerance more smoothly and faster. If you have to chase the edge with an indicator after every roughing pass, one setup has already lost both on time and on stability.
Where people most often go wrong
Scrap on a long base surface is more often caused not by the machine or the cutter, but by small route decisions. Two routes by themselves do not save the job if the operations were split only on paper and the logic of referencing and inspection was not changed.
The first common mistake is simple: the route is split, but no new base is defined. After the first stage, the part has already changed shape and now has a different support geometry. If the operator keeps relying on the old scheme in the second stage, the plane can drift easily even with normal cutting conditions.
The second mistake is tied to stock allowance. On the second pass, people sometimes leave too little material because they want to save a few minutes. On a short part, that can sometimes work. On a long one, it often does not. If only a couple of hundredths are left for finishing, any slight bend from clamping or heat leaves nothing to remove it with.
Another trap is measuring only the center of the part. That is where the plane often looks fine, while the edges have already moved. If you measure one "calm" point, you can keep thinking the process is stable for a long time and not understand why the part later will not fit in assembly.
Clamping repeatability is also often underestimated. The first part is set up carefully and passes. Then production speeds up, and a small difference in clamping force or support position starts to build up error. For a long base, that is already enough.
There is also a simpler reason: chips under the support or a dirty seat after flipping the part. On a short part, that sometimes causes only a small deviation. On a long plane, such a small thing can easily become a noticeable twist across the whole length.
Quick check before starting
Before starting, it is better to spend a few minutes at the machine than to argue about flatness all day later. On a long base surface, a small mistake in support or stock allowance quickly turns into scrap.
First, look at what the part will sit on after the first route. It should rest on clear and clean points that have already been machined. If, after flipping, the long plane is effectively hanging on random bumps, chips, or a raw surface, the second route will not fix the shape; it will only repeat the misalignment.
Then it is worth checking a few things. After the first route, are there three stable support points or a rigid clamping scheme with no rocking. Is there an even stock allowance along the long plane, without a strong difference between the ends. Is an intermediate inspection planned after the first route, not just a final one. Do you already know what to do if an edge rises above tolerance: check the support and chips, adjust clamping, or restart the second route.
It is better to be a little conservative with stock allowance than too bold. For a long plane, both extremes are risky: leave too little and you will not remove the wave, or leave too much and you will create extra heat and edge drift during finishing. A good sign is that the allowance is clear in the process sheet, not chosen at the machine.
A small example. There is a long plate whose base runs almost the full length. After the first route, two good support pads and one clamping point were achieved. That is already a workable scheme. But if, after the check measurement, the edge is above tolerance, do not try to force it down with clamping right away. That can make the shape even worse. It is better to remove the part, clear the chips, seat it again on the supports, and measure once more.
If the second route adds 12 minutes and the risk of rework takes 40, the choice is usually obvious. When the pre-start check is done honestly, the route runs much more calmly.
What to do next
If doubts remain, it is better not to argue about the scheme in theory. Take the same part, the same material, and the same flatness tolerance, then run it both ways: through one setup and through two-route machining.
That test quickly shows where time is really being lost. On paper, one setup often looks simpler, but on the shop floor it eats up time in corrections, repeated measurements, and extra clamping.
It is best to compare with a short table: how many parts came out right the first time, how many minutes each scheme took, how many times the operator reset zero, feed, or clamping force, and how many parts went to scrap or rework. It helps to look not only at the average result, but also at the bad day. If a part sometimes drifts in one setup, but runs steadily with two routes, that is already a strong argument. Production lives not by the best part, but by repeatability.
It is also useful to check where the time is actually going. Sometimes the second route adds 6-8 minutes for repositioning, but removes 20 minutes of inspection, corrections, and extra passes. Then the two-route scheme is actually cheaper, even if it first looks longer.
If the order repeats and the batch grows, it is worth reviewing not only the route, but also the fixturing. In a small batch, you can tolerate a clumsy clamp, but in dozens or hundreds of parts it starts to interfere more than the cutting conditions themselves. Often a stiffer support, a different referencing order, or a calmer clamp without unnecessary part bending helps.
If the question is not only about the route, but also about choosing equipment for a series launch, it is useful to discuss it together with the machine and fixturing. EAST CNC works with metalworking equipment, including machining centers, and helps with selection, supply, commissioning, and service. In tasks like this, that is often more important than yet another program tweak after production has already started.
A good next step is simple: run a trial batch, record the numbers, and make the decision based on facts. For a long base surface, that is more reliable than sticking with one setup just because it looks shorter.