Turning Welded Blanks: How to Handle Hard Weld Seams
Turning welded blanks calls for a separate approach: we explain how to assess the seam, choose the right pass, and reduce impact load on the tool and lathe.
Why a Weld Seam Disrupts Stable Turning
When turning a welded blank, the cutting tool is not cutting the same metal all the way around. In the seam area, several things change at once: the composition of the deposited metal, the hardness, the structure after heating, and the surface itself. Even if the seam looks smooth on the outside, it is already a different area with a different load for the tool.
The problem is usually not one single factor, but their combination. After welding, there is often local hardening, a small bead, shrinkage, and residual stress. Over the base metal, the tool moves calmly, and then in a fraction of a second it hits a harder, uneven zone. The shock most often happens as the tool enters the seam, when the insert cuts through a protrusion or enters a hard section, and again at the exit, when cutting changes sharply after the tight contact.
Because of this, the cut is no longer smooth and predictable. The load jumps, the insert deflects slightly, then springs back. On the part, this shows up as size waves, vibration marks, and a torn surface in places. On the tool, this kind of work often ends in micro-chipping of the cutting edge. Sometimes the insert does not break right away, but after a few passes it starts to crumble without any obvious reason.
There is another issue as well. A weld seam rarely matches the ideal axis of the part. After welding, the blank can warp a little, and the bead itself creates local runout. Then the tool cuts one depth for part of the revolution and gets a different one in the seam area. That creates impact load, and vibration begins even at a setting that would be calm on an ordinary blank.
That is why one general cycle often gives inconsistent results. The mode can be fine for the base metal, but too aggressive for the seam. And if you reduce the settings for the seam, the rest of the surface is machined too slowly and not always cleanly. In the end, the size before the seam, on the seam, and after it turns out different, even though the program is the same. In practice, it is often better to treat the seam zone separately instead of dragging the whole pass through it under general conditions.
When It Is Better to Remove the Seam Separately
A single pass is convenient only until the first hard impact. If the bead stands noticeably above the base surface, the tool enters the metal like a step on every revolution. For the machine, that means an extra jolt. For the insert, it means a risk of chipping. For the dimensions, it means scatter.
In many cases, it is faster and more stable to remove the most problematic zone first and then return to the normal cycle. This approach often saves both the tool and time, even if it adds one short pass.
It is especially worth separating the cycle when the weld bead protrudes above the diameter, there is hard build-up, the seam is clearly harder than the base metal, or the blank is thin, long, or already starts to ring at a light feed. A circumferential seam almost always needs special attention. It creates the same impact on every revolution, and the machine receives the same jolt again and again.
On a thin-walled part, this shows up quickly. First there is a ringing sound, then a wave on the surface, and after that the size drifts for no obvious reason. The cause is often not only the cutting mode, but the fact that the tool is working with impact for too long.
A simple rule of thumb: if you hear a sharp hit after the tool touches the seam, see sparks, or notice the cutting sound changing, it is better to stop the general cycle and level the seam zone separately. Do not expect the tool to force its way through the irregularity by itself. Sometimes it does get through the seam, but breaks on the finishing pass when nobody expects it.
After the problematic zone is leveled, you can return to the normal machining. Then the seam no longer pulls impact through the whole cycle, and cutting becomes predictable again.
What to Check on the Blank Before Starting
Problems with a welded blank often begin before the first pass. If the part has not been measured after welding, the tool does not meet metal of one section, but a set of height differences, runout, and local hard spots.
First, measure the seam itself and the metal next to it. Look not only at the bead height, but also at the allowance on both sides. It happens that the seam stands out by 1.5 mm, while there is almost no allowance nearby. Then trying to bring it to size in one pass ends in impact, a chipped insert, or a wave on the surface.
It is a good idea to check runout after welding every time, even if the part looks straight to the eye. Welding and tack points often pull the blank, especially on thin-walled bushings, rings, and long tube parts. A dial indicator will immediately show where the part has warped and how much material needs to be removed to get smooth rotation.
For a quick check, a caliper or depth gauge, a dial indicator, good lighting, and a marker are usually enough. That is enough to see the main issue in advance instead of discovering it during cutting.
Inspecting the seam is not just about asking whether it fused properly. In turning, porosity, undercut, overlap, and hard spatter near the bead are all problems. An overlap creates a sharp hit on the cutting edge, and a pore can open into a cavity after the pass, when the size is almost finished.
Then check the clamping. The blank should sit firmly in the chuck, without tilt and without resting on a random overlap. If the jaws press against an uneven area after welding, the part may already be crooked before the spindle starts. On that kind of base, you will not get an accurate size.
It is best to mark the seam location in advance. At speed, nobody looks for it by eye. The operator should immediately know where the tool will meet the hardest section and from which side it is better to approach with the tool.
If you already see a large bead, strong runout, or seam defects at this stage, do not drag them through the entire cycle. It is easier to remove the problematic zone separately than to change the insert and chase the size again.
How to Pass the Seam Step by Step
With a welded blank, the biggest trouble comes from the sudden change in hardness and height. If you pass it like an ordinary section, the insert takes a hit, the size drifts, and the surface after the seam often goes out of control.
The normal sequence is simple: first remove the hardest area, then return to the regular setting for the rest of the length.
- Before starting, check runout and locate the seam all around the circumference. If the part is already clamped with a tilt, the other decisions only hide the problem.
- Start with a short roughing pass only in the seam zone. The goal is not to reach final size right away, but to remove the high bead and get rid of the first shock. Usually a short section with a small margin on both sides of the seam is enough.
- Reduce feed on the entry into the seam. At that moment, it is better not to increase the spindle speed, even if the machine is running smoothly on the straight surface. Losing a few seconds is cheaper than chipping the edge on the very first entry.
- Once the seam is leveled and the tool no longer hits the protrusion, return to the main mode on the clean metal. There is no point in keeping a soft mode across the whole part if it is no longer needed.
- After the first part, check the cutting edge and remeasure the size near the seam and on the adjacent section. If the size drifted only in one area, the issue is usually not the program, but the way the tool handled the first impact.
On bushings with a circumferential seam, this sequence works especially well. First a short removal over the seam, then the main pass over the body of the part. After the first part, you usually already know whether the batch can run without mode changes.
If, after leveling the seam, the tool still makes noise or leaves a torn mark, do not try to save the cycle with a feed adjustment alone. More often, a firmer clamp, less tool overhang, or a separate roughing tool for that area helps.
Tooling and Cutting Conditions Without Unnecessary Risk
On the first pass over the seam, think less about surface finish and more about making sure the edge survives the impact. A too-gentle approach, a very sharp insert, and a long overhang all work worse here than on a normal blank.
Start with a rigid setup. The tool holder should be as solid as the turret and part geometry allow. The tool should not be extended farther than necessary to reach the cutting zone. Extra millimeters quickly turn into vibration, and on the seam that almost always ends in insert chipping.
For the first contact with the seam, a stronger insert is usually better than a finishing one. A sharp edge cuts smoothly on an even surface, but on a hard bead it often crumbles in the first seconds. If the seam stands out clearly, it is better to use an insert that can take the impact without trouble, even if it leaves some allowance for the next pass.
At the start, reduce speed. If you already know the working setting for a regular bar, on a welded area it makes sense to begin more slowly and look at the condition of the edge after the first few revolutions. Too much speed on the first pass usually gives not productivity, but chipping, blue chips, and impact marks on the part.
Depth of cut is another common mistake. When the bead is high, a symbolic cut only skims the top and makes the edge hit the same hard spot again and again. If the seam protrudes, the pass should actually remove the top of the bead. For example, with a bead around 1 mm, a cut of 0.1–0.2 mm is often worse than a calm pass of 0.5–0.7 mm at a lower speed.
Do not forget about chips. A long chip that comes back to the tool can easily damage the edge right at the seam. So it is worth keeping an eye on chip control, choosing insert geometry that breaks chips shorter, and not leaving the first passes out of sight.
A good sign is when the tool passes the seam without a ringing hit, and the insert shows no edge chipping after the pass. If after one revolution the edge already looks dull or shows micro-chipping, do not increase speed. First shorten the overhang, check the insert, and give the pass a proper depth.
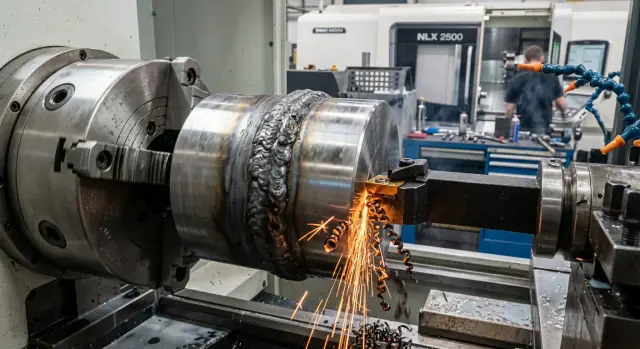
Workshop Example: A Bushing with a Circumferential Seam
A telling case is a bushing with a welded flange. After welding, a circumferential bead remained on the outer diameter, and the seam itself was harder than the base metal. Outwardly, the part looked ordinary, but in cutting it behaved very differently.
First, the part was sent through a general finishing pass over the entire outer surface. The program was standard for this bushing: no aggressive feed and no extra depth. The problem began when the insert reached the seam. An impact appeared on entry, tiny chips formed on the edge, and after that the tool no longer cut evenly across the surface.
After that, the size drifted not over the whole part, but specifically after the seam zone. Before the seam, the surface was smooth; after the seam, diameter scatter increased and a rippled finish appeared. The insert had to be changed earlier than usual, even though the rest of the toolpath was easy for it.
The cycle was split into two stages. First, only the seam bead was removed in a separate pass with a narrow zone, covering the seam itself and a few millimeters on both sides. A calmer mode was used for this, and the tool was not dragged through the full length of the part. The goal was simple: remove the hardest and roughest section, not try to finish the entire surface in one go.
After that, the rest of the outer surface was machined with the normal finishing mode. The tool no longer met a sharp change in hardness and did not take an impact on every revolution. The movement became smoother, and the cutting sound evened out as well.
The result was clear enough: one insert lasted for more parts, edge chipping almost disappeared, diameter scatter after the seam decreased, and the finishing mark became more even along the whole length. On this kind of bushing, a separate seam pass is almost always better than trying to force one finishing cycle through a circumferential weld seam.
Mistakes That Break the Cycle
The most expensive mistake is to treat the seam like ordinary allowance. On the first part, it often looks harmless: the operator sets the working feed and standard speed, the cycle starts, and on every pass through the seam the insert takes a hit. Sometimes one revolution is enough to chip the edge and send the whole batch into dimension risk.
The first welded part does not like haste. If the seam has not been checked separately, the machine is cutting almost blindly: hardness can vary around the circumference, the bead may be higher than expected, and the heat-affected zone does not behave like the base metal. By sound and on the screen, everything may still seem normal, but the tool is already starting to crumble.
Another common mistake is trying to remove a high bead with a finishing pass. A finishing tool should not knock down excess metal that stands above the calculated allowance. In that situation, it alternately rubs and digs in, which leads to a step on the surface, size drift, and chipping at the top of the insert.
Runout after welding is often forgotten too. The blank may have been straight before assembly, but the seam pulled the part, and the allowance started to vary. Then, in one part of the revolution, the tool removes very little, and a quarter turn later it digs in deeper. On bushings and rings, this quickly creates a torn surface exactly in the seam zone.
A long tool overhang only makes the problem worse. In the impact zone, such a tool works like a spring: it deflects, returns, and gets hit again. That leads to ringing, ripple, and cracks in the insert. A much simpler fix is often enough: shorten the overhang and remove unnecessary flexibility from the setup.
And one more typical mistake is not stopping after the first part to measure and inspect. If the operator did not check the seam, did not look at the edge, and did not measure the area after the seam, defects are often found only after several parts. By then, the tool is more worn than it seems.
Warning signs usually appear right away: spindle load jumps sharply at the seam, a short hit or ringing sound is heard at the same point in the revolution, the size drifts locally, and the insert loses its edge faster than usual. If the first part ran hard, there is no point hoping the second one will suddenly go easier. It is usually better to stop the cycle, check runout, bead height, and insert condition, and only then return to the batch.
Quick Check Before a Batch
Before a batch, do not start by running the full cycle through the seam right away. First remove the extra uncertainty. At this stage, it is easy to save ten minutes and then lose an insert, a dimension, and machine time.
Usually five actions are enough. Measure the height and width of the seam at several points around the circumference — even a neat bead is rarely identical all the way around. Check runout after clamping — if the part wobbles, the impact will not be only at the seam. Set the first pass so that it removes the extra bead instead of trying to bring the whole surface to size at once. Make sure the tool sits rigidly and the holder does not chatter during idle rotation or a test touch. After the first part, always stop for measurement and an edge inspection.
Pay special attention to the difference between the seam height and the allowance. If in some places the seam is one and a half to two times higher than the allowance, a standard roughing pass often becomes too heavy. In that case, it is wiser to first remove the seam zone in a separate short pass and only then run the main cycle.
Runout should stay within the range your shop already considers workable for that part and that overhang. A vague idea like "roughly okay" does not help here. If the clamping is unstable, the batch will start drifting by the second or third part.
A good result after the first piece is easy to recognize: the bead is removed cleanly, the tool edge is intact, the sound is even, and the size is predictable. A bad one is just as easy to spot: the tool knocks on the seam entry, torn marks remain on the part, and the machine has to be slowed down manually. After that, it is better not to continue the batch, but to correct the setup, the seam pass, or the cutting conditions right away.
What to Do Next
If the first pass was successful, do not rush to start the batch immediately. First record what worked on this specific blank: where the tool enters the seam, at which section the load rises, and what allowance is best to leave for finishing. For such parts, an averaged template mode often hurts more than it helps.
It is convenient to keep two sets of settings: one for the seam zone, and one for the finishing surface. Then you do not have to choose between a slow, safe cycle on the whole part and a fast mode that hits the hardest point.
On the machine itself, it is worth keeping a short first-part routine: check runout and seam position, pass the seam as a separate section of the cycle, inspect the insert edge after the first pass, and only then start finishing. After the part, it is useful to compare the size before and after the seam zone. This kind of routine saves not minutes, but damaged parts and broken tools.
If such blanks come in regularly, it is worth looking at the whole process more broadly. The problem is often not only in the cutting mode, but in the overall rigidity of the system: the bed, chuck, fixture, tool overhang, and part clamping. When the setup is working at its limit, even a good seam pass does not always prevent vibration and chipping.
In such cases, it helps not only to adjust the program, but also to rethink the base itself. EAST CNC supplies CNC lathes for metalworking, handles selection, commissioning, and service, and the company blog includes equipment reviews and practical materials for these tasks. If welded parts run in batches, that often brings more benefit than endless attempts to adapt the cycle to a weak setup.
And one last thing: start with a test part. Do not try to write the perfect program right away. Run one cycle, look at the mark on the seam, measure the part, check the insert, and only then change the settings. This approach usually gives a calmer and more predictable result.
FAQ
Why does a weld seam create a shock during turning?
The seam changes the load on the tool within a single revolution. The deposited metal, the heat-affected zone, and the bead itself cut differently from the base metal, so the tool gets a shock at the entry and exit of the seam, and size and surface finish start to drift.
When is it better to remove the seam in a separate pass?
Take the seam separately when the bead stands noticeably above the surface, the seam is harder than the base metal, or the part already starts to ring on a light feed. This is especially useful on a ring seam, because the impact repeats on every revolution.
What should be checked on the blank before the first pass?
Before starting, measure the bead height, the allowance near the seam, and the runout after clamping. Also inspect for overlap, porosity, and spatter, because these are often what damage the cutting edge on the first contact.
How can you tell whether the problem is runout and not just the cutting mode?
Watch how the part behaves around the full circle. When runout is the problem, the cutting depth changes throughout the revolution even outside the seam; when the seam is the issue, the impact and load spike appear at the same point every time.
Which tool is better for the first pass over the seam?
For the first contact, use a rigid tool holder and a strong insert, not a delicate finishing edge. Keep the overhang as short as access allows; otherwise the tool starts to flex and quickly chips.
Should speed and feed be reduced at the seam?
Usually yes: start slower than on a regular blank and do not speed up the spindle on the first entry into the seam. It also helps to ease the feed a little in the problem zone, then return to the normal mode after the seam is leveled.
Can a high bead be removed with a finishing pass?
No, a high bead is better not removed with a finishing tool. Such a tool either rubs the top or cuts in too sharply, which causes chatter, size drift, and quick insert chipping.
What should be done if the size shifts after the seam?
First check the edge, runout, and the remaining height right at the seam. In most cases, the size drifts because of the first impact: the tool is pushed away at the seam, then comes back with a different load.
How can you tell that the insert has started to chip?
The signs show up quickly: the sound gets harsher, the edge develops a dull spot or tiny chips, and the part shows torn marks. Do not keep using that tool through the batch, because the next pass often destroys the insert more severely.
What should be recorded after a successful test part?
Write down the working zone of the seam, the first-pass settings, the allowance for finishing, and the actual size result before and after the seam. This simple template helps you repeat a successful setup and avoid searching for settings again on every similar part.