Turning Large Housing Components with a Crane: How to Reduce Error
Flipping large housing components by crane requires accurate lifting points, clear datums, and a check after re-clamping to avoid building up shift.
Where the error appears after flipping
After a large housing component is flipped, the size often drifts not because of one cause, but because two errors stack up. The first happens during lifting and turning. The second appears after the part is placed back on the supports and clamped again.
During lifting, the part is rarely hanging perfectly still. The sling pulls to one side, the hook turns the housing slightly, and one sling leg takes the load earlier than the other. If the lifting points were chosen poorly, the housing gets skewed. It may be almost impossible to see by eye, but after it is set on the machine, the position of the datums and axes changes.
There is another problem too: the contact points. A thin chip under a support, a small burr on a boss, or dirt on the datum is enough for the housing to seat differently from the first setup. For a large part, even a shift of a few hundredths or tenths of a millimeter on one support can create a new error in height, parallelism, or concentricity. The greater the distance between the datums and the machining zone, the more clearly this shows up in the final size.
It helps to separate the deviations into two groups. A lifting error appears when the part bends under its own weight, turns under the sling, or gets skewed before it is set down. A re-clamping error appears when the part rests on different contact points, lands on chips, hits a burr, or is pulled sideways by the clamps.
This split is useful in practice because the countermeasures are different too. Lifting error is reduced by proper suspension points, equal sling leg length, and a smooth flip without jerks. Re-clamping error is reduced by clean datums, equal supports, a clear clamping scheme, and a quick check immediately after installation.
When large housing components are flipped by crane, many people look for one "guilty" cause. In reality, the error usually builds up step by step. First the housing turned slightly in the air, then it sat on the support not over the full surface, and then the clamp pulled it into position. In the end, the new datum no longer matches the one used for the first machining operation, and the size drifts even if the machine geometry is fine.
What to prepare before the first lift
Most of the error is set up before the crane even lifts the part off the table. If the crew misjudged the weight, did not understand the center of gravity, or chose weak areas for slinging, the first flip will already introduce extra skew.
First, verify the real weight. Do not look only at the drawing value. Include stock allowance, temporary plates, handling lugs, and everything still on the part at this stage. It is also better to estimate the center of gravity in advance rather than by eye. For housing parts, it is often shifted because of pockets, ribs, and heavy bosses on one side.
Then find the rigid areas that can carry the load without noticeable deflection. These are usually ribs, thick walls, mounting pads, or areas close to them. Thin flanges, finished edges, covers, and long protruding lugs should not be used for the sling.
Mark the surfaces that must not be pressed. This is especially important in tight spaces where the sling can easily slide onto a finished datum. The list usually includes finished datum planes, sealing surfaces, thin edges and flanges, as well as areas for bearings, sensors, or precise fits.
It is also useful to mark the orientation in a simple way ahead of time: "top", "front", "left side". Next to that, mark two or three control points so it is easy to see whether the part has turned or shifted after re-clamping. A center punch mark, marker, or permanent paint is enough, as long as the mark is outside the machining zone.
One more step is often skipped: clean all contact areas. Supports, prisms, pads, clamps, and the bottom of the part itself should be free of chips, scale, dried coolant, and dirt. Even a small chip under one support changes the seating, and after the flip that shift looks like a datum error.
If the part weighs several tons, it helps to make a short lifting map on paper: where to sling, what to protect, and what the correct orientation looks like. It only takes minutes, but the second setup becomes calmer and less guesswork-heavy.
How to prepare the lifting points
Lifting points should be chosen not where it is easiest to hook on, but where the housing bends the least under its own weight. These are usually areas near stiffening ribs, bosses, and thick walls. If the sling pulls on a thin edge, the part may flex slightly as soon as it leaves the table.
Thin flanges, covers, mounting lugs, and long protrusions are not suitable for this. They hold their shape worse than the massive part of the housing. Even if the lift happens without visible deformation, after the flip you may get a shift that is hard to explain from the measurements.
It helps to picture in advance how the part will hang in the air. The hook should be above the center of gravity, or as close to it as possible. If the housing immediately leans to one side, the slings start pulling unevenly, and the part can rotate with a jerk.
For a quick check, a few questions are enough. Are the intended lifting points near a stiff area or near a thin wall? Will the sling hit a boss, fitting, or finished edge during the turn? Will those points interfere with the support or clamp in the second setup? This kind of short check often prevents errors better than long explanations after scrap.
All finished surfaces that may touch a chain, shackle, or sling should be protected in advance. Soft pads, covers, or protective corners work well. One dent on a finished datum costs more later than a few minutes of preparation.
There is another common detail: the lifting points must not interfere with the second setup. If an eye bolt, shackle, or sling path crosses a future support area, the operator has to change the scheme while the part is hanging. That is a bad moment for improvisation.
In practice, this order works better: first define where the housing will rest and locate after the flip, and only then choose the lifting scheme. For a gearbox housing, that may mean lifting from heavy side areas instead of from the top flange. It is a little less convenient to lift, but the part reaches the second setup without extra skew.
Which datums to keep for the second setup
After the first operation, the part should not just have machined areas left over, but datums that can be found without argument after the flip. If the crane shifted the housing slightly during the turn, these surfaces help you quickly see where the part sat correctly and where it drifted. When large housing components are flipped by crane, the error often grows not because of the lift itself, but because the second clamping datums are weak.
The best approach is to leave two or three clean support pads on stiff areas of the housing. They should follow a clear scheme and not sit on thin walls, springy ribs, or areas where the metal pulls after stock removal. If the first operation allows it, make the pads a little wider than the minimum contact area. That makes them easier to place on the supports and easier to check with an indicator.
For measurements, choose one end face or one plane that is easy to use as a reference in the second setup. This datum should be simple: flat, accessible, and easy for the operator to see. If the next step uses it to define mounting holes, center distances, or a mating surface, it is better than a random side wall that is hard to measure.
Using a cast surface as a datum is a bad idea. Casting skin, shrinkage cavities, fins, and local waviness create false support. The part may seem to sit firmly, but after re-clamping the size drifts. On a large gearbox housing, such an error can easily add extra tenths of a millimeter, and then the search starts with the machine, fixture, and program.
It is convenient to check the datums for the second setup against four simple criteria:
- the support is on clean metal, not on casting skin;
- a feeler gauge or indicator can reach the datum without awkward extensions;
- the needed holes and surfaces are easy to measure from that datum;
- the datum is linked to dimensions that cannot be lost after the flip.
If the size is critical for assembly, link the datum to that size specifically, not to a surface that is simply convenient to mill. Here it is better to spend an extra 15 minutes on preparation than to chase a shift after the second clamp.
How to carry out the flip and re-clamping
Flipping large housing components by crane does not like haste. The error often appears not during lifting, but a minute later, when the part is already set in the new position and the clamps are tightened carelessly.
First, loosen the clamps in a clear order. If the part has temporary stops or safety elements that no longer hold the size, remove them before lifting. Otherwise the housing will stop in the wrong place, skew, and create extra stress even before the flip.
Lift the part only slightly, a few centimeters off the supports. That is enough to see the balance: whether one side dips down, whether the housing tends to rotate, and whether one sling leg is taking more load than the other. If the balance is poor, lower the part and move the lifting points instead of trying to correct it with the crane while it is already in the air.
Make the turn smoothly. A jerk at the start and a sharp stop at the end often shift the slings and disturb the part more than it seems. If the housing is long or has thin walls, give it a couple of seconds to settle after each movement.
After seating
Do not place the part directly on the finished datums. First, set it on temporary pads. That makes it easier to remove the slings, check how the housing sits, and avoid scratching the datum surfaces if the seating is uneven.
Before final clamping, clean the datums, supports, and clamp pads once more. After the flip, fine chips, scale, or dirt from the slings almost always land there. Even a chip only a fraction of a millimeter thick is enough to make you search for the cause of the shift for a long time.
Tighten the clamps not randomly, but from the stiffer area toward the more flexible one. Usually you seat the massive part of the housing first, then pull in the sections with walls, flanges, or long shelves. That reduces distortion and gives a more even contact on the datums.
If in doubt, stop for a minute and check four things:
- the housing is fully seated on the supports;
- the datums are clean and no visible gap remains anywhere;
- the slings were removed without pushing the part;
- the clamps are not pulling a thin section before the stiff one.
A good re-clamping process looks boring: no jerks, no "by eye" shims, and no prying corrections. That is exactly how it should be.
What to measure right after re-clamping
After large housing components are flipped by crane, do not start the next pass right away. First you need to understand how the part actually sat on the datums and whether the re-clamping moved it. At this stage, people often lose not minutes but a whole shift if they skip a simple check.
First, check the seating of the datum with a feeler gauge. Not in one point, but in several places around the perimeter and near the supports. If the gauge passes where the datum should sit tightly, there is debris, a burr, a skew, or extra force from the clamp under the part. Then the indicator readings will no longer be trustworthy, because the seating itself is wrong.
After that, use an indicator to check surface shift or runout on the surfaces you left under control. It is better to go over the full length or width, not just one point. That shows whether the part simply moved or was slightly rotated during tightening. A small difference on one edge can create a visible shift in holes on the other side.
A useful check order is:
- check datum seating with a feeler gauge in several places;
- use an indicator to check the plane, side datum, or control surface;
- compare the control points with the first setup measurements;
- check holes, bosses, and seating surfaces before finishing.
The comparison with the first setup is always necessary, even if the part looks straight. Look not only at the absolute dimension, but also at the relative position of the control points. If one point shifted only a little and another shifted noticeably, the cause is usually part rotation, not a measurement error.
It is better to check holes and bosses before finishing passes. If they have already shifted relative to the datum, finishing will not fix the situation; it will only lock in the scrap. On a large housing component, that is especially frustrating: a lot of metal has already been removed, and it cannot be put back.
If the measurements raise doubt, decide immediately whether to re-setup the part or not. Do not hope that the next pass will "pull in" the geometry. If the datum seated poorly, the indicator shows shift, and the control points do not match the first setup, the part should be loosened, the supports cleaned, and clamped again. That is faster than searching for the reason the sizes drifted later.
Common mistakes during flipping
When large housing components are flipped by crane, the problem is rarely the crane itself. More often, it is caused by preparation. The part is not even on the second setup yet, but the skew is already built into the lifting points, supports, and datum surfaces.
The most common mistake is lifting from the "convenient" hole. It may be close to the slings and seem reliable, but it may not be a calculated lifting point. As a result, the housing twists slightly already in the air. After re-clamping, that turns into a shift that is then hunted down on the machine for a long time.
It is no better to use a painted, cast, or simply rough surface as a datum. Paint compresses, scale blocks contact, and traces from rough machining create false support. From the outside everything looks tight, but the geometry has already moved. For machining large components, this small issue quickly turns into hole misalignment and surface shift.
Another costly mistake is rushing before clamping. The operator sets the housing on prisms or support pads, but does not clean out chips, dust, coolant drops, and burrs. Sometimes one chip under a support is enough for the indicator to look "fine" in one point and fail in another.
A simple set of rules helps:
- lift only from pre-marked points, not from the first hole that looks suitable;
- before the second setup, clean not only the part, but also all supports, prisms, jaws, and pads;
- locate from a clean machined surface or from a specially left datum;
- check the position not in one point, but in at least several along the length and width;
- keep the orientation marks so they are not erased by the shift or by washing.
Another typical mistake is checking in only one place. An indicator on one edge may show a good result, while the other side already has skew. Post-flip inspection must confirm the position in several points, otherwise the operator sees only part of the picture.
A quiet cause of scrap is lost marks. If the shift cannot see where the top, front side, and original datum are, the housing may be turned "almost the same way." For such parts, "almost" usually ends in another setup and wasted time.
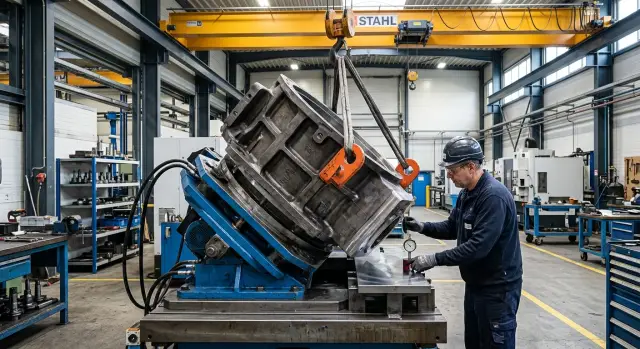
A simple shop-floor example
In the shop, everything often looks fine until the part is placed on the second setup. A gearbox housing that must be machined from both sides is a good example. After the first operation, two support pads and orientation marks were left on the part in advance so the crew would not have to search later for a stable seating point and a reference for checking.
On the first setup, the operator does not try to remove the maximum amount of metal from every accessible surface. He deliberately keeps clean supports and clear datum areas. That slightly limits the first operation, but it makes the second clamping much easier and reduces the risk of extra correction.
When it is time to flip the part, the slinger takes the housing at two points near the ribs. This kind of lift usually goes more smoothly than grabbing random protrusions. The part does not heel over as much in the air, and the housing does not pull to one side during seating.
After the flip, the operator sets the part on the prepared supports and immediately checks the seating with an indicator. The dial shows a small skew, for example 0.06 mm on one of the datum pads. That is not an emergency, but it is not something to ignore either.
This is often where the error begins. If machining continues right away, the skew carries into the holes, surfaces, and center distances. Later it seems that the machine, fixture, or program is at fault, although the problem appeared when chips got under the support or the housing did not seat fully.
The operator stops, removes the load, cleans the supports, checks the contact points, and seats the part again. Sometimes one small chip or burr is enough to move the housing by a few hundredths. After reseating, the indicator may show 0.01–0.02 mm, and only then can work continue.
This simple order works better than any rush: keep the support pads, mark the datums in advance, flip from clear lifting points, and check the position before cutting starts. On a large housing, these small details are what most often preserve accuracy.
What to do next
If the part has already been flipped without surprises, this process should be fixed as a standard shop rule. One successful case does not mean the next one will go the same way. Errors after re-clamping often return where everything depends on the operator’s memory instead of a clear procedure.
Start with the simple thing: before each new batch, check the lifting points again. Even if the fixture is the same, the blank weight, protrusions, lifting lugs, slings, and center of gravity position may change. On a large housing component, a small detail quickly turns into extra tenths, and sometimes into a lifting risk.
It is useful to keep a short diagram near the machine. Not a thick folder, just one sheet showing the datums for the first and second setups, the lifting points, and the flip sequence. When the crane operator, setter, and machine operator all look at the same document, there are fewer mistakes and almost no disputes.
A good habit is to record the actual shift after re-clamping. A few lines per part or batch are enough: where it shifted, by how much, and how it was corrected. After a week, those notes start to show a pattern. If the shift almost always goes in one direction, the cause is usually not measurement, but the stop, the datum, or the way the part is seated.
In practical terms, it comes down to a few actions:
- inspect the lifting points, slings, and contact areas before each batch;
- keep a setup and flip diagram at the machine;
- record the actual shift in a log right after re-clamping;
- if the flip takes too much time, check the fixture, stops, and crane access;
- if the problem repeats, review the machine itself for that part.
For large housing flips, this is often the most useful step: track not only scrap, but also time loss. If each flip takes an extra 20–30 minutes and the operator spends a long time finding the datum after seating, the issue is no longer just discipline. The current fixture may simply be inconvenient for a housing of that size, and the machine may not have enough travel, access, or a clear re-clamping scheme.
At that point, it helps to discuss the job based on the actual part, not just the catalog. At EAST CNC, the full cycle is usually reviewed: the housing dimensions, number of flips, locating scheme, commissioning, and future service. That kind of discussion helps eliminate extra re-setups in advance instead of dealing with them later on the shop floor.
If after every flip you have a clear record, a stable scheme, and predictable shift, the process is already under control. Then the next step becomes obvious: improve the fixture, change the setup order, or choose equipment for the part instead of forcing the part to fit random limitations.
FAQ
Why does the size shift after the part is flipped?
Usually the size shifts for more than one reason. The housing may twist slightly in the air, then seat on different contact points after re-clamping. Even a small chip under one support or a burr on a datum can cause a shift in height, parallelism, or concentricity.
What should be prepared before the first lift?
Before lifting, check the real weight of the part, the center of gravity, and the areas that can carry the load without noticeable deflection. Mark the places where the sling must not press, add orientation marks, and clean all supports, pads, and lower surfaces of the part.
How do you choose lifting points so the housing does not twist?
Place the slings near ribs, bosses, and thick walls, where the housing bends less under its own weight. Do not hook onto thin flanges, long protrusions, covers, or finished edges. If there are no good lifting points, it is better to prepare protective pads or temporary lifting elements in advance.
Which datums are best to leave for the second setup?
Leave two or three clean support pads on the stiff areas of the housing and one clear datum that is easy to measure from in the second setup. These surfaces should be easy to reach with a feeler gauge and an indicator. It is better not to use a cast, painted, or rough surface as a datum.
How can you tell the part is hanging wrong before the flip?
Lift the part only a few centimeters and watch how it behaves. If one side immediately dips down, the hook twists the housing, or one sling leg takes the load much earlier than the other, the balance is poor. In that case, lower the part and move the lifting points.
How should the part be clamped after flipping?
After seating, first place the housing on temporary pads, remove the slings, and clean the datums and supports again. Then tighten the clamps from the stiffer area toward the more flexible one, without jerks and without trying to force the part with a pry bar. If the part does not seat calmly, stop and correct the setup right away.
What should be measured right after re-clamping?
First check the contact of the datum with a feeler gauge in several places, not just one. Then use an indicator to check the plane, side datum, or control surface along the length and width. After that, compare the marks and dimensions with the first setup before starting the finishing pass.
What should you do if the indicator shows shift after the flip?
Do not start machining. Loosen the clamp, remove chips, dirt, or burrs, seat the part on the supports again, and repeat the check. The next pass will not fix a bad seating; it will only lock the error into the holes and surfaces.
What mistakes are most common when flipping a part?
The most common problems are lifting from the first convenient hole, using a cast or painted surface as a datum, and dirty supports. Another common issue is checking the indicator in only one place and losing the orientation marks, so the part is set almost the same way, but still rotated.
When should you change the fixture or reconsider the machine for this part?
If each flip takes extra time, the shift keeps moving in the same direction, and the operator spends a long time finding the datum, the issue is no longer just carelessness. Then it is worth reviewing the fixture, stops, locating scheme, and the machine itself for the part size and the number of flips.