Turning Discs and Drums Without Vibration on a Large Overhang
How to turn discs and drums without vibration: how to choose support, set cutting parameters, remove stock step-by-step and keep size on a large overhang.
Why vibration appears at a large overhang
When the part is pushed far from the chuck or a support, the system loses stiffness. Under load not only the part bends, but also the arbor and the toolholder. The cutter presses into the metal, the part moves by fractions of a millimeter, then springs back, and the cut no longer goes where it was set.
The greater the overhang, the easier it is to start oscillations. At first you hear a light hum or tremor, then the sound sharpens: a whistle, a chattering ring, a dull rumble appear. You can see it on the surface almost immediately. Instead of a smooth track you get a wave, sometimes with fine ripples. If you run a fingernail across the mark, the irregularity is often felt without instruments.
Size also begins to "wander" for a simple reason. On one section the cutter removes the intended layer, on another the part moves away and the actual depth of cut drops. After part of a revolution the part returns, the cutter bites deeper, and the cycle repeats. Because of this diameter, taper and surface finish all shift. It often seems the modes are to blame, but that's not the whole story.
Discs and drums behave differently. A disc often acts like a thin plate. If the wall is thin, it responds easily to radial force and can "sing" even at a small cut, especially near the outer diameter.
A drum is usually stiffer by shape, but it has another weak point. If it's long, it acts like a cantilever tube: it sags along the axis and, with weak support, starts to wobble. Internal turning adds problems because a long boring bar is less rigid than an external tool.
So vibration on these parts rarely has a single cause. Usually several factors combine: part overhang, arbor length, cross-section of the tool, feed, depth of cut and the point where cutting force hits the weakest spot of the system. If that spot can't be held, chatter appears before the first serious cut is removed.
What to check before the first cut
Most problems start not during the cut but during setup. Small things decide a lot: dirt in the jaws, an excessive overhang, a dull tool or a support remembered too late.
First remove everything that prevents a tight fit. Clean the chuck jaws, the seating collar of the part and the points where the support will sit. Even a thin chip or dried coolant can cause a tilt that becomes runout and chatter at the edge.
Then measure runout before machining. Not by eye, but with an indicator. Check the face and the OD in two places: near the clamp and closer to the free end. If the chuck keeps small runout but it grows sharply at the end, you already see where the part loses stiffness.
A simple guideline: if the chuck holds the part firmly only over a short section while a long overhang remains, the first pass can already break into vibration. When a drum is clamped for 30 mm and overhangs 160 mm, the issue is usually not the cutting parameters but that the free part "plays" under the cutter.
Before starting the spindle, it's useful to check four things:
- where the rigid clamp ends and the part overhang begins;
- the real tool overhang from the holder;
- whether there is play or wear on the insert, holder and insert seat;
- where you will place a support if the first pass shows deflection.
Even experienced operators often err with the tool. Excessive tool overhang easily adds vibration, even if the part is clamped correctly. If you can shorten tool overhang by 10–15 mm, that often helps more than trying to "calm" the process with feed changes.
Plan the support before the first cut, not after the first signs of chatter. For a disc that can be a mandrel or a steady rest near the area that won't move. For a drum it's important to ensure the support won't contact the machined zone or push the part sideways.
If you check all this in advance, the first pass will immediately show the real picture. Then you tune parameters by fact, not by treating vibration where its cause is in the setup.
How to choose a support for a disc or drum
When the cutter works far from the chuck, the part bends even at a normal feed. In this situation the support influences the result more than a small change in RPM. If chosen incorrectly, even a rigid machine won't save the cut.
A mandrel is best for a disc or a short drum with an accurate center hole. It holds the part on the axis and prevents lateral movement. If the wall is thin, don't clamp the part to the stop: excess force often induces ovality even before the first pass.
Centers are convenient when the drum is long and the part has proper bases on both sides. They hold the axis well and reduce sag. But a center can damage a thin edge if clamped with extra force. In that case lower the load and check if runout changes after tightening.
A steady rest is needed where the part starts to spring in the middle or near the cutting zone. Mount it as close as possible to the cut. If the support is far, it gives little benefit. Usually the difference is audible right away: the sound steadies and the surface track becomes cleaner.
A simple rule:
- mandrel — for discs and short drums with a good hole;
- centers — for long parts with prepared bases on both ends;
- steady rest — when overhang causes deflection near the cutter.
Don't look only at the part shape. Diameter, overhang length and mass change the picture significantly. A heavy short disc may cut well on a rigid mandrel, while a light long drum will chatter even on roughing and ask for a steady rest.
After the roughing pass check the support again. The part heats up, the fit changes slightly, and chips may appear on rollers or jaws. A few minutes of checking can prevent a ruined finishing pass.
If after roughing the sound got higher or fine ripples appeared, don't rush to change parameters. First check where the support sits and whether the part is overclamped. Very often the cause is right there.
How to set the part with minimal runout
If a disc or drum is clamped on a dirty or weak base, runout appears before the first pass. Often the machine isn't to blame but a small thing: a chip under the face, a burr on the seat or a clamp tightened unevenly.
Choose a surface that holds the part rigidly. It should be a clean, machined base: a seating diameter, a hub or a flat face — not a thin edge. If the part rests on a weak place, you'll get eccentricity even with careful tightening.
Wipe the base, jaws and supporting surfaces before mounting. One stuck chip easily adds a few hundredths. On parts with large overhang such small issues affect the result more than you expect.
Clamp the part evenly. Don't fully tighten one stud or jaw while others are loose. Better work in small steps: tighten a bit, rotate, tighten again. This way the part seats evenly instead of shifting to the side.
On CNC lathes don't skip the double indicator check. First check the face, then the diameter. Face runout shows whether the part sits flat on the base. Radial runout on the diameter shows if there's axial misalignment relative to the rotation axis.
A convenient sequence:
- place the part on a clean base without full tightening;
- check the face with an indicator in the working zone;
- check the diameter or base cylindrical surface;
- correct the setup with small adjustments;
- fully tighten and measure again.
Correct the setup in small steps. If you give a large final turn or tap the part, it's easy to overshoot the correct position. It's much better to remove half the error, check again and then finish tightening.
After full tightening measure once more. A common trap: the indicator was good at the preliminary seating, but after final torque the face shifts by 0.03–0.05 mm. For roughing this is sometimes tolerable, for finishing it is not.
If face and diameter hold stable, the tool cuts steadier, the sound calms, and the risk of chatter at a large overhang is much lower. A good setup usually saves more time than another trial pass.
How to choose cutting parameters without chatter
At a large overhang start parameters for stability rather than for maximum productivity. If you immediately run high RPM and deep cut, the part will quickly ring and the surface will wave.
A good start is moderate RPM and a short trial cut. Remove a small amount of metal and listen: a steady rasp means you're close to correct, ringing and periodic hum mean the mode needs changing.
If chatter appears, change RPM first, not feed. Often a 10–15% shift up or down helps. The resonance moves and the cut calms without other changes.
Don't rush depth of cut. On the first pass take less than you might like, especially for thin or long-overhang blanks. When the machine, part and tool run quietly, you can gradually increase.
A simple scheme helps:
- start with moderate RPM and a short trial cut;
- if you hear ringing, change RPM stepwise rather than abruptly;
- keep feed even across the pass;
- don't remove all stock in one go;
- leave a small allowance for finishing.
Feed should be steady and uniform. Sudden changes almost always spoil the picture: the tool bites harder then unloads, and vibration rises. If feed is set by program, avoid abrupt transitions in the cutting zone. If you work manually, move the carriage smoothly.
Always leave allowance for the finish pass. The roughing cut should remove most metal but not drive size to the limit. On the finish you can take a small, stable layer and achieve a ripple-free surface.
In practice a shop worker makes a trial pass, hears ringing at mid overhang, lowers RPM, keeps the same feed and reduces depth. Noise disappears, chips become even and the finish pass goes without surprises.
How to remove stock in steps
On a large overhang don't try to remove all stock at once. That approach often causes chatter, torn chips and marks on the surface. A calm multi-step scheme usually finishes cleaner and often faster overall, even if there are more passes.
Start in the zone where the system is stiffer. If the disc or drum overhangs far, the first layer is better removed nearer the chuck, mandrel or support, not straight into the weakest edge. This immediately reduces mass and the part's tendency to swing.
A convenient sequence:
- Remove a small first layer and observe how the part behaves.
- Split the total stock into several medium-depth passes.
- After each pass evaluate sound, chip shape and the cutter trace.
- Check runout again before the finishing pass.
- Make the final pass at steady RPM and without feed changes during the cut.
If the first pass is quiet, chips are even and no wave appears, continue with the same step. If sound sharpens, chips get short and bluish, and a frequent pattern appears on the part, immediately reduce depth or feed. Waiting for the process to settle on its own is usually pointless.
On these parts it's more effective to do several predictable passes than one heavy cut. It's not glamorous, but it better preserves size and surface finish.
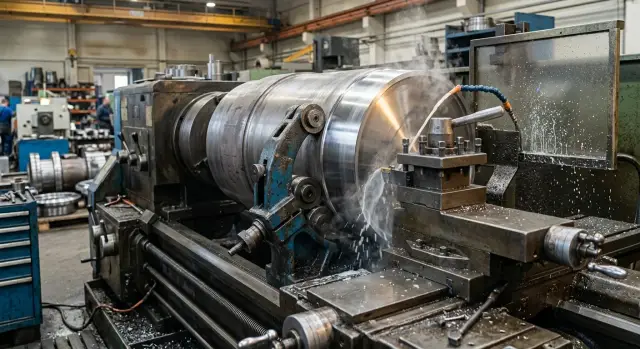
A simple shop example
A shop took a drum with a thin wall: about 320 mm diameter, 8 mm wall, nearly 180 mm overhang from the chuck. The blank was set up carefully, runout removed, but the first trial was done without a support. They chose ordinary roughing parameters: depth 1.5 mm per side and feed 0.22 mm/rev.
After a few seconds the drum began to "sing." The cutter left not a smooth track but a fine wave. The entry looked acceptable, but toward the edge chatter started and size began to wander. Typical picture: thin wall, large overhang and an overambitious first pass.
They moved the steady rest closer to the cutting zone — not to the center and not at the chuck, but almost next to the cutter with a small margin. Contact was set without overclamping so the drum wasn't crushed. On that section the sound dropped immediately and the tool trace became calmer.
One support alone wasn't enough. They also reduced roughing depth: instead of one pass of 1.5 mm they made two passes of 0.7 and 0.6 mm. Feed was slightly reduced so the edge would cut more gently. It took a little more time, but the cut stopped tearing the surface and the machine ceased to be guided "by ear."
For finishing they left a small allowance of about 0.15 mm per side. They kept the steady rest nearby, increased speed moderately and kept feed steady. After the pass the surface showed no obvious wave and the size along the machined zone was more uniform than in the first unsupported attempt.
This example shows a simple point. It's not enough to remove runout before starting. If the wall is thin and overhang is large, the result usually comes from a combination of three solutions: support close to the cutter, smaller depth of cut and removing stock in several passes. If the drum still rings after that, then check clamping, insert condition and rigidity of the whole setup.
Mistakes that quickly cause vibration
The problem usually breaks out from simple mistakes. They seem small, but at a large overhang any extra flexibility immediately gives ringing, surface ripples and load spikes on the cutter.
The first frequent mistake is too long a tool overhang. It's convenient for the operator to give some clearance, but an extra 20–30 mm already changes tool behavior. The tool begins to spring, the edge enters the metal in jerks, and a clean pass becomes a wavy track. If you can shorten overhang by even one toolholder length the effect is often immediate.
The second mistake is placing the support far from the cutting zone. For a disc or drum this is especially bad: the part behaves like a spring and the cutter shakes it each revolution. The steady rest, clamp or other support should hold the part as close as possible to the cut.
Another quick path to chatter is removing all stock in one pass. This is done to save time, but on a long overhang it often backfires: the cutter is overloaded, the part moves and chips are uneven. Much more reliable is two or three calm passes and a small finishing allowance.
Even experienced setters err with RPM. When vibration appears many simply increase speed to pass the area faster. Sometimes this hits resonance. The sound rises and the surface mark worsens. In such moments it's more useful to check the combination of RPM, feed and depth than to spin the spindle faster.
After reclamping some continue machining immediately. That's a mistake too. Radial or face runout changes the real stock around the circumference, and the cutter alternately cuts easy and cuts deep. A couple of minutes with an indicator after reclamping usually saves the part.
If these parts are produced in series, look not only at the single operation but at the machine's capabilities. EAST CNC supplies CNC lathes for metalworking and helps with selection, commissioning and service. That makes sense where repeatability matters and a stable result is needed on similar blanks.
Quick check before the finishing pass
Finishing is often spoiled not by settings but by small things nobody rechecked after roughing. On a large overhang even a slight misalignment quickly gives ripples, ringing and noticeable size deterioration.
First recheck part runout. Don't rely on the initial setting. After roughing the clamp, support and part can "settle" slightly, especially if the disc or drum warmed up.
If you use a support, check it isn't squeezing the part harder than needed. That's a common reason size shifts without an obvious cause. The support should not heat up, leave marks or pull the blank aside.
Also inspect the cutting edge before the last pass. Even a small chip or built-up edge changes the cutting sound and immediately leaves marks. If you doubt the edge, replace the insert in advance.
It's useful to measure remaining stock not at a single point but along the length and diameter. If one side shows 0.2 mm and the other 0.6 mm, the tool will work unevenly. Then it's already not only a parameters issue but an uneven stock.
A short checklist before finishing:
- take runout readings at working points;
- check whether the support is heating;
- inspect the insert edge and toolholder seating;
- compare remaining stock at several sections;
- make a short trial feed-in and listen to the sound.
Sound often tells the truth faster than instruments. A steady rasp usually means everything is fine. Ringing, vibration at the handle and fine ripple on an already machined section show that the part or tool has entered oscillation.
If you see even one of these signs, don't start the finish pass "by chance." Two extra minutes of checking is almost always cheaper than a ruined part and rework.
What to do next
If the part finished quietly, don't leave the result only in memory. On a similar blank a few days later it's easy to forget which support worked, at what RPM chatter disappeared and how much stock was removed per pass. Better document your working scheme right away.
Write a few things down:
- which support was used and where it was placed;
- spindle speed;
- feed for roughing and finishing;
- depth of cut for each stage;
- tool overhang and type of cutter.
Then you will have a repeatable setup instead of a lucky run. On similar parts this is especially useful: if diameter, overhang and fixturing method repeat, the part behavior often repeats.
Compare results on two or three similar blanks. If the scheme works again and the surface is consistent, you can consider it a working method. If the picture changes on the second or third part, look for differences not only in RPM. Very often the cause is in seating, jaw condition, support or extra tool overhang.
When vibration won't go away, don't try to solve everything by simply lowering speed. First review the fixturing. Then check whether the whole system is stiff enough: chuck, support, toolholder, guides and the machine itself. At a large overhang two small weaknesses together give noticeable chatter.
A good note after a successful pass usually saves more time than another experiment at the machine.
FAQ
Why does a disk or drum start vibrating at a large overhang?
Because the part and the tool lose stiffness. The cutter pushes the metal, the free edge moves away and then springs back, and the cutter starts exciting the system. You usually hear it as a hum or ringing and see waves on the surface. The farther the cutting zone is from the chuck or support, the sooner this starts.
What should I change first when chatter starts?
First, change the spindle speed by 10–15% up or down and make a short trial cut. Resonance often disappears this way. If the ringing remains, reduce the depth of cut. Adjust feed only after that so you don't get torn surface or unstable chips.
When to use a mandrel, and when is a steady rest or centers better?
A mandrel (arbors) suits disks and short drums with an accurate center hole: it supports the part on the axis. It can distort thin walls if overclamped. A steady rest is needed when the part springs near the cutter. Long drums with bearing surfaces on both ends are convenient to run between centers.
How to tell if the issue is fixturing and not the cutting parameters?
Measure runout with an indicator at the chuck and at the free end before the first cut. If runout grows toward the end, the problem is in fixturing or overhang. Another sign is that the part rings on a soft trial cut. In that case, check bases, clamping and support first, not the cutting parameters.
How critical is tool overhang?
Shorten it as much as the access to the part allows. Even 10–15 mm less overhang often calms the cut noticeably. Extra tool overhang makes the cutter spring; on a long overhang this quickly leads to waves and size variation.
Can I remove all stock in one pass?
Better not. One heavy pass on a long overhang often causes ringing, torn chips and size drift. It's more reliable to split the stock removal into a few calm passes and leave a small allowance for finishing.
Where is the best place to put the support relative to the cutter?
Place it as close as possible to where the tool cuts. If the steady rest or support is far away, the part will still bend in the weak zone. After roughing, check the support again: the part heats up, fits change, and overly strong contact can ruin the finish.
What must I check before the finishing pass?
Re-measure runout at the working points — don't trust the initial check. After roughing, the clamp, support and part can shift slightly, especially if the part warmed up. If the support is heating or leaving marks, don't start the finish pass. Also inspect the insert edge: a small chip or built-up edge immediately changes the cutting sound and leaves lines.
Why does a wave appear again after reclamping?
After reclamping the part often sits differently. Even small axial or face shifts change the actual stock around the circumference. Because of that the tool sometimes cuts shallow, sometimes deep, and waves appear. A couple of minutes with an indicator after reclamping usually saves the part.
How to preserve a successful machining scheme for the next part?
Write down which support you used and where you put it, spindle speed, feeds for roughing and finishing, depths of cut for each stage, tool overhang and type of cutter. This gives you a repeatable setup instead of a lucky run. When similar parts come in series, compare the notes with results on a few blanks to confirm the scheme works.