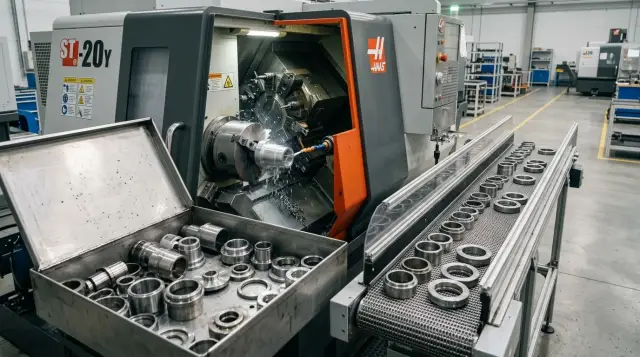
Tray or Conveyor for Bushings and Rings: Which Is Gentler on the Surface
Tray or conveyor for bushings and rings: let’s break down how the removal method affects impacts, end-face marks, out-of-roundness, and stability after cutoff.
Why defects appear right after cutoff
The problem often starts not in the warehouse and not during transport around the shop floor, but in that split second when the part separates from the bar or blank. While the ring or bushing is still held by the last tenths of a millimeter of material, its position is still predictable. As soon as the connection is gone, the support disappears, and the part starts moving along its own path.
At that moment several things change at once: some forces are released, the part may rotate slightly, drop, or bounce. If cutting is done at a high feed, a short bushing or ring often comes off with a jerk. That is already enough to hit the tray, guide, chuck, or a neighboring part.
Even a light impact leaves a mark. These parts have a small contact area, and the edge after cutting is often thin and sharp. Because of that, a short touch can create a dent on the end face, a crushed chamfer, or a shiny scratch on the outer diameter. On a thin-walled part, slight out-of-roundness can easily appear along with the surface mark.
Most often, the end face, edge, and outer diameter are affected. The end face gets bruised if the part falls flat or catches the edge of the receiving unit. The edge dents first because it takes the impact. The diameter gets damaged when the ring rolls, hits sideways, or rubs against a hard surface right after separation.
Because of this, the defect is easy to mistake for a machine problem. The operator sees marks on the batch and starts looking for spindle runout, backlash, tool wear, or compensation issues. That can be true, but not always. If the geometry was fine after machining and the marks appeared in the removal zone, the source of the scrap is not the cutting itself, but the way the part leaves the machine.
That is why you should not choose between a tray and a conveyor by habit. For sensitive rings and bushings, the first 20–30 centimeters after cutoff matter most. That is where a batch often gets more damage than during machining itself.
What actually damages the surface
After cutoff, the cut itself rarely damages the part. More often the mark appears in the same second when the ring or bushing loses support and moves along the removal path. One short impact can leave a scratch, crush a thin edge, or create a small work-hardened spot that shows up later during fitting.
The most common source of trouble is falling onto a hard surface. If the part comes onto a steel tray without a soft transition, it does not just touch the metal, it strikes it with its full mass. On a ring, the outer edge usually suffers. On a short bushing, the mark often stays on the end face, and then the part rotates and adds a scratch.
Another very common cause is impact with a neighboring part. From the outside it looks harmless, especially if the parts are small. But rings have a small contact area, so even a light tap leaves a visible mark. If the flow is continuous, the first part does not move away in time, and the next one crashes into it with its end face or edge. That is how a batch quickly picks up the same marks in the same place.
A dry chute can also easily damage the surface. A ring does not always roll evenly. It may stand on edge, start sliding, and drag chip dust along with it. In that moment, the tray works like sandpaper. The mark then comes not from an impact, but from friction, and it is often noticed too late, when the batch has already gone to inspection.
Bushings often behave differently. The part reaches the stop, bounces, and hits again. That rebound is especially unpleasant for light short bushings: they change position easily, touch the wall, and then fall onto the end face. In the end, one removal creates several contact points instead of one.
Sometimes a very small issue ruins the batch: a joint between tray sections, a screw head, a tiny step, or hard chips in the chute. On a turning line, this is usually visible as a repeating defect pattern. If every ring has the scratch starting in the same place, the material is not the problem, but the path after cutoff is. The thinner the wall and the tighter the out-of-roundness tolerance, the more such a small issue costs.
When a tray is gentler
A tray often wins when the part needs to be removed almost immediately after cutoff and moved only a very short distance. The shorter the distance from the tool to the receiving point, the lower the chance that the bushing or ring will speed up, bounce, and pick up small dents. For delicate geometry, that sometimes makes all the difference.
A tray works best with a light part that leaves in a predictable position and does not tumble. If the ring falls onto the same generatrix every time, and the short bushing does not stand on its end face, the movement stays predictable. In that situation, a conveyor does not always have an advantage: it still has to receive the part, absorb the impact, and move it on without a second contact.
A tray is especially gentle when the angle is small and the insert is soft. Then the part does not slide with a jerk, but moves down calmly. But there is a nuance here too: if the material is too springy, it can bounce the part back. Then the number of marks may even increase.
Usually, a tray performs better if the part is light, does not accelerate on the way down, and moves one by one rather than in a tight line. The receiving surface also matters: it should absorb the touch, not bounce it back.
In practice, this is easy to see on a short small-diameter bushing. If it drops only a short distance after cutoff and immediately lies on its side in a tray with a polyurethane insert, then at a small angle it simply rolls into the receiving zone. In that setup, there is often less damage than on a fast conveyor with a hard belt, where the part first hits the belt and then another part.
But a tray has its limits. It works well only while the flow stays even. If the rings start to catch up with each other and pack tightly, the first marks come not from the exit itself, but from impacts between parts. Then the problem is not choosing between a tray and a conveyor, but the production pace and the design of the receiver.
When a conveyor is gentler for the part
A conveyor gives a cleaner surface when the part cannot even be dropped slightly. For a thin ring or a short bushing, just a couple of centimeters of fall can leave a mark on the end face and push the roundness out of tolerance.
A tray often loses in a simple situation: the part rolls down, catches up with the previous one, and hits it sideways or end-on. A conveyor is more convenient where the goal is not just to receive the part, but to carry it on without pauses, bumps, or counter-impacts.
A well-tuned conveyor keeps a steady rhythm. The part lands on the belt or into a pocket almost immediately after cutoff and keeps moving at the same speed. It does not bounce, does not pick up extra momentum, and does not crash into a neighboring part. This is especially noticeable in continuous flow, when the machine produces parts one after another.
Another advantage is that parts can be separated right away, one by one. For rings and bushings, that is often more important than it seems. When there is even a small gap between parts, the risk of contact drops sharply, and it is easier for the operator to inspect quality at the exit.
A soft receiving zone also changes the result a lot. If the conveyor starts with a softer insert or a support with a bit of travel, the part settles calmly. The impact does not return into the thin wall, and the surface stays cleaner.
In practice, a conveyor often wins in three cases: when the part is very sensitive to end-face impact, when the flow is long and cannot be stopped, and when parts need to be separated one by one before inspection or packing. This is especially clear with small-section rings. A tray looks simpler, but a ring on it can turn, catch the edge, and get a mark. A conveyor with a steady speed and soft receiving area removes that extra contact.
If the line works in flow and the machine produces parts without long pauses, a conveyor is often gentler on the surface. But only if the speed, pitch, and first receiving zone are set correctly. A poorly adjusted conveyor can ruin a batch almost as easily as a hard tray.
How to choose the removal method
It is better to compare a tray and a conveyor not by general impression, but by a simple test on the part itself. Otherwise it is easy to choose an option that looks gentle but still leaves scratches, crushes the edge, or adds out-of-roundness after cutoff.
Start by measuring the part itself. You need not only the diameter and length, but also the weight. A short heavy ring falls and rolls very differently from a light long bushing. If the wall is thin, even a small impact changes the contact area, and that later shows up on the surface and in measurements.
Then watch how the part leaves the cutoff zone. It may slide off smoothly, drop on edge, or bounce slightly after separation. This is best recorded on video in slow motion. The eye often misses a very short impact, and that is exactly the one that leaves the first mark.
Next, assess the height to the first contact. The smaller the free fall, the lower the risk of crushing. But height alone does not decide anything if the part then hits a hard stop. So look not only at the first contact, but also at the second impact point. It is often more dangerous than the first: the part has already turned, entered the contact on an edge, and marked the finishing surface.
After that, simple logic helps. If the part lands flat right after cutoff, a tray often gives a gentler exit. If it falls on its end face and then rolls, a conveyor with even support usually leaves fewer marks. If the part bounces and changes position twice, first you need to remove the impact path itself. And if it catches on an edge or chip, it is too early to compare a tray and a conveyor: that obstruction must be removed first.
Then run a trial with one batch using the same material, cutting conditions, and tool condition. Otherwise the comparison will not be fair. Usually 30–50 parts per removal method is enough. Look not only for obvious dents. Note matte spots, circular marks, small end-face bruises, and the spread in out-of-roundness.
If one option produced two or three fewer marked parts, that is not enough to conclude. What matters is the overall picture. A good removal method gives a rare and understandable defect pattern, and the geometry does not drift from batch to batch.
Example with a ring and a short bushing
The same removal scheme behaves differently on a ring and on a short bushing. After cutoff, a thin ring often still “moves” a little. If it drops onto a hard tray, the part may bounce, rotate slightly, and touch the surface with its edge or another part. The mark may be small, but it is already visible on the finishing surface.
A short bushing behaves differently. It is usually heavier and more stable in flight, but it more often hits the end face. If the bushing leaves the tool and immediately strikes the tray at an angle, the main mark appears not on the cylinder, but on the end face or edge. Later this is easily mistaken for a tool problem, although the real cause is the removal path.
That is why the question “tray or conveyor for bushings and rings” is better answered not by a general rule, but by how the specific part behaves. For a thin ring, a tray works if the path is very short, the angle is small, and the part does not have time to speed up. Then the ring simply slides off and does not build up impact.
A conveyor usually gives better results when production is frequent and parts come one after another with almost no pauses. In that case it reduces the risk that a new ring or bushing will catch up with the previous one. For a short bushing, this is especially noticeable: fewer end-face impacts and fewer random edge dents.
At the start, it is usually enough to check four things: how the part leaves after cutoff, where the first contact happens, whether it accelerates on the way to the receiver, and whether each part follows the same route. The last point is often underestimated. If the geometry has to stay stable from part to part, the path must be stable too. When one ring falls straight and another slightly sideways, the spread in marks grows quickly. The same applies to a bushing: a different drop angle creates a different end-face dent.
Mistakes that quickly ruin a batch
Most often, it is not the cutoff itself that ruins the batch, but the first two or three seconds after it. The part has already separated, but it has not yet come to rest. In that moment, even a light impact on the edge or side surface leaves a mark, and a thin ring can also go out of round.
One of the most common mistakes is to look only at how the part leaves the machine. In reality, you need to watch the whole path: the drop point, joints, slope, neighboring parts in the receiver, and how you inspect the result.
A very steep incline often looks like a convenient solution. The part leaves the working area faster, and nothing piles up. But the speed increases, and so does the impact at the bottom. For a short bushing, that usually ends with an end-face dent; for a ring, with a mark on the outer diameter and a change in shape.
Sharp joints are no less harmful. If there is a transition between sheets, a screw, an edge, or a gap in the part path, the ring gets the same hit in the same place every time. Then inspection shows a repeating mark, and the tool gets blamed, although the problem is in the receiving path.
Another common mistake is mixing parts of different sizes in one receiver. A heavy bushing can easily hit a light ring. The parts start colliding, turning over, and catching on each other. After that, the surface gets damaged even if the cutoff itself was careful.
There is also a quieter problem: looking only at scratches. If the part looks clean, that does not automatically mean everything is fine. After an impact, a ring may show almost no visible mark, but still end up with out-of-roundness above tolerance.
And finally, checking just one part tells you very little. You need a short run of at least 10–20 parts in a row. Only then can you see whether the mark is random or whether the system is already damaging the whole batch.
A quick check before startup
Before a full batch, give the removal system 20 test parts. At this stage, it is important to watch not only how easy it is to move the parts away, but also the first contact after cutoff. That is where the mark most often appears, and once it appears, you usually cannot remove it later.
Listen to the sound and watch the movement. If the part rings, bounces, or makes an extra turn after cutoff, the surface is already getting an extra удар. A good removal process is boring: the part touches the support softly and moves on immediately without a jump.
Check a few things in sequence:
- There should be no metal-on-metal impact at the first contact point.
- After contact, the part should not bounce or spin like a coin.
- The edge should not catch on a seam, screw, insert joint, or burr.
- The conveyor speed should match the machine’s rhythm.
- The first 20 parts should keep their geometry, not just their appearance.
It helps to take two parts in a row and compare where the mark appears. If the mark shows up in the same area every time, the cause is almost always one specific point in the path, not the tool.
A common scene looks like this: a short ring seems to come off neatly after cutoff, but its edge hits a joint in the tray. Everything looks fine to the eye, but by the tenth part you can already see a matte spot and a slight shape drift. Remove that joint from the path, and the problem disappears without changing the cutting setup.
If even one item fails the check, it is better not to start the series. Five minutes at the beginning often saves the whole batch from scrap and extra rework.
What to do next
Do not change everything at once. First find the point where the part gets its first noticeable impact after cutoff. That is usually where the mark appears, and it is later mistaken for a tool, clamping, or blank problem.
Look not only at the scratch or dent, but also at its shape. A short, bright mark usually points to a hit against a hard edge. A long rubbed area usually appears where the ring or bushing slides under its own weight. If the part is thin-walled, even a weak impact can create out-of-roundness that you will see in measurement, not by eye.
The most useful step is a short test on the same part type. Take a batch of rings or bushings with the same material and size, run some parts through a tray and some through a conveyor, keep the same cutting settings and receiving conditions, and then compare the surface, the geometry after cooling, and the removal pace itself. This kind of test quickly shows what matters more for your batch: faster removal or a cleaner surface.
Do not rely on general rules like “the conveyor is gentler” or “the tray is simpler.” In practice, everything depends on the height of the first contact, the stiffness of the support, and how the part turns after cutoff. That is why two similar machines can produce different results on the same bushing.
If you are choosing a new machine or want to redesign the removal setup for specific rings and bushings, it is better to look at this together with the machining process from the start. At EAST CNC, the official representative of Taizhou Eastern CNC Technology Co., Ltd. in Kazakhstan, these tasks are usually reviewed as a whole: machine type, part removal method, commissioning, and service. That helps eliminate the small impacts at the exit that later ruin the whole batch.
FAQ
What most often damages the surface right after cutoff?
Usually it’s not the cutting tool that damages the surface, but the first impact after the part separates. The ring or bushing loses support, falls onto a hard tray, hits a wall, a joint, or a neighboring part, and gets a dent, a crushed chamfer, or a scratch.
When is a tray better for bushings and rings?
A tray usually gives a cleaner result if the part is light, the path is very short, and the part lands on its side right away without tumbling. With a small angle and a soft insert, it slides calmly into the receiving area without an extra удар.
In what cases does a conveyor hit the part less?
A conveyor is often better where parts come one after another without pauses and you can’t allow them to collide. If the first receiving zone is soft and the speed matches the machine’s rhythm, the part lands smoothly and moves on without bouncing.
How can you tell the problem isn’t the tool or the machine?
Look at where the mark appears. If the geometry is fine after machining, but a scratch or dent shows up in the removal zone, the cause is the part path, not the cutting. Slow-motion video usually makes this clear very quickly.
What should you watch in the first few centimeters after cutoff?
Watch the first drop height, the first contact point, and the second impact after that. It’s often the second contact that damages the finishing area, because the part has already turned and comes in on an edge.
How can you quickly test the removal setup before starting production?
Give the removal system 20 test parts and don’t rush into production. If the part rings, bounces, spins like a coin, or catches the same spot every time, the removal path is already damaging the batch.
Why do thin rings suffer more than short bushings?
A ring has a small contact area and a thin edge, so even a light impact leaves a mark right away. If the wall is thin, the ring also tends to go out of round after a short contact.
Which receiving-path mistakes most often cause a repeating defect?
Common culprits are a steep slope, a hard stop, a joint between sections, a screw in the channel, or hard chips on the path. If the mark sits in the same place on every part, look for one specific impact point in the receiver.
How many parts do you need to fairly compare a tray and a conveyor?
For a quick decision, 30–50 parts for each option is usually enough, with the same material, tool, and cutting settings. One or two clean parts prove nothing, because a lucky exit can easily mislead you.
What should you change first if the batch is already getting dents after removal?
First remove the first noticeable impact, and only then touch the cutting settings. Usually it helps to reduce the drop height, soften the first receiving point, remove the joint from the path, and separate the parts so they don’t catch up with each other.