Tool life on machines: why it differs
We explain why tool life on machines can differ even with the same insert: rigidity, runout, coolant delivery and overhang length.
Why the same tool can behave differently
The same insert may happily run a whole shift on one machine and start chipping after an hour on another. This happens even with similar material, the same program and identical cutting parameters.
The first reaction is usually simple: "bad insert" or "wrong brand." But tool life depends on more than the insert itself. The cutting edge works inside a whole system: the machine, spindle, chuck, holder, coolant delivery and workpiece clamping.
This is familiar in the shop. On one lathe the cutter produces a smooth surface and predictable wear. On another you get vibration, extra heat and early dimensional drift.
Most often four things make the difference: machine and tooling rigidity, tool or mounting runout, coolant delivery to the cutting zone, and the tool overhang.
If the system has even a little "play," the edge cuts unevenly and receives extra shocks. With runout, part of the edge takes more load. If coolant doesn't reach the cutting point, heat stays on the tool. If the overhang is too long, the cutter is more prone to vibration.
So when tool life differs, don’t rush to change the insert, supplier or cutting data. First look at the whole setup. Usually the cause is there.
What rigidity of the machine and tooling changes
Rigidity is easiest to imagine with a simple example. Picture a table with one loose leg. It still stands, but under load it moves. A machine behaves similarly: if the system springs under cutting load, the tool no longer performs as intended.
Rigidity isn’t just the bed. It’s the whole chain: spindle, chuck, clamping, toolholder, tool and the workpiece itself. One weak link is enough to lose stability. A good machine won’t help if the part is clamped poorly or the holder has play.
When rigidity is lacking, cutting happens in jolts. The edge digs in deeper, then backs off. At first you hear an unusual ring or hum. Later you see it on the part: the surface becomes uneven and dimensions start to wander.
Usually the problem shows several signs at once: the machine is noisier, the surface has ripples, dimensions vary from part to part, and the insert develops premature edge chipping.
Those chips are often blamed on a bad insert. In fact the insert often breaks because of impact loading. The edge takes many small shocks in a row and life drops sharply. The same insert on a stiffer setup can last twice as long simply because it cuts calmly without shaking.
On CNC lathes this is especially noticeable with long parts or poor clamping. The modes and the insert are the same, but the results differ. On one machine the surface is clean and dimensions hold; on the other a wave appears and after several passes dimensions start to drift.
If you hear extra noise and see unstable cutting marks, check the rigidity of the entire assembly first—not the tool catalog. The cause is often nearby: weak clamping, a worn chuck, an overly long holder or a workpiece that plays under load.
How runout shortens tool life
Runout makes the cutting edge work unevenly. One zone removes more material, heats up more and dulls earlier than the rest. The tool may still look acceptable, but it cuts noticeably worse.
Think of a drill: if it doesn’t rotate exactly on axis, one lip cuts deeper than the other. The load isn’t shared evenly. One side wears out faster, holes drift, and noise, vibration and temperature rise.
Even small runout consumes tool life faster than you’d expect. If the drill tip is off by a few hundredths of a millimeter, at high RPM this becomes constant hammering on the edge. The first parts may look fine, but after a shift the tool loses size and finish.
The same happens with an arbor and a milling cutter. Rotation may appear smooth, but one tooth cuts more than the others. It overheats, chips and develops microcracks first. Load then shifts to neighboring edges and wear accelerates in a chain.
That’s why tool life often differs between machines under the same cutting data. On one machine the tool cuts calmly; on the other it fails early because the rotation axis, clamping and fitting behave worse.
Where runout comes from
Most often the problem isn’t the tool itself but small details missed before startup. Runout comes from a dirty taper or seating surface, weak clamping, a worn chuck or collet, damaged arbor, or a tilt from careless installation.
A common shop situation: a new drill is put into an old chuck, the same program is run, and they expect the same result. But the chuck now holds the tool with deviation. The first holes may be acceptable, then cutting forces climb, a squeal appears, the edge darkens, and the drill must be replaced much sooner.
If a tool suddenly starts to last less, first check runout with an indicator. Then clean the taper and inspect the clamping condition. Very often the issue is there, not in the carbide grade or cutting settings.
Why coolant delivery matters more than it seems
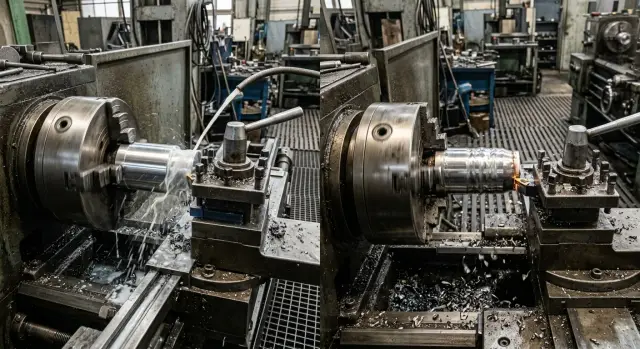
Coolant only helps when it reaches the cutting zone—the spot where the edge removes metal and where most heat is generated. If the jet hits nearby, the tool gets almost no cooling even if the pump supplies a large volume.
Because of this, two similar machines can give different results. On the first the nozzle is aimed right under the chip flow, and the insert lasts longer. On the second the stream is strong but off to the side, washing the part or the chips instead of the edge, so the cutter heats almost dry.
High flow and accurate delivery aren’t the same. In practice it’s more important to hit the right point than simply to “pour more.” Even a moderate flow does well if it consistently reaches the contact between tool and metal.
When coolant doesn’t get to the edge, temperature rises quickly. Then follows the familiar chain: built-up edge, poor surface finish, and then small chipping. In interrupted cuts this shows up especially fast. The tool may still look usable but cuts worse and starts to fall apart.
You can often tell without instruments. Near the cutting zone you see steam, chips darken or blue, a sharp smell of heating appears, instead of a steady sizzle you hear a dry sound, and built-up material forms on the edge.
A simple example: during external turning the nozzle sits a bit high and hits the top of the chips. It seems coolant is present. But the chips already cover the edge and the fluid doesn’t reach inside. If you lower the nozzle and aim the jet under the chips, tool life often grows noticeably without changing parameters.
Before changing the insert, feeds or speeds, check coolant delivery. Stop the machine, set the tool to working position and see where the stream actually lands. Sometimes one small nozzle adjustment helps more than long tuning of cutting modes.
How overhang changes cutter behavior
A few extra millimeters of overhang may seem minor, but in practice it quickly becomes a problem. The farther the cutting edge is from its support, the more the tool flexes under load. The load is the same, but the lever arm is longer, so deflection increases.
Because of that, the same cutting data on two setups gives different results. With a short overhang the cutter holds the path steadily. With a long overhang it starts to steer, tremble, heat up and lose the edge faster.
Example on one operation
Imagine turning a shaft. If the tool projects 30 mm from the holder, cutting is calm, sound is steady and the surface is clean. If you increase the overhang to 50 mm for the same part, at first only the sound changes. Then small waves appear on the surface and tool life drops sharply.
The difference is most noticeable on hard materials, interrupted cuts and finishing passes. Where a short overhang gives stable dimensions, a long one can shift diameter by several hundredths and leave ripples.
Usually the picture is simple: vibration increases, a ringing sound appears, surface finish degrades, the edge wears faster and unevenly, and dimensions start to vary from part to part.
The issue is that long overhang worsens several things at once. The cutter deflects more, then returns, and this cycle repeats many times per pass, creating vibration. It spoils the surface and strikes the insert with short impacts.
Sometimes a long tool is necessary: to reach a deep groove, bore an internal cavity or work near a shoulder. But if the part geometry allows, keep overhang to a minimum. Even 10–15 mm less often calms the cut noticeably.
A simple rule: extend the tool only as much as the part and a safe pass require. If an operation became noisy and the surface deteriorated without an obvious cause, check overhang first.
Shop example: two similar operations, different results
In one shop they turned two batches of identical shafts from the same steel. The program was nearly identical: the same cutter, same insert, similar feed and speed. On paper there was almost no difference. In practice the first machine ran the whole shift on one set of inserts, while on the second the edge wore noticeably after an hour and a half.
On the first machine the setup kept the tool overhang short. The cutter didn’t wander under load, coolant hit the cutting zone directly, chips evacuated well, sound was stable and surface finish remained clean. Wear progressed normally without edge chipping.
On the second machine the issue wasn’t the insert. There was slight play in the part clamping and runout in the tool. A deviation of just a few hundredths changes the picture: one portion of the edge cuts deeper and takes extra load. If the clamping is also softer, the cutter receives small shocks on every pass.
Coolant on the second machine also worked worse. The nozzle pointed slightly aside and cooled the chips more than the cutting point. Temperature rose, built-up edge formed, then microchipping followed. After that the tool no longer cut smoothly but started rubbing the material and wear accelerated further.
That’s why tool life can differ a lot even with the same part and the same insert. Rigidity, runout, coolant delivery and overhang work together. If the first machine has those four under control, the tool behaves predictably. If two or more of them fail on the second, tool life falls fast and the operator thinks the insert batch is weak.
In such cases look for the cause in the machine rather than the tool catalog. The difference is usually not the insert grade but how it actually operates in real clamping and in the real cutting zone.
How to find the cause step by step
When a tool lasts 200 parts on one machine and yields after 40 on another, don’t rush to twist feeds and speeds. First check the mechanics. Otherwise you’ll treat symptoms, not cause.
It’s convenient to follow a fixed order.
- Check workpiece clamping and tool seating. Play in the chuck, weak clamping, dirt under the holder or misalignment in an arbor quickly produce vibration.
- Measure runout and the actual overhang. Don’t rely solely on the setup sheet. The real overhang is often 10–20 mm greater than planned, and that’s enough to make the cutter shake.
- Watch coolant delivery during cutting, not at idle. The jet can neatly miss the cutting zone, especially on deep cuts or with an awkward holder angle.
Only after these checks does it make sense to compare cutting modes. If two CNC lathes use the same insert but one is stiffer and the other has runout, identical RPM and feed explain little. Fix the mechanics first, then tune speeds, feeds and depths.
Another useful rule is to change only one parameter at a time and record the result. Otherwise it’s easy to get confused. If you shorten overhang, tweak coolant and reduce RPM all at once and the tool lasts longer, you won’t know what actually helped.
Even a short note in a log often saves more time than arguing beside the machine. Record overhang, runout, coolant direction, cutting data and the number of parts the tool reached. This routine quickly reveals where the problem hides.
Common mistakes when hunting for the cause
When a tool lasts long on one machine but fails early on another, many immediately look for a villain. That wastes time. The cause usually lies in clamping, overhang, vibration or coolant delivery, not in the insert.
The most common mistake is blaming the insert or supplier right away. Edge chipping doesn’t automatically mean a poor insert. Often it’s the first sign that the machine, holder or parameters are uneven.
The second mistake is changing everything at once. The operator raises RPM, lowers feed and at the same time moves the coolant nozzle. After that it’s impossible to tell what affected the result. It’s much better to change a single variable and observe wear after the same number of parts.
The third mistake is leaving excessive overhang "just in case." It seems more convenient to reach the part, but extra 10–20 mm often cause vibration that shortens edge life.
Another slip is not noticing weak vibration early. It may be almost inaudible, but the tool senses it immediately: microchipping appears on the edge, surface finish degrades, and tool-life differences grow fast.
People also err when comparing two machines. You can’t fairly compare results if one machine uses one type of holder and the other a different one, if clamping differs or if overhangs aren’t equal. The same tool in those conditions works in different environments.
A simple action plan: first check workpiece and tool clamping, then measure overhang and runout, then verify where coolant actually hits, and only after that change cutting modes. This approach is almost always faster than guessing.
Pre-start checks
Tool life is often lost before the first chip forms. Five minutes of checks before start-up usually pay off more than long arguments about insert grade or RPM.
The most common small issue is dirt where you don’t expect it. If dust, abrasive oil or tiny chips remain on the taper, in the chuck or on the holder seating surfaces, the tool no longer sits as you expect. Then runout, heating and uneven wear follow.
Before starting, it helps to do a few simple things: clean the taper, holder and clamping surfaces, remove extra overhang, check coolant delivery to the cutting zone and ensure runout is within your operation tolerance. After that run a test cut. Sound should be steady and chips consistent in shape and color.
Overhang is often underestimated. If the tool sticks out 10–15 mm more than needed, it already works softer than the specification suggests. On roughing you hear a ring; on finishing you lose diameter and see early edge wear.
Coolant is also checked too formally. The pump runs and pressure exists, but the jet sometimes hits the holder or misses the cut. The edge overheats, chips don’t break well and tool life shortens noticeably.
Runout is similar: you may not spot it by eye, but one cutting edge takes too much load. If you see one-sided wear after a few parts, check seating and clamping before changing cutting data.
If a trial cut sounds steady, chips run smoothly and the tool doesn’t heat too quickly, you’ve got a good start. This simple check often separates a stable run from early tool change.
What to do next
If tool life repeatedly differs without a clear reason, don’t swap inserts at random or lower speeds blindly. First collect facts for each operation. Memory fails in such cases, and a short log usually shows where the discrepancy begins.
For each part it helps to record material, machine, chuck, holder, tool, overhang, cutting data, coolant delivery, batch size, when wear began and how it looked. That’s enough to spot repeating patterns.
Then look at the whole system, not a single component. The same insert can cut fine on a rigid machine with short overhang and fail quickly on another with slight runout, weaker clamping or worse coolant. Individually those deviations seem small; together they easily cut tool life in half.
If a problem repeats on a group of parts, compare two operations pairwise. Don’t say generally "this machine is worse," but check concrete things: where is overhang longer, where is the holder weaker, where does coolant miss, where does the spindle run steadier. That analysis is usually more useful than arguing about insert brand.
When choosing new equipment, look broader than power alone. In real metalworking, rigidity of assemblies, spindle condition and clamping quality and proper coolant delivery often affect tool life and cost per part more than horsepower. For series production these factors quickly show in expenses.
If you need help matching a machine to material, part type and production volume, you can contact EAST CNC. The company supplies CNC lathes and machining centers and helps with selection, commissioning and service. This approach is useful when you need not just equipment purchase but stable tool performance in a real shop.
FAQ
Why does the same insert last different amounts of time on two machines?
Because it’s not only the insert cutting the metal, but the whole system: the machine, workpiece clamping, toolholder, spindle, coolant delivery and tool overhang. If there’s play, runout or poor coolant supply, the edge gets extra heat and shocks. Most often the differences come from rigidity, runout, coolant targeting and excessive overhang. So check the machine and tooling first before blaming the insert.
What should I check first if a tool suddenly lasts shorter?
Start with the mechanics. Check the workpiece clamping, tool seating, cleanliness of the taper and the actual overhang. Then measure runout and see where the coolant hits during cutting. If you immediately change speeds and feeds, you may hide the cause instead of fixing it. Remove play, dirt and misalignment first.
How do I tell if there’s insufficient rigidity?
Usually you lack rigidity when the machine sounds brighter or louder than usual and the workpiece surface shows ripples. Dimension tends to drift from part to part. On the insert you’ll often see premature edge chipping. That’s a common sign of impact loading rather than a poor substrate.
Why is a small amount of runout dangerous?
Even small runout eats tool life quickly. One area of the edge removes more material, overheats and dulls earlier than the rest. Measure runout with an indicator rather than by eye. Often the cause is a dirty taper, a worn chuck or collet, or a tilted mounting.
How can I quickly tell if coolant is missing the cutting zone?
Watch the cutting zone during operation, not just at idle. If the coolant stream misses the cutting point and you see steam near the edge, darkening or bluish chips, the coolant is bypassing the edge. Try shifting the nozzle slightly under the chips toward the contact point. Often that alone extends insert life noticeably without changing cutting parameters.
Is an extra couple of centimeters of overhang really harmful?
It matters a lot. The farther the cutting edge is from its support, the more the tool will flex under load. That extra lever increases deflection and encourages vibration. Sometimes an extra 10–15 mm of overhang already worsens sound, surface finish and tool life. Keep overhang to the minimum required by the part geometry and safe clearance.
Should I immediately change speed and feed if the edge chips?
No — don’t change speeds and feeds right away. First sort out clamping, overhang, runout and coolant. Only after the mechanical issues are fixed does it make sense to tune cutting parameters. If the machine vibrates or the tool runs with runout, changing feeds won’t solve the problem long-term — it only delays failure.
How to properly compare two machines for tool life?
Compare more than the program and the insert. Look at the toolholder type, overhang length, workpiece clamping, runout, chuck condition and coolant delivery. If these conditions differ, results will differ too. Drawing conclusions about the insert alone will be wrong in that case.
What is best to check before starting a production run?
Clean the taper, holder and clamping surfaces. Reduce unnecessary overhang, check workpiece clamping and ensure the coolant stream reaches the cutting zone. Then make a trial cut and listen. A steady sound and stable chips are a good start.
When should I look for the problem in the machine rather than the insert?
When the same problem repeats on one machine despite normal inserts and similar settings, look for the cause in the machine or tooling. Common culprits are play, a worn chuck, weak clamping or an unstable spindle. When choosing equipment, look beyond power: rigidity of components, spindle accuracy and reliable coolant delivery often have a bigger impact on tool life and cost per part.