Tool cabinet at the machine without chaos and searching
A tool cabinet at the machine should save time, not consume it. A simple storage scheme for holders, inserts and measuring tools that avoids confusion.
Where minutes are lost
Minutes rarely disappear because of one big mistake. More often they slip away bit by bit, many times during a shift. At a CNC turning station, the operator doesn’t lose time on the setup itself but on searching for items that should be within reach.
The scene is usually the same. The needed tool holder isn’t in its place. The operator opens one drawer, then a second, then checks the shelf next to the machine. After that they ask a colleague if they borrowed it for the next station. This search takes only a couple of minutes, but it repeats several times per shift.
The story with inserts is similar. When inserts are mixed with screws, hex keys and other small parts, mistakes are almost inevitable. Small boxes get covered, labels get obscured, and similar packaging is easy to confuse. In the end the operator takes the wrong size or geometry, notices it at the machine and goes back to the cabinet again.
Measuring tools are even worse. A micrometer, bore gauge or indicator is often placed wherever there's space left. If heavy tooling is later stored on top, the instrument is not only harder to find. It can be knocked, lose its setting or get dirty with chips and coolant.
So the same scenario repeats shift after shift. A new worker looks where the previous one looked yesterday. A senior operator remembers that it was "somewhere here," but that’s one person’s memory, not an understandable order. Such a cabinet works only as long as the person who arranged it stands nearby.
At one turning station this looks ordinary. You need to change a tool, check a size, grab a new insert. Instead of three short actions you get a chain of extra movements: open, move, peek, ask again, return. From the outside the loss seems small. In reality it disrupts the whole shift rhythm and annoys people more than the setup itself.
What should stay at the machine
The cabinet next to the machine is for quick access, not for storing everything. If the operator opens the door and sees a dozen equally useful boxes, they don’t work — they choose and search.
Only keep at the machine what is used every day or almost every shift. Usually this is the frequent tool holders, the most common arbors, the current set of inserts, the necessary screws and hex keys, and the measuring tools that are truly needed at that station.
The principle is simple:
- keep at the machine only what is used today;
- store roughly one shift’s worth of reserve;
- rare tooling goes to the shared inventory;
- personal items don’t belong in the tool cabinet.
A week’s stock seems convenient at first. Then boxes pile up, batches mix, and the needed insert hides under something not needed yet. One shift’s reserve is usually enough: the operator doesn’t run for every small part, but the cabinet doesn’t turn into a storage room.
Rare tooling is better moved immediately to a common storage place. If a holder is needed once a month, it doesn’t belong at a specific machine. The same applies to spare chucks, nonstandard arbors, old inserts “for later” and random unlabeled screws. As soon as such items sit next to the everyday tooling, order quickly falls apart.
A separate problem is papers and personal items. Gloves, a mug, a charger, old job sheets, insert packaging and crumpled wipes take space from things that should be within reach. For papers, make one pocket or folder outside the cabinet. For personal items use the employee’s locker.
The rule at a turning station is simple: everything needed for current parts and the next shift stays in place. Everything else is removed right after setup or at the end of the batch.
How to divide the cabinet into zones
Don’t divide the cabinet by “how it fits,” but by two clear criteria: how often an item is picked up and how heavy it is. That way the operator doesn’t reach up for heavy tooling or rummage at the bottom for a gauge or key.
Top shelves are better for light, clean tools. It’s convenient to keep boxes of new inserts, gauges in cases and other items that don’t like chips and dirt. If an item is needed rarely but is light, the top zone suits it as well.
The middle tier and middle drawers are the most convenient. Put the items used most often here: tool holders, arbors and the everyday tooling for current operations. This is the hand level, so items here should be reachable without extra bending or shifting.
Small parts shouldn’t be kept loose. Inserts, screws, clamps, hex keys and spare fasteners are easier to manage in trays or small containers with clear labels. Indicate size, type and where it’s used. When every small part has its place, the needed item is found in seconds.
The lower tier is suitable for heavy tooling. Chucks, massive arbors, adapter pieces and anything noticeably heavy are safer to store low. There’s less risk of dropping something, and keeping order is easier.
If the cabinet is already overfilled, don’t try to perfectly sort everything at once. First free up the middle zone for daily-use items. Then it becomes clear what should move up, what should go down, and what doesn’t belong at the machine at all.
How to tidy up without fuss
Mess rarely appears in one day. Usually the cabinet fills gradually: one holder placed “temporarily,” a box of inserts left without a place, an old micrometer not written off. So it’s better to tidy following a simple scheme.
First completely empty the cabinet. Don’t shuffle items from shelf to shelf. Take everything out and lay it on a table or a clean cart so the full set is visible. Otherwise the old chaos simply moves into new drawers.
Then immediately remove what interferes with work:
- broken tools, empty boxes and worn small items that can no longer be used;
- random things that don’t belong at the machine: other people’s keys, old papers, “just-in-case” fasteners;
- extra duplicates. If there are three identical holders and only one spare is needed per shift, move the rest to the shared cabinet;
- rare items needed monthly, not daily.
After that, group what remains according to how the operator actually works. Holders for external turning separate from boring arbors, separate tooling for grooving and threading, etc. Within each group add a second criterion: size, fit or insert type. Then the operator searches by two simple cues instead of rifling through the whole drawer.
Next put everything back into the cabinet according to the new scheme. A common mistake at this stage is arranging neatly but not labeling. In a week that order disappears. Labels should be short and clear: group name, size range, sometimes quantity. If a slot is empty, it should be obvious immediately.
A simple working principle works well: items used every day are placed at hand level; reserves and rare items go above or below. The first time usually takes about an hour. After that the operator won’t waste 3–5 minutes on each search or grab the first tool they find.
How to arrange tool holders and arbors
Most time is lost not searching, but in hesitation. Is this holder for finishing, grooving or boring? So it’s better to divide tooling by operation, not by shelf size. When everything is arranged by purpose, the needed item is found almost instantly.
A basic scheme can be very simple:
- external turning;
- boring;
- grooving and threading;
- drilling and axial tools;
- arbors and adapter pieces.
This order is easy for even a new worker to understand. There’s no need to check every holder’s marking.
How to sort within a group
After dividing by operation, arrange holders by cross-section. For example: 12x12, then 16x16, 20x20 and larger. If there are several identical sizes, place them side by side by insert type or fit. That way it’s clear how one holder differs from another and installation mistakes become less frequent.
The same approach works for arbors. First separate them by mount and shank, then by diameter and length. Keep short and most-used arbors at the front, long and rare ones further back or higher. If an arbor is needed once a month, it doesn’t belong at hand level.
Frequent items should sit where the hand reaches first — usually middle shelves and the front part of the cell. Typical turning holders, common boring holders and main arbors shouldn’t be stored in the bottom where you must bend, or on the top where you must reach up.
It’s useful to leave some free space in each group — about 10–20%. This reserve prevents new chaos after a shift. When a tool has its own free slot to return to, it goes back. When there’s no space, it’s left “temporarily,” and the cabinet starts to spread out.
On a typical turning station it looks simple: tool holders for external turning on the left by size, boring arbors next, grooving and threading below, and separate arbors for standard mounts. For similar series of parts this scheme noticeably reduces changeover time.
How to store inserts, screws and small parts
Chaos usually starts not with holders but with small boxes and loose screws. Even a neat cabinet quickly loses meaning if similar inserts from different brands are in one cell and the right wrench must be hunted around the station.
Keep inserts in factory boxes. Don’t pour them into a common organizer and mix brands, even if shape and size match. Two boxes can look almost identical from the outside but behave differently in work: one grade holds the edge longer, another suits different material, a third produces a different chip break.
If a box has been opened, mark the start date on it with a marker on the lid. This makes it easier to see which inserts are used up quickly and which sit for months.
The rule for screws and keys is also simple: keep only the fasteners and the key that fit the inserts nearby. A common cup of all shop screws almost always becomes a trap. Minutes are lost and threads can be damaged when someone tries a similar but wrong fastener.
It’s convenient to separate small parts like this: closed boxes in one zone, opened ones separately, nearly empty packages in their own tray. Keep the screw and key next to the corresponding insert box, not separately where you’ll have to search.
A tray for nearly empty packages works well in daily use. It’s not for mixing leftovers but for quick inventory. The operator immediately sees when to reorder and can finish the opened box before opening a new one.
A good sign is simple: a new worker opens the cabinet and in 10 seconds understands where the working inserts, leftovers and needed screw are. If that’s not clear without instruction, simplify the storage scheme.
Where to keep measuring tools
A micrometer and caliper quickly lose accuracy if stored where chips and coolant land. Even a good instrument begins to give wrong readings when dirt gets on the jaws or the anvil. So measuring tools should not be kept on the machine bed, on a shelf next to the chuck, or in an open tray.
If there is a tool cabinet at the station, the upper clean drawer is best reserved only for measuring tools. It’s the calmest spot: less debris gets in and the needed instrument is visible right away. It’s even better when that drawer contains only items used for measuring, not random small parts mixed together.
Keep a clean wipe near a micrometer and caliper. It’s not for photos but for work. One quick wipe before and one after measuring often prevents false readings and scratches on the instrument. If the wipe becomes wet or dirty, replace it immediately.
There’s a simple rule: return each instrument to the same place after use. Not to the nearest free shelf, not on the drawer lid, and not “I’ll put it here for now.” If the place is fixed and always free, the instrument won’t get lost or knocked against other tooling.
It’s good when each instrument has its own cell or at least a clear outline in the drawer. That way you instantly see what was taken and what wasn’t returned. This is especially useful where several people work at the same station.
What a working layout at one station looks like
A cabinet at one turning station shouldn’t store everything that might be useful someday. Its task is simpler: let the operator pick up what’s needed in a few seconds and return it just as quickly.
Usually 6–8 frequent tool holders are enough for a station — the ones really used daily or for the current series. For most operations that’s sufficient. When the number of holders grows too large, the hand starts searching, shifting and hesitating.
Next to them keep only 2–3 grades of inserts for the parts currently in work. Not ten boxes “just in case,” but the set the operator will use in the next shift. That way it’s easier to track remainder and confusion between similar packages almost never happens.
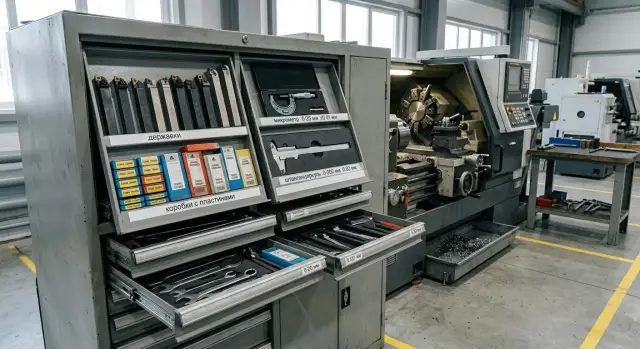
A working layout can be like this: measuring tools in the top clean drawer, tool holders and arbors in the middle by operation, a separate tray nearby with the wrench, screws and the gauge, and heavy or rare tooling in the bottom that still must stay at the machine.
A separate tray for small parts simplifies work a lot. Wrenches, spare screws and the gauge get lost not because there are few, but because they’re placed in a different spot every time. One fixed tray solves this problem almost immediately.
Spare tooling is better removed from the station to the shared cabinet. If extra holders, old inserts, rare arbors and random fasteners lie at the station, order doesn’t hold more than a few days. Keep a working minimum by the machine, and store reserves separately with labels.
In practice a well-arranged station looks calm: the operator opens one drawer, takes a holder, grabs the correct insert from the adjacent zone, takes the wrench and gauge from the tray. No hunting through three shelves and no boxes blocking the drawer.
Mistakes that quickly bring back chaos
Chaos starts with small things. A new holder is put in the first empty drawer, a box of inserts is left nearby “for later,” a micrometer shoved where screws already lie. In a week the cabinet seems full but finding what you need is hard.
The first mistake is simple: treating any free space as the correct place. That’s not how order holds. If new tooling is always placed in random drawers, the cabinet stops working as a system.
The second mistake is related to inserts. Old, partially used or questionable boxes often remain unlabeled. Then nobody knows if it’s a usable leftover, scrap or an obsolete series. People grab the first box and waste time checking. Don’t complicate: good leftovers separate, scrap separate, unknown items don’t stay.
The third mistake is mixing items of different purpose in one drawer. Measuring tools, fasteners and cutting tools shouldn’t be in the same place even if it seems faster. They catch on each other, get oily and get lost.
Another frequent problem is stocking the cabinet a month ahead. Extra insert boxes, duplicate holders and rare arbors take the best hand-level spots. Everyday items move higher or lower, and unnecessary movements and temporary relocations begin.
If the cabinet is overfilled, order won’t last. So the rule is simple: keep only a short shift reserve and the frequent positions at the machine. Send everything else to the central store or a separate cabinet.
Quick check
You can tell if the layout works in a couple of minutes. Ask any operator to pick one holder, one box of inserts and the needed measuring tool. If each item is found in about 10 seconds, the scheme is fine. If they open three drawers in a row and start searching by memory, the storage needs redesigning.
It’s useful to judge by speed, not neat appearance. A tidy cabinet isn’t always convenient. Good order saves time in a normal shift when you need to change an insert, check a size and return to the part quickly.
There’s a second test. At the end of the week remove everything from the cabinet that nobody touched in the last few shifts. Usually it will be arbors for rare operations, old screws, empty boxes and stock kept out of habit. Keep at the machine only what’s used regularly.
To keep order from disappearing after three days, fix the storage scheme. The simplest option is labels on locations and a short layout diagram on the inside of the cabinet door. Then a new shift won’t rearrange tools by habit but will return them to where they belong.
After a month review the scheme based on how it worked. By then you’ll see which spots were chosen well and which only get in the way. For example, a micrometer used ten times a shift may be too far, while a rare arbor uses the best drawer.
If you’re setting up a new cell or selecting machines for specific tasks, plan tool storage together with the workstation. EAST CNC, the exclusive official representative of Taizhou Eastern CNC Technology Co., Ltd. in Kazakhstan, helps with machine selection, commissioning and service. So it’s convenient to solve the workstation organization right away, rather than after small time losses become a habit.
FAQ
How much tooling should be kept right at the machine?
Keep at the station only what’s needed for the current parts and the next shift. Usually that’s enough: a few frequently used tool holders, working inserts, the necessary screws and hex keys, and the measuring tools actually used at this machine.
Where should rare tool holders and arbors go?
Put it in a shared cabinet or a separate storage location. If a holder or arbor is needed once a month, it just takes up space next to the items used every day.
What is the simplest way to divide the cabinet into zones?
Give the top to light, clean tools; the middle to items used most often; the bottom to heavy tooling. This layout reduces unnecessary bending and reaching and helps find things faster.
How should tool holders be stored to avoid confusion during setup?
Sort them by machining operation, then within each group by size and fit. That way the operator goes straight to the right area instead of rummaging through the whole drawer.
How should inserts be stored correctly?
Keep inserts in their factory boxes and don’t mix similar brands. Store opened boxes separately from closed ones, and put nearly empty packages in a dedicated tray so you can see the remaining quantity at a glance.
Where to keep screws, keys and other small parts?
Keep next to the inserts only the screws and the key that fit them. Dumping all shop screws into one container turns into a trap: people spend time finding the right fastener and may damage threads by using a similar but wrong screw.
Where is best to keep a micrometer and caliper?
Place them in the top clean drawer or in a separate clean cell. Don’t leave micrometers and calipers where chips and coolant fly — the instruments will quickly give wrong readings.
Should drawers and cells be labeled?
Labels should be short and clear: group, size or type, sometimes the number of slots. If someone can’t tell what’s in a cell without a hint, the labeling needs to be simplified.
How to quickly tell if the cabinet is organized correctly?
Ask any operator to find a tool holder, a box of inserts and a measuring tool. If each item is located in about 10 seconds, the layout works. If they open several drawers and start searching by memory, the storage needs to be redesigned.
What usually brings chaos back fastest?
Chaos usually returns because random items are put in the cabinet, month-long stock piles are kept there, or people place tools in the first free spot. Lack of labels and fixed places is another common reason.