Thin Face Shoulder Without Burrs: How to Choose the Pass
A thin face shoulder without burrs requires the right turning direction, feed, and tool exit so you can eliminate manual finishing and avoid assembly problems.
Where the problem appears
A thin face shoulder is a narrow step on the face of a part, where one diameter transitions into another. On the drawing, it often looks like a small detail: half a millimeter, a millimeter, sometimes even less. On the machine, this area behaves very differently, because metal right at the edge easily stretches and forms a burr.
When you need a thin face shoulder without burrs, the trouble usually does not appear across the whole part, but exactly at the contact point during assembly. The part may look clean, the size may be within tolerance, and the surface may be fine. But a tiny burr on the face works like a thin shim and keeps the part from seating fully.
Because of that, very ordinary assemblies suffer:
- a bushing that must seat tightly against the face of the mating surface
- a shaft or axle where the stop edge sets the exact part position
- a fitting, nut, or ring where the face is responsible for a tight clamp
- parts for cars, construction equipment, and pump assemblies, where an extra edge immediately gets in the way of assembly
The problem shows up where the assembler cannot simply force the part into place without risking misalignment. The edge interferes with seating, changes the axial position, leaves a gap, or scratches the mating surface. Sometimes the defect is not visible to the eye, but it already affects runout, clamping, or repeatability during assembly.
The worst part is that this kind of burr is rarely caught by size alone. A caliper will show the part is fine, but the assembly still goes together too tightly. Then manual finishing after turning starts: the operator takes an abrasive stone, a knife, or sandpaper, removes the edge, and checks the fit again. On one part, that seems minor. On a batch of 100, it is already an extra hour or more.
On CNC lathes, this pattern is often seen on parts with a narrow stop face, where the edge immediately affects assembly. That is why the problem should be noticed not after the assembly station, but when the first part comes off the finishing pass. If the assembler asks to "just take the edge off" on almost every second part, the time is already going not into cutting, but into correction.
Why the burr grows on this edge
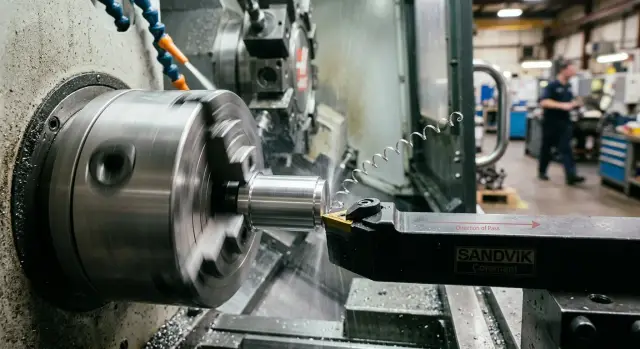
A burr on a thin face shoulder most often grows at the very end of the pass. While the tool is cutting with support, the metal holds its shape. But at the exit, that support disappears, and the tool no longer shears off the last layer cleanly. It pulls the thin edge along, the edge bends, and tears. Instead of a straight face, you get a crushed edge.
On a thin wall, this is even more obvious. The closer the tool gets to the shoulder, the less load the section can carry. The tool pushes, the wall gives way slightly, and the chip thickness changes right away. At one moment the tool is cutting deeper; at the next it is rubbing more than cutting. That is why the edge comes out uneven, even if the settings before that area looked normal.
Extra stock makes the problem worse. If too much metal was left for the finishing pass, pressure on the thin section rises. The wall flexes more, and in the last millimeters the metal does not shear off smoothly; it tears away. On the part, it looks familiar: the face is clean, but a thin burr hangs on the edge and later has to be removed by hand.
Chip flow also ruins the result. A long chip can catch the finished face and rub the very edge. If the machine, the tool, or the part vibrates even a little, the edge starts to crush instead of cut. You can usually tell by these signs:
- the edge shines, as if it was burnished;
- the burr is uneven around the circumference;
- one section is sharp, the next is already curled over;
- after removing the part, the edge catches on a fingernail.
If you need a thin face shoulder without burrs, a sharp tool alone is not enough. The turning feed direction changes where the tool leaves the metal and when the thin edge is left without support. So the burr is caused not by one thing, but by a combination of four: the tool exit, extra stock, wall deflection, and chip behavior right at the edge.
What to check before changing direction
If a burr remains on the part, it is tempting to simply reverse the pass and see whether it improves. But on a thin face shoulder, that does not always work. Sometimes the problem is not the tool path, but the fact that the edge is too weak, the stock varies, and the tool is pushing harder than it is cutting.
First, find the exact edge that keeps the part from assembling properly. Not every burr matters in use. For example, if a bushing must seat in a housing without misalignment, even a small lip on the outer edge of the face shoulder can cause a tight fit or axial shift.
Before changing direction, it helps to check four things:
- where the working edge is that stops against the mating part;
- how much stock is actually left on the face after the previous pass;
- whether the tool nose radius matches the shoulder width;
- whether the clamp is holding the part rigidly and whether coolant reaches the cutting zone.
Stock is often misjudged. The drawing may show one value, but in reality the roughing pass leaves an uneven layer on the face. Then during finishing, the tool cuts normally in one area and crushes the metal in another. That is exactly how a burr on the part edge grows. It is better to measure the face in several places instead of trusting one dimension.
Then look at the shoulder itself. If its width is, for example, 0.4 mm, and the tool nose radius is 0.8 mm, the tool cannot form the geometry cleanly. It will start rubbing the adjacent surface and pulling metal toward the edge. In that case, changing the turning feed direction is pointless at first: you need a more suitable insert.
Rigidity also matters a lot. Weak clamping, a long overhang of the part or tool, intermittent coolant flow, and the thin edge immediately becomes difficult to control. On the machine, you can see it with a simple sign: the size still holds, but the edge is already torn. That means the cause is not only the tool path.
If these checks are in order, then it makes sense to change the finishing pass on the face and see which exit leaves a cleaner edge. Otherwise, manual finishing after turning will simply move from one side of the shoulder to the other.
How to choose the pass direction
On a thin shoulder, the burr most often grows where the tool leaves the metal. So first look not at program convenience, but at which edge will later take part in assembly. If one side of the shoulder presses against another part, it is better to make that edge the tool entry side, not the exit side.
In practice, this is simple. You identify two edges: the working one and the free one. The working edge should stay cleaner, and the tool exit is better moved to the side where a small leftover does not matter or will be removed in the next operation.
For the topic of "a thin face shoulder without burrs," this usually helps more than trying to change the insert, feed, and speed all at once. First change the logic of the pass, then adjust the settings.
The safest approach is not to argue at the machine, but to test both options on two identical parts. On the first part, make the finishing pass in one direction; on the second, in the opposite direction. Keep the same settings, tool, and tool overhang, otherwise the comparison loses meaning.
After that test, look at more than the size. The same shoulder can be within tolerance in both cases, but the edge will behave differently during assembly. Under a magnifier, it is obvious right away: one option has a smooth edge, the other has a thin fringe that the operator later removes by hand.
Another common mistake is to do the finishing pass without proper stock allowance. If the finishing tool has to remove too much metal, it pulls the edge and tears it on exit. It is better to leave a small, stable allowance so the finishing pass only removes the remainder and does not correct geometry after roughing.
Usually this scheme is enough:
- choose the edge that affects assembly;
- set it as the tool entry side;
- leave a small allowance for finishing;
- compare two directions on a pair of identical parts;
- check the edge under a magnifier, not only by size.
If the burr moves away from the working edge after changing direction, you have already removed unnecessary manual finishing. That is a good result even if the cutting settings stayed the same.
How to set up the finishing pass step by step
If you need a thin face shoulder without burrs, do not try to solve everything with one tool path. Roughing and finishing are better kept separate. Roughing removes the main stock, and finishing forms the edge where manual finishing most often appears.
In practice, problems often start with something small: the operator keeps the same feed, the same tool exit, and expects a clean edge. On a face, that rarely works. The tool either pulls a thin burr or crushes the edge at the very end of the stroke.
Setup order
-
First, leave stock for the finishing pass. A small, even layer is usually enough so the tool is cutting metal, not rubbing on an almost finished surface. If there is no allowance, the edge comes out unstable.
-
Run the roughing pass in a mode that is comfortable for material removal. Do not lower the feed too early. A roughing pass that is too soft often only heats the part and damages the edge before finishing.
-
On the finishing pass, reduce the feed only on the final cut. That gives a calmer cut and forms the face more cleanly. Do not change all the settings at once: then it is harder to tell what actually removed the burr on the part edge.
-
Give the tool a short and clear exit. Do not drag it far after forming the shoulder. The longer the unnecessary exit, the higher the chance that the tool will raise a burr at the end or leave a mark on the face. A short, repeatable motion usually works better.
-
After a successful result, write the setup into the operation sheet. You need four things: finishing direction, stock before finishing, finishing feed, and the tool exit point. Without that note, a good result lasts only until the next shift.
A good sign of a proper setup is this: the operator gets the same edge on the first and tenth part, and manual finishing after turning is not needed. If the first parts are clean but later the edge starts to fray, look not for a new direction, but for tool wear or a change in the actual feed.
For a simple check, one part from a normal batch is enough. Make two finishing passes with the same stock, but a different feed only on the final cut, and compare the edge under a magnifier. That test takes a few minutes and quickly settles the settings debate.
Example from a real assembly
A good example is a shaft for a construction equipment assembly, where there is a thin face shoulder about 0.8 mm wide before the bushing is installed. On the drawing, everything looks simple: the diameter must hold, the face must be clean, and the edge must not interfere with assembly. On the machine, the part looked fine, but on assembly it became clear right away that there was a problem.
The diameter measured within tolerance. The shoulder length was also fine. But the edge caught on the bushing during installation, and the assembler felt it immediately: the part did not go in smoothly, but with a slight stop right at the beginning.
Usually at that point people suspect insert wear, vibration, or too much stock for finishing. Here the cause was simpler. The tool exited the metal right on the edge that later mattered in assembly, and left a very thin burr.
From the outside, it was almost invisible. You could feel it with your finger, but not with an instrument. Because of that, the fitter removed the edge by hand with a fine abrasive after every part so the bushing would seat without sticking.
When the finishing pass was reversed, the picture changed. The tool was guided so that it entered the cut from the side of that edge and exited on the safe side of the shoulder. The cutting settings were not changed, the insert was not changed, and the feed stayed the same.
After re-machining, the diameter, length, and runout were checked again. The size stayed the same. But the edge stopped catching the mating part, and the bushing went into place without extra force.
The best part was that the problem disappeared without new tooling and without a long re-setup. Only the direction of the finishing pass changed. For the shop, that gave a clear result: the fitter no longer had to remove the edge by hand, and assembly became smoother and faster.
On parts with a thin face shoulder, this happens often. If the size is correct but the edge still gets in the way, it is worth checking not only the numbers on the inspection sheet, but also the tool exit path from the metal.
Mistakes that bring manual finishing back
Even if you get a clean edge once, it is easy to spoil the result on the next part. On a thin shoulder, small details decide everything: where the tool goes, how much metal it removes, and what condition its tip is in.
A common mistake is changing the feed and the pass direction at the same time. After that, it is no longer clear what removed the burr and what, on the contrary, brought it back. If you are testing a new turning feed direction, keep the feed, depth, and tool overhang the same for at least 3 to 5 parts.
The second mistake is removing all the stock in one finishing pass. On an ordinary face, that sometimes works, but a thin face shoulder without burrs is rarely achieved that way. When the tool takes too much, the metal stretches more at the exit, and a thin but hard burr appears again.
It is better to leave a small, even allowance for the final pass. Then the tool cuts instead of crushing the edge. Often, manual finishing after turning disappears on its own after such a simple step.
Another miss is using too large a nose radius. On paper, it gives a smoother track, but on a narrow shoulder it often presses on the edge more than needed. As a result, the face looks nice, but the part edge catches a finger and gets in the way of assembly.
This is easy to see on a simple part with a stop face. The first part assembled without problems, the operator changed nothing, but then switched to a tool with a larger radius "for better finish." The size stayed within tolerance, but the burr on the part edge made them reach for the abrasive stone again.
The most expensive mistake is trusting the first good part and not checking tool wear. After 10 to 20 parts, the edge cuts differently. The pass direction stayed the same, but the exit from the metal became rougher, and the shoulder again needs hand correction.
It helps to keep a short checklist:
- do not change two parameters at once;
- do not leave all the stock for one finishing pass;
- do not use a large nose radius without testing on the edge;
- check the condition of the tool after the first stable run.
If the burr comes back, do not rush to add finishing to the route. First return to the last working pass setup and compare two or three parts in a row. Usually the cause shows up faster than expected.
Quick checks at the machine
If you need a thin face shoulder without burrs, do not wait for final inspection. The operator can understand the result right after finishing, while the part is still in process. It takes less than a minute, and later there is no need to bring manual finishing back into the process.
The simplest check is to run a fingernail across the edge. Not along it, but across the edge itself. If the nail catches, a burr is still there, even if it is almost invisible to the eye. It is a rough method, but on the shop floor it is more honest than many quick looks under a lamp.
The part should not be checked with chips still on it or under an oil film. After machining, a small burr often hides under coolant and only shows up after washing. So it is useful to wash one part from the batch right away and inspect the edge clean. Often that is when you can tell whether the new turning feed direction helped or whether the problem just became less visible.
In a production run, do not trust only the first good part. Compare the first and the tenth. If the edge on the tenth is worse, the cause is usually not the program, but small things: the tool has settled, material has built up, the coolant feed has changed, or a different bar stock batch has started. For assembly, that is an unpleasant situation: at first everything looks normal, then the burr on the part edge starts interfering with the fit again.
It is useful to keep a short note right at the machine:
- on which part the nail catch appeared
- from which side the burr grew
- after which tool it happened
- whether the problem is visible after washing
These notes quickly show a pattern. If the burr keeps returning in the same place every time, the cause is almost always stable, not random. Then it is easier to adjust one parameter or change the finishing pass side on the face than to argue with inspection and later remove the edge by hand.
Another practical guide is not to look for perfection under magnification, but to check what affects assembly. If the edge does not catch a nail, does not leave a mark on the mating part, and does not change from the first part to the tenth, the process is already under control. For production work, that is usually enough.
What to do next
Do not leave a good result "in the setter's memory." If you found a pass that consistently produces a thin face shoulder without burrs, lock it into a short procedure right away. Otherwise, in a week or after a tool change, manual finishing will come back.
The procedure should include only what truly affects the edge:
- material and hardness of the blank
- shoulder size and edge tolerance
- finishing pass direction
- feed, speed, and stock for finishing
- insert grade, nose radius, and tool condition
That is usually enough to repeat the result without guessing. A photo of the edge after machining is also useful: one good photo often saves more time than a long note in a log.
The next step is a trial run without manual finishing. Do not draw conclusions from 2 or 3 parts. It is better to run a small batch where tool wear, heating, and blank variation can be seen. For many shops, a run of 20 to 50 parts is enough. If the edge stays clean on the last parts, the setup is holding not only at the start of the shift.
Then check the parts not only at the machine, but in real assembly. Sometimes the edge looks fine under a magnifier, but during installation the part catches a neighboring element, goes in crooked, or leaves a mark on the seal. If assembly goes through without trimming, grinding, or extra abrasive contact, that is already a working result.
If the problem remains even after changing the pass direction, the cause is often wider than one setting. Sometimes low rigidity, unsuitable insert geometry, blank runout, or the machine itself not giving the needed repeatability is the real issue. In that case, it is better to analyze the whole job instead of adding yet another manual operation.
If you need help selecting a machine, fixtures, and a process start-up for these parts, you can discuss the task with EAST CNC. The company works with CNC lathes and helps through the whole cycle: from choosing a solution to start-up and service. For an edge that affects assembly, that is often faster and cheaper than living with manual finishing for months.