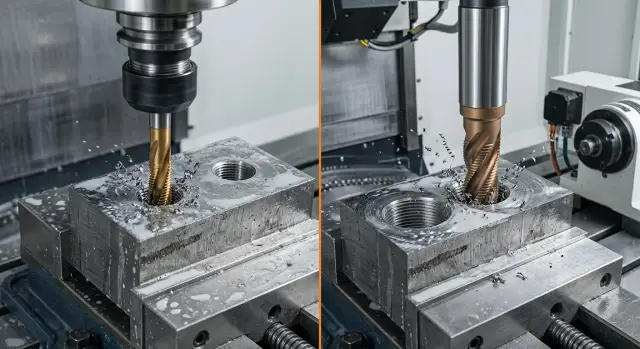
Tapping or Thread Milling on a CNC: How to Choose
Tapping vs thread milling: compare breakage risk, cycle time and thread quality for small batches and series on a CNC machine.
Why the choice is debated
On a drawing a thread looks simple: size, pitch, tolerance. But in machining the same thread can behave very differently. The debate usually isn’t about the profile, but about risk, cost of mistakes and how the part behaves in a run.
A tap and a thread mill remove material differently. A tap forms the profile all at once, so the cycle is often shorter. But it depends more on material, chips and precise hole preparation. Thread milling removes material gradually; the cutting is gentler and the chance of sudden breakage is usually lower. On paper the result can be the same, but the process margin differs.
The part material quickly changes the choice. In aluminium and soft steels a tap often runs calmly and fast. In stainless steel, ductile alloys and tougher materials the load increases, chips evacuate worse, and a mistake costs more. If a broken tap stays in the part, the losses are often worse than a few extra seconds per cycle.
Hole depth also matters. In a short through hole a tap often performs better. In a deep or blind hole chip evacuation, bottom margin and the risk of jamming come to the fore. So the same M10 thread on two different parts may need different approaches.
Batch size adds another factor. For small batches the shop values flexibility: it’s easier to tweak a program, adapt to another material or change sizes. In series production people pick the method that delivers consistent results over dozens or hundreds of parts.
So the question “tap or thread mill” is rarely decided in isolation. It’s important to understand which method will produce fewer rejects for your part, in your material and at your volume.
Where a tap is simpler and faster
A tap usually wins on time when it’s a standard thread in a regular hole. If the size is typical, the material familiar and the program already proven, the cycle is short and predictable. For series this is often the most direct option.
Tapping is especially convenient in through holes. Chips have somewhere to go, the tool can follow the profile more easily, and the operator can keep the process under control. On parts with dozens of identical holes the time difference quickly adds up.
A good example is an M8 thread in a through hole in medium-hard steel. If the drill yields an accurate diameter and the machine keeps alignment, a tap usually makes that thread faster than a mill. On batches of 50–100 parts this already gives noticeable time savings.
But that speed has a condition: taps like accurate preparation. If the hole is even slightly undersized, the load rises sharply. The tool starts cutting harder, heats up and can break with little warning.
Taps also tolerate misalignment poorly. If the spindle, chuck or the hole itself is off, the thread immediately goes under extra stress. The same happens when chips don’t evacuate properly, especially in ductile materials and blind holes.
Tapping is usually better when conditions are predictable:
- standard pitch and common size;
- through hole;
- stable material without sudden hardness changes;
- precise drilled diameter;
- repeating series with an already tuned process.
If the part is simple, the hole prepared correctly and chips leave freely, a tap delivers a quick result without extra actions. But once preparation starts to “drift”, the margin for error ends fast.
Where a thread mill gives more margin
A thread mill often wins where the cost of a mistake is high. If a tap breaks in a hole, the part is sometimes unsalvageable: the broken piece sits tight, removing it is difficult and the walls are easily damaged. With thread milling the risk to the blank is lower. Even if the tool breaks, it usually doesn’t lock the hole so tightly, and the chance to save the part is noticeably higher.
This matters especially for expensive blanks. When a part has already passed many operations, no one wants to lose it at the last step because of one thread. That's why mills are often chosen for stainless steel, ductile alloys and parts where a scrap is costly.
Another plus is diameter flexibility. If the pitch is the same, one thread mill can often produce several nearby diameters just by changing the toolpath. For small batches this is handy: you don’t need a separate tap for each size and setup changes are easier.
Where control is better
In blind holes a thread mill usually gives the operator more peace of mind. You can set depth more precisely, leave the required undercut at the bottom and avoid bottoming the tool. A tap has less bottom margin and a miscalculation quickly leads to breakage.
A mill also helps when the thread is close to a shoulder or in a thin wall. The tool engages more smoothly, the load rises less abruptly, and the process is easier to adapt to the part geometry.
There’s another practical advantage. If the thread turns out slightly tight, you can adjust the program by hundredths of a millimetre and run it again. With a tap that freedom is almost nonexistent. For series this is not always decisive, but in trial runs, setups and expensive housings this room for adjustment often pays off the longer cycle.
What most affects tool breakage
A tool rarely breaks for a single reason. Usually a combination triggers it: tough material, long thread, poor chip evacuation and weak clamping. With that mix a tap may not survive even the first part.
First look at material, pitch and thread length. In ductile steel and stainless steel chips string, stick and quickly raise the load. Fine pitch is more dangerous than it seems: the tooth cuts less metal and any feed error immediately hits the edge. On long threads the load persists through most of the cycle and the strength margin disappears.
On CNC threading not only cutting mode but mechanics decide a lot. Spindle runout, long tool overhang and soft clamping ruin the process from the first seconds. For a tap this often ends in jamming. A mill may not break immediately, but it will start shifting size and spoiling the profile.
Chips and coolant influence outcomes more than you’d expect. If chips don’t leave the hole, they get under the cutting edge again. The tool begins rubbing instead of cutting, heat rises and breakage becomes a matter of time. In blind holes this shows up quickly.
You can’t transfer feeds and speeds from one tool to another without checking. A tap and a mill have different cutting schemes and sensitivities. What runs calmly on a mill can instantly overload a tap for CNC. Conversely, an overly cautious mode for a mill often wastes cycle time and yields poor surface finish.
Catch early wear signs immediately. They usually look like:
- rising spindle load;
- change in cutting sound;
- darkening or sticking chips;
- burrs appearing on the first turns;
- thread size starting to “wander”.
If those signs appear, don’t push the tool to finish the batch. It’s much cheaper to replace it 20 parts early than to lose a part, collet and time on a stoppage. Breakage is usually caused not by chance but by the habit of ignoring small signals.
What truly changes cycle time
Looking at a single hole, a tap is often faster. On a simple run where the material is familiar, the hole is accurately prepared and thread length is small, it can save a few seconds per part. On hundreds of parts that becomes significant.
A thread mill usually cuts longer. It follows a path rather than forming the profile in one axial pass, so pure machine time per hole is often higher. For small batches this may not matter, but on long series the difference affects machine utilization.
But cycle time isn’t just program lines. If a tap breaks in a part, the machine stops. The operator removes the fragment, inspects the part, sometimes removes it from the batch, then restarts. Those losses can easily eat the per-hole time advantage.
The same goes for scrap and extra checks. When a process behaves inconsistently people measure threads more often, stop the machine for checks and run more cautiously. A program might be short, but actual output per shift drops.
In practice four things change real cycle time:
- seconds per hole;
- how often the tool breaks or wears out prematurely;
- how many parts need extra inspection or rework;
- minutes lost restarting after a stoppage.
Simple example: a batch of 200 parts with 4 threaded holes each. A tap may be faster per hole, but one mid-shift break causes downtime, inspection of neighbor parts and tool change. A mill goes slower but steadier, especially if the material is ductile or the thread is sensitive to mistakes.
So for a series you count not only cutting time but also time without surprises. For small batches the conclusion is often simpler: if you need to run different parts quickly and avoid breakage debates, a longer operation can be faster over the whole shift.
How to check thread quality
A single gauge pass is not enough. It shows the thread is within size, but not why it might fail in assembly or quickly wear the mating part. On CNC threading check size, form and surface condition.
First inspect the thread entry. If the first turns have compression, chips or noticeable burrs, the part will give problems in assembly. Then look at the profile: turns should be even, without torn edges or shiny smearing. Check the last turns separately — that’s where poor tool exit often becomes visible.
A quick check routine looks like this:
- inspect the entry and first 2–3 turns under light;
- check the flank surface for scratches, adhesion and torn marks;
- evaluate the last turns after tool exit;
- run the gauge and compare the feel to a reference part.
If the gauge goes tight, don’t rush to blame size. The cause may be a burr, poor chip evacuation or rough flank surface. Thread milling more often shows flank toolpath marks; tapping more often shows entry compression and a rough exit if chips didn’t clear.
Compare parts over time
The first part after setup and the part after an hour of running often differ. The machine warms up, spindle and assemblies settle, and size can drift slightly. Keep the first good part as a reference and compare later parts to it, not only to the gauge.
If the thread will be used in a tight assembly, do a simple manual test with the actual mating part. This quickly shows issues the gauge can miss and gives a more honest picture of quality.
How to choose for your part
When deciding whether to tap or mill, don’t start from the shop habit. First inspect the part itself. Material, diameter, pitch and thread depth usually narrow the choice immediately.
For soft materials and common sizes a tap often gives the shortest cycle. This is especially noticeable on series with hundreds of repeated holes. But in ductile stainless, hard steel or at large depth the tap’s margin for error is smaller.
Separate blind and through holes right away. In a through hole chips evacuate easily, so a tap often runs calmly. In a blind hole there’s less room and the breakage risk grows, especially when the thread approaches the bottom. A mill usually gives more control over depth and entry shape.
Another sober calculation is part cost and machine downtime cost. If the housing is expensive and a broken tool will leave a fragment inside, savings from a fast cycle vanish. For cheap production parts the situation is different: if the material is stable and the process proven, a tap often wins on cost per hole.
Before launch check five things:
- what the part material is and how consistent it is across the batch;
- the required thread size and working depth;
- blind or through hole;
- the cost of scrap and the cost of machine downtime;
- results from a 3–5 part trial in terms of time, wear and thread quality.
A trial run quickly clarifies. Suppose you have 5 steel parts with an M12 thread in a blind hole. A tap might work, but one break would make that choice too costly. If it’s a batch of simple aluminium parts with through M6, a tap often wins on time without quality loss.
Decisions rarely rest on a single number. Look at cycle, scrap and how fast the tool loses size.
Mistakes that ruin results quickly
Scrap usually comes from small preparation misses, not from the method itself. They quickly eat tool life, increase cycle time and spoil thread quality.
Problems often start before the first part. A common mistake is using an old drill diameter table without accounting for material. The same preparation for aluminium, steel and stainless may behave differently, so a tap can feel tight on the first turns.
In a blind hole chips must evacuate immediately. If they don’t, a tap will jam; in thread milling the bottom will show marks that later prevent the gauge from passing cleanly.
Too long an overhang almost always causes extra vibration. On small diameters this shows clearly: the profile wanders and the edge wears faster than expected.
Another frequent error is increasing feed after one good part. One part doesn’t show how the tool will behave after 15 or 30 holes. Equally problematic is failing to correct: the tool is already cutting slightly differently, the operator keeps old values and ends up with tight gauges or torn profiles.
Worst of all, these mistakes rarely come alone. For example, in stainless a small hole, a blind bottom and excessive feed can break a tap in a couple of parts. With a mill breakage is rarer, but the thread size will start to drift and that’s also scrap.
Good practice is simple: check the actual drilled diameter, reduce overhang, give the tool a stable mode and adjust compensation as wear appears. This approach usually saves both the tool and the batch.
Example for a small batch and for a series
It’s more useful to look at scrap cost and batch size than at shop habit.
For a small run of expensive parts caution often beats raw speed. Imagine 12 housings in stainless with blind threads. The blank has already passed most operations and a scrap at the last stage is costly. If a tap breaks in the hole you may lose the part entirely. In such a case thread milling is often calmer: the cycle is longer, but the tool is less likely to jam and size can be adjusted in the program.
On one part the mill can lose on seconds. But for the whole batch it often lowers overall risk. This is clear when the material is ductile, chips evacuate poorly, and the hole won’t forgive mistakes.
For a large series the picture often flips. Suppose you need 800 parts in ordinary steel with through M8 holes. The material cuts predictably, conditions repeat and chip evacuation is simple. Here a tap often gives the best pace. If the modes are already tuned and the pre-drilled diameter stays stable, the cycle per hole is shorter. On a big series a few seconds difference becomes machine hours.
But even here don’t decide by habit. A short trial run gives an honest answer:
- 10–20 parts to check the tool;
- measure actual cycle time;
- check thread size after the first parts and mid-run;
- evaluate chips, cutting sound and wear.
If after the test a tap runs cleanly and without torque spikes, the series usually wins on pace. If the trial shows the material drags, the thread drifts or there’s a risk of breakage, a mill often proves cheaper despite the longer cycle.
Quick checks before start
The first 10 minutes before a run often matter more than the next hour of tweaks. Missing one small detail can make a tap break on the first part or leave a mill producing threads at the edge of tolerance.
First check the drilled hole diameter. A deviation of a few hundredths changes tool load: for a tap it raises torque, for a mill it increases chip load and cycle time. It’s simpler to measure the first hole immediately than to later remove a broken tool from a part.
Then compare the program with the actual tool in the spindle. For a tap check pitch, direction, depth and rigid tapping mode. For a mill check tool diameter, path, entry and number of passes. Errors here look small but produce instant scrap.
Make sure coolant hits the cutting zone. If the jet goes aside, chips stay in the hole, the thread tears and the tool overheats. This is most visible in blind holes.
Before a run keep a short control kit nearby:
- the thread gauge for the target size;
- the first control part marked as reference;
- a record of pitch, depth and tolerance;
- a clear first-measure routine.
One more point should be agreed before starting, not after ten parts. The operator and the setter must share the same stop criteria: gauge going tight, unusual sound, rising spindle load, burr formation or size drift.
This short control is useful for single parts and long series alike. Start from the first checked part, not from theory.
What to do next
If the question is “tap or thread mill”, don’t decide by habit. Take the same part, same material and run at least 20–50 pieces. Only such a test shows the difference you won’t find in tables but in real work.
Run both methods under identical conditions: same machine, same quality control, same coolant, same pre-drilled hole diameter. Then record not impressions but simple numbers:
- cycle time per part;
- tool wear after the run;
- number of scrap parts and causes;
- chip behaviour during cutting.
Such records remove pointless arguments quickly. Often a tap wins on time but starts failing on ductile material or in deep holes. Thread milling goes slower but handles tough conditions calmly and doesn’t punish mistakes as harshly when a tool breaks.
After the trial don’t lock the process to a single method forever. Better to record a primary option and a backup. For example, for a series on stable blanks keep the tap; for small runs, new materials or costly parts keep the mill as a reserve.
If you are choosing both the method and the machine and tooling for these operations, discuss it before purchase. EAST CNC, the official representative of Taizhou Eastern CNC Technology Co., Ltd. in Kazakhstan, works with CNC metalworking machines and helps with equipment selection, commissioning and service. This is useful when you need to know not just “what’s faster on average”, but what will run consistently on your parts, in your material and at your volume.
FAQ
What should be chosen by default: a tap or a thread mill?
If the material is soft, the hole is through, and the thread size is standard, you usually start with a tap. It often gives a shorter cycle. If the material is tough, the hole is blind, or the part is expensive, it's wiser to consider a thread mill first. It normally provides more margin for error.
When is a tap truly more advantageous?
Taps perform best on repeated parts with standard threads where the drilled hole holds size reliably. In through holes in aluminium or ordinary steel, taps are often faster and simpler to run. This choice is good for series production when the process is already proven and chips evacuate without issues.
In which cases is it better to use a thread mill right away?
Thread mills are chosen where the cost of scrap is high. If a tool breaks, the chance of saving the part is usually higher than when a tap breaks off in a hole. They are also convenient for stainless steel, tough alloys, blind holes and trial batches where you want to be able to adjust size in the program calmly.
What causes taps to break most often?
A tap usually fails due to a combination of factors rather than a single cause. A slightly undersized hole, poor chip evacuation, long overhang, misalignment and excessive feed quickly add up to breakage. This happens especially in stainless steel, on fine pitches and on long threads.
What is better for a blind hole?
For blind holes, a thread mill is generally safer. It makes it easier to control depth, leave a margin at the bottom, and avoid the tool bottoming out. A tap requires very precise preparation in this case. If there's little room for chip escape, the risk of jamming grows quickly.
Does a thread mill always lose on cycle time?
Not always. On a single hole the tap is often faster, but real shift productivity is also affected by stops, scrap and tool changes. If a tap starts failing, its seconds-per-hole advantage vanishes. On difficult materials a thread mill can turn out cheaper for the whole batch.
Can one thread mill make several thread sizes?
Often yes, if the pitch is the same and the diameters are close. You can change the toolpath rather than the tool itself. This is convenient for small batches and frequent part changes. Still, you should test the actual size range and machine rigidity before running production.
How to quickly check thread quality on a part?
First look at the thread entry and the first turns. If there is burr, compression or torn material there, assembly problems will likely follow. Then check with a gauge and compare the effort with a reference part. It's also useful to inspect the last turns because that's where poor tool exit often shows up.
What to do if the gauge goes tight?
Don't rush to blame size. Often the cause is a burr on the entry, chip adhesion or rough flank surfaces. First inspect the thread under light, check the first and last turns, then repeat the gauge check. If the problem remains, check the drilled hole diameter, tool wear and any offset.
How to decide before starting a production run?
Make a short trial on several parts under the same conditions as the series. Compare not only seconds per cycle, but tool wear, size stability, cutting sound and chip behaviour. After that keep a primary method and a backup. For a stable series a tap often fits, while for expensive parts, new materials or risky holes it’s sensible to keep a thread mill as a working alternative.