Storage of Chucks, Jaws, and Arbors Without Extra Searching
A simple storage system for chucks, jaws, and arbors reduces time wasted searching during a shift. Learn how to label, track, and place tooling on the shop floor.
Why tooling gets lost during a shift
Tooling rarely disappears “by itself.” Usually, ordinary rush causes the problem: the operator removed a chuck for changeover, set it down nearby, got distracted by checking a part, and an hour later no longer remembers which machine he left it by.
On the shop floor, it seems minor, but over a shift these small things add up. One person is looking for jaws, another is waiting for a machine to free up, and the supervisor walks between stations trying to remember who last took what.
Most often, the problem starts with temporary storage. The chuck was taken not to the storage room, but “for five minutes,” and those five minutes turn into half a day. A neighboring machine is standing there, there’s an open spot, so the tooling gets placed there. Then another operator sees it and moves it again so it’s not in the way.
Jaws get mixed up even faster. If a set doesn’t live as a set, it gets split across different drawers: one jaw is by the lathe, the second went into a common tray after cleaning, and the third left with another setup entirely. They all look similar on the outside, but in fact the set has already fallen apart.
Arbors often fall victim to a different habit. After washing or blowing off chips, they are placed wherever there’s a dry spot, not where they’re supposed to live. A couple of hours later, no one can say whether that arbor is for the current job or whether it’s already free. If a shop has several identical positions, a mistake is almost guaranteed.
There’s a simpler reason too: people search from memory instead of by label. As long as one experienced supervisor is running the area, the system holds together. Once another setup person comes in on a different shift, the whole “system in the head” stops working.
On a CNC turning area, this is especially noticeable when tooling moves between machines. Today a chuck is needed on the first machine, an hour later it has been moved to the third, and nobody made a note. Formally, the tooling is there. In practice, three people are looking for it.
Poor storage of chucks, jaws, and arbors hurts more than just time. When people spend a long time looking for the right set, they are more likely to take something “almost the same.” And that means extra setup time, scrap, and arguments at the end of the shift about who put what where.
What to track from day one
From day one, don’t put everything under control at once. Start with the items that most often slow down changeovers. The rule is simple: if a part is needed to quickly assemble the working setup, it should have its own number, its own place, and an entry in the log. Otherwise, the shop loses not minutes, but whole chunks of a shift.
Start with chucks. Track them by size, mounting type, and the machine they work with without adapters. If you have chucks of the same diameter but different mounts, they are often mixed up. They may look alike from the outside, and the mistake only shows up during installation.
Keep jaw sets under separate control. Straight and reverse jaws should not be stored as loose parts “near the chuck.” It’s better to count them as a set: one chuck, one set, one storage location. If even one jaw goes to another machine, the set can no longer be considered ready to use.
Next come arbors, adapter sleeves, and flanges. These are exactly the small items that “were here somewhere,” but take the longest to find. On a turning area, one lost sleeve can easily eat up 20–30 minutes because the operator has to go through drawers, carts, and the CNC tooling cabinet.
There’s another group that is often underestimated: fasteners, keys, and spacers. If a setup can’t be assembled without them, they belong in the record too. Bolts, clamps, washers, special keys, and spacer rings are better tied to a specific setup rather than stored separately “just in case.” Otherwise, the chuck is there, the jaws are there, but it still doesn’t go into production.
For storing chucks, jaws, and arbors, one more filter is useful. Track any tooling if:
- it is easy to confuse with something similar;
- it fits more than one machine;
- without it, setup stops;
- finding it has already taken extra time at least once.
This kind of start doesn’t overwhelm people. You are not trying to describe the whole storeroom at once; you’re only tracking what affects daily output. For a shop with CNC turning machines, that is usually enough to remove the most common cause of running back and forth between machines within the first week.
How to separate storage areas
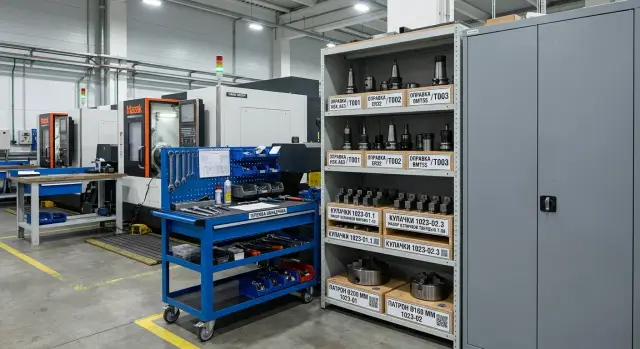
If tooling is mixed together in one cabinet, people spend time not on setup but on searching. Usually, the problem is not lack of space, but the fact that chucks, jaws, and arbors are stored by one rule: “put it wherever it fits.”
For a turning area, it’s better to separate storage not by part name, but by weight, size, and how often the item is used. Heavy chucks and large assemblies should be kept apart from small tooling. That’s safer, and it’s easier to find the right item even in a hurry.
One cabinet or one rack should be assigned to each group of machines. If three neighboring machines often share tooling, they should have their own storage area rather than one common store for the whole shop. Then the mechanic, setup person, and operator all go to one point and don’t argue about where the set is.
Use the lower shelves for heavy chucks, faceplates, and large arbors. They are awkward and unsafe to lift from shoulder height. Leave the upper shelves and pull-out drawers for light jaws, adapter sleeves, fasteners, and small sets. A simple rule works well: the heavier the assembly, the lower it should be stored.
How to lay it out without confusion
A four-zone layout helps a lot:
- working stock near the machines
- return area after a shift or changeover
- clean tooling ready for installation
- a separate shelf for questionable or incomplete sets
The return area is best placed near the wash station, setup table, or cleaning spot. Remove the chuck, wipe it down, check its condition, and put it straight into a clear zone. If there is no such place, tooling starts to “live” on pallets, carts, and empty cabinets.
For storing chucks, jaws, and arbors, what matters is not fancy furniture, but a clear path of movement. Take it off the machine, clean it, return it to its group, and place it on its level. When that path is the same every day, search time drops noticeably. On many shops, that saves 10–15 minutes per shift on just one machine.
How simple labeling works
For storing chucks, jaws, and arbors, long names don’t work. No one in a shift wants to read “250 mm lathe chuck with such-and-such mount.” You need a short code that can be seen from a couple of steps away and quickly entered in the log.
A good system is built from three parts. First comes the part letter: C for chuck, J for jaws, A for arbor. Then comes the size and mounting type. At the end, add a set number if there are several identical positions.
It looks like this:
- C-250-A2-03
- J-250-03
- A-32-BT40-07
That kind of code can be read in a second. A person immediately sees what it is, what size the tooling is, and which set it belongs to. If there are three identical 250 mm chucks on the shop floor, the set number removes the confusion right away.
The same code should appear everywhere. On the tooling itself, it can be applied with a tag or paint. On the storage location, the same code should be written on the slot, shelf, or bracket. The log should use exactly the same wording, without “from memory” abbreviations or different versions from different shifts.
A double label works best. The part keeps a physical marking, and there is also a photo card nearby. The photo shows the actual assembly, its code, and its storage location. This helps new employees a lot and saves time in a rush, when jaws are removed, taken to a neighboring machine, and forgotten there.
Use paint only on a safe spot where the label won’t wear off or end up on the working surface. For heavy assemblies, a metal tag on a cable tie or ring is convenient. For small arbors, a durable sticker under a clear protective layer is often enough, as long as coolant doesn’t ruin it.
If the code is longer than five or six blocks, the system starts getting in the way. A simple standard for the whole shop is better than a “perfect” scheme no one remembers. When each item has one short code, search time usually drops sharply within the first few days.
How to keep records without complicated software
On the shop floor, tracking usually breaks not because of the software, but because of extra steps. If an operator has to open three files, look for a slot number, and remember who took the set in the morning, people quickly stop recording it. A practical system is simpler: one table for the whole area and one recording method for everyone.
For storing chucks, jaws, and arbors, that is usually enough. Don’t create separate files for machines, cabinets, and shifts. When tooling moves from one CNC machine to another, those tables start contradicting each other, and no one trusts the result anymore.
Keep only the fields that are actually needed during the shift:
- tooling code
- current location
- which machine it is assigned to
- who took or returned it
- time of the last action
The code should match the label on the tooling itself and the storage location. Then the operator sees chuck C-12, opens the table, enters C-12, and immediately understands whether it is in the cabinet, on machine #2, or with the setup person. No descriptions like “large three-jaw.” Everyone interprets those differently.
An entry should take no more than a minute. If an arbor is taken from the rack, update the location and machine in the table. If it is returned after the job, change the row again. If recording takes longer, people will put it off, and then no one remembers the exact movement.
A simple rule of responsibility also works well: whoever took it is the one who marks it. Not the supervisor at the end of the day, not the storeroom attendant from memory, but the person who physically moved the tooling. That removes half the confusion.
You do not need to check the entire list every time. Once per shift, review only the problem items: rare jaws, expensive arbors, adapter sets that often move between machines. On one turning area, 10–15 such entries are usually enough. Full reconciliation is needed less often.
If there are three machines on the area, the table can look very ordinary: in the morning, chuck C-12 is in cabinet 3A; by 10:20 it is assigned to machine 2; after changeover at 14:05 it returns to the same slot. When this is done every day, search no longer eats up 15–20 minutes per shift.
How to implement the system in one week
Within a week, you can eliminate most of the unnecessary searching if you don’t try to make everything perfect right away. At the start, you need not beauty, but a clear rule: every item of tooling has its own place, its own code, and a return mark.
Start with simple things: paper or plastic tags, a marker, labels for the slots, and one logbook or shared shift table. That is enough to start storing chucks, jaws, and arbors without expensive software.
A day-by-day rollout for the week
On the first day, gather all the tooling in one place. Don’t leave chucks by the machines, in operators’ drawers, or on random carts. When everything is in front of you, it immediately becomes clear how many duplicates you have, what is working, and what has been waiting for repair for a long time.
On the second day, sort the tooling into clear groups. First by type: chucks, jaws, arbors. Then by size and, if needed, by machine assignment. If two turning machines use different mounts, do not mix them even in the same cabinet.
On the third day, assign codes. The code should be readable in a second: for example, C-200-01 for a chuck, MJ-08-03 for a set of soft jaws, A-32-02 for an arbor. Write the same code on the storage slot. If someone takes MJ-08-03, they should return it only to the place marked MJ-08-03, not to an empty shelf.
Use the fourth day for the records. Don’t write extra details. For the start, five fields are enough:
- code
- name
- size or mount
- storage location
- who took it and when it was returned
Starting on the fifth day, begin checking after each changeover. It only takes 2–3 minutes, but this is exactly where order either takes hold or falls apart again. At the end of the setup, the supervisor or setup person checks not the whole cabinet, but only the tooling that was in use.
The sixth and seventh days are for corrections. That’s when weak spots usually show up: two identical items with different names, a slot without a label, jaws that people are used to placing closer to the machine. Don’t argue for long. Change the label, move the slot, or remove the extra marking right away.
After a week, the result is already visible. The operator no longer spends 15–20 minutes looking for the right set, and the supervisor knows what is missing on the shop floor right at the beginning of the shift. If you already have a CNC tooling cabinet, that is enough to start. If you don’t have one yet, the same system can begin with a regular rack and labeled locations.
Example for a shop with three machines
On a three-machine shop floor, confusion usually starts not because of a large storeroom, but because of small moves during the shift. One chuck is removed for an urgent part, a jaw set is taken to the neighboring machine, and an arbor after setup is placed “for now” in the wrong cabinet. A couple of hours later, people are already spending 10–15 minutes searching.
A working setup can be very simple. The first machine often changes 200 mm and 250 mm chucks, so both chucks are not kept in a common area. Two labeled spots are assigned near the machine: one for the chuck in use, and one for the spare. If the 250 mm chuck is on the first machine, the slot marked C250-01 is shown as occupied, while C200-01 remains free.
Jaws are best stored only as sets, not as loose pieces. Each diameter and chuck type needs its own tray, and the full set goes into that tray. If one jaw is lying separately, the set is immediately considered incomplete and is not returned to the slot. This greatly reduces mistakes when the operator grabs two correct jaws and one that is “almost the same.”
It helps when the codes can be read without explanation:
- C200-01 - 200 mm chuck, slot 01
- C250-01 - 250 mm chuck, slot 01
- MJ-08-03 - soft jaw set for a 200 mm chuck, tray 03
- BT40-07 - arbor with BT40 shank, slot 07
Arbors are placed in the cabinet not by machine, but by shank type. One section holds BT40, another HSK, and a third other taper types if they are used on the shop floor. Then the setup person doesn’t have to remember “where we left the arbor last time” and can go straight to the right cabinet section.
To see what is free and where things are stored, a simple sheet by the cabinet or a screen at the setup station is enough. It needs only three short entries: tooling code, current location, and status. Status can be just two words: “on machine” or “free.” For a shop of this size, that is already enough.
In practice, storing chucks, jaws, and arbors this way removes most unnecessary trips between machines. People find the right set faster, and setup moves forward without pauses caused by searching the whole shop.
Where mistakes happen most often
Even good storage of chucks, jaws, and arbors can fail over small things. Usually the problem is not the cabinet or the tracking table. The problem is that the shop runs at shift speed, and people take tooling “for a minute” and return it without leaving a trace.
Most often, the system breaks down where it looks complete only on paper:
- A chuck gets a number, but the jaw set is left unnumbered. A couple of days later, the chuck is in the system, but no one can quickly say which jaws belong to it, which are soft, and which have been bored for a part.
- Heavy assemblies are placed far from the cart, stand, or crane. As a result, the operator leaves the chuck not in the right spot, but where he took it off the machine. That’s how “temporary” storage becomes permanent.
- Working stock is kept near scrapped or questionable tooling. If they are not separated by shelf and clearly marked, worn-out parts can easily end up back in production.
- Codes are made too long. If a number can’t be read in a second, it won’t be read. People will start relying on memory, a marker on the body, or words like “that one, from the second shelf.”
- No one is responsible for closing the return. The tooling is taken, moved between machines, the shift ends, and the record stays open. The next day, the search starts all over again.
There’s also a quiet mistake: the system is introduced only for the storeroom attendant or the setup person. But tooling moves between machines in the hands of several people. If one assigned person on each shift doesn’t close the return, the records quickly become messy.
For a shop with CNC turning machines, the rule is simple: every item needs a number, the path to storage must be short, and the status must be readable without questions. If even one of these three doesn’t work, searching will again eat up 15–20 minutes per shift.
A short checklist for the start of the shift
Before the first machine starts, it’s worth spending 3–5 minutes on a quick walk through the cabinet and log. For a shop where storing chucks, jaws, and arbors has already been organized, this habit usually removes unnecessary searching even before the first changeover.
The check should not be long. If it takes 15 minutes, the system is already overloaded. Five points are enough.
- Match the slots with the storage map. Each set should be in its place, and an empty slot should be explained right away: who took it, to which machine, and when.
- Check the free shelves, top of the cabinet, cart, and the area by the machines. If someone’s part or tooling “for a minute” is lying there, it is often forgotten by mid-shift.
- Open the log or simple tracking table. If there is no return note for an item from the previous shift, don’t leave it until lunch. Find out where the set is right away.
- Check how the high-use items are arranged. Chucks, jaws, and arbors for frequent jobs are better kept closer: at hand height, near the walkway, without extra lifting or turning.
- Look at the tooling marked as damaged. Defective items should be stored separately, with a clear label, so no one puts them back into use out of habit.
In practice, that’s enough to remove most morning confusion. For example, on a three-machine area, the setup person can see in a couple of minutes that one jaw set is still on the lathe, an arbor has gone for repair, and the empty slot for a chuck is not a mistake, but planned work on the neighboring machine.
If one person runs the checklist at the start of the shift, order holds much better. When everyone checks things “along the way,” no one is responsible for gaps in the log or random items on the shelves. It is better to assign one person in charge and record the result immediately, rather than relying on memory at the end of the day.
What to do next on the shop floor
Don’t wait for a general repair, new furniture, or a company-wide order. It’s better to pick one area and launch the system right there, where tooling moves between machines most often. One pilot area brings more value than long talks about order.
Start small. For storing chucks, jaws, and arbors, you do not need a complex project. You need clear locations, simple labeling, and one person who checks during the first week that the rule is actually working.
A good order of action is this:
- choose an area with 2–3 machines where searching for tooling slows down shifts the most;
- assign permanent locations for chucks, jaws, and arbors near the work zone;
- for 5 working days, measure how many minutes are spent searching before the system starts and after;
- record not everything, only simple cases: who searched, what they searched for, and how long it took.
Even a rough measurement quickly shows the difference. If a setup person used to spend 8–12 minutes searching a couple of times per shift, that adds up to a noticeable loss of time in a week. After order is introduced, the numbers usually calm down, and there is nothing left to argue about: the area sees the result in minutes.
If you are changing the shop layout or adding CNC turning machines, space for tooling should be planned right away. Otherwise, the new machine will arrive, and chucks, jaws, and arbors will again spread across random shelves and carts. For heavy tooling, it’s better to plan ahead for a cabinet, low shelves, a cart aisle, and a temporary return area after the shift.
When equipment is selected with EAST CNC, it makes sense to discuss not only the machine itself, but also the nearby storage area, layout, and service. That helps avoid a simple mistake: the machine is already in place, but there is no convenient spot for tooling nearby.
The next step is simple: choose one area today, apply the labels tomorrow, and compare the lost minutes in the shift log in a week.