Step Height Control on a Housing: Why One Base Gives the Wrong Reading
Step height inspection on a large housing often gives a false result if you use only one base. Let's look at where the mistake comes from and how to check the dimension more accurately.
Why one base gives the wrong reading
On a large housing, the part almost never rests as perfectly as it does on the drawing. On paper, the base is flat and rigid. In the shop, the housing sits on the plate or on V-blocks at the actual contact points, and those points are often nowhere near where you imagine them to be.
Because of that, one base for the measurement often shows not the real step height, but a mix of the part size and its tilt. The operator sets an indicator or height gauge in a convenient spot, gets a neat number, and records it in the report. The number looks convincing, but at that moment the housing may be slightly rotated or resting on only a few areas.
The reasons are usually simple: local unevenness remains on the support surface after machining, a long part sags under its own weight, chips or dirt get under the base, or the housing touches the plate not with the whole surface but only with two or three zones. On a small part, such a shift is sometimes barely noticeable. On a long or heavy housing, the error grows quickly.
If the step is measured at only one convenient point, the inspection does not see that the other end of the housing has already shifted by several hundredths of a millimeter or more. For assembly, that is enough to start arguments: the report says the dimension is within tolerance, but the mating part does not fit as it should.
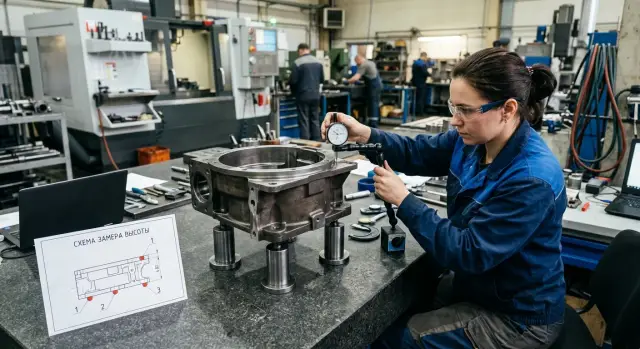
This often happens after machining a large housing on a machining center. The part is taken off the table, placed on a plate, the step is measured from one base, and everything looks fine. Then during assembly it turns out that the step height relative to the working base is different, because the housing was sitting differently during inspection than it does in the unit.
Step height control only works when the measurement base reflects the real position of the part, or at least does not hide the tilt. If you rely on one plane without checking, the measurement only gives peace of mind. It does not answer the main question: how the part behaves as a whole.
That is why one neat dimension on a large housing means almost nothing by itself. If there is any doubt, it is better to check the part at several points right away and compare the readings against another base. In practice, that often saves more time than a reassembly and a search for a mysterious error.
Where the error comes from on a large housing
A false reading appears even before the operator brings the indicator to the step. The problem is usually not the instrument, but the way the part itself sits on the supports. The greater the mass and length of the housing, the more the result depends on the support point, the cleanliness of the surface, and the condition of the fixture.
A heavy housing rarely sits exactly the same way twice. If one support is even a few hundredths higher than another, the part twists slightly, and the step height already looks different. On a short part, this may go unnoticed. On a long housing, the error quickly becomes obvious.
The usual picture looks like this: a housing about 800 mm long sits firmly on the table, but one side carries more of the weight. The operator takes one base as the reference and gets a dimension that seems to match. Then the part is moved, set on the supports again, and the same step shifts by 0.03-0.08 mm. The geometry of the part has not changed. Its seating has.
After clamping, the situation often gets even worse. The clamps press the housing down, it adjusts slightly to the table, and after the clamps are released it partly returns to its previous shape. If you measure the step while it is clamped and then compare that with a measurement after release, the numbers start to disagree.
There are also very ordinary reasons, but they show up every day. Chips under the base, an oil film, a tiny burr after machining, and the part has already lifted by fractions of a millimeter. On paper that is tiny, but in step height inspection it is enough to send a good part into the questionable pile.
Temperature also matters. A housing right after machining may be warm, while the table and supports are cooler. Metal does not change size much, but on a large part even that is enough for a noticeable shift, especially if you measure right after the machine.
Finally, the supports themselves often introduce the error. A worn pad, a V-block packed with dirt, or a settling adjustable screw can create a random tilt. The worst part is that this kind of error comes and goes: one reading looks fine, the next does not. That is why on large housings one measurement base almost always paints too simple a picture, while the real cause lies in how the part sits.
How to choose the base for inspection
Choose the base for the measurement not by the principle of where it is easiest to place the part, but by which surface controls the dimension in the assembly. If the step sets the position of a cover, bearing, or adjacent plane, that working surface should shape the inspection scheme. Otherwise, the measurement will give a nice number that does not match the actual assembly.
The drawing also needs to be read carefully. It often shows one base for machining and another for the function of the part in the assembly. These are not the same thing. If the step size is defined from base A, but on the shop floor the part is placed on the first wide surface that comes along, the measurement can easily add extra hundredths of a millimeter, and on a large part even more.
A good base keeps the part stable. A simply flat spot is not enough if that surface itself may have sag, machining marks, or local wear. It is better to look for support points that reflect the real position of the housing and do not let it rock during inspection.
For a long housing, one point or one short plane almost always creates a tilt. The part may sit with a slight twist, and the instrument will honestly measure the wrong size. That is why the measurement base for long parts is usually set by several support points. This lets the housing take a more natural position, and the setup error drops noticeably.
Before the first measurement, it helps to answer four questions: which surface the dimension comes from in assembly, which base is shown on the drawing, where the housing sits without rocking, and how many support points are needed for this part length.
It is better to fix the basing scheme once on paper or directly at the inspection station. Then the operator, setter, and inspector all place the housing the same way instead of each doing it their own way. For housing dimensional inspection, that is often more important than the instrument itself. An indicator or height gauge will not save you if the part sits differently every time.
In practice, it usually looks simple. If a long housing rests on only one end, the other end may hang slightly in the air. If you add two more supports along the length and set the same position for every measurement, the result usually becomes repeatable from the very first batch.
What to do before measuring
Before inspection, do not pick up the instrument right away. First, clean the part itself and the contact area. Even a thin film of oil, stuck chips, or dust on the base creates a tilt, and on a large housing that tilt quickly turns into a false step size.
Wipe the base surface and the step itself. If the part came straight from machining, check not only the visible chips, but also the fine debris at the edges and in the corners. It is easy to miss, but it can lift the housing noticeably.
Then look at the edges. A clear burr is better removed before inspection, not after a dispute over the size. Otherwise the instrument will show not the step height, but the sum of the height and the random buildup on the edge.
Temperature also gets in the way. If the housing has just come off the machine, do not rush to measure it. A warm part changes size and sits on the supports differently from a cooled one. On long and heavy housings, this is especially easy to see: the first reading is one thing, and ten minutes later it is another, even though nothing changed.
Check the support setup separately. The supports, pads, and clamps must be clean and even. If one pad has caught chips or a clamp is pulling the part sideways, the base is no longer the one you think it is.
A useful test is very simple: place the housing on the supports, clamp it lightly, take a reading, then remove the part and set it up two or three times again and compare whether the seating repeats. If the number wanders, do not blame the instrument right away. More often, the housing sits a little differently every time. For step height control, that is a direct sign that you are not checking the size yet, but an unstable setup.
A normal picture looks different. You reposition the housing several times, and the reading stays within a narrow range. Only then does it make sense to discuss the step itself, the tolerance, and a possible machining error.
How to measure step height step by step
First place the housing not however it happens to land, but on the support points chosen as the base. For a large part, this matters: if one point is hanging in the air or catches a chip, the housing already sits with a tilt, and the entire measurement shifts off course.
Then check whether the part rocks on the table. Press by hand on different areas of the housing one after another. If one corner springs or tips even slightly, it is too early to start measuring. First remove the dirt, check the supports, and set the part again.
It is better to set zero not at one point, but at several points along the base: left, right, and near the center. If the instrument shows a difference between these points, the problem is no longer the step, but how the housing itself sits or how the base surface behaves.
Measure the step with the same logic. Do not limit yourself to one touch in the most convenient spot. Take the size at the edges and in the middle. On a long housing, the picture often looks like this: the left side is fine, the center shifts by two or three hundredths, and the right side almost comes back. One random measurement will not show that.
If you work with an indicator or a height gauge, keep the same sequence of actions. Do not change the pressing force, do not move the part between points without a reason, and record the values right away. Otherwise it becomes hard to tell later where the real spread is and where the operator's mistake is.
After the first pass, remove the housing, set it up again on the same supports, and repeat the measurement. That is a very honest check. If the numbers drift after the second setup, the base is unstable or the part sits differently each time.
Usually this is enough: check the seating on the table, zero against the base at several points, then measure the step on the left, in the center, and on the right, and finally reposition the part and do a second pass. If both sets of values are close, the result can be trusted. If not, do not look for a step defect first; look for the cause in the basing and in how the housing is set.
Example with a long housing
On one shop floor, they were checking a long gearbox housing, 1200 mm long. According to the drawing, the step height had to stay within 42.00 ± 0.05 mm. The inspector placed the housing on the lower surface and took a measurement in the middle. The instrument showed 42.01 mm, almost perfect.
But assembly turned into a dispute. The fitter said the cover did not seat evenly, while the operator insisted the part was fine. When the housing was measured closer to the edges, the picture changed: 41.92 mm on the left and 42.11 mm on the right. The same step had moved in different directions, even though one measurement in the center did not show it.
The problem was not the number 42.01 itself. The measurement base failed. The lower surface of the long housing had a slight tilt, and when the part rested on it, it seemed to settle down in the middle. For one cross-section, the dimension looked fine, but along the length the housing was already behaving differently.
This case shows well why step height control cannot be reduced to one point and one base when the housing is large. One lucky measurement often hides a bend or twist.
The team repeated the check at three sections: near the left edge, in the middle, and near the right edge. They also changed the base. Instead of the lower surface, they used the support surfaces from which the housing is actually set in the assembly.
After that, it became clear that the problem was not a random instrument error, but the basing during measurement.
The difference was very telling. With the old method, the results drifted: today the housing sat a little differently, tomorrow a little differently again, and the numbers argued with each other. With the new scheme, the step measurement on the housing became repeatable. If the left side was negative and the right side positive, that was confirmed during repeat inspection as well.
In the end, the dispute on the shop floor ended quickly. One base did not show the tilt of the long housing because it was part of the error itself. Three control points and a base close to the working setup gave a clear picture: the middle was fine, and the step drifted at the edges, which was exactly what prevented assembly.
Where people most often make mistakes
Most often the problem starts not with the instrument, but with the base. The inspector or operator picks the surface that is easiest to reach with a probe or stand and gets a neat number. But if the step on the drawing is tied to another base, that measurement is almost useless. On a large housing, the difference between easy to measure and correct to measure can easily amount to tens of microns.
The second common mistake is measuring at one point only. For a small part, that sometimes passes, but a long or wide housing does not forgive it. One corner may sit higher, another lower, and the middle may also shift after machining or clamping. In the end, one point shows the nominal value, while the next one is already out of tolerance.
Confusion also comes from habits that seem harmless: using the nearest surface instead of the one the dimension comes from, checking the step in only one place, not considering how clamping pulls the housing, combining measurements from different setups into one report, and writing down only the final number without the support scheme and contact point.
Clamping influence is often underestimated as well. A long housing may twist slightly on the supports or deflect if it is clamped harder than usual. Then the person removes the part, sets it on the plate more lightly, and wonders why the step height changed. The instrument is not at fault. The measurement conditions themselves have changed.
Another typical situation is mixed results. For example, the base was checked in one setup, and the step was finished after repositioning. The numbers were written in one line as if they were the same measurement. On paper everything looks neat, but such values cannot be compared.
Worst of all is when only one number remains in the log, with no explanation. A day later no one remembers which supports the housing was on, where the indicator was placed, or from which surface the measurement was taken. If the part is questionable, it is almost impossible to reconstruct the picture later.
A simple rule helps a lot: along with the number, always record the base, the support scheme, and at least two or three check points. It takes a couple of minutes, but it immediately shows where the real size is and where the error comes from in the measurement method itself.
Quick check before releasing the part
Before releasing the part, it is worth spending two or three minutes on a short check. On a large housing, that is often enough to catch a false size before a dispute starts between the operator, QC, and the setter. Most often the problem is not the step itself, but how the part was placed and what it was measured from.
A quick check works better than one rushed measurement at one point. If chips are left under the base, a burr hangs on the edge, or the housing rocks slightly, the instrument reading looks precise, but it no longer means much for the part.
The sequence is simple:
- Clean the base and the contact area. Wipe the support surfaces, remove chips, and check the edges.
- Look at how the housing sits. Press on the corners by hand. If the part rocks, find the cause first.
- Check repeatability. Set the part, take a reading, remove it, and set it again.
- Do not limit yourself to one point. Measure at the edges and in the middle.
- Compare it with the inspection sheet. It should show the support scheme and the measurement points.
This order is especially important on long housings, for example in construction machinery assemblies. The edges may sit tightly, while the middle hangs slightly or, on the contrary, is being pushed up. If you check only one edge, the step measurement on the housing will show a normal value even though there is already a shift in the middle.
If even one item does not match, it is better not to sign off the part right away. First restore a clear measurement base, repeat the setup, and only then record the result.
What to do next on the shop floor
If the step measurement jumps from part to part, there is no point changing the tolerance right away. First bring order to the base and to the inspection route itself.
For a specific housing, you need one clear basing scheme that is used both on the shop floor and in QC. Not the way people are used to doing it, but a short rule: which surfaces define zero, where the support is checked, and at which points the size is taken. It is better to add a simple sketch to the route card right away so that each shift does not interpret the base differently.
One measurement point on a large housing rarely gives the full picture. For step height control, it is useful to add several points along the length or at the corners of the part. Then it becomes immediately clear where the problem is: in the step itself, in the housing tilt, or in the fact that the base sat differently than expected.
Usually four steps are enough: fix one basing scheme for the specific housing, add two or three inspection points to the route, separately mark the dimensions that most often drift, and record which tool was used and in what position the measurement was taken.
That is already enough to remove most disputes between production and inspection. When the setter and the inspector look at the same part together, the cause is usually found quickly. One sees how the part was clamped and what may have shifted the housing after machining. The other sees where the measurement base does not match the working support.
It is useful to examine two or three disputed parts right next to the machine, not at the end of the shift and not from memory. On a long housing, a difference of a few hundredths between points often explains the whole size conflict.
If the housing keeps moving after machining from batch to batch, it is worth checking not only inspection, but also the process itself: the machine, the fixture, the clamping, and the sequence of operations. In such cases, practical metalworking materials from the EAST CNC blog are also useful. The company supplies CNC machines for metalworking, helps with selection, commissioning, and service, so this kind of review is usually easier to connect to the real work of the shop floor.
It is better to test the new procedure not on one part, but on the next batch. Take several housings in a row, measure them using the new scheme, and compare the spread. If the numbers are closer together and there are fewer disputed parts, then housing dimensional inspection is finally based on the real geometry rather than on a random base.
FAQ
Why does one base often give the wrong size on a large housing?
Because a large housing almost never sits on its supports in exactly the same way every time. The part may twist a little, sag under its own weight, or rest on only part of the surface, and the instrument then shows a mix of the actual size and the tilt. On paper the base looks flat. In the shop, the result is affected by the contact points, the condition of the supports, and the state of the surface itself.
How can I tell whether the error comes from the setup and not from the instrument?
Do a simple test: set up the housing, measure it, then remove it and place it again. If the reading changes noticeably, first look for a problem with how the part sits, the supports, or dirt, not with the indicator. Another sign is that the base gives different zeros on the left, right, and in the middle. That means the housing is sitting unstably.
How many points should be checked when measuring a step?
Usually you check at least three points along the length: left, middle, and right. On a long housing, one measurement almost always hides a tilt or twist. If the housing is wide or has a complex shape, also check the points near the corners where the part actually works in the assembly.
Which base is best for measuring step height?
Use the base that the dimension works from in assembly. If the step defines the position of a cover, bearing, or adjacent surface, those support surfaces should be part of the inspection. A convenient wide surface is not always the right choice. If the part does not work from that surface in the assembly, the measurement can easily drift off.
Should the step be measured right after machining?
It is better not to rush. A warm housing changes size and sits on its supports differently from a cooled one, especially if the part is long and heavy. Let the part and the fixture equalize in temperature, then take the measurement. That gives you a calmer and more repeatable result.
What should be checked before measuring step height?
First clean the base, the step, and the supports. Remove chips, oil, dust, and check the edges for burrs. Then see whether the housing rocks on the table. If it springs or tips, fix the setup first and only then take the instrument.
Why remove and set the housing again before a repeat measurement?
Repositioning quickly shows whether the part sits the same way each time. If the reading is almost the same after the second setup, the base is working properly. If the numbers drift, do not argue with the number. First find where the part loses stability: on the support, on the edge, or in the basing scheme.
Can I trust a single measurement in the middle of the housing?
No, that is not enough. The middle often looks fine even when the size has already shifted at the edges. That is exactly how disputes start at assembly: the report shows a nice number from one point, but the mating part does not seat evenly.
What should be recorded in the report besides the size itself?
Record not only the number, but also the base, the support scheme, and the points where you took the measurement. Otherwise, the next day no one will understand exactly how the housing was positioned. It is also useful to note the repeat measurement after repositioning. Then you can see the real spread and the unstable setup separately.
What should be done if the report says the step is within tolerance, but the part does not fit during assembly?
First do not look for someone to blame in assembly or inspection. Repeat the measurement against the working base, check several points, and reposition the housing. Often it turns out that the part was not sitting in the measurement setup the same way it sits in the assembly. If the new measurement scheme confirms a shift at the edges or corners, then it is time to look at machining and clamping.