Spindle and cabinet cooling: what to check in the chiller
Spindle and cabinet cooling: how to check the chiller’s water, heat exchanger and early signs that a chiller is losing temperature control.
Why cooling starts to work worse
Chiller problems almost never appear suddenly. Usually the system loses its cooling margin gradually, and at first it looks like a small issue. In the morning the machine runs fine, but by mid-shift the temperature rises by 1–2 °C.
This happens when the cooling was sized for normal conditions with a small reserve, and that reserve begins to disappear. The water gets dirtier, the heat exchanger accumulates deposits, the radiator clogs with dust. The chiller still runs, but no longer as stably as before.
The first noticeable sign is not a failure but a change in the machine’s usual behavior. The spindle takes longer to cool after a load. At the same cutting mode and on the same part the temperature stays higher than normal. If the operator knows the cycle well, they notice this quickly.
The picture is similar for the control cabinet. While the shop is cool, the difference may be almost invisible. When the shop air heats up, the chiller and ventilation no longer have margin, and the cabinet rejects heat worse. On a hot day this appears especially quickly.
Usually small signals appear first:
- temperature slowly rises during the shift;
- overheat warnings occur more often than before;
- components take longer to cool after a stop;
- during the hottest hours the machine performs worse than in the morning.
There is another reason this fault is easy to miss. A chiller can hold setpoint without load or on short cycles, but sag on a long series of parts. Because of this the problem seems intermittent: today everything is fine, tomorrow the same machine gives a temperature warning.
This is common in workshops. For example, a lathe processes a morning batch without notes, but toward evening it shows spindle warnings more often. The machine did not get worse in a single day. Several small losses in the system simply added up to a noticeable problem.
What to keep within limits
A chiller must consistently remove heat from the spindle. If the temperature fluctuates even slightly, the machine starts to hum earlier, takes longer to reach operating mode and holds size worse. On lathes this often isn’t visible immediately: first a few hundredths drift on a long part, then the number of temperature stops grows.
The control cabinet needs its own regime, but the idea is the same. Cool air alone is not enough. You need clean filters, unobstructed airflow, working fans and normal heat removal from the machine area. If dust and heat accumulate inside the cabinet, electronics age faster and drives and modules run with little margin.
Many look for a single big failure, while the problem often consists of small issues. The water became harder, a mesh partially clogged, the heat exchanger fouled, the cabinet door does not seal tightly, a fan spins slower than normal. Each item alone seems acceptable. Together they cause overheating and loss of accuracy.
Keep a few simple things in check: stable fluid temperature without spikes during the shift, steady circulation without flow drop under load, clean water without cloudiness or odor, and clean filters, radiator and heat exchanger. Equally important is free ventilation of the cabinet and absence of hot air around it.
Even a slight overheating affects accuracy more than it seems. The spindle, housing, tool holders and the part expand with heat. If temperature rises slowly, the operator may not link rejects to cooling for a long time. Later it turns out that size drifts only in the second half of the shift.
So it’s better to look not at a single sensor but at the whole picture. If the chiller holds temperature but the cabinet stays hot, the problem remains. If the cabinet is clean but the loop water is dirty, the cooling margin is still fading. Normal operation is when the whole system runs steadily without small deviations that accumulate day after day.
Where to start inspection without disassembly
If the chiller doesn’t yet show an alarm, that doesn’t mean everything is fine. Systems often weaken gradually: temperature holds on the edge, and the issue becomes visible only after a long shift or on a hot day.
First don’t open the unit; look for simple external signs. This check takes a few minutes and often immediately shows where to look next.
- Compare the setpoint with the actual reading on the panel. If the system asks for 22 °C but holds 25–26 °C under normal load, the chiller is already performing worse than spec.
- Check fluid level in the tank. Low level often causes unstable temperature, pump noise and weak circulation.
- Inspect hoses, fittings and connections. Look not only for obvious drops but for damp traces, white residue, drips and dirt that stuck to a wet spot.
- Listen to the pump and fans. A steady sound is normal. Hum, cracking, whining or frequent stops are signs of trouble.
- Check grills and air intakes. If they are clogged with dust, the chiller struggles to shed heat even if the pump is fine.
Do this inspection on a warmed-up machine after it has run 15–20 minutes. On a cold start the chiller may look fine even though it later can’t handle the load.
There is also a very simple shop sign: everything is calm in the morning but temperature creeps up by mid-shift, though mechanics and program haven’t changed. In such cases weak condenser airflow, dropping fluid level or a small leak at a fitting are common culprits.
If after the external inspection you already see a temperature deviation, pump noise or dirty intakes, don’t rush to blame the machine’s electronics. First fix these small items. Overheating often begins exactly with them.
How water quality affects temperature
In a chiller the fluid does more than circulate. It takes heat from the spindle, control cabinet or heat exchanger and carries it away. If the water is dirty, hard or hasn’t been changed for a long time, the system cools noticeably worse even while pump and fans still run without obvious faults.
Cloudy water almost always leaves deposits inside the loop. First it’s a thin film on the walls, then the layer thickens. Heat passes worse through it, and the chiller needs more time to remove the same amount of heat. Typically you see this: the machine runs normally in the morning, but after an hour or two the temperature climbs faster than usual.
Hard water causes a different issue. It leaves scale in narrow channels, on fittings and in the heat exchanger. Passages narrow, flow drops, and heat removal weakens. Because of this the system loses margin even without an alarm and without a sharp sensor signal.
Look carefully at the fluid color and condition:
- a rusty tint often indicates corrosion inside the loop;
- a greenish color may signal contamination or biological film;
- cloudiness and flakes in the tank mean dirt is already circulating;
- a strong smell and sediment on the bottom are rarely harmless.
Regular topping up with tap water accelerates these processes. Each refill brings salts, impurities and oxygen into the circuit. At first it seems fixed—the level is restored and the chiller circulates. But after weeks scale builds up and metal oxidizes faster.
Start the check from the tank. Open the lid and inspect the fluid color, smell and sediment on the bottom or on the walls. If the water is dark, has deposits or rust traces, don’t limit yourself to topping up. It’s better to drain the fluid, flush the loop and fill with what the machine and chiller manual recommend.
This check takes little time and pays off. Often it explains why temperature holds worse even though the chiller does not yet look faulty.
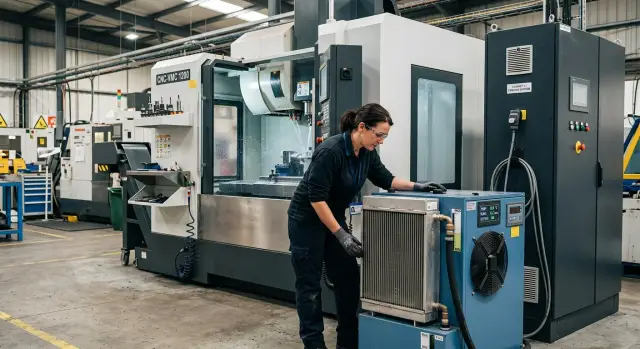
Where dirt and weak heat exchange hide
Weak cooling often begins with the simplest things. The chiller may be functional, the fan may spin and the pump may sound normal, but heat still escapes worse because of dirt, deposits and poor circulation.
First inspect the radiator. Air must flow freely through the fins; a layer of dust blocks it immediately. If an oily film reached the radiator, the problem grows faster: dust sticks in a compact layer and one blow of air is not enough.
Such a deposit rarely appears in a single day. Externally the radiator may look acceptable, but inside the cores air already struggles to pass. As a result the chiller takes longer to shed heat and the cooling system begins to lag behind the machine’s load.
After the radiator check the fluid circuit. A clogged filter cuts flow even if the pump hasn’t shown obvious signs yet. In this case temperature grows not sharply but after a long shift when spindle and cabinet have accumulated heat.
Check the radiator surface and the space in front of it, signs of oily film on the fins, the filter condition, hose kinks and the air around the cabinet and chiller. These small details often give more information than long searches for a complex fault.
A simple thing is often missed with hoses. After equipment rearrangement, repair or panel replacement, a hose can be pinched by a body, tray or fastener. Even a small kink reduces circulation, and temperature drifts appear only under load while the cause is looked for elsewhere.
Another frequent risk area is the air around the cabinet. If there is equipment with a hot exhaust nearby or the chiller is pushed too close to a wall, the system circulates already-warmed air. Then even a clean radiator performs worse.
Look not only at the chiller itself but at everything that prevents air and fluid from moving freely. Dirt on fins, a clogged filter, a kinked hose and a hot zone near the cabinet together cause that unclear overheating that initially looks random.
Step-by-step chiller check
It’s better to inspect when heavy machining can be stopped safely. Remove the load, let the chiller and machine sit for 10–15 minutes and only then take the first readings. If you measure immediately after cutting, the numbers easily mislead.
First record the fluid temperature before starting. Then run the machine in normal mode and take a second value after 20–30 minutes. On a lathe this is usually enough to understand the overall picture. If under load the system used to reach 27 °C but now holds at 30–32 °C, that’s a sign of trouble even without an alarm.
Next check flow. If the chiller has an indicator, watch it. If not, assess the return line: fluid should move evenly without noticeable bubbles, jerks or long pauses. Weak flow gives the same effect as poor heat exchange—temperature slowly but steadily rises.
Then do a simple cleaning:
- rinse the filter;
- clean grills from dust and chip debris;
- remove deposits and oily film from the heat exchanger surface;
- check that air passages are not blocked.
Restart the machine in the same mode and compare the temperature with the first measurement. If after cleaning the chiller reaches operating conditions faster and holds them steadier, the cause was weak heat exchange or poor fluid passage.
If temperature still climbs, move on to the pump and sensors. The pump may be noisy, hot or losing performance without visible leaks. A sensor can be off by 2–3 °C, leading troubleshooting down the wrong path. This happens often: water and radiator are cleaned first, while the real fault is the pump or an incorrect temperature reading.
Workshop example: the problem doesn’t appear immediately
This happens often: in the morning the machine runs steadily, the spindle keeps temperature, and the cabinet isn’t hotter than usual. After lunch the picture changes. First the operator notices fans run longer, then the on-screen temperature rises, and the cabinet feels noticeably warm to the touch.
At this stage it’s easy to blame load or shop heat. But if the system copes in the morning and fails after a few hours, the cause usually accumulates gradually. The chiller is still functional, it’s just out of cooling margin.
In one case the issue wasn’t the sensor or the spindle. When opening the chiller area, a thick layer of dust with an oily film lay on the radiator. The fan spun, but air passed poorly. The chiller ran and sounded normal, so no one suspected a fault early on.
Next they checked the tank. The fluid no longer looked clean: it had darkened and sediment had appeared on the bottom. Such fluid removes heat worse and gradually leaves deposits in the circuit. As a result the heat exchanger takes less heat and temperature climbs not instantly but throughout the shift.
Outwardly everything seemed acceptable, but in fact the system was slowly losing ground to heating. While the machine only warmed up, margin remained. After two to three hours it was gone and the operator saw the strange overheating that appears only in the middle of the day.
After cleaning the radiator, flushing the tank and replacing the fluid the situation changed quickly. Temperature returned closer to working levels, the cabinet stopped getting noticeably hot, and the chiller stopped running almost continuously.
This example is a wake-up call: if overheating doesn’t come immediately, don’t wait for a clear failure. First check the simplest things—airflow through the radiator, water condition and sediment in the tank. Very often the cause is there.
Mistakes that make overheating return
Overheating rarely goes away for long if you only remove the symptom. For a cooling system topping up fluid or blowing dust off the exterior is rarely enough. If the root cause remains inside, the machine will overheat again after several shifts.
One of the most common mistakes is topping up instead of a full fluid change. At first this seems fine: level restored, temperature drops slightly, alarm disappears. But the old fluid may already contain salts, fine rust, oil and biofilm. That mixture transfers heat worse and clogs channels faster.
Mixing different fluids has the same effect. Sometimes people add whatever is at hand without checking compatibility. The result is a cloudy mix, sediment and heavier work for pump and heat exchanger. If one type of coolant was already in the system, adding another at random is not recommended.
You can also clean the radiator incorrectly. If you blow it with a strong stream from the wrong side, dirt may be pushed deeper between fins. The exterior looks cleaner, but airflow is worse. In a week or two temperature will rise again, especially after lunch when the shop warms up.
Another issue is closed grills and poor airflow. It’s convenient to place a box, container or spare parts near the chiller, but the chiller and cabinet need free intake air. Even 20–30 cm of obstruction near the grill can noticeably raise internal temperatures.
What is often missed
If the machine runs fine in the morning but alarms by midday, that’s not a quirk—it’s a direct signal that the heat removal margin is gone.
In practice the picture is simple. The machine starts in the morning and everything is stable. After several hours of cutting, when the shop warms, spindle and cabinet temperatures rise even though settings didn’t change. This means the chiller is at its limit and small maintenance misses quickly show up.
The worst part is these mistakes masquerade as random overheating. Until you replace the fluid completely, clean the heat exchanger properly and free ventilation, the problem will return—sometimes after a day or a month, but the scenario is usually the same.
Short checklist and next steps
If the chiller already holds temperature worse, don’t start with disassembly. First collect simple signs. They quickly point to the cause: water, airflow, circulation or the chiller itself.
A quick check takes 10–15 minutes:
- look at current temperature and tank fluid level;
- assess the water by color and clarity;
- inspect filter, radiator, fans and hoses;
- compare readings from morning and later under normal load;
- record temperature, pump noise, errors, traces of leaks and fan operation.
A single measurement tells almost nothing. If temperature holds steady in the morning but starts rising after an hour of work, the cause is often worsened heat exchange or weak circulation. If overheating appears immediately after startup, first check fluid level, sensor and ventilation condition.
Keep simple logs: date, time, machine mode, display temperature and external observations. Such a journal helps avoid guessing and saves time when calling service. A technician understands the situation better with concrete numbers and a repeatable scenario rather than a vague complaint.
When not to delay
If the fluid darkens quickly, the chiller is louder than usual, fans jerk or temperature rises almost daily, DIY measures rarely fix it for long. In that case plan a full cooling-system check.
If you need a service inspection, EAST CNC works with CNC machines, commissioning and maintenance for metalworking equipment. You can consult east-cnc.kz not only for blog tips but also for checking the entire cooling chain—from the chiller to machine assemblies.
The most common post-inspection mistake is simple: top up the fluid, wipe exterior dust and stop there. If the root cause is a clogged heat exchanger, old filter or weak pump, overheating will return. It’s far better to record symptoms properly once and check the whole system.
FAQ
What are the first signs that a chiller is cooling worse?
Most often temperature slowly rises toward the middle of the shift while the machine still runs fine in the morning. Another common sign is that components take longer to cool and overheat warnings appear more often.
Where to begin inspecting the chiller without disassembly?
Start by comparing the set temperature with the actual reading on the panel, check the fluid level and inspect the intake grills for dust. Then inspect hoses and connections for damp spots and listen to the pump and fans: an even sound is normal, while grinding or jerks are worrying.
Why does water quality affect cooling so much?
Dirty or hard water leaves deposits inside the circuit and narrows passages. As a result heat transfers worse, flow falls, and temperature starts to climb under load.
Can chiller overheating affect machining accuracy?
A small temperature rise already affects dimensions because the spindle, housing, tool holders and the part expand when heated. At first this shows only on long parts or in the second half of a shift, then the number of temperature-related stops increases.
Why is everything fine in the morning, but temperature rises after lunch?
Usually at that time the workshop is warmer and the system is already near its limit. If the radiator is clogged, fluid level is low or flow is weak, the issue shows up more strongly after several hours of work.
Can simply underfilling the fluid cause overheating?
Yes. Low level often causes unstable temperature, pump noise and poor circulation. Even without an alarm, the chiller holds setpoint worse, especially on long production runs.
Where does dirt most often accumulate and reduce heat exchange?
Start with the radiator, filter, heat exchanger and hoses. Dust, oily film, a clogged filter or even a small kink in a hose often steal the cooling margin faster than expected.
How to tell if the pump or fans are no longer working properly?
Listen to them on a warmed-up machine, not immediately after startup. The pump and fans should run smoothly, without whining, cracking, stops or noticeable drops in air or fluid flow.
Why does topping up the water rarely solve the problem for long?
Because the old fluid may already contain salts, rust, oil and sludge. If you only top it up, you temporarily hide the symptom, but deposits and dirt remain inside and overheating will return soon.
When should I call service instead of trying to fix it myself?
Don’t wait if the fluid darkens quickly, the chiller is louder than normal, fans jerk or temperature rises almost every day. In such cases it’s better to inspect the whole system rather than rely on quick external cleaning.
What is often overlooked when overheating keeps returning?
A typical sign is stable operation in the morning and warnings by midday. That means the cooling margin is gone: clean filters, flush the heat exchanger and restore proper ventilation instead of treating only the symptom.