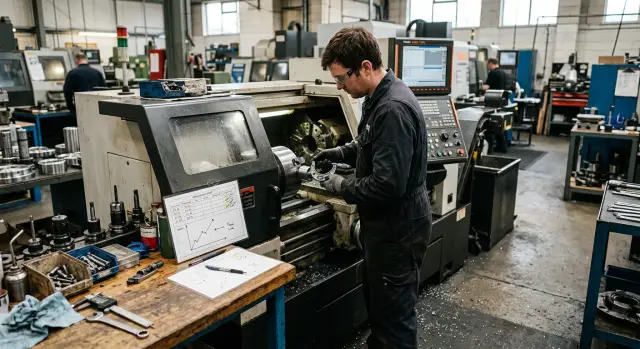
Size Trend in a Series: How to Catch Drift Before Scrap
Size trend in a series helps you spot size drift before it turns into scrap. We show a short measurement chart, check frequency, and the right moment to stop the process.
Why the size drifts unnoticed
In a series, the size almost never goes out of tolerance in one sharp jump. More often it shifts little by little: by a hundredth or two, then another one. The first part may be perfect, and an hour later the same setup already gives a different result.
That can happen even in a stable process. The tool wears, the machine heats up, and the blank changes slightly in hardness. Each deviation is small, so it is easy to miss on a single part.
That is the problem. As long as the size stays within tolerance, everything looks fine. The part is good, there is no alarm, and the process keeps running. But the margin to the limit is already shrinking, and the most dangerous drift often happens right inside the tolerance band.
The first good part does not save the whole batch. It only shows one thing: at setup, the size was correct. After that, cutting conditions change. On a long run, this is especially easy to see: the beginning is calm, then the size slowly creeps up or down.
Checking only at the end of the shift is almost always too late. By then, the machine has already made many parts, and part of the batch is at the edge of tolerance or beyond it. Then you have to sort parts, remeasure them, and look for the moment when the drift started. That takes longer and costs more than short checks during the run.
Usually it looks like this:
- the first part lands closer to the middle of the tolerance band;
- after a few cycles, the size shifts, but the part is still good;
- the next check shows it getting close to the limit;
- a few more parts, and scrap appears.
This kind of trend rarely stands out right away. You only see it when the operator looks not at one good part, but at several measurements in a row. Even a simple measurement chart helps catch the moment when the process can still be stopped without losing the whole batch.
Which dimensions to put on the chart
You do not need to put every dimension of the part on the chart. Extra numbers only get in the way: the operator wastes time, and the trend gets lost in the noise. For a working chart, one to three dimensions are usually enough, the ones that directly determine whether the part is acceptable.
Look at the dimensions that affect fit, clearance, or the position of the next part. On a turned part, this is often the bearing diameter, the bushing seat, or the step length to the stop. These are the places that show first when the process starts to drift.
Another simple guide is a tight tolerance. If the tolerance band is small, the size will show tool wear, thermal drift, or a shift in correction faster. A dimension with a wide tolerance may stay within limits for a long time and still hide the problem.
For each chosen dimension, the chart only needs:
- what exactly you are measuring;
- the nominal size;
- the upper limit;
- the lower limit.
That is already enough to see how the actual value changes from one check to the next. If you want to make shop-floor work easier, add a column for the actual size and the check time.
One common mistake ruins the whole chart: today you measure from one reference, tomorrow from another. Then the numbers can no longer be compared. Measure the same point, the same way, from the same reference. If you are checking a step diameter, always place the part the same way and do not move the measuring point closer to the chamfer or radius.
A simple example: a shaft has a 25 mm diameter for a fit and an overall length of 80 mm. It is better to put the 25 mm diameter on the chart if its tolerance is, for example, +0.00 / -0.02, while the length has a looser tolerance. By length, the part may still pass for a long time, while the diameter is already drifting and causing assembly problems.
In short, the chart should keep the dimensions that decide the part’s fate. Everything else can be checked less often. Then the chart stays short, clear, and truly useful.
How to set up a short measurement chart
A short chart only works if the operator fills it in within 10-15 seconds. If the form is too long, people put it off until later, and the trend is lost. You need a chain of points in the same order the parts come off the machine.
The simplest option is one sheet next to the machine. Not in a supervisor’s folder and not in a separate log on the inspection table, but right where the work is happening. Then the record is made immediately after the measurement, without relying on memory or guesses.
Leave one line for one part or one sample, if you are not measuring every piece. That is enough to see where the size is going: up, down, or in jumps after an adjustment.
Usually five columns are enough: check time, part or sample number, actual size, deviation from nominal, and operator action.
The "action" column is often forgotten, and that is a mistake. If the operator adjusted the offset, changed the insert, or simply rechecked the size with another tool, it should be written down. Otherwise, an hour later no one will understand why the line changed suddenly.
It is convenient to keep the chart in the same format for every run. For example, like this:
10:20 | part 12 | 24.98 | -0.02 | no action
10:35 | part 18 | 24.97 | -0.03 | no action
10:50 | part 24 | 24.95 | -0.05 | offset adjusted
11:05 | part 30 | 24.98 | -0.02 | checked after adjustment
Record points strictly in order. Do not copy data later from rough notes and do not sort the entries "for neatness." The point of the chart is not a tidy archive, but to make the eye catch size drift right away.
If the sheet does not have enough space for a shift or batch, the form is too detailed. On a machine, a simple sheet is better than a pretty two-page form. On a turning run, that is usually enough to spot a problem a few points before scrap starts showing up.
How to set the check frequency
It is better to set the check frequency not by habit, but by how the size behaves. If a part drifts smoothly because of heating, insert wear, or blank variation, infrequent checks will give you a late warning. Too frequent checks are not good either: the operator wastes time and loses rhythm.
A simple rule works well at the start. Measure the first 3-5 parts in a row after setup. That way, you can see whether the machine holds size right away or whether it is still moving during warm-up. One good part proves nothing. You need at least several points in a row.
When the size settles into the normal range and the row shows no clear drift, you can increase the interval. For an ordinary run, checking every 10-20 parts is often enough. But that is not a universal number. If the tolerance is tight, the material behaves unevenly, or the insert wears quickly, the interval is better shortened. If the process is stable and you already know its behavior, the interval can stay longer.
Drift usually breaks at the same moments. After changing the insert, measure several parts in a row again, even if everything was fine before. A new cutting edge often changes the actual size on the first few passes.
The same rule applies after a pause. The machine cools down, the spindle and other units warm up again, and the part can shift a little. After lunch, a changeover, a stoppage, or a morning start-up, go back to frequent checks and only then return to the normal interval.
A quick guide is this: first in a row, then at intervals, and after any change, back to in a row again. A change is not only an insert, but also a new batch of blanks, an offset adjustment, a different operator, or noticeable heat in the shop.
A good check frequency should catch the moment the size has just started to drift, not when you already have a box full of scrap.
How to read the trend across several points
One measurement says almost nothing. It shows the condition of one part at one moment. You only see the trend in a series of values, when you look not at one number, but at 4-6 measurements in a row.
Suppose you are turning a shaft with a tolerance of 24.95-25.05 mm. The first parts read 24.97, then 24.98, 24.99, and 25.00. Officially, there is still no scrap. But the row already shows movement upward. If you wait until 25.05 is exceeded, you will notice the drift too late.
Two or three measurements in a row in the same direction already deserve attention. You do not need to wait for a long history. If the size rises three times in a row or falls three times in a row, the process is changing. The reason may be ordinary: heating, insert wear, a new batch of blanks, or play in a unit.
Look at several things at once: where the average is going, whether the spread stays the same, how fast the row is getting close to the tolerance limit, and whether the shift from point to point is speeding up.
The middle of the tolerance band is a useful reference. If the process started near the lower limit and then reached the middle, do not keep the same inspection rhythm. Check more often. For example, if you measured every 10th part, switch to every 5th or 3rd until you see the row stabilizing again.
Also watch the spread. If the values are not only moving up or down, but also starting to jump more, that is a bad sign. For example: 24.98, 24.99, 24.99, then 25.00, 25.02, 24.99, 25.03. At that point, the problem is no longer a calm drift, but a loss of stability. In that moment, it is better to prepare to stop and look for the cause than to hope the size will come back on its own.
In practice, the operator rarely has time for calculations, and they are not needed. A short chart that shows the direction of the row is enough. If several points move in the same direction and the spread is growing, the process is asking for intervention much earlier than the first scrap part appears.
When to stop the process
Waiting for scrap is too late. If the points on the chart are moving toward the limit in a steady line, it is better to stop the machine before it crosses the boundary. Scrap usually does not appear suddenly: the size drifts step by step, and that step can be seen in advance.
The guide is simple. Look at how the size moved between the last checks and compare that with the remaining margin to the nearest limit. If by the next check the part will almost certainly reach the limit or cross it, the run should not continue. Stop now, not after one more box of parts.
Example. A shaft is running at 20.000 mm with a tolerance of 19.990-20.010 mm. The last three checks gave 20.003, 20.006, and 20.008 mm. The movement is clear. If you check every tenth part and the trend continues, the next point may be 20.011 mm. One step away from scrap.
There is a second signal as well. You made an adjustment, but the size did not move back closer to the middle of the tolerance band. Then you made another one, and the picture stayed the same. If two adjustments in a row do not fix the drift, the cause may be more than just the correction value. Often it is something else:
- the tool wore out faster than expected;
- the part or machine heated up;
- the clamping is not holding the part steadily;
- chips are interfering with seating or measurement.
At that point, it is better to stop the machine and check the cause by hand, rather than keep turning the offset further. Otherwise, you may end up with a batch of parts whose size keeps changing: some will pass, some will not, and the source of the problem will remain.
Writing the reason in the chart is also useful. A short note is enough: "tool wear," "heating after 40 parts," "chips in the jaws," "overclamping." After a few runs, these notes save time. The operator will more quickly know what to check first if the size starts drifting toward the same limit again.
The rule is simple: if the trend is moving toward the limit steadily and calmly, do not wait for scrap to appear. A five-minute stop is almost always cheaper than sorting the whole run.
A simple example on a turning run
On a turning run, the most dangerous thing is not one bad measurement, but a smooth shift toward the tolerance limit. Scrap has not appeared yet, but several points already show that the size is drifting.
Take a simple shaft with a nominal size of 30.00 mm and a tolerance band of 0.02 mm. For the example, let us assume the upper limit is 30.020 mm. The operator does not wait until the end of the batch, but keeps a short measurement chart during the run.
The chart shows four measurements in a row: 30.000, 30.006, 30.010, 30.014. All parts are still good. If you look at each point separately, there seems to be no reason for concern. But if you look at the row, the picture is different: the size is rising by almost the same step.
This is not random variation, but a directed shift. If the next part adds about 0.004 mm again, the result will be 30.018. One more part like that will give 30.022 mm, and that is scrap.
That is why the operator stops the process earlier. They check the simple causes: warm-up, tool condition, a correction error, chips on the reference surface, or chips on the measuring tool. If the cause is clear and the machine is running steadily, they make a small size correction, for example 0.006 mm.
After the correction, the run usually moves back closer to the middle of the tolerance band. The next measurements may be, for example, 30.008 and 30.009 mm. That is a comfortable zone: there is room before the upper limit, and the operator can again see the behavior of the process instead of guessing from one part.
In such an example, a short chart is more useful than long notes made just for reporting. Part number, time, and actual size are enough. With four or five points, you can already see when to keep going and when it is better to stop for a couple of minutes instead of ending up with a dozen parts to sort or scrap.
Where people most often make mistakes
The most common mistake looks harmless: one chart uses different measuring tools. One operator uses a micrometer, another uses calipers, and a third measures on a stand. Then the numbers do not match, and it seems like the size is drifting. In reality, it is not the part drifting, but the measuring method.
The same problem appears when people change the contact point. Today they measure closer to the edge, an hour later a little deeper on the land. The difference can be several hundredths, and the chart shows a false drift. If you are tracking a trend in a series, the measuring location and method must be the same for every part.
Many people make the picture even worse by writing only "good" or "bad" on the chart. That kind of record does not help catch drift early. While the part is still within tolerance, the number may already be slowly moving up or down. If the actual size is not recorded, you will not see it.
The problem often starts after the first correction. The operator sees a shift of a couple of hundredths and makes too large an adjustment. The next part goes the other way. Then they adjust again, and the size starts swinging around the nominal. That is no longer a process trend, but a trace of abrupt actions.
A simple rule usually helps: do not adjust the machine based on one random point. First look at 2-3 measurements in a row, check the gauge, and make sure the measuring method has not changed. Only then make a small correction.
Another common mistake is skipping the check after changing the tool or insert. People rush to get the machine back into cycle and think that because the correction is written down, everything will be the same as before. But a new tool often cuts a little differently. The first part after replacement should be measured and entered in the chart separately.
In practice, it looks like this: before lunch, the shaft stayed within 24.998-25.002 mm, then the insert was changed and the first part was not checked. Ten parts later, you get 25.008 mm and argue about when the drift started. If the first part after the change had been measured and recorded right away, the reason would have been clear sooner.
A good chart is not about paper. It keeps one gauge, one measuring point, real numbers, and calm corrections without unnecessary jerks.
A quick check before a new batch
Size drift often starts not with the tool, but with something small before the batch begins. One chip on the support, a warm part right after machining, or a gauge zero that has shifted can cause a deviation that first looks random and then turns into scrap.
Before the first part, it is better to spend 3-5 minutes on a quick check. That is faster than later sorting out disputed measurements and stopping the machine after the size has already drifted.
Usually four actions are enough:
- wipe the part, the measuring tool, and all support surfaces;
- check the gauge zero against a master or standard;
- make sure the part is not hot after machining;
- open an empty chart in advance and write down the stop rule.
Cleanliness matters more than it seems. If a film of coolant is left on the end face of the part and fine chips stick to the micrometer anvils, you will get a false size. On a turning run, that mistake can easily eat up a couple of hundredths, and the operator starts adjusting for no reason.
Temperature works the same way. If one part was measured right after removal and the next one five minutes later, the numbers can no longer be compared fairly. It is easier to agree on one rule: measure only after the same pause, for example 2-3 minutes after the part is removed.
The empty chart is also needed before start-up, not after the first measurements. It should already include the part number, time, size, tolerance, and a simple stop threshold. For example: if three points in a row move in the same direction and the total shift is more than half the tolerance, the operator calls the setter and does not continue blind.
Another common failure is that nobody knows who is responsible for the decision. One person measures, another looks at the chart, a third is busy with the machine, and the run keeps going on momentum. It is better to agree in advance: who takes the measurement, who records it, and who gives the stop command.
If you repeat this routine before every new batch, the chart stays cleaner, there are fewer disputed numbers, and drift is noticed before the part goes out of tolerance.
What to do next
Do not try to rebuild the whole inspection system at once. Start with one dimension that most often drifts in the run and has the biggest impact on whether the part is acceptable. Take one batch and keep a simple manual chart: part number, actual size, check time, and a short note if the operator changed the correction or the tool.
That is already enough to see the process in numbers, not by feel. Often the problem becomes visible before the first scrap part appears. If the size is still within tolerance, but each next check moves in the same direction, it is better to stop the process for three minutes than to review the whole lot later.
After one or two runs, compare two cases: where you stopped in time and where you pushed to the last minute. The difference is usually very clear. In the first case, you change the correction or the tool without losses. In the second, you get extra checks, arguments about part quality, and machine downtime.
To make the habit stick, keep the plan simple:
- choose one dimension to control;
- set the same check interval for the whole run;
- note every intervention in the process;
- watch not only the tolerance, but also the direction of drift;
- after the batch, briefly review where you reacted in time.
If the drift repeats from one run to the next, the cause may no longer be only in the measurement chart. In that case, it makes sense to check the machine rigidity, the repeatability on your part, and how quickly setup and service issues are handled.
In such cases, a discussion with EAST CNC specialists, the official representative of Taizhou Eastern CNC Technology Co., Ltd. in Kazakhstan, may help. The company supplies CNC lathes for metalworking and runs a blog with equipment reviews and practical tips, so it is better to discuss not abstract "accuracy," but your specific case: which size is drifting, after how many cycles it starts, and how much time goes into inspection.