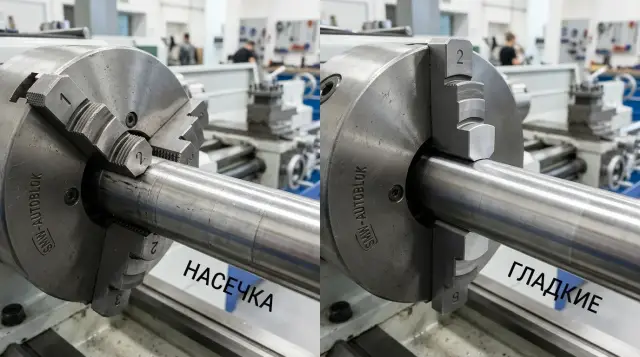
Serrated or Smooth Custom Jaws: What Damages the Base
Serrated or smooth custom jaws — we compare part holding and the risk of marks on the finished base so you can choose the best option for frequent re-clamping.
Where the problem starts
The debate over which custom jaws are better — serrated or smooth — usually does not begin with the first part. The real problems show up when the part has to be put back into the chuck.
After the first clamping, the base already changes. Micro-marks remain on the contact land: light dents, scratches, and sometimes barely visible deformation. They may not be obvious at first, but on the next setup they change how the part seats.
If the part is returned at a different angle, the jaws press on new points and add new marks to the finished surface. If the operator tries to land on the old impressions, that does not always help either. One jaw may seat sooner, another later. As a result, runout increases, and the size after re-machining starts to drift by hundredths.
On a finishing operation, this shows up quickly. A small clamping mark lifts the part slightly on one side or shifts the axis. The machine still follows the program exactly, but the part comes out with a shift, taper, or unstable diameter. From the outside it looks like a setup error, although the cause is often much simpler: the base was already damaged during the previous clamp.
The risk is higher with soft materials. Aluminum, brass, and some stainless steels take a mark faster than hard steel. Thin walls add another problem: the jaws do not just leave marks, they also slightly deform the shape. If the clamping land is narrow, the pressure is concentrated in a small area, and the base gets damaged even faster.
A typical shop-floor situation looks like this: a bushing was removed after measurement and then returned to the lathe chuck for a short finishing pass. The first-clamp marks are almost invisible. After re-clamping, the indicator shows an extra 0.02–0.03 mm, and the finished base no longer repeats the way it should.
How serrated and smooth surfaces differ
Serrations hold the workpiece more securely because they do not just press — they also bite into the surface. This is easy to see on parts with varying load. The jaws are less likely to let the part rotate or shift along the axis. If the allowance is large, the overhang is noticeable, and the cut is heavy, this kind of clamping usually forgives more mistakes.
Smooth jaws work differently. They do not dig into the base; they hold through contact area and the correct clamping force. They usually leave fewer marks, but only if the turner has chosen the force correctly. Too little force — the part slips. Too much — the base deforms, and the benefit of the smooth surface is lost.
The contact patch matters most. If the jaw touches the part on a narrow strip, pressure on the metal rises sharply. From the outside everything may look fine, but that is exactly where impressions, ovality, and size shift after re-clamping often appear. So a smooth jaw with poor seating can damage the base more than a serrated jaw with good support.
Material also changes the picture a lot. On steel, serrations often leave a noticeable but acceptable mark and still hold reliably. On aluminum, the same serration deforms the surface faster and leaves a deeper pattern that later interferes with the finished base. Smooth jaws on aluminum are usually safer if the support is wide and the cutting conditions are calm.
If you compare the two options without tying them to a specific part, there is no single winner. For rough and reliable holding, serrations often win. For re-clamping on a finished base, a smooth surface is usually better, if the jaws are bored accurately to the diameter and the chuck does not require extra force.
When serrations make sense
Serrations are not needed “just in case” — they are used for a specific problem: the part slips or rotates in the chuck. That can happen with interrupted cutting, a heavy pass, or a slippery material. If smooth jaws only hold when clamping force is increased noticeably, that is already a bad sign.
In that situation, serrations often help hold the workpiece with less force. They grip the surface better, and the part shifts less during cutting. This is especially useful when the contact area is small: a short land, a narrow shoulder, a thin ring, or a short clamping length. On a smooth surface, such contact can break loose easily, especially if vibration appears.
But serrations are justified only when there is a rough zone or a separate machining land under the clamp. If the jaws bear not on the finished base but on stock allowance or a section that will be machined away later, the marks are much less serious. For re-clamping, that is often the calmest option: the clamp holds more securely, and the working base stays intact.
Usually serrations are chosen when at least two of these conditions are met: the part has already tried to slip on smooth jaws, clamping is applied on a rough area, the contact zone is short or narrow, and increasing clamping force deforms the part more than a light serration on allowance.
Simply put, serrations win where the risk of slipping is higher than the risk of an imprint. This is especially true for parts that return to the chuck several times. It is better to leave a mark on allowance than to lose size after a slip during a finishing pass.
When smooth jaws are better
If a part is removed and then put back for finishing, any chuck mark quickly becomes a problem. On the first setup, the mark seems minor; on the second, it already changes how the part sits and shifts the size.
Smooth jaws often win for a simple reason: they do not press into the base as aggressively as serrations. If the jaw is bored to the part diameter or shaped to match its contour, contact is made not along a narrow line or individual teeth, but over a larger area. Then the workpiece can be held with less force without losing stability.
This is especially noticeable on a finished base that later affects fit. For a shaft, bushing, or thin-walled ring, even a shallow mark has an annoying effect: the part seats differently, runout increases, and the dimension drifts from one repeat to the next. In that case, smooth jaws are almost always preferable, if the cutting is already calm and there is enough holding margin.
A smooth surface usually gives the best result when the part goes back into the chuck often, the base is already machined and responsible for fit or concentricity, the jaws are bored to a specific diameter, the contact area can be increased, and clamping force can be reduced without any slip risk.
A simple example: a bushing is machined on one side first, then returned for a finish pass on the outside diameter. With serrations, the chuck holds firmly, but pressure points remain on the base. After re-clamping, the part no longer sits the same way, and the machinist spends more time chasing hundredths than actually machining. With smooth bored jaws, the mark is weaker or disappears altogether because the pressure is distributed more evenly.
There is one exception. If the workpiece is rigid, the surface is rough, and the cut is heavy, smooth jaws may hold worse. But for a finished base during re-clamping, they usually damage the surface much less.
How to tell the base is already suffering
The base is rarely damaged in one clamp. Usually the problems build up little by little, and then the part suddenly stops repeating. Yesterday it sat perfectly; today, after the same operation, it already needs correction.
The first sign is visible right after removing the part from the chuck. Dents, shiny contact spots, or a clear serration pattern remain on the finished surface. If the mark is not only visible but also catches a fingernail, it is no longer cosmetic. The clamp is changing the surface that will later support the part again.
The second sign appears during re-clamping. After the first pass, runout is normal, but after the second or third setup it grows even though the clamping force and locating point are the same. In that case the problem is often not the machine or the indicator. The base receives a slightly different imprint each time, and the part sits differently.
There are also more practical signs. The part starts fitting the inspection fixture worse. Zero on X or Z has to be searched for again almost every time. After the first pass everything looked stable, but then it starts to feel like the part “does not quite seat” or comes in crooked. On a finishing operation, that is enough to create a size shift.
In the debate about jaw type, repeatability tells the truth. If the base no longer repeats, the jaws or the clamping scheme are already working against the part.
How to choose the right option for your part
When choosing, it is better to look at the part itself, not at the setter’s habit. The most common mistake is simple: the workpiece is clamped on the surface that should later stay clean and accurate.
First, figure out which zone can be used without harming the base. If there is a rough land, allowance, or an area that will be machined later, it is better to clamp there. If there is no free zone and the chuck will hold almost a finished surface, smooth jaws are usually safer.
Next, estimate how many times the part will return to the chuck. With one setup, serrations may still pass without noticeable consequences. With two, three, or more returns, small marks add up and the base starts to drift. This is especially noticeable on bushings, rings, and thin-walled parts.
After that, quickly check a few things: what cutting force the operation will create, how much actual contact area the jaws have, how rigid the part is at the clamping point, whether cutting force can be reduced by changing the cutting conditions or tool, and whether there is enough clamping length.
If the area is small and the cut is heavy, smooth clamping may not hold the part without slipping. In that case serrations can make sense, but it is better to move the clamp to a less critical surface rather than risk the finished base.
The most reliable way to choose is simple: do one trial clamp with each set of jaws. After removal, measure runout, inspect the contact mark, and compare how easily the part shifts during re-clamping.
In practice, it comes down to two losses: the risk of losing the part and the risk of damaging the base with the clamp mark. The winner is the option with the lower total risk.
What matters more than the jaws themselves
The argument between serrated and smooth surfaces often goes in the wrong direction. What affects the finished base more is not the surface type, but how the part touches the jaw and how much pressure is applied.
First, look at the contact patch. If the part rests on a narrow strip or on an edge, pressure rises even with normal clamping force. Then marks appear on the base even with smooth jaws. When the contact patch is wide and the jaw shape matches the part profile, the load is distributed more evenly and the risk is much lower.
Clamping force works the same way. Parts are often pulled down “with extra margin” so they definitely will not slip. In reality, the extra force only deforms the base, especially if the part is later put back into the chuck. It is better to set the force according to the actual cutting load than to over-tighten the chuck for no reason.
There is also a very ordinary cause of scrap: chips, thick oil, and fine dirt between the part and the jaw. One hard particle is enough to make the part seat crooked and leave an impression. After that it is easy to blame the jaws, even though the real cause was simply debris in the clamping zone.
The geometry of the custom jaw is also very important. If the profile does not match the outer diameter, shoulder, or thin wall of the part, contact becomes random. Then holding is unstable, and marks appear in the same place every time the part is returned.
And the chuck itself cannot be ignored. Worn guides, backlash, poor clamping repeatability, and spindle runout can ruin the result even with carefully made jaws. On CNC lathes, this becomes especially obvious during re-clamping, when the same seating is needed again and again.
In short, the order is this: cleanliness first, then the contact patch shape, then clamping force, and only after that the jaw surface choice.
A shop-floor example
The difference is easy to see on a normal shaft. After one operation, a shaft with an already finished journal is returned to the lathe chuck for face trimming and a light finishing pass on the adjacent section. On the first setup everything is fine, but on the second a thin mark suddenly appears on the fit surface. The geometry can still be held, but the finished base is no longer truly finished.
At first the shaft was clamped in serrated custom jaws. They held confidently: the part did not rotate, the operator could safely remove the extra 0.1–0.2 mm, and everything looked stable during cutting. But after unclamping, an imprint remained on the journal. Sometimes it was barely visible, sometimes it was already picked up by an instrument. If the part returns to the chuck more than once, that kind of mark starts building a problem.
Then the technologist did not change the whole process — only the clamping method. They installed a smooth jaw bored exactly to the shaft diameter, reduced the force to the level where the part would not move under cutting load, and added a stop so the shaft sat in the same position every time.
After that, holding became softer but not worse in practice. The jaw began to bear over a larger area, pressure was distributed more evenly, and marks on the fit almost disappeared. On the finishing pass, the shaft also stayed steadier because the stop removed variation in overhang. There was no longer any need to over-tighten the chuck “just in case.”
This is exactly the kind of case that shows why one universal answer does not work. If the part is rough and the allowance is large, serrations often forgive more mistakes. If the base is already finished and the part is re-clamped, a smooth jaw with an accurate bore usually damages the surface much less.
Common mistakes
The most expensive mistake is thinking that a more aggressive grip is always better. If the part is later returned to the chuck, serrations often hold more securely, but they also leave a mark on the finished base faster. For a finished surface, that is a bad trade.
Another common mistake is adding serrations simply “for safety” without checking whether that much holding force is even needed. The opposite extreme is also common: on smooth jaws, people simply increase the force, even though they should have widened the contact patch or adjusted the jaw shape.
Another error is clamping on the finished base even though there is a rough land nearby that could be used instead. And one especially frustrating mistake is checking the part only after a batch, not after the first trial cycle. A jaw mark on a fresh part is visible immediately: under raking light, after wiping, and without an oil film. If the nail already catches the imprint, it will only get worse from there.
With smooth jaws, the mistake is usually different. The operator sees that the workpiece does not sit securely enough and simply pulls harder. In the end, a mark appears anyway — not from serrations, but from too much pressure on a small area.
If the contact is weak, it is more useful to redesign the contact itself than to increase the force blindly. Sometimes it is enough to support the part on a wider land, bore the jaw to the part shape, or add support where the part shifts during clamping.
And there is one very simple thing that people often underestimate: oil and fine chips. One chip trapped between the jaw and the part can damage the base more than the difference between a smooth surface and serrations. Before clamping, the contact area should not just be wiped quickly — it should actually be cleaned.
Quick check before startup
Before the first part, it is better to spend five minutes on a trial than later chase marks on the base and rising runout. Mistakes usually come not from the theory, but from small details: clamping the wrong surface, using too much force, or not checking what happens after re-clamping.
First, find the surface that can be used without harming the finished base. If there is no such zone, smooth jaws are almost always safer, but only with a proper contact area. When the contact is narrow or the part is thin-walled, serrations may hold better, but the price is often paid in imprints.
Before starting the batch, it is worth checking five things:
- the jaws bear on an area that does not later serve as a finished base;
- the contact patch is wide enough, and the part does not try to rotate without serrations;
- after two or three re-clampings, the mark does not deepen or spread across the base;
- the chuck holds the part evenly, and runout does not grow after each new clamp;
- the operator knows the force limit and does not tighten “just in case.”
One quick test often gives the honest answer. Clamp the part, remove it, put it back twice, and measure runout and the contact mark each time. If smooth jaws hold steadily and the mark is barely visible, there is little point in switching to serrations.
On the shop floor it looks very simple. A shaft with a finished journal is returned for a small correction. On the first setup everything is fine, but on the third the serrations already draw a ring and the size drifts by hundredths. A smooth clamp with a slightly larger contact area usually gives a cleaner result in that situation.
If the choice comes down to “holds better” versus “damages less,” do a short series of three re-clampings and watch not only the grip, but also the mark. For a finished base, that is more honest than any guess.
What to do next
If the base is already getting marked, do not rush to replace serrated jaws with smooth ones and expect the problem to vanish on its own. It is better to first review the contact setup: where the jaw presses, how large the support area is, how much overhang the part has, and whether the clamping force is too high. Once the clamping scheme is right, the choice of jaw surface becomes much easier.
Trial clamping is best planned during process setup, not after the first batch of scrap. Do several tests on a real blank with the same force that will be used in production. Then remove the part, put it back, and check how the base behaves after re-clamping.
Usually a simple sequence is enough: mark the jaw contact zone, measure runout after the first and second setup, compare the mark on the base after removing the part, and see whether the imprint grows at the same clamping force.
This approach quickly shows what matters more for your part: maximum holding power or a cleaner base without extra marks. Sometimes smooth jaws win immediately. Sometimes the part starts slipping, and then the problem is not the smooth surface, but too little contact area or a poor custom-jaw shape.
If it becomes clear that the base is suffering, first try changing the jaw profile, the bore to match the part, or the clamping location. Simply replacing serrations with a smooth surface does not always solve the issue.
And if the problem is no longer just the jaws, but the repeatability of the equipment itself, then a broader review of the whole machining process is needed. EAST CNC helps with CNC lathe selection, commissioning, and service support. For a shop, that is useful when you need to remove not just a symptom, but the root cause of unstable machining.
FAQ
Which is better for re-clamping: serrated jaws or smooth jaws?
If the part goes back into the chuck for finishing, smooth jaws with a precise bore to match the diameter usually win. They deform the base less and give a more even seating. Serrated jaws are useful when the part tends to slip or rotate. If the clamp lands on a finished surface, serrations usually leave marks faster.
When are serrated jaws really justified?
Use serrated jaws when a smooth clamp no longer holds the part without slip. That happens with heavy cuts, interrupted cutting, a short clamping land, or a small support area. Serrations work best on a rough zone or on stock allowance. Then they hold the part while the working base stays safe.
Why does runout increase after re-clamping?
After the first clamp, micro-marks remain on the base. On the next setup, the part no longer sits exactly the same way, and the jaws press on new points. Even a small dent changes the support. That shifts the axis, and the indicator shows extra hundredths.
Which materials and parts suffer the most?
Marks appear fastest on soft materials. Aluminum, brass, and some stainless steels pick up impressions much sooner than hard steel. Thin-walled parts suffer even more. The jaws do not just leave a mark — they can also slightly distort the shape.
Can smooth jaws damage the base more than serrated ones?
Yes, it can. If the jaw touches the part along a narrow strip or at the edge, pressure rises even without serrations. In that setup, a smooth jaw can leave an indentation just as easily as a serrated one. The real problem is usually a poor contact patch and excessive force, not the surface itself.
How do I know the base is already being damaged?
Look at the surface right after removing the part. If you see dents, shiny contact spots, or a clear serration pattern, the base is already changing. Then check repeatability. If runout grows after the second and third re-clamp, and you have to find zero again, the clamping method is already damaging the support.
What should I check before starting a batch?
First decide which area can be used without harming the base. Then check how wide the contact patch is and whether the clamping force is too high. After that, do two or three re-clamps in a row and measure runout each time. This test quickly shows whether the setup holds the part without new marks.
Should I just increase clamping force on smooth jaws?
Usually not. If you simply pull harder, you often do not solve slipping — you just deform the base. First widen the contact patch, bore the jaws to match the part, or move clamping to a less critical surface. Only then does it make sense to increase the force.
How can I reduce marks on the finished base?
Start with the basics: clean the jaws and the part, and remove chips and thick oil from the contact area. Then make sure the jaw bears on a wider area instead of a narrow land. If the part goes back into the chuck, it is often best to bore smooth jaws to match its diameter and reduce force to a reasonable level. That is often enough to make the marks almost disappear.
What if the size still shifts after re-clamping?
First eliminate the small things: dirt in the chuck, part tilt, excessive force, and a poor jaw profile. Then look at the chuck and spindle themselves — backlash and poor repeatability also cause shift. If the problem remains after you correct the clamping setup, review the whole process. Often the culprit is not one jaw, but the combination of clamping, part overhang, and machine condition.