Scratches on Stainless Steel Parts: How to Reduce the Risk
Scratches on stainless steel parts often appear not on the machine, but during transfer. We break down the route, containers, and inspection for medical device parts.
Where scratches appear
For medical equipment parts, the surface often gets damaged not on the machine, but after machining. The cutting tool did its job cleanly, the dimensions are within tolerance, and the finish looks good. Then the part is removed, placed in a box, moved to the next operation, and a thin mark appears on the metal that no one notices right away.
This happens more often than it seems. When an operator picks up a part by hand, sets it on a table without a soft pad, or slides an edge across a metal surface, stainless steel gets fine scratches. On housings, covers, rings, and thin walls, these marks show up especially quickly.
Shared containers create more problems. If finished parts are mixed together, they rub against each other during any transfer. A short ride on a cart over an uneven floor is enough for matte streaks, small arcs, or tiny gouges to appear on an already clean surface.
Another cause is chips and dust. After turning or milling, tiny hard particles remain on the table, in the container, and even on gloves. They act like an abrasive. A part may look clean, but one trapped chip between two surfaces can leave a visible scratch in just a couple of seconds.
Often the problem stays hidden until the very end. After an intermediate operation, scratches are lost among coolant marks, fingerprints, and general film. Then the part is washed, dried, sent for inspection, and the defect suddenly becomes visible under the light. Because of this, scratches on stainless steel parts are often found only at receiving inspection, after time has already been spent on the batch.
Usually these marks appear in four places:
- when removing the part from the machine and placing it on the nearest surface;
- when storing it in a shared container without cells or dividers;
- when moving it between areas together with chips and dust;
- when waiting for the next operation on a workbench, cart, or rack.
A simple example: after finishing, a sensor housing is placed in a plastic box with other parts. Fine chips from a previous batch were left at the bottom. While the box was moved to washing, the parts shifted slightly, and long scratches appeared on two housings. There was no defect on the machine. Ordinary movement around the shop created it.
Which parts suffer most
Parts that are already almost ready for delivery collect scratches most easily. On stainless steel, this is easy to see: light hits the surface at an angle, and even a tiny mark stands out. For medical equipment parts, this is especially frustrating because appearance and surface cleanliness are often checked more strictly than for ordinary tooling.
Sensor housings, small valves, thin covers, and shrouds are among the most vulnerable. They have few "safe" areas to hold without risk. If an operator places such a part in a shared container, the neighboring part quickly leaves a mark on a flat surface or edge.
Polished flats usually take the first hit. They are wide, exposed, and unprotected. Edges are vulnerable too: one touch against the wall of a box or another part is enough to create a light scratch or dent.
These items are especially sensitive:
- sensor housings with a finished exterior surface;
- valve parts with narrow seating areas;
- thin covers after grinding or polishing;
- small bushings and rings that roll around in shared containers;
- parts with a decorative or inspection-facing side.
Small parts often get damaged not by the machine, but afterward. They are easy to pour together, move quickly, and scratch just as quickly. When the batch is large, the parts rub against each other at every transfer: after turning, after washing, while waiting for inspection, and when being fed to the next area.
Another issue is parts after finishing and washing. At this stage the surface is already "clean," so any new mark looks rougher than it would have in the middle of the route. Manual touch-up rarely helps: it can remove material, damage the geometry, or leave a patch that becomes even more visible later.
In practice, the most trouble comes not from the biggest parts, but from the most delicate ones. A small polished sensor housing handles a shared tray worse than a heavy blank. If a part cannot be quickly reworked later without risk, it should be treated as sensitive from the first transfer, not only after the final operation.
How to build the part route step by step
Scratches on stainless steel parts often appear not during cutting, but in the short moves between operations. The part is removed from the machine, placed on the edge of a table, then moved into a shared box, then taken out again for washing or inspection. Every one of these moves adds risk.
Start with a simple sketch on one sheet. Mark the entire route for the medical equipment part: machine, washing, inspection, intermediate storage, next operation, final packaging. If the route cannot be drawn in a couple of minutes, there are already too many unnecessary steps.
A good route is almost always shorter than it first seems to the supervisor. Remove backward moves, where the batch goes to one corner of the shop for inspection and then comes back for rework on a nearby operation. It is better to arrange operations so the part moves only forward, without loops or repeated handoffs.
It helps to check the route with these questions:
- Where is the part picked up by hand most often?
- Where is it placed in the wrong container?
- Where does the batch wait longer than usual?
- Where are other parts and tooling lying nearby?
- Where does the operator not have enough space on the table?
After that, assign one container to each operation. Not a shared one for the whole area, but its own, with clear labeling. If after turning the part always goes into a cassette with soft cells, the operator will not look for a random tray and stack parts on top of each other.
For stainless steel, a simple rule works well: one cell, one part. It only seems slow on paper. In reality, the shop spends more time on disputed defects, sorting, and repeated inspection than on careful placement.
Also mark the waiting points separately. Usually it is not the machine, but the table by inspection, the cart by washing, or the area before packaging. If the batch sits there for hours, the surface rubs against the container, wipes, neighboring parts, and even chips that someone missed.
A small example: after the final pass, a sensor housing is placed not in a shared plastic box, but in its own cassette. From the cassette it goes to washing, then to surface inspection, and then straight into clean packaging for the next operation. The route looks longer on paper, but there are fewer hand movements. And that is what reduces the risk of scratches.
How to choose containers for each transfer
Containers between operations often damage the surface more than the cutting tool itself. The part comes off clean, but then it is tossed into a shared box, moved around the shop, and small scratches appear at the end. If you want to reduce scratches on stainless steel parts, start not with polishing, but with something simple: how the part is placed after each operation.
Soft trays that hold the shape of the part, instead of letting it roll around, work best. Bushings, housings, and thin-walled rings need support at several points so the edge does not rub against the bottom. If a part is complex, a simple insert made of a soft polymer or dense foam is made for it. It costs little, but it prevents accidental contact.
Crumpled paper seems convenient, but in practice it compresses even more and stops separating the parts. Worse, paper collects chips and dust, and then works like sandpaper when shaken. For medical equipment parts, dividers or separate cells are safer. Then each part sits in its own place and does not hit the next one.
Stainless steel should not be placed directly on a bare metal cart or table. Even if the cart surface looks smooth, it almost always has hard dust, burrs, and traces of old chips. There should be an intermediate layer between the cart metal and the part: a soft plastic sheet, a rubber mat, or a clean felt insert.
Every container has a service life. An insert that was clean yesterday may collect fine chips after a couple of shifts and start scratching every new part. That is why containers must be checked just like tools. If an insert has darkened, filled with particles, or become hard, it should be replaced immediately, not after a complaint from quality control.
In practice, simple labeling helps:
- operation number
- loading side
- maximum number of parts per cell
- surface type that must not be touched
- insert replacement date
A label on the container removes extra guesswork for the operator and warehouse staff. One tray for rough machining and another, looking the same, for a finished part is a common cause of scrap. If the part route in the shop is long, clear containers save a lot of time and noticeably reduce the risk of new scratches.
Where to place inspection points
If you look for scratches on stainless steel parts only before shipment, the problem is found too late. The part has already gone through the machine, the container, the washing stage, and shop movement, and the source of the mark is already hard to catch.
The first point is placed right after removal from the machine. The operator should not only check dimensions. They should quickly inspect the surfaces where the part touched the jaws, supports, chips, and gloves. That way the team can immediately tell whether the defect came from machining or appeared later.
The second point is placed before loading into the container between operations. Here, you check not only the part, but the container itself. The tray, cassette, or box must be clean before every new batch. Leftover chips, grinding dust, or a chipped divider often create the same scratches across the whole batch.
After washing, a separate inspection is needed. On a clean surface, a small mark can sometimes be easier to see, but employees often rush and miss it. A simple routine helps: inspect the same areas under the same light, without arguing about how the part should be turned.
Another point is placed before storage or before transfer to the next operation. This is where an old mistake is often exposed: parts were packed too tightly and started rubbing against each other during transport around the shop. For medical equipment parts, this is especially unpleasant because manual touch-up can then damage the geometry or the appearance.
For the inspection to work, the team must record not only the defect itself, but also where it was found. It helps to note:
- which operation the mark was found on
- which area of the part it appeared in
- which container the batch was in
- who passed the batch onward
- whether the scratch pattern repeats on neighboring parts
If the marks repeat, the batch should be stopped immediately. Otherwise, the shop spends a shift producing scrap for the same reason.
Good stainless steel surface inspection does not require a complex system. You need four or five points along the part route in the shop, the same inspection rules, and a habit of looking for the source right away instead of arguing about who is at fault.
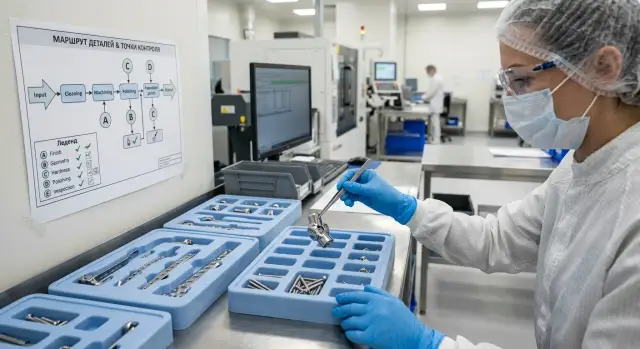
Example with a batch of sensor housings
On a batch of small sensor housings, the problem did not show up on the machine, but between operations. After turning, the stainless steel parts were removed clean, with a smooth surface, but then the whole batch was simply placed in one box. For ordinary mechanical parts, this approach sometimes works. For medical equipment parts, it quickly creates scrap.
At first the marks were almost invisible. The operator noticed them only after washing, when the parts dried and the light hit them at an angle. Small scuffs appeared on the edges, and thin arcs from metal-on-metal contact showed up on the side surface. These are exactly the kinds of scratches on stainless steel parts that are hard to explain later: the machine cuts normally, the tool is fine, but the surface is already damaged.
The reason was simple. While the box was being moved from turning to washing, the housings shifted slightly and rubbed against each other. At the washing station, the risk became even higher: the parts lay close together, the edges touched neighboring parts, and the water only helped them slide across the surface.
What changed
For the trial batch, the route was rebuilt without complicated measures:
- after turning, each part was placed in its own cell
- a container with soft dividers was used for the transfer to washing
- one unnecessary move through a shared table was removed
- after washing, the parts were sent directly back into a cased container
The changes looked minor, but the effect was noticeable the same day. On the repeat batch, the number of marks dropped sharply, and new scratches appeared only on parts that were placed outside the cells once during temporary storage.
This example shows the weak point in the route very clearly. The surface is more often damaged not by cutting, but by the short section between two clear operations, where no one thinks the risk is serious. One shared box, one extra transfer, one wash without separating the parts — and the batch has already lost its appearance.
For such housings, manual touch-up is usually a poor solution. It takes time, changes the outer layer, and gives different results from part to part. It is much cheaper to catch the moment when the parts start rubbing and remove the cause itself. That is exactly why a trial batch is needed: it shows not theory, but the exact point where the route breaks the surface.
Mistakes that damage the surface
For medical equipment parts, even a small scratch can become scrap. On stainless steel, these marks are easy to see, and manual touch-up often only creates a new problem: it changes the size, the edge, or the uniformity of the surface.
A common mistake is using the same container for rough and finishing operations. After rough machining, fine chips and hard dust remain in the cells, corners, and seams. If a finished part is then placed in the same container, it gets scratched not on the machine, but during ordinary movement around the shop. It is especially frustrating when the batch has passed almost the entire part route in the shop without issues.
The second mistake is placing the batch directly on a pallet or metal table without a soft layer. The parts look like they are sitting still, but when the container is moved, the pallet is turned, or there is a light bump, they rub against the hard surface. Long matte streaks then appear on flat walls and near radii. For stainless steel, this is a typical source of defects, even though people often look for it somewhere else.
Another cause of scratches on stainless steel parts is blowing chips into the area where finished parts are already lying. Air lifts tiny particles and throws them onto the clean surface. The same thing happens when an operator handles a part with gloves that already have abrasive dust, grinding residue, or fine chips on them. The outside of the gloves may look clean, but one touch is enough to leave a thin web of scratches.
Inspection only at the end of the shift also works poorly. If the defect is found too late, you no longer know where it appeared: at the machine, in the container, at washing, or during transfer. In a few hours, dozens of parts can be damaged, and the entire batch will need to be reviewed.
The normal practice is simpler than it seems: separate containers for finishing stages, a soft layer at each contact point, clean gloves for final operations, and a quick surface check after every transfer. It takes minutes and usually saves more parts than any final sorting.
A short check before starting a batch
Before the first part, it is worth spending 10 minutes on a dry run of the route. That is cheaper than chasing scratches on stainless steel parts after the whole batch, when the surface has already passed through several transfers and manual touch-up is no longer allowed.
Take one blank or a training sample and move it through the entire shop route. If the part has to be placed "for now" anywhere along the way, the route already carries risk. Any extra transfer almost always means extra contact with a table, vise, gloves, or a neighboring part.
Check five simple conditions.
- The part moves along a short path, with no returns, no waiting on a random pallet, and no unnecessary handoffs between people.
- Every transfer has its own container. After turning, washing, inspection, and packaging, the same shared box should not be used.
- Parts are not piled together. Each one has its own place: a cell, a soft pad, or a divider.
- Surface inspection is placed right after the operations with the highest risk. A final check at the end of the batch will not save you if the defect appeared early.
- The operator knows exactly where to place the part next. If they ask the supervisor every time or choose the spot themselves, the system breaks down quickly.
For medical equipment parts, this is especially noticeable. A housing, bushing, or thin ring made of stainless steel may leave the machine in good condition and lose its surface on the way to washing. The reason is often simple: a clean part was placed next to a semi-finished one, and then both shifted in the container.
A good pre-start check looks simple. There are no "temporary" storage spots on the floor. The containers are labeled. Between operations there is no gap where the part is left without a clear next step. If even one of these points is not ready, it is better not to start the batch. First remove the weak point, then launch the volume.
What to do next
Do not try to fix the whole system at once. Take one route where the surface suffers most often, and break it down frame by frame: after the machine, after washing, after measuring, after storage, before the next operation. If employees can see real photos from each transfer, it becomes harder to argue about the cause of the defect.
Usually, one small batch is enough to find the weak spots. Run a trial shift not at full volume, but with a small number of parts. Separately record where the part touches a hard surface, where it is handled without protection, and where the container collects chips or dust. It is better to collect such notes right on the spot, while people still remember exactly what happened.
How to lock in the working method
When you find a good sequence of actions, record it in the operation sheet. Not in general terms, but very simply: which container stands by the machine, how many parts are in one cell, who performs the surface check, and at what moment. If the rule is not written down, it will start changing from memory after a couple of shifts.
The same sequence should be included in training. Telling a new operator "don't scratch the surface" is not enough. They need to be shown how to pick up the part, where to place it, what to use to separate one part from another, and when to tell the supervisor about a risk. For medical equipment parts, this is especially important: manual touch-up after a scratch often no longer saves the batch.
You can proceed like this:
- choose one problem route and take photos of all transfers;
- run a trial shift with a small batch;
- collect feedback from the operator, inspector, and setup technician;
- approve the containers, movement order, and inspection points;
- add the scheme to the operation sheet and training.
If you are upgrading a section or changing the product range, discuss not only the machine. Bring up right away how the part will move through the shop after machining, where it will be stored, and who is responsible for the surface at each stage. For tasks like this, you can involve EAST CNC: the company has experience with machine selection, commissioning, and service, and a discussion of the part route helps reduce scratches on stainless steel parts even before production starts.
A good result looks simple: the part passes the entire route without extra contact, and the inspection catches the problem not at the end of the batch, but at the moment when it is still easy to stop.