Safe Planes in 5 Axes Without Extra Idle Moves
Let's look at how to set safe planes in 5 axes so you can eliminate unnecessary idle moves, keep the needed margin, and avoid risking the part.
Where the extra idle moves come from
Extra idle moves usually appear not because of the part itself, but because of the habit of using one big safety margin for everything. The programmer lifts the tool to a common safe plane after every pass, the CAM system follows the command, and the spindle rises higher than needed each time. On screen, this looks harmless. On the machine, it turns into seconds that quickly add up to minutes.
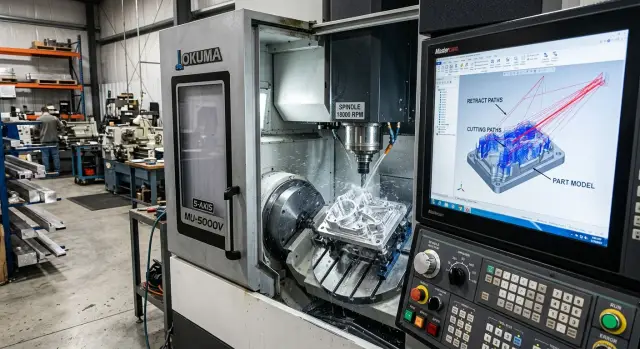
In 5-axis machining, the problem grows faster. Not only the tool moves here, but also the rotary axes. If the path changes tilt, the system often builds this kind of route: retract up, rotate, then move back down. Sometimes that makes sense. But when safe planes in 5 axes are set with too much margin, the machine makes unnecessary moves even where the model has already been checked and there is no collision risk.
Another reason is shared settings for different areas of the part. A pocket, an outer contour, and holes all have different geometry, but many people still keep the same retraction plane for the whole operation. CAM does not argue and simply builds long transfers between sections. On one part, the loss may seem small. On a batch of 50 or 100 pieces, it becomes noticeable in cycle time and part cost.
There is also the human factor. When the toolpath is full of long lifts and returns, it is harder for the operator to review it quickly. In simulation, there is a lot of empty space, useful sections get lost, and dangerous spots are harder to notice at first glance. A program that is too cautious often becomes harder to understand.
This is easy to see on a box-type part machined at different angles. Instead of a short 8-10 mm retract, CAM may lift the tool 80 mm up, rotate the axes, and then lower it back to the surface. One such move is hardly annoying. Dozens of them in one program already stretch the cycle noticeably.
Most often, extra air comes from four things:
- a safe plane that is set too high
- automatic retraction before axis rotation
- the same settings for all areas of the part
- a "just in case" margin that nobody later reduces
If the cycle suddenly grew by several minutes after switching to 5 axes, the first thing to check is not cutting, but the retractions between positions.
Where a safety margin is truly needed
Reducing idle moves feels great until the first contact with a clamp. In 5-axis machining, an extra 10-15 mm of retract can seem like unnecessary caution, but in a few places that margin should not be touched.
The most common risk area is near clamps, jaws, and protruding fixtures. CAM sees the toolpath, but in the shop the part rarely lives in ideal conditions: a bolt sits a little higher, a clamp was turned after setup, a jaw was replaced with another one. If the tool travels close to the fixture, leave a larger gap on both the approach and the retract.
Where it is better to keep the air
When the table or head rotates near tall part walls, raise the tool higher than usual. During rotation, not only the angle changes, but also the actual position of the holder, arbor, and shank. What was clear on a straight move can hit the wall exactly during the rotation.
A long and thin tool also needs margin. On screen it looks like a simple line, but in cutting it flexes, especially after a heavy pass or a sharp change in direction. If you reduce the tool retraction path too aggressively, you may save seconds and easily get a mark on the part or a hit on the fixture.
On the first part of a new program, margin is needed almost always. Even if the model is clean and the simulation passed without problems, the operator has not yet seen how the machine behaves in that axis position. The first run is better done with a higher retract, and only then should the extra air be reduced based on real results.
A separate case is an incomplete fixture model. If the assembly does not include clamps, extensions, washers, or a nonstandard plate, do not lower the height just for a nicer cycle. In such a situation, safe planes in 5 axes must reflect the real machine, not only what was imported into CAM.
A simple guideline is this:
- keep more margin near the fixture;
- raise higher before rotating near tall walls;
- do not shorten tool retracts with a long tool without checking;
- run the first part more cautiously;
- do not reduce height when the model is incomplete.
If a box-type part sits on a fixture plate with two side clamps, it is better to spend an extra 8 seconds on a safe lift than later change a tool and search for where the contact happened.
Where you can reduce moves
The cycle is inflated most by not the cuts, but the extra lifts between nearby areas. If the tool works on one side of the part and moves from a pocket to the next section without any risk of hitting clamps or protrusions, a full retreat to the common safe plane is usually not needed. A short local retract and a smooth transition are often enough.
This is especially visible in finishing. The surface is already open, there is no tall fixture above, the stock allowance is small, yet CAM still lifts the tool too high. In that situation, safe planes in 5 axes can be lowered to a sensible level and the extra "air" can be removed without losing protection.
A good rule is simple: the better you know what is above the part, the lower the retract can be. If there are no long studs, tall jaws, angle clamps, or unmachined protrusions above the area, a large lift rarely helps. It only adds seconds to each transfer, and over a shift that becomes minutes.
There is another common case: axis rotation between two positions. Many people keep a high retract "just in case," even though the rotation path passes beside the part and does not cross any dangerous areas. In that case, it is better to set a short transition and check not only the tool tip, but also the holder and spindle. If they pass cleanly, the margin can be reduced.
You can be more aggressive about reducing moves after four checks:
- neighboring areas are on the same side of the part;
- there is no tall fixture above;
- the axis rotation does not pass over protrusions;
- the real tool stick-out matches what is set in CAM.
That last point often decides everything. In simulation, the tool may look compact, but on the machine the setter installs a longer holder or adds another 15-20 mm of stick-out. Then a short retract that was safe on screen becomes too close to the part or clamp.
That is why retract height should be lowered not "by eye," but after checking the real assembly. In practice, this review gives a noticeable reduction in idle moves, especially where 5-axis machining often changes the tool position and makes dozens of short transitions in one program.
How to check the model before adjusting planes
You should reduce retracts only after the full model assembly is complete. If CAM contains only the part without vises, jaws, or clamps, the safe plane will almost always end up too high or, worse, dangerously low.
First, build the real picture of the machining area. The model must include the part, fixture, jaws, clamps, and everything that actually enters the working space. Even one forgotten bolt changes the safe passage during axis tilt. When working with safe planes in 5 axes, this is especially noticeable: the tool may pass cleanly from above, while the holder body hits a clamp from the side.
Check the reference point separately. The part zero in CAM must match how you set the part on the machine, not "roughly nearby." After that, verify the real limits of axes A, B, or C. On screen, the rotation may look fine, but the machine may run into a limit and rebuild the motion in a completely different way than you expected.
Then set the real tool assembly. Stick-out length, arbor diameter, holder shape, and chuck must match the shop setup. If you leave a default tool holder, the simulation will miss the spot where the body comes close to the part by a dangerous few millimeters.
What to look for in simulation
Run collision checking over the entire path, not only during cutting. Watch three zones:
- approach to the part;
- transitions between elements;
- retract after leaving the cut.
These are exactly the areas where extra lifts and unnecessary air most often show up. It helps to step through the path frame by frame and mark places where the tool rises for no clear reason. Usually this happens after an overly general safety rule, an old operation template, or an incorrect clamp model.
If you see an unnecessary lift, do not edit the plane across the whole program right away. First answer two questions: what exactly is the program avoiding, and does that object exist in the real machining area. Sometimes a high retract is needed above a jaw, but 20 mm later it can be lowered and the idle move reduced without risk.
This check takes a few minutes, but it saves time on every part later. And even more importantly, it lowers the chance of a hit not with the cutting edge, but with the tool body or the clamping unit.
The CAM adjustment order
In CAM, it is better not to edit all heights at once. When a programmer lowers safe planes in 5 axes in one move, they often save a couple of seconds on screen and create a risk on the machine. A calm order gives the same result without surprises.
First, set the height for the very first entry into the operation. The entry almost always needs more margin than moves inside an already open area. The tool does not yet "know" the part, the axes are only moving into position, and the stock may have allowance that is not obvious from memory, but is present in the model.
After that, move on to local retracts inside one machining area. If the tool is working in one pocket, along one edge, or on neighboring surfaces, a full move to the common safe height is usually not needed. A short retract above the current geometry is often enough to reduce idle moves without extra risk.
Next, separately check all transitions where axes A, B, or C rotate. In 5-axis machining, these are the moves that most often break the neat logic of "everything is clear in Z." The tool tip may travel safely, while the holder or spindle body comes too close to the part, vise, or fixture.
A convenient working order is this:
- Set the height of the first approach to the operation.
- Set short local retracts within one area.
- Review transitions with axis rotation separately.
- Reduce heights in small steps.
- After each change, run the simulation again.
The steps are better kept small. For example, reduce the retract not by 20 mm at once, but by 5 mm. Check the simulation, look at the minimum clearances, and assess the position of the arbor and tool body. If everything is clear, lower it a little more. It is less exciting, but it saves you from expensive mistakes.
Do not look only at the tool itself. In CAM, it is easy to miss a collision with the chuck, extension, angle head, or fixture during rotation. If the system shows only a barely acceptable gap, do not try to squeeze out a couple more millimeters at any cost. One extra second in cycle time is cheaper than a machine stop and a damaged part.
Good setup looks simple: a high first entry, short moves within the area, and separate strict control of all axis rotations. This order usually gives a noticeable reduction in idle moves after the first proper check.
Example on a box-type part
A box-type part is often mounted on a rotary table with low clamps. From above, it looks like there is plenty of room, but in 5-axis machining this feeling is often misleading. The tool changes angle, and near the clamp it is no longer only the cutting edge that passes by, but also the arbor or holder.
For roughing, it is better to leave a larger margin above the fixture. A box-type part usually has many deep areas, chip evacuation is not always even, and a long tool may deflect slightly. If the process planner sets a retract with a good safety margin above the highest point of the clamp, the cycle time increases, but the machine does not come too close to the fixture in difficult spots.
Then the situation changes. Imagine the top face with two neighboring pockets. Roughing has already removed the main stock, the part is still in the same position, and finishing is done with a short cutter. If the part model and fixture model have been checked, there is no point in moving the tool up to the full safe retract after the first pocket. For such a transition, a small retract and a short move to the second pocket are enough.
In practice, it is useful to keep three different modes in mind:
- for roughing near clamps - a large height margin;
- for finishing between neighboring pockets on the same face - a small retract;
- for moving to another face - a full safe lift.
Many people cut the last point too boldly. While the part stays in one orientation, a small retract works well. But before the table rotates, everything changes. The tool and holder follow a new arc, and the old clearance above the part surface no longer guarantees anything. Here it is better to lift fully, even if the path seems clear.
That is exactly how idle move reduction gives a proper result. Between neighboring pockets, finishing runs faster because the machine does not waste time on extra air. Before switching faces, the program again enables the full safety margin. The cycle gets shorter without the risk of hitting a clamp, and safe planes in 5 axes remain a working tool, not a formality.
Mistakes that create extra air or a crash
Usually the problem is not the path itself, but the assumptions behind it. CAM honestly calculates what it is given. If the project still has old fixture dimensions, one common retract for all transitions, or an incomplete assembly, the machine will either move too high or come too close.
A common mistake is using the same safe plane for all operations. Roughing, finishing, and angled machining all have different conditions. When the programmer sets one large margin "just in case," the cycle grows by minutes. If the margin is too small, a collision can happen during axis rotation or when switching to another side of the part.
The tool library causes just as many problems. The cutter or holder overhang may have been changed for a previous part, while the current program still uses the old value. Then the simulation looks calm, but the real tool follows a completely different geometry. In 5-axis machining, a small detail like this quickly turns into a collision risk because not only the length changes, but also the position of the tool body when tilted.
Another weak point is an incomplete fixture model. If the assembly is missing soft jaws, spacers, a clamp, or a nonstandard support, CAM sees too much free space. Because of that, safe planes in 5 axes seem too high or, on the contrary, needlessly low. On screen everything looks clean, while on the machine the tool passes within a centimeter of something that simply is not in the model.
Many people check only the cutting part of the tool. That is not enough. The holder, nut, extension, and even the spindle nose can enter the danger zone before the cutter itself reaches the part. If collision checking is disabled for the full tool assembly, the program gives a false sense of safety.
There is also a very ordinary mistake: the machine gets a new chuck or fixture, but the old program is run without revision. The base geometry has already changed, but the retracts, approach moves, and intermediate points stayed the same. After such a replacement, it is worth checking at least five things again:
- actual tool stick-out
- model of the chuck and jaws
- height of spacers and clamps
- collision checking for the holder
- safe levels for each operation
A good sign of a healthy program is this: retracts are different where the conditions are different, and the same only where that is truly justified. If every move goes to "space," you lose time. If the program stays low without a full assembly check, you do not lose minutes anymore, but the tool, the part, or the fixture.
A quick check before starting
Before starting the program, look at more than the calculated time. In 5-axis machining, one mistake in the tool retract costs more than a couple of extra seconds, but an overly high margin also creates empty travel on every transition.
First, check the tool's first entry for each setup. This is usually where you can see how CAM brings the tool to the part: with a sensible approach or with a lift "to the ceiling." If the start is clean, the rest of the path usually behaves more calmly.
Then review each axis rotation separately. Do not judge only the final head or table position. Step through the rotation itself and make sure the tool, holder, and spindle body do not come too close to the fixture. On screen everything may look fine until the real machine kinematics are activated.
The tightest spots are better checked manually. Compare the clearance above clamps, vises, the plate, and part protrusions where the tool has already retracted, but the axes have not yet completed their rotation. These short segments often break the logic if safe planes in 5 axes were reduced too boldly. On a box-type part, this often shows up near a tall clamp or the edge of the rotary table.
After that, run the program in graphics at a higher speed. This makes it easier to catch two types of problems: repeated unnecessary lifts and one dangerous episode that gets lost at normal speed. If the tool retraction path is clear everywhere, you can start thinking about reducing idle moves without unnecessary risk.
For the first part, it is better to keep a little more margin than usual. Even if the model has been checked and the simulation is clean, the first run should be calm. Do a dry run, watch the real clearances, and then take off another 5-10 mm where the machine and fixture allow it. This is not the fastest approach, but it protects the tool, the fixture, and shift time.
What to do next on your shop floor
First, find the operations where the machine spends the most time cutting air. This usually shows up quickly: the tool goes too high to the common plane, makes a long detour around the part, or returns every time to a place where it is no longer needed. Take several programs from the last month and see which transitions consume the most time without cutting.
Do not change everything at once. If you are setting safe planes in 5 axes, mass changes usually create confusion rather than benefit. It is much better to choose one part, one setup, and one set of tools. That makes it easier to understand what actually shortened the cycle and what added risk.
It helps to keep a short table for each checked operation:
- part and setup number
- original retract height and new height
- minimum clearance to the part, fixture, and chuck
- result of the model check and dry run
When a local retract has already passed the model check, dry run, and first part, save it as the working value. Do not keep such settings only in the memory of the programmer or setter. In a couple of weeks, they are easy to mix up, and extra air will come back into the cycle.
Often the problem is not only in CAM. Sometimes a large margin has to stay because of a long tool overhang, awkward fixturing, or difficult access to the machining area. In that case, it is better to adjust not one number in the path, but the whole operation logic.
If you need help choosing a 5-axis machine for the job or reviewing the technology itself, this can be discussed with EAST CNC. The company supplies CNC machines for metalworking, provides commissioning and service, so the conversation can be based not on theory, but on your part and shop-floor conditions.
After commissioning, transfer the successful values into your CAM templates. Save the proven retract heights, approach moves, rotation limits, and standard safe transitions. One careful template later saves more time than constant manual edits in every new program.
Start with the operations where the losses are most visible. Even minus 30-40 seconds on one transition quickly turns into hours over a month if the part is produced in a batch.