Roughing Mill with Round Inserts vs. Face Mill
A roughing mill with round inserts handles cast skin, shock entry, and changing stock allowance better. Let’s look at where it outperforms a face mill.
What is the problem with uneven skin and changing stock allowance
A cast blank rarely gives the cutter a smooth, predictable entry. The surface may have a hard skin, scale in places, hard inclusions, and softer metal nearby. When the tooth touches such an area for the first time, it does not start cutting smoothly. It takes a short удар. The load on the cutting edge rises suddenly, so the first pass is often the most unpleasant one.
The same is true for stock allowance. On one section the cutter removes 1.5 mm, and a few centimeters later it is already 4 mm. The feed and spindle speed do not change, but the chip thickness jumps. For the tool, that means one simple thing: the cut is sometimes light and sometimes heavy, with almost no transition between the two.
The operator usually hears this before they see it. A steady sound quickly turns into dull knocks, crackling, or a rough, uneven noise. Sometimes the machine starts to vibrate, and after the pass there are streaks, edge chipping, or areas with different roughness left on the surface. This is not always a mistake in the cutting conditions. Often the workpiece itself keeps changing the cutting conditions.
Even neighboring parts from the same batch may behave differently. One blank has a thicker skin, another has a shifted allowance after casting, a third has a harder section, and somewhere the setup has slightly changed the actual depth of cut. That is why a face mill that runs quietly and cleanly on one part may start knocking on the next one and quickly wear out the inserts.
On the first roughing pass, the tool almost never works in calm conditions. It meets a changing metal layer, a shock entry, and a constant change in load. The rougher the skin and the more the allowance varies, the higher the risk of chipping, vibration, and unstable sound from the very first seconds.
Why a round insert handles this cut more smoothly
When the cutter moves over cast skin and the allowance changes from one spot to another, the main enemy is a sharp удар at entry. A round insert has no sharp corner that bites into a protrusion first. Contact begins along an arc, so the entry into the material is softer.
On cast blanks, that shows immediately. One area has a thin skin, nearby there is a buildup, and farther along the allowance suddenly grows by another millimeter. A face mill with a more rigid geometry often answers with a jolt in such places. A round insert passes them more calmly.
What changes in cutting
The arc of the cutting edge spreads the load over a larger part of the edge instead of one point. The pressure in the contact zone is lower than with an insert that has a pronounced corner. The impact does not disappear completely, but it becomes noticeably softer. For a roughing pass, that is often enough.
There is also a second effect. When the tooth meets a protrusion or a local buildup, the contact point on a round insert shifts slightly along the arc. The tool does not catch on the corner and does not try to tear a piece of the skin away suddenly. It cuts the metal more evenly, without extra shaking.
That is why a roughing mill with round inserts handles unstable material layers better, where the amount of metal being removed keeps changing. The spindle gets a more even load, the cutting sound is usually calmer, and the cutting edge lasts longer.
Why the inserts last longer
On cast skin, the problem is not only hardness. The tool is constantly cutting deeper and then shallower again. This kind of changing удар quickly chips an insert corner if the corner takes the load first.
A round insert does not have that weak point. Its shape is naturally better at handling interrupted entry, discontinuous contact, and short overloads. That does not mean you can set the conditions carelessly. But the geometry usually has more reserve.
In practice, it looks simple: fewer bangs when meeting the skin, less risk of microchipping on the first pass, and less vibration when the allowance changes along the part. If the blank is uneven, the first rough pass is rarely pretty. Its job is different: remove the problematic layer without unnecessary stress on the machine and the tool. In such conditions, a round insert often behaves more predictably than a standard face mill.
Where the round mill beats the face mill
A round insert performs especially well where the surface hits the tool on every revolution. That is typical after casting, rough gas cutting, or light preliminary machining.
The difference is obvious on cast parts. The hard skin holds the cutter in one spot, and a few degrees later the metal is already softer. For a face mill, that transition is often harsh: one part of the tooth cuts easily, while another takes the shock. A round insert behaves more calmly in these areas and usually keeps a working edge longer.
A similar picture appears on forgings. The stock there is rarely the same across the whole face. In one place the cutter removes 1–2 mm, in another it bites deeper almost immediately. If the tool meets such changes on every revolution, the round geometry forgives them better than a face mill with a more direct entry into the metal.
Another typical zone is the first rough pass over an uneven surface. The plane is not established yet, support on the workpiece is unstable, and the tooth sometimes cuts fully and sometimes only touches the top of a bump. Here, the key is not a perfect surface finish but predictability. A round insert helps get through this stage without constant chipping and nervous adjustments to the settings.
It is usually chosen when the blank comes with a hard skin and uneven top, the allowance changes noticeably across the cutting width, the first removal needs to be calm rather than fast, and the machine or clamping does not provide full rigidity. For shops that often machine cast housings, construction equipment parts, or heavy forged blanks, that is a big deal. Sometimes a round mill removes metal a little less cleanly, but it lets you get through a difficult roughing stage without stopping to change inserts.
When a face mill is more convenient
A face mill wins where the workpiece is already predictable. If there are no casting bumps, cavities, or sharp changes in allowance, it is easier for it to keep a steady cut and leave a noticeably cleaner surface.
You can see this clearly on rolled stock, a forging after preliminary machining, or a part whose top has already been leveled once with another cutter. In that kind of work there is almost no shock load, so a face mill runs more smoothly and usually gives a neater plane.
It is especially convenient in four cases: when the stock is roughly the same across the whole surface, when you need to remove a small layer in one pass, when the entry into the material happens without strong shocks, and when a flat surface matters more than insert life on hard skin.
If the layer is small, the cutting edge does not get sharp impacts every time it enters the metal. Because of that, the face mill works more smoothly and leaves a more even mark from the pass. If the part is going straight to finishing or flatness control, that is a meaningful advantage.
Round inserts have their own strength. They handle heavy skin and changing allowance better. But if those problems are already gone, that extra toughness is not always needed. In that situation, a round insert may simply leave a rougher trace where the tool is expected to produce a cleaner geometry.
A good example is a housing support face after preliminary machining. You need to remove 1.5–2 mm across the whole area and get a clear base for the next setup. Here a face mill is usually more convenient: the feed stays stable, the sound is even, and it is easier to keep the plane without extra passes.
There is also the economics side. If the surface is already flat, there is no reason to pay for extra durability just in case. In those conditions, a face mill often gives the needed result in fewer passes and without extra touch-up.
How to set up the first rough pass
The first pass on a cast blank should not be aggressive. Even if you are using a roughing mill with round inserts, it still needs a calm entry into the material. On uneven skin and with unstable stock allowance, the cut can easily become ragged, and the insert starts taking shocks instead of doing normal work.
First inspect the part and find the highest area. That is usually the first place the tool meets and the one that sets the load for the whole pass. If one corner or edge is noticeably higher, it is better to account for that in the toolpath right away instead of hoping the cutter will pass through it on its own.
Before starting, it is worth quickly checking the whole setup: machine, tool, holder, and clamping. Too much overhang, weak workholding, and noticeable runout can ruin even a good tool very quickly. On a roughing pass, this shows right away: the sound gets harsh, the chips come off unevenly, and the surface shows patchy marks.
The basic check is simple. Do not keep the cutter longer than needed for the pass. Make sure the workpiece does not move in the clamp. Check whether there is noticeable runout on the cutting edges. Do not start with full width of cut and do not increase the feed on the first contact. These things sound obvious, but they are exactly where inserts are most often lost.
If possible, move the entry away from the hardest bump. Let the cutter enter a smoother area of skin first and only then move into the heavy zone. That way the first удар on the inserts will be softer, and the behavior of the part under the cut will be easier to understand.
As for the settings, it is better to start moderately. Do not take the full width of cut right away, even if the machine allows it. For the first pass, a medium width of cut and a calm feed are more sensible, so the tool shows the real stock rather than the one from the calculation.
Test cut
A short test pass often saves a set of inserts. A few dozen millimeters are enough to see how the chips come off, whether the sound changes, and whether the cutter starts bouncing on the skin.
Watch it without overthinking. If the chips come off evenly and predictably, the settings are close to working conditions. If they are too blue, ragged, or go from dense to almost disappearing, the load is changing too much and the settings need to be adjusted.
A simple example: on a cast housing, one edge is 2 mm higher than the rest of the surface. If you go straight into that bump with a large width of cut and a high feed, the cutter will hit the skin and start working in jolts. If you shift the entry slightly to the side, reduce the engagement, and first make a short check pass, the cut usually runs much more calmly.
The first rough pass is not there to set stock removal records. Its job is simpler: safely remove the top uncertainty and give a clear picture of the part, the tool, and the actual load.
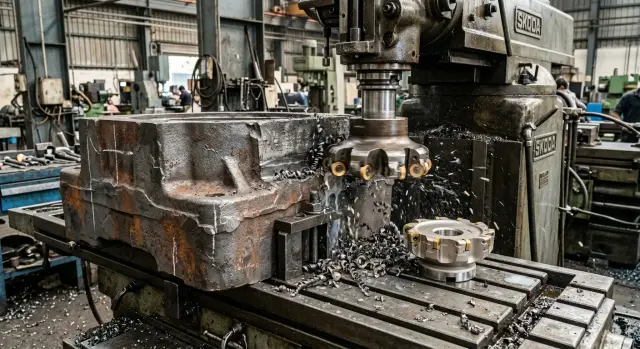
Shop example: a housing blank after casting
In practice, it looks very simple. A cast housing is placed on the table. From the outside it seems even, but on the first pass you can immediately hear that the metal is different from one area to another. At the edge of the blank, the skin is often harder than it is closer to the center. The cutter runs quietly for a couple of seconds, then hits a hard spot, and the sound changes sharply.
The problem gets worse when the allowance varies. In one area the tool removes almost dust, and 40–50 mm later it bites much deeper. For rough milling, that is a normal picture on castings, but this is exactly where the difference between a face mill and a mill with round inserts becomes especially clear.
On one such housing, the operator first mounted a standard face mill. At the entry into the skin, it worked harshly: short impacts appeared, the machine responded with vibration, and small chips quickly formed on the inserts. The worst moment came during the transition from a thin layer to a thicker one. While the cutter was removing little, the cut seemed normal. As soon as the allowance increased, the impact returned and the spindle loaded in jerks.
Then the same area was machined with a roughing mill with round inserts. The settings were not made more aggressive; the goal was different — to get a calm pass without surprises. The difference was audible right away. The round insert enters the uneven skin more gently and handles changes in chip thickness more evenly. Where the face mill was hitting the part almost on every entry, the round one ran quieter and without sharp load jumps.
Of course, one geometry does not solve everything. If the workpiece is clamped poorly or the feed is too high, the problems will remain. But on a cast housing with a hard skin and unstable stock allowance, a round insert usually gives a more predictable result. It is easier for the operator to keep the settings stable, and the inserts last longer.
Mistakes that wear inserts out fast
Inserts rarely fail on their own. More often, they are damaged by the settings, tool overhang, or weak workholding. On a rough pass over a cast blank, this shows up especially quickly: the edge has barely entered stable cutting, and it is already taking shock after shock.
The first mistake is taking too much stock right on the skin. Cast skin is harder than the base metal, and the allowance after casting often varies. If you apply a large load right away, the insert does not cut evenly; it alternates between biting in and taking a shock on exit. For round inserts, this is less painful than for a standard face mill, but their reserve is not unlimited either.
The second mistake is increasing the feed before a test pass. On paper, the settings may look fine, but the real workpiece rarely matches the drawing. It is better to pass the area calmly first, check the sound, the chips, and the surface mark. If the machine is not vibrating and the edge is working evenly, you can raise the feed gradually.
The third mistake is leaving the holder too long without a real reason. The farther the cutter is from the spindle, the easier it is to get vibration. On uneven skin, that quickly affects both the edge and the insert seats. If the task allows it, shorten the overhang even by 20–30 mm. You can usually hear the difference right away.
Another common cause is weak part clamping and tool runout. The blank may seem clamped properly, but under load it shifts slightly or springs back. In that moment, one insert takes more than the others and fails first. The same thing happens with runout: some edges barely cut, while one carries the whole shock load.
There is an even simpler mistake: expecting a roughing cutter to leave a finishing surface. When the operator starts trying to get a smooth plane on the first heavy pass, they usually begin changing settings back and forth, adding extra passes, and wearing inserts out faster than necessary. A roughing operation has a different goal: remove the problematic layer steadily and without extra impacts.
Before starting, it is useful to check four things: the actual stock at several points, the rigidity of the clamping, the holder overhang, and the cutter runout. Those few minutes are usually cheaper than one bad pass on a new set of inserts.
What to do next
After the test pass, it helps to separate two jobs: removing the cast skin and getting a flat surface. For the first task, a roughing mill with round inserts often works better; for the second, a face mill is often more convenient.
If the allowance varies and the surface is hard and uneven, do not try to solve everything in one operation. That kind of saving often costs more. The inserts wear out faster, the cutting sound jumps around, and the machine takes extra shocks.
In practice, it is better to choose one tool for removing the skin and another for bringing the plane into shape. It also makes sense to record the working settings not only by feed and spindle speed, but also by depth of cut, width of engagement, and the actual tool overhang. After the first batch, it is worth checking insert wear and adjusting the settings before the issue becomes constant.
The same settings on paper and on the machine behave differently. So it is better to judge by the cut, not by the catalog. If the sound becomes even, the chips come off predictably, and the spindle does not jerk, you have found the working point.
For heavy rough milling, it is usually more efficient to split the stages. First remove the skin and unstable allowance with a tool that handles shocks calmly. Then use a separate pass to finish the surface. This approach gives a clearer result and helps you plan insert life more accurately.
If you are choosing equipment for these tasks, EAST CNC can discuss the machining center configuration, commissioning, and maintenance. On east-cnc.kz, the company blog also has materials on equipment and practical metalworking tips.
FAQ
When is it better to choose a mill with round inserts?
Use it for the first rough pass on castings, forgings, or any uneven surface where the skin is hard and the stock changes as the cut moves along. In those conditions, a round insert usually enters more smoothly and handles short overloads better. If the part is already flat and you need a clean surface, a face mill is often the better choice.
Why does a round insert hold up better on cast skin?
Because it does not bite into a raised spot with a sharp corner. Contact starts along an arc, so the entry shock is softer. As a result, the cutting edge is less likely to chip on cast skin or a local buildup.
When does a face mill have the advantage over a round insert mill?
A face mill is more convenient when the workpiece is already predictable: the stock is even, the surface has no bumps, and the cut is shallow. It usually leaves a cleaner face and a calmer track after the pass. For a base surface before the next setup or for a part after preliminary machining, this is often the best option.
How should the first rough pass on a cast part be set up?
First, find the highest area and do not enter it aggressively. Use a moderate feed, do not take the full width of cut, and keep the tool overhang as short as reasonably possible. If you can, start in a smoother area and only then move into the heavy zone.
How can you tell that the mill is cutting too hard?
Listen to the cut. If a steady sound quickly turns into dull knocks, cracking, or a ragged noise, the load is changing too sharply. Other signs are uneven chips, streaks on the surface, and noticeable machine vibration. In that case, reduce the width of cut or the feed and check the clamping.
Is a test pass needed before the main operation?
Yes, a short test pass almost always pays off. A few dozen millimeters are enough to see the real stock, hear the sound, and understand how the chips are coming off. That way you spot overload sooner and do not lose a full set of inserts on the first complete pass.
Can one cutter remove the skin and still leave a clean surface?
Usually not. One operation rarely removes a hard skin well and leaves a flat surface at the same time if the stock varies. In practice, it is easier to first remove the problem layer with a roughing cutter and then finish the surface with a separate pass using another tool.
Why do the tool overhang and weak clamping wear inserts out so quickly?
They affect it directly. A long overhang makes the cutter go into vibration faster, and weak clamping lets the part spring under load. In the end, one insert takes too much of the cut and fails first. The stiffer the machine–holder–part chain is, the smoother the tool runs.
Why do parts from the same batch cut differently?
Because castings are rarely identical, even in the same batch. One part has a thicker skin, another has a shifted allowance, and a third may have a harder area. Sometimes the setup also plays a role: the actual depth of cut changes even though the machine settings stay the same.
How can I reduce insert consumption on an uneven workpiece?
Do not chase a large stock removal on the first contact. First check the allowance at several points, shorten the overhang, remove runout, and give the tool a calm entry into the material. Once the pass sounds and cuts more evenly, increase the cutting conditions gradually. That helps the inserts last longer and keeps the machine from taking unnecessary shocks.