How to Reduce the Number of Setups in Process Planning
How to reduce setups during process planning and fixturing: simple techniques for part routing, datum selection, clamping and checking risks before launch.
Why extra setups hurt productivity
If you want to cut setups, first calculate the cost of one extra flip. On paper it looks like a couple of minutes. On the shop floor it becomes noticeably more.
Each new setup is not just taking the part out and turning it. The operator stops the cycle, clears chips, checks stops or jaws, re-clamps the part, verifies runout and often re-establishes zero. Even a simple flip easily takes 5–15 minutes. On small runs that’s hours. On large batches — whole shifts.
Losses grow even faster if you then need to inspect the first part after repositioning. The machine isn't cutting metal during this pause — it's waiting. If the part is large, heavy or awkward to clamp, the pause gets even longer.
An extra setup hits not only time. It often shifts the dimension chain. While the part stays on one datum, geometry is predictable. After a reposition a new error appears: the part may seat slightly differently, jaws may press with a different force, a small chip may get under a support, and the datum can move by hundredths of a millimeter.
For some tolerances that’s enough. Suppose you machined one side of a housing, flipped it and work on the other. If the new seating shifted even by 0.03–0.05 mm, the total distance between surfaces is already off. Each side may look fine alone, but the assembly won’t fit.
Typically every extra setup causes three kinds of losses: machine time for stop and re-setup, scrap risk from the new datum, and delivery delay when you have to re-check the batch.
This affects the whole process. The lead time stretches not just at one step but across the chain. And scrap is rarely a one-off: if a datum error repeats, you get a series of identical bad parts.
Extra setups are not trivial — they are a direct source of loss. The earlier you remove an unnecessary flip from the route, the smoother the launch and the fewer surprises on the first batch.
What to decide before the first route sketch
Start not with CAM or tool choice but with the drawing. Analyze the part as if the route already failed: where must the part be held rigidly, which dimensions depend on each other, and which surfaces should act as datums throughout the process.
First check datum surfaces and tolerances on those datums. Often the drawing shows the tightest dimensions tied to one plane or one hole, while the technologist habitually builds the route from another, more convenient datum. Holding that critical dimension later becomes hard, and an extra setup appears. If the drawing already points to a datum for accuracy, align the route to it from the start.
Also mark features that are best produced in a single setup. Usually these are coaxial holes, the relationship of a plane and a pocket, or runout of a bore relative to an OD. If you spread such features across setups, you're almost guaranteed extra repositions, extra checks and adjustments. It's simpler to group them and see if you can machine them without flipping the part.
Answer four quick questions:
- Which surfaces set accuracy, and which only form the contour?
- Which dimensions are linked to the same datum?
- What cannot be moved to another setup without risking the tolerance?
- Where will the tool collide with the chuck, jaws, part wall or fasteners?
Another common mistake is confusing mandatory operations with habitual ones. For example, the route may automatically include separate drilling, boring and a finishing pass in a new setup, even though part of that work could be combined in one cycle and one fixturing scheme. Not every familiar operation needs its own stage — sometimes it remains in the route simply because it was always done that way.
List zones with poor access early: blind pockets, deep steps, reverse chamfers, holes near an edge, areas next to jaws or clamps. If you don’t mark these in advance, the tooling will look good on paper but fail at the machine: the toolholder may be too short, the holder hits the part, and one difficult area forces another setup.
Good preparation is simple: before the first sketch you know which datum will persist through the route, which dimensions must stay together and where the tooling will interfere rather than help.
How to choose datums for the whole route
Choose datums not for a single operation but for the whole chain. If the datum changes almost every step, the part will wander: dimensional scatter increases, the operator spends time re-referencing, and the number of flips grows quickly.
First find a surface that allows a reliable hold from the first operation. It doesn't have to be a finished surface, but it must give repeatable clamping and a clear reference. On a shaft this is often the OD and the face. On a housing it may be a rough plane and two stops that later help locate final datums.
Then tie critical features to a common datum system. If holes, a pocket and a fit are all referenced from one plane and one side, keep those datums through to the end. When some features reference the face and others reference a random edge after a flip, error accumulates rapidly.
A simple rule applies: if a datum persists from the first operation to inspection, keep it. If a new datum is needed only for convenient clamping, check whether you’re paying for that convenience with another setup. If a datum blocks tool access, change not only the datum but the clamping method. And if a dimension matters for assembly, measure it from the datum easiest to reproduce on every operation.
Before approving datums, look at the tooling, not just the drawing. Jaws, grippers, vises and stops often obstruct a drill, boring bar or endmill. Then the fix is chosen for tool clearance and an extra setup gets added just to reach one surface.
A simple example is a flange with a central hole, OD and four bolt holes. If you machine the face and OD first and then use those surfaces for holding, the bolt holes can be done without changing datum logic. If instead you clamp the flange by an unmachined edge, you’ll almost certainly need to reposition later.
A good datum holds well, doesn't obstruct tools and groups important features into one system. That's how you reduce setups already at the routing stage.
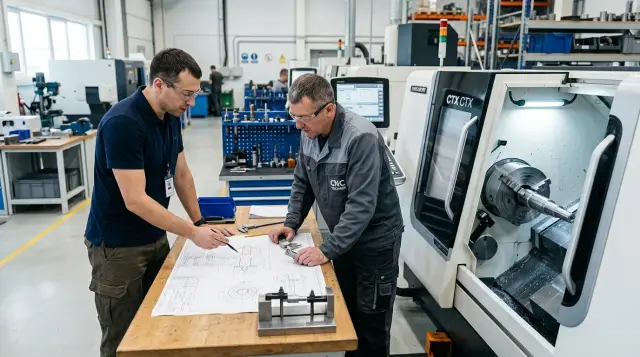
How to simplify fixturing
Often the clamp decides everything. Good fixturing opens more sides of the part in one go. Bad fixturing blocks tool access and forces extra repositions.
Usually the winner is not the most complex scheme but the clearest one. If the part can be reliably held in a chuck, vise or soft jaws and several surfaces can be machined consecutively, that’s enough. The fewer intermediate elements between machine and part, the easier it is to hold dimensions and quicker to set up.
Use a riser plate only when it solves a clear problem: it raises the part for a long tool, rotates it to the needed angle, or gives stable repeatability on a run. If the plate is used merely for assembly convenience, it’s a bad sign — you add height, extra errors and another check point.
For clamps the rule is simple: use the minimum needed to hold the part rigidly. An extra clamp often interferes with the cutter more than it helps the operator. But don’t save to the extreme. If the blank is thin or long, a weak clamp will vibrate and you’ll have to rework the route.
A practical order: decide which sides of the part must be open in this setup, then choose the lowest and stiffest clamping method, check whether clamps obstruct the tool or probe, and finally consider where chips will go during the cycle.
Many remember chips too late. If chips accumulate at stops or under a clamp, the part may seat unevenly on the next blank. On turning this shows immediately in runout; on milling it often appears only at inspection. So leave clear chip escape paths and don’t trap chips in tight fixture cavities.
Probe access should also be planned. The touch point must be reachable without removing clamps or performing unsafe maneuvers around jaws, bolts or posts. If the probe cannot quickly check the datum or feature in-machine, the operator will measure manually and slow the launch.
In practice a simple clamp with two stops and one reliable hold-down often works better than an assembled fixture of plates, angles and extra fasteners. It sets up faster, runs cleaner and forces fewer route changes at the machine.
How to build the route step by step
Construct the route from the part’s geometry, not the shop’s habits. First see which surfaces you can realistically machine in one clamp without losing access, stiffness or accuracy. This approach immediately removes unnecessary flips and re-datuming.
A convenient start is a simple breakdown: main datums, working surfaces and hard-to-reach zones. Then it usually becomes clear that some features can be grouped into one setup, while others are better separated so the fixture stays simple.
Assembly order for the route
First combine surfaces that the machine can take from one orientation. If the face, OD and some holes are accessible in one clamp, don’t split them into separate operations out of habit. Every new setup should solve a real problem, not duplicate already possible machining.
Next, place operations in the usual logic: roughing first, finishing later. This keeps allowance where the part can still move and avoids damaging finished surfaces with intermediate clamping. In practice this often saves more time than complex program tweaks.
Then check whether one clamp can cover two tasks. For example, if you clamped the blank by the OD and in that position you can both remove the bulk and prepare the finish datum for the next stage, you simplify the route and reduce accumulated error.
Finally, walk through the transitions and remove anything that doesn’t change the datum or the result. If an operation doesn’t add accuracy, doesn’t open access to the next zone and isn’t needed for inspection, revisit it. Often one or two extra repositions disappear this way.
Quick checklist
Before releasing the route ask four questions:
- Which surfaces are already accessible in the current clamp?
- Where does the finish datum appear too late?
- Which transition was added only for convenience?
- Can the fixture be simplified instead of adding a new setup?
This check is especially useful for serial parts. Even on a simple turning route removing one setup usually yields more stable dimensions and noticeable time savings per batch.
Example with a simple part
Take a common flange: OD, two faces and radial holes around the rim. It looks simple, but it clearly shows how extra repositions ruin a route before the first program runs.
Old route
A typical flow: put the blank in the regular chuck and face one end. Then flip the part, chase runout and turn the OD with the other face. After that the part is moved to a special fixture for drilling the side holes.
In practice it rarely ends there. If a vise or clamp hides part of the rim, the operator repositions the part again to finish the remaining holes. You end up with four setups instead of two.
The issue is not only time. Each re-clamp shifts the dimensional chain slightly. The OD is done separately, holes separately, and then you spend time finding which datum drifted.
New route
A calmer option looks like this. In the first setup seat the blank in soft jaws with a stop and in a single clamp perform the reference face and OD. The two most important surfaces appear together in one coordinate system.
Then place the part in a second fixture that references the finished diameter — a expanding arbor or soft jaws with a cutout for the flange body. The fixture holds the part by a narrow land and does not cover the rim, so the machine can finish the second face and drill the side holes without a new datum.
The gains are usually immediate:
- 4 setups become 2;
- cycle time drops roughly from 28 to 18 minutes;
- the operator makes fewer alignments and inspection measurements;
- the risk of hole-to-diameter shift is noticeably lower.
The best part is this scheme doesn’t require magic. You need proper datums and tooling that opens the cutting zone. For many shops that alone removes unnecessary flips.
Common mistakes
Most extra work starts at the technologist’s desk, when one locally convenient choice drags an awkward route behind it.
When the first datum breaks the whole route
Often a datum is chosen because it’s easy to clamp on the first op. It gives a quick start but performs poorly afterward. The operator ends up flipping, re-referencing and working from another surface — a minute’s gain turns into an extra setup.
A typical example is a simple sleeve. It’s convenient to clamp by the OD, but for the bore, face and concentricity it might be better to start from another surface. If not checked early, the datum drifts on the second step.
The same applies to tooling. Sometimes a fixture is designed around one convenient cutter so the holder doesn’t hit the jaws. But parts are not machined for a single tool pass. If the fixture hinders inspection, lacks rigidity or forces a clamp change, it only complicates the process.
When inspection and habit add an operation
Another error is ignoring in-machine measurement. Then the route includes extra allowance to remove the part, measure and possibly return it. It’s almost always cheaper to design inspection from the datum used for machining.
Old routes also mislead. A part resembles an earlier one and the scheme is copied. But a new length, different allowance or one extra hole changes everything. On CNC lathes such a small difference can add another setup, with extra time, scrap risk and setup work.
Before releasing the process check four things quickly: does one datum flow through most operations, does the tooling help the part not just the cutter, can the control dimension be measured in-machine, and was the new drawing reviewed from scratch rather than applied from an old template? If any item fails, the route can usually be simplified before the first program run.
Final quick check before launch
Before launch walk the route with a few short questions. It takes minutes but prevents urgent process changes at the machine.
Look at geometry and clamping, not the program. A good route is often obvious: where is the first datum, what is done in the first setup, what remains for the second and how can you check sizes without extra fuss.
Check whether main features fit into two setups. If the third is needed only for one small cutout, it’s usually better to adjust datums or rotate the blank in the first operation. Then assess tool reach: if a cutter runs at the limit of its extension, accuracy and tool life fall quickly.
Also verify whether the clamp holds the part after removing some allowance. Sometimes the blank is rigid only until you remove a thick wall. One more important point: does the datum logic remain from roughing to finishing? When datums change without reason, dimensions start wandering after flips.
What to do next on your shop floor
Start with one part that consistently costs extra time. Don’t take the whole flow at once. Choose a clear example and dissect it thoroughly.
Take the current route and rebuild it on paper. Mark where the part is removed, flipped, re-chucked or moved to another machine. Often you’ll see some transitions exist by habit rather than necessity.
Then compare the old and new options. Look not only at the number of setups but at what each setup drags: minutes lost on repositioning, where the operator most often misreferences the datum, after which setup the dimension tends to drift, which surfaces need protection from re-clamping, and whether operations can be combined.
Even a rough estimate helps. If the new scheme removes at least one setup, on a run that often produces substantial time savings and reduces scrap risk from datum shifts.
After that check the machine-fixture-route combination itself. Sometimes a route looks complex not because the part is hard but because the chosen clamping is not optimal. Soft jaws, a different chuck or a simple fixture may solve the problem faster than long program edits.
Sometimes the problem runs deeper. If a part repeatedly needs an extra transfer between operations, ask directly: is this machine appropriate for the task? That discussion is better before launch, not after the first batch.
If you’re preparing a new route or selecting equipment, you can also cross-check the solution with EAST CNC. The company supplies CNC lathes and machining centers, helps with selection, commissioning and service. Often such a conversation is enough to remove one setup before the part launches.
A good outcome for the shop is simple: fewer repositions, shorter cycle and a calmer launch.
FAQ
Why reduce the number of setups?
Because every extra setup eats time and introduces a new datum error. The operator stops the machine, cleans the area, re-clamps the part and checks the size again. If a part seats slightly differently after repositioning, you lose not only minutes but also repeatability across the batch.
How much time does one extra setup take?
Typically an extra reposition takes not just a couple of minutes but about 5–15 minutes including cleaning, clamping and measuring. On a run this quickly turns into hours. If the part is heavy or the first piece after repositioning is checked very carefully, the pause becomes even longer.
Where to start when preparing the route?
Start by breaking down the drawing and choosing datums that will work for the whole route. Only after that pick tools, CAM and operation order. If you begin from the program or a habitual machining scheme, extra repositions will almost certainly appear later.
Which dimensions are best produced in one setup?
Keep together the features that rely on the same datum and tight tolerances. Common examples are coaxial holes, fits, planes and pockets where the distance between them matters for assembly. If you spread these features across multiple setups, that distance will likely shift at the reposition.
How to recognize a poorly chosen datum?
A bad datum is convenient only on the first operation but breaks the rest of the route. It forces the operator to flip the part, reestablish references and work from a different surface. Test a datum simply: it should provide repeatable clamping, not obstruct the tool and remain usable through most of the process.
What usually causes an extra reposition?
Most often an extra reposition is caused by poor access. Jaws, clamps, vises or stops block the tool path and the technologist solves it with another setup. Another frequent reason is copying a route from an old part without rechecking the new drawing from scratch.
Can simple tooling be enough?
Yes — often a simple fixture is the best choice. Soft jaws, a different chuck type or a clear clamping scheme with stops usually outperform a complex assembly of plates and brackets. The fewer intermediate parts between the machine and the blank, the easier it is to hold dimensions and prepare the workstation.
When is a riser plate really needed?
Use a riser plate only when it solves a clear problem: gives reach for a long tool, orients the part to the required angle, or ensures repeatability on a run. If the plate is there merely for assembly convenience, it usually does more harm than good. A plate adds height, extra error sources and another check point for the operator.
How to quickly check the route before launch?
Quickly review four things: the datum, tool access, clamp stiffness and in-machine inspection capability. If at least one item fails, the route is still raw. Also check whether the main features fit into two setups. If a third is needed for a single small feature, rethink the datums first.
What if the part still needs many setups?
Pick one troublesome part and rebuild its route on paper. Mark every place where the part is removed, flipped, re-chucked or moved to another machine. Then tally minutes spent on each step and where the datum drifts most often. If the extra transfer repeats, check not just the fixture but the machine choice as well.