Reaming After Drilling: How to Avoid Size Drift
Reaming holes after drilling needs the right allowance, correct feed and a clean setup — otherwise size will drift and the hole axis will lose straightness.
Why the hole shifts on the finishing pass
After drilling many expect the reamer to correct everything and bring the hole to size. Usually it doesn’t work that way. A reamer holds diameter well only where the hole is already prepared evenly.
If the drill shifted the axis, produced a taper, or damaged the entry, the reamer more often repeats that geometry rather than correcting it. It follows the existing channel and removes metal where it’s easiest. Therefore a defect that appeared earlier often remains after finishing.
This is especially noticeable in long holes. The drill can drift slightly, and then the reamer follows the same channel and removes metal unevenly. As a result the diameter may almost meet tolerance while the straightness is already lost.
Often the problem starts with the allowance. If it’s too small, the cutting edges barely cut and the tool mostly rubs the wall. Heat rises, the surface smears, and the size starts to wander up and down.
Too large an allowance is harmful as well. Load on the reamer increases, the tool can flex a bit, and the hole axis shifts further. If the chips are crowded they add lateral force and leave marks on the wall.
Setup also matters. Spindle runout, a tilted chuck or a poorly clamped part immediately change how the tool enters the hole. The reamer enters off-axis and cannot restore the geometry.
Usually size drift on the final pass is caused by several reasons at once. The drill leaves a shifted axis or ovality, the allowance is wrong, and runout or a misclamped part finish the job. The final pass rarely creates the defect from scratch; it mostly reveals earlier errors.
How to leave the correct allowance
Allowance for the reamer affects the result more than it seems. If the margin is too small the tool won’t cut properly and will start to rub the wall. If it’s too large the operation becomes heavy, the hole shifts, and surface finish suffers.
Relying only on calculation is risky. The drill almost always produces a real diameter and shape that differ slightly from expected. So after the first part it’s better to measure the hole and see what allowance actually resulted.
For small diameters the allowance is usually kept moderate. If the target after reaming is about 10 mm, it’s common to leave a few hundredths or a couple of tenths of a millimeter of diameter rather than trying to remove too much in one finishing pass. The exact value depends on material, hole length, machine rigidity and drill condition.
You must look not only at the diameter number. A hole can be fine at the entry but have taper, ovality or an axis shift. Formally the allowance exists, but the reamer still works unevenly and pulls the hole to one side.
On the first part it’s useful to check diameter at the entry and, if possible, deeper along the length. You’ll immediately see if there is ovality, where the axis went, and what trace the drill left on the wall. A separate risk is a dull drill. It heats the metal, presses instead of cutting and leaves an unpredictable shape. In that case you can’t rely on the programmed allowance — you must measure it.
A practical approach is simple: use the calculated drilling diameter, make a trial part, measure the hole and only then correct the drill diameter, machining mode or toolpath. This takes a few minutes and can save the whole batch.
If you often machine serial housing parts, record the actual allowance from the first good part for each material and tool. On the next run you’ll start not from a guess but from a verified number.
What to check before reaming
A reamer removes a thin layer and repeats the hole shape. So the result is more often ruined by small things missed before the run than by the reamer itself.
First, remove the burr at the entry and exit. Even a small edge can upset the entry and cause the reamer to run skewed from the first millimeters. A burr at the exit also interferes: the tool leaves unevenly and edges wear faster.
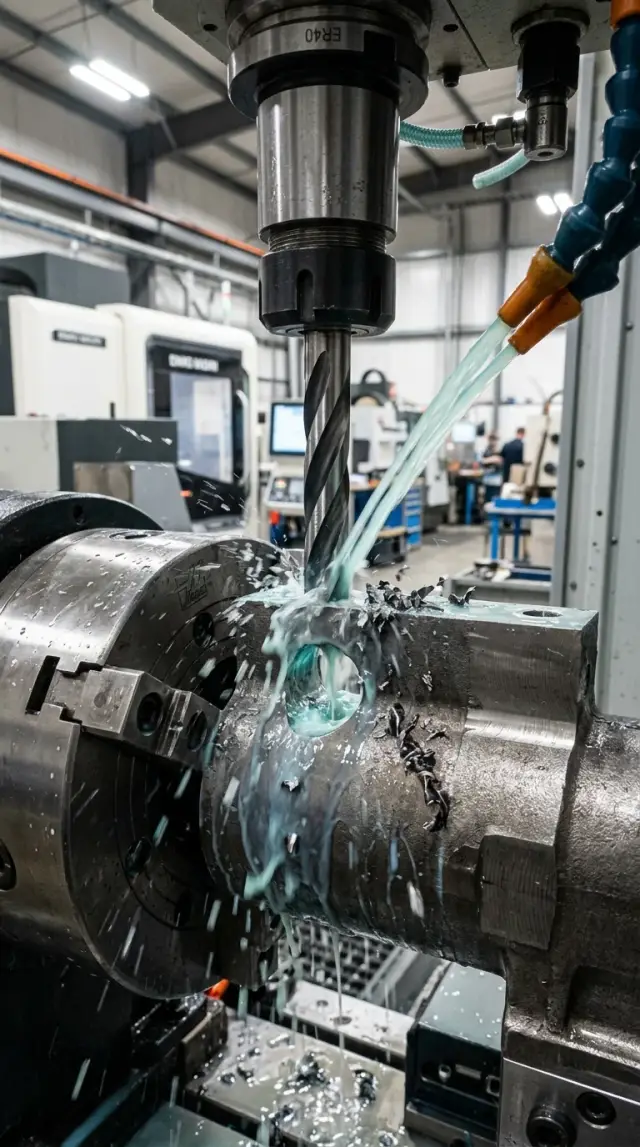
Then fully clean the hole. Remaining swarf, thick coolant or fine dust from the previous pass easily scratch the wall and shift size by hundredths. Don’t rely on a single coolant pulse. Blow the hole out, check the bottom, and only then apply a steady coolant flow for the pass.
Check the arbor and part clamping separately. If the arbor has runout, the reamer will undercut one side more. If the part is clamped crookedly or loosely, the hole axis no longer matches the tool axis. On the machine this often looks acceptable, but after measurement the size will vary and straightness will be lost.
Before the run check a few simple things:
- the reamer doesn’t snag the entry edge;
- there’s no swarf in the hole or in the tool flutes;
- the chuck or arbor runout is within limits;
- the clamp doesn’t push the part out of alignment when tightened.
Requirements are even stricter for blind holes. Chips need volume to evacuate at the end of the pass. If the bottom is left almost flush, the reamer will start to bear, heat the metal and smear the surface. Then the diameter can end up larger and scoring will appear at the bottom.
If the hole already looks doubtful after drilling, don’t try to fix it with a single reamer. Spending a minute checking runout, cleaning and chamfering is easier than later diagnosing the cause of batch scrap.
How to choose speed and feed
Hurrying a reaming pass almost always harms the result. Speed is usually set lower than for drilling the same diameter because the reamer must not aggressively remove metal. Its task is to calmly remove a small allowance and bring the hole to size without marks or taper.
A good starting point is to reduce speed about 30–50% compared with drilling the same diameter. Then adjust the mode for the material and the hole behavior. Steel, cast iron and aluminum behave differently, so on the first part don’t chase speed.
Feed mistakes are more common than RPM errors. Too light a feed causes rubbing instead of cutting. Too heavy a feed pulls the size, roughens the surface and can push the tool off axis. Keep a steady feed throughout the pass, without jerks or manual adjustments halfway through.
This is especially important for long and blind holes. Any pause inside the hole quickly leaves a mark on the surface. Worst is stopping feed while the spindle keeps spinning. That easily produces scoring, ovality or size drift in the last millimeters.
Bring coolant before the tool enters the hole and keep the flow until the end of the pass. Uneven coolant changes heating and thus tool behavior. On CNC machines this is easier to keep stable if the cycle and feed approach are set up in advance.
On a trial part look not only at size. A dull or torn surface, a squealing tool, heavy exit burrs and floating results from part to part usually mean the mode is off. In that case first try reducing speed, then carefully adjust feed. Sharp changes rarely help.
How to finish a hole without size drift
Measure the hole immediately after drilling. Not by the drawing or by eye, but with a bore gauge or caliper. If the drill already shifted the diameter or axis, the reamer won’t fix it.
Before the finishing pass check the tooling. Arbor, chuck and reamer should run without noticeable runout. Even small runout quickly shifts size: the hole becomes larger and the wall gets striped marks. If in doubt, spend a couple of minutes with an indicator.
Entry to the hole should be smooth. Don’t slam the tool into the edge and avoid a sharp grab in the first millimeters. The spindle should already be rotating and the feed should start gently. If the reamer stumbles at the entry it often leaves a taper or removes too much at the near end of the hole.
Make the pass in one continuous motion. Don’t stop feed inside the hole and don’t try to “touch up” with a reverse move. That creates scoring, local heat and size drift. For blind holes set depth in advance so you don’t hesitate while cutting.
Immediately after the pass check diameter along the full length, not only at the entry. Look at the cutting trace and the entry edge after the tool exits. A uniform trace without torn bands usually means the tool ran smoothly. Shiny spots, helical streaks and different sizes at entry and depth most often point to runout, a feed jerk or a pause inside the hole.
A good pass looks boring. The tool entered gently, went through without stopping and produced the expected size.
Common mistakes
Scrap from reaming often comes not from the machine but from small things that seem harmless. On the final pass the allowance is already small, so one old habit easily ruins both diameter and straightness.
A common mistake is using a worn reamer “just for this batch.” Externally the tool may look fine, but in fact it no longer cuts and only rubs the wall. The hole heats up, size floats and the surface tears. The worst is that the first parts sometimes are almost in tolerance, which creates false confidence.
Another error is asking the reamer to remove too much. If a large allowance remains after drilling or boring, the tool will pull, load one side more and hold the axis worse. The operator then searches for feed or RPM problems, while the real cause is simply asking too much of the reamer.
Reversing inside the hole is another frequent blunder. When the tool is pulled back without clearing the part, edges score the surface and can damage the entry. After that the measured size may be “almost okay,” but a bushing or pin will not fit correctly.
Incorrect clamping produces a lot of scrap as well. If the part is clamped at an angle, the reamer obediently follows the shifted axis. The operator often tweaks modes, changes feed and lowers RPM, but that doesn’t fix the datum. Even a precise tool won’t correct a crookedly clamped part.
A costly mistake is measuring the first part superficially when the size is “almost there.” One thorough check after the first piece usually saves the batch.
If size begins to drift, first check the reamer condition, the actual allowance before finishing, absence of reverse moves, part position in the fixture and measure the first part in several sections. Most often the problem is simple and comes from one missed check.
Example: hole for a bushing in a housing
A typical shop case: a 20 mm bushing hole is needed in a housing. After drilling everything looks fine, but a bore gauge shows slight ovality. For a rough pass that’s acceptable, but for a press fit it isn’t.
On the first try the reamer gives varying results. In one part the hole is almost to size, in another the bushing is tight, and in a third it fits too loosely. When size floats from part to part the cause is rarely a single factor.
Here the problem was a combination of small issues. After drilling a burr remained at the entry. The drill left a too-small and unstable allowance. Added to that was a small arbor runout. As a result the reamer didn’t cut evenly around the circumference and in places only smoothed the surface, repeating the drill’s form.
The operator didn’t change feed at random. First he removed burrs at entry and exit, then checked runout of the chuck and the reamer, and after that adjusted the drilling diameter. They made the allowance slightly larger and, importantly, consistent.
After the second try the picture changed:
- the reamer began removing metal all around the circumference;
- size stopped wandering between parts;
- the hole became straighter along the axis;
- the bushing started to press in without skew.
This example shows a simple fact: if the hole after drilling is already oval with burrs and varying allowance, even a good tool won’t save the batch. So before pressing a bushing check not only the final diameter but also how the hole was prepared. Five minutes to check runout and the entry edge often saves an hour of reworking scrap.
Quick checks before a run
Before starting a run it’s better to spend a few minutes on control than to sort a whole box of parts later. Reaming most often fails because of small disruptions: allowance varies by depth, clamping shifts the part, or coolant is intermittent.
A quick check can be reduced to five steps:
- inspect the rough hole at start, mid-length and exit;
- inspect the reamer before mounting and clean the flutes;
- make a trial clamp on the same datums used in the series;
- ensure coolant flows steadily and reaches the cutting zone;
- after the first part measure the hole by depth and in at least two directions.
If the first part shows a difference between entry and exit, don’t rush to change feed only. First check allowance and clamping. When the hole after drilling already has a skew, the reamer almost never corrects the shape.
A simple guideline: if size is stable at the beginning but drifts toward the exit, the problem is usually in roughing geometry or part support. If size is stuck in the middle, check tool runout and flute cleanliness.
This control is especially useful before a series of identical housings or bushing fits. One checked first part usually saves both the tool and the operator’s time.
What to do next
If size still floats after tuning the mode, don’t change everything at once. First check machine and tooling rigidity. Chuck play, long tool overhang, weak clamping or arbor runout often spoil the hole more than wrong feed.
In practice the problem often hides in small details. A reamer removes very little, so any deflection or vibration immediately shifts diameter and straightness. If in doubt start with simple steps: reduce tool overhang, check clamping and ensure the part isn’t “breathing” in the vise or chuck.
It helps to make two short trials on one blank or on two identical parts. Change only one parameter, otherwise comparison is meaningless. Usually a base mode and a second, slightly calmer mode by feed or speed are enough.
After the trial record not only final size but also how the hole behaves along the length: what diameter at entry and exit, whether there are signs of vibration on the surface, whether force changes during the pass, and how many parts the tool holds size for. Don’t rely on memory. Even a short note in the routing card saves time when the run returns in a month.
For repeat parts it’s useful to create a short procedure. After the first piece measure the hole, check entry and exit sizes, inspect form and surface. If everything is in tolerance, lock the mode, tool, overhang, clamping method and control point. Then the operator won’t start searching again on the next run.
If the part is sensitive, measure the first several pieces consecutively rather than selectively. It’s tedious but catches size drift before the whole batch is ruined.
Sometimes the cause isn’t allowance or mode but the equipment itself. If you hit limits of rigidity, repeatability or stability over a series, these issues can be discussed with EAST CNC. The company supplies CNC machines for metalworking, helps with selection, commissioning and service, and publishes practical materials on machine use and metal cutting in the east-cnc.kz blog.
FAQ
Can a reamer fix a crooked hole left by drilling?
No. A reamer usually follows the existing channel rather than correcting it. If the drill shifted the axis, produced a taper, or damaged the entry, the reamer will most often remove metal where it’s easiest to go and preserve that error.
What allowance should I leave for reaming?
Leave a moderate allowance and check it on the first part instead of relying only on calculations. If the allowance is too small the tool will rub and heat the material; if it’s too large the reamer can bend and the hole will drift.
What should I check after drilling and before reaming?
Measure the hole immediately after drilling at the entry and, if possible, deeper along the length. Check for ovality, taper and axis shift. If the shape is already poor, don’t expect the finishing pass to fix it.
Should I remove burrs before the finishing pass?
Yes. Deburr the entry and exit. Even a small burr can upset the entry, causing the reamer to start with a misalignment.
How to choose speed and feed for a reamer?
Typically run the reamer at a lower speed than the drilling speed for the same diameter, and keep feed steady without jerks. If you hear squeal, see a matte surface or the size varies, first reduce speed slightly and then carefully adjust feed.
Is it okay to stop the reamer inside the hole or reverse while cutting?
No. Do not stop feed inside the hole or retract the reamer while cutting. That causes heat, scoring on the wall and size drift at the last millimeters.
Why does size start to drift during the finishing pass?
Most often size drift is caused by a combination of small issues: wrong allowance, spindle or arbor runout, misclamped part, dull drill, or worn reamer. The final pass rarely creates the problem from scratch; it usually reveals earlier mistakes.
How to properly check the first part in a series?
Measure the first part not only at the entry but along the length in several sections. If the size looks nearly correct don’t relax. One full check at the start of a run often saves the entire batch.
What to consider when reaming blind holes?
For blind holes leave room for chips near the bottom and don’t bring the tool almost to a hard stop. If the reamer bottoms out it will heat, smear the surface and easily create excess diameter at the bottom.
When is the issue due to the machine or tooling rather than the mode?
Look at the tooling and fixtures when size still wanders after correct mode settings. Reduce tool overhang, check runout, clamp condition and backlash. If the part moves in the vise or the arbor has runout, changing cutting parameters won’t fix it.