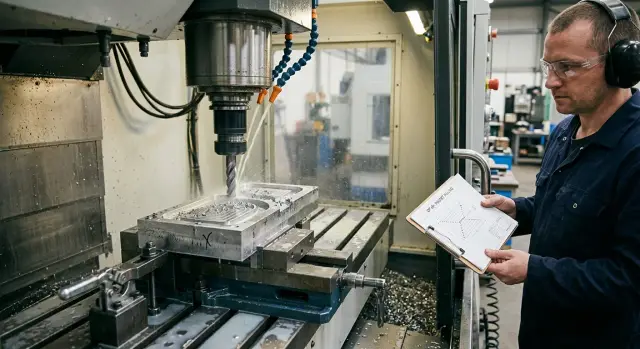
Pocket Milling Near a Thin Lip Without Losing the Edge
Pocket milling near a thin lip requires precise datums, a smooth tool exit, and the right pass order so the edge stays intact on the finish pass.
Why the edge gets pushed away at the end
When the pocket is almost done, the thin lip no longer carries load the way it did at the start. As long as there is extra metal around it, it is supported by the mass of the part. After roughing and intermediate passes, that support goes away, and the edge starts to flex even from a small side force.
That is why the last pass is often the most dangerous, even though it removes very little. The cutter runs next to an already weakened edge and cuts not a rigid blank, but a thin wall that can be pushed outward very easily. A shift of just a few hundredths is enough for the tool to take off too much. On the CAM screen this is almost invisible. On the machine, the edge disappears in a second.
The problem gets worse when the stock allowance is uneven. If 0.1 mm is left on one side and 0.3 mm on the other, the load at the end of the cycle becomes uneven. Sometimes the cutter hardly cuts at all, then suddenly bites deeper. At that moment the lip gets not a steady force, but a short jerk. For a thin edge, that is already enough.
The tool exit from the pocket is especially risky. While the tooth is working inside the material, the process is still manageable. But at exit, the contact changes abruptly, and the tool pulls the material outward. This is especially common when the toolpath ends right at the lip without a smooth lead-out. Then the final cutter mark becomes the place where the edge is lost.
In the shop, this kind of mistake looks frustratingly simple. The whole cycle runs smoothly, the size holds, and the surface looks fine. Then the finish pass starts, the tool exits briefly, and a breakout appears on the edge. The issue is not only the cutting mode. By that point the edge has already lost stiffness, and the final path finishes it off at the weakest moment.
The thinner the lip and the taller the wall, the sooner it starts to flex. That is why the end of the cycle is the riskiest part for such details, even if only a tiny amount remains to be removed.
What to check before the first toolpath
Do not look only at CAM; check the workpiece itself after roughing. A thin lip is rarely ruined by one big mistake. More often it is the result of several small issues that nobody checked in advance.
First, measure the actual lip thickness after roughing. Do not rely on the model alone. If the drawing says 1.2 mm but in one spot only 0.8 mm remains, that area will move sooner than the others. It is better to scan it with a gauge, a micrometer, or at least check a few points with an indicator than to later hunt for the cause of a finish-pass chip-out.
Then look at where the largest stock allowance remains. Often it is not where you expect: at the tool entry, in one pocket corner, or along one wall after uneven roughing. Then the cutter runs calmly for almost the whole contour, but at the end it suddenly gets a heavier load. That is exactly when the thin edge moves outward or breaks.
Before starting, it helps to check four things:
- how much metal is left on the thinnest section;
- where the allowance is noticeably larger than on the neighboring walls;
- whether the pocket depth is the same at the corners and on the straight sections;
- whether the clamp is pressing near the thin area.
Do not guess the depth from the screen either. If the corners ended up deeper than the walls, the cutter changes load on exit and starts pulling the edge. If one side of the pocket has already dropped by a couple of tenths after roughing, the finish pass there will be very different from the opposite wall. On a thin lip, that is enough.
Also check the clamping. Even a good clamp can ruin a part if it sits too close to the thin area or presses toward the pocket wall. The metal bends slightly, which is almost impossible to see, and after the load is removed the size shifts. In the shop this happens all the time: the operator blames the final milling pass, when in fact the part was already stressed before it.
If these checks take 5–10 minutes, do not save time on them. They usually save both the edge and the entire batch.
How to choose datums
When a pocket comes close to a thin lip, the mistake often starts not with the toolpath, but with the datum. If the part is supported on a weak area or zero is set from the thin edge, the edge moves even before the last pass. The cutter only removes what was already spoiled by the setup.
The main datum is best placed on the stiffest and widest surface of the part. Usually that is the bottom machined face or a solid side of the blank that does not flex under clamping. The shorter the force path from clamp to support, the more steadily the part holds size.
The thin lip is not suitable as a reference. It flexes, changes position under clamping force, and sometimes even "breathes" a little from heat. If coordinates are taken from it, the pocket may be right only on paper, while on the machine the cutter ends up too close to the edge.
A workable setup is usually simple: the main datum comes from the lower rigid face, the second comes from a thick side wall or a prepared stop, and the third comes from an end face with normal thickness. The clamps must not press near the lip.
It is important not only to choose the datums, but also to leave the tool a proper exit from the pocket. If the fixture, stop, or clamp blocks the safe side, the process planner is forced to lead the cutter toward the thinner wall. That is what causes edge loss at the very end, when almost the full size is already finished.
The rule is simple: the datum and the exit direction should not pull the tool toward the weak spot. It is better to rotate the part or move the stops to a more solid side in advance than to chase tenths on the last pass.
After repositioning, check repeatability. Do not assume the part "sat the same as last time." It is enough to run an indicator across two datum surfaces or quickly check control points with a probe. If the position drifts, the thin lip will almost certainly show it first.
When the part sits on a thick base, the side stop acts on the solid section, the clamps do not choke the edge, and the cutter exits into free space, the last pass usually goes smoothly.
How to set the tool exit from the pocket
Most often a thin lip fails not during the main material removal, but in the last few seconds, when the cutter leaves the material and drags the edge with it. This happens especially often near a thin wall: the metal is already weakened, the allowance is small, and the toolpath is still running at the same feed.
The worst choice is to lead the cutter straight through the weak edge. At that moment the tool loses steady load, a short jerk appears, and the lip gets a side hit. If the wall is thin, that is enough to take off the edge, shift the size, or leave a burr that is hard to remove without losing geometry.
It is better to move the exit point to a stiffer area. Usually that is a spot near a thicker wall, a rib, or a zone that will be cleaned up later anyway. The idea is simple: let the tool leave the material where the part can absorb the remaining force without flexing.
A practical approach
This sequence works well:
- roughing does not run all the way to the lip; a small allowance is left;
- feed is reduced for a short section before the tool exits;
- the exit itself is moved to a rigid part of the pocket, not to the thin edge;
- the lip is finished with a separate short finish pass.
The feed reduction before exit should not be symbolic. If the cutter was running confidently through the body of the part, the last millimeters are better done noticeably more gently. Then the tool does not jerk the wall at the moment when contact with the material changes suddenly.
A separate finish pass on the lip also often saves the part. Do not try to remove stock and make a clean exit from the pocket in one motion. It is much safer to leave a small remainder on the lip and then run it with a short toolpath, a clear cutting direction, and a soft exit into empty space.
A simple example: the pocket is almost finished, and one side still has a 1.2 mm lip. If the cutter exits through that edge after a long arc, the lip often bends. If the same exit is moved to the thick wall, and the lip is finished separately at a lower feed, the edge usually stays intact even on the last pass.
If you are unsure, look not only at the shape of the toolpath, but also at the last 10–15 mm of travel. That is where the mistake is most often hiding.
Pass order
For this kind of part, the order of operations is often more important than the cutting parameters themselves. If you approach the weak area too early, the lip loses support, starts to flex, and the last pass cuts the edge away at the end of the cycle.
Remove the main volume first where the wall is stiffer and there is still plenty of metal around it. Leave the area near the lip for later. That way the part keeps its shape longer, and the tool does not press on the thin edge under full load.
Usually this order works well:
- Start roughing from the side farthest from the lip.
- Keep the same stock allowance on all pocket walls, without random "islands" or empty spots.
- Finish the rigid walls earlier, but do not bring the weak area to size yet.
- Approach the lip at the very end, when only a small amount still needs to be removed.
- Machine the area near the lip with a separate gentle path, not the same line used for the entire contour.
A uniform allowance on the walls matters for a simple reason: the cutter runs more smoothly when the load does not jump around. If 0.1 mm is left on one side and 0.5 mm near the lip, the tool will jerk exactly where the metal is weakest. That is how the edge ends up distorted, seemingly out of nowhere, in the last minute.
A separate finish on the lip often solves the problem. A short path with a small chip load and a careful exit into the stronger part of the pocket is usually enough. If the cutter exits directly through the thin edge, it can create a side push even at normal feed.
On a simple part it looks like this: a 60 x 40 mm pocket with a 1.2 mm lip next to it. First the main volume is removed, leaving the same allowance everywhere, then the rigid walls are finished. Only after that is the lip finished with a separate pass and a light exit into the open part of the pocket. The cycle becomes only a little longer, but the edge stays put.
After the first part, check not only the pocket size. Inspect the lip itself: is there any distortion, a shiny rubbing line, or a small burr at the exit? If the edge has already started to drift, fix the tool exit from the pocket and the finishing allowance on the weak area first. That is usually faster than recalculating the whole toolpath.
Shop-floor example
On one part, there was a normal pocket in the housing, but one side had a thin 1.2 mm lip. Roughing ran smoothly: chips came out clean, the size held, and the walls looked fine. The problem appeared right at the end, when the final contour pass of the pocket started.
The operator saw the same thing on two parts in a row: almost the entire cycle ran without surprises, but at the finish the edge was pushed slightly outward. The shift was small, but it was already enough for the lip to lose its straight line. By eye it looked minor, but in practice the part had to be rechecked.
The cause was not the cutter and not the material. The tool was exiting the pocket right next to the thin side. At that moment the load changed, the cutter pulled the edge with it slightly, and the lip could not take that jerk.
The fix was simple. The exit point was moved to the opposite corner of the pocket, farther from the thin area. The lip was no longer finished in the same pass as the rest of the contour. A separate finish path was made for it with a lower feed.
After the adjustment, the program looked like this:
- roughing removes the main volume and leaves the lip alone until finish size;
- the finish pocket pass exits in the rigid corner;
- the lip is machined separately, with a calm cut and no sharp exit near the edge;
- feed on this operation is reduced by about 20–30%.
On the next part, the edge stayed straight. The lip size was preserved, the exit mark disappeared, and the operator no longer had to catch the defect in the last few seconds of the cycle.
This case shows something simple: a thin edge is often not lost because the whole strategy is bad, but because the last few millimeters of the toolpath were chosen poorly. Sometimes it is enough to move the tool exit from the pocket and separate the finish pass on the lip for the problem to go away without changing the cutter or rewriting the whole program.
Mistakes that make the lip move
The edge often stays fine through most of the cycle and then breaks or shifts right at the end. Usually there is not just one reason. Several small decisions add up to one bad ending: the wall is already weakened, the tool exits in the wrong place, and the operator is in a hurry to finish the cycle.
A common mistake is to leave all the stock next to the thin edge for the last pass. While the cutter removes the main volume in the middle of the pocket, the lip is still holding up fine. But if almost all the extra metal remains near it, the last pass suddenly changes the load. The edge flexes, the cutter pulls the material toward itself, and the size is gone in a second.
It is no better to send the cutter out of the pocket along the shortest line through the lip. On the screen the path looks neat. In metal, it often creates a side push exactly where there is almost no stiffness left. If the tool exits through a stiffer area, the lip usually holds.
Another mistake comes from rushing. At the end of the cycle some people increase feed because there is "almost nothing left". On a thick part this sometimes works. Near a thin wall, it quickly creates vibration, marks, and a size shift.
Clamping also often ruins the result. If the clamp is too close to the pocket, the part holds rigidly only until some metal is removed. Then the stress changes, the lip starts to move slightly, and the finish pass is no longer cutting the geometry that was there at the start.
In practice, the same set of issues usually comes up:
- the allowance was left in one chunk near the lip;
- the cutter was led out through the weak edge;
- feed was increased at the end;
- the clamp was placed near the thin area;
- the first part was judged only by simulation.
Simulation helps, but it cannot feel how the part flexes in a real fixture. That is why the first part must be checked by hand and by eye: measure the lip before and after finishing, check the tool exit mark, and listen to the sound at the end of the path. If there is a short squeal or a sign of pull-out there, the problem is already present, even if the size is still within tolerance.
A good sign is when the lip holds its size not only on the first part, but also after several repeated runs. For this area, that is more honest than any pretty CAM picture.
Quick check before startup
Before starting the cycle, look not only at the screen but also at the part itself. If the datum was taken from a thin wall, everything that follows will be right only on paper. For this kind of operation, setup should be taken from the stiffest surface, the one that keeps its shape under clamping and does not move from internal stress.
Then assess the stock allowance on the pocket walls. It should be even around the whole contour, with no area where the cutter suddenly removes much more. Uneven stock is often what tears the thin lip off on the final pass: the whole cycle goes smoothly, and then the tool gets an extra load near the weak edge.
Before startup, a short checklist is enough:
- the datum comes from a rigid surface, not from the lip or a thin rib;
- the stock allowance on the pocket walls is the same in the model and on the blank;
- the tool exit moves to the safe side and does not cross the weak edge;
- the lip is finished in a separate pass;
- the first part is measured before the batch starts.
If in doubt, run the last seconds of the toolpath in air or with the tool lifted. Watch one thing: where the cutter goes after the finish wall. That is where you can usually see whether it crosses the thin edge or simply moves away safely.
Then start the first part as a trial piece. Measure the pocket position, the lip thickness, and the remaining stock after semi-finishing, if there is one. Do not move straight to the full batch, even if the program already worked on a similar part. One extra measurement takes a few minutes, while a broken edge can force rework on the whole batch.
Most often, it is not the machine that causes trouble, but the rush before startup. When the datum sits on a rigid surface, the tool exit does not go through the weak edge, and the finish on the lip is handled in a separate pass, the scrap risk drops a lot.
What to do next
If you find a setup once that keeps the lip intact, do not keep it only in memory. Record the setup, pass order, and tool exit point in a short operation card. For this kind of job, that is often more useful than another general tip from a textbook.
It is worth saving only the essentials: a sketch of the datums, the safe tool exit mark, the remaining material before finishing the lip, and the point where the part loses stiffness first. One page is usually enough.
It also makes sense to save a separate CAM template for the finish pass on the lip. Not a general pocket template, but a short path template with the right entry, cutting direction, and safe exit. Then you will not have to rebuild that section from scratch every time or risk a small mistake at the end of the program.
If the lip still moves, review the operation together with the process engineer. It helps not to argue about cutting parameters by eye, but to pinpoint exactly when the part loses stiffness: after roughing the bottom, after opening the side wall, or after removing a rib. Once that moment is clear, it is easier to change the pass order, add temporary support, or leave stock where it really holds the edge.
If these jobs repeat on machining centers, it is worth checking not only the program, but also the machine rigidity, fixture convenience, and startup quality. In such cases, an outside perspective helps. EAST CNC offers not only metalworking equipment, but also consultation, startup, and service support, so recurring series issues are often best reviewed with the people responsible both for selection and for putting the machine into operation.
A good result for the shop is simple: you have your own setup scheme, your own finish-pass template, and a clear point where the part starts to drift. Then the next similar part starts calmly, instead of being checked at the very last minute of the cycle.
FAQ
Why does a thin edge get cut away most often on the last pass?
Because by the end of the cycle the lip has already lost support. At first there is extra metal around it, but after roughing passes only a thin wall remains, and the cutter can push it outward even with a small chip load. Often it is not the cut itself that causes trouble, but the tool exit from the pocket. At that moment the load changes suddenly, and the edge can move by just a few hundredths.
What allowance is best to leave near the lip?
Leave a small, even allowance around the whole contour instead of keeping all the stock near the lip. When one side has 0.1 mm left and the thin area has 0.3–0.5 mm, the cutter starts cutting in jerks and pulls the weak section. If in doubt, first make sure the remaining stock is even after semi-finishing, then finish the lip with a separate light pass.
Can you use a thin lip as the setup reference?
No, it is better not to use the thin edge as a datum. The lip flexes from clamping, heat, and machining forces, so the coordinate can shift very easily. Use a rigid, wide surface as the main datum, and take the side reference from a solid wall or a stop.
Where is the best place to lead the cutter out of the pocket?
Guide the cutter toward the stiffer part of the workpiece, where there is a thick wall or a solid corner nearby. Then the remaining force is taken by the strong area, not the thin edge. Do not send the tool along the shortest line through the lip. On screen it looks neat, but in metal it often causes a breakout right at the end.
Do you need a separate finish pass on the lip?
Yes, in most such cases this is the safest choice. First you bring the pocket to size without fully finishing the lip, then you go over the edge with a short path at a lower feed. That separates two jobs: finishing the wall and making a safe exit. For a thin area, that is usually more reliable than one shared contour.
What should be checked before the first run to avoid losing the edge?
First measure the actual lip thickness after roughing, not just what the model shows. Then check where the largest stock remains and whether a clamp is too close to the weak area. It also helps to run the last seconds of the toolpath in dry run. If the cutter exits through the thin edge, the risk of scrap is high.
Can clamping ruin the lip?
Yes, and often more than people expect. If the clamp presses close to the pocket or pulls the metal toward the thin wall, the part is already under stress before the finish pass. Move the clamp to a more solid area and check with an indicator how the part sits after tightening. Even a small bend can later shift the size.
What should be changed first if the edge is already being cut away?
Start by not changing the whole cutting strategy at once. Most often three fixes are enough: move the tool exit into a rigid area, even out the stock on the walls, and make the lip a separate finishing pass. If the defect remains, reduce feed on the last few millimeters and check again whether the fixture is pressing near the thin area.
Should feed be increased at the end if only a tiny amount is left to remove?
No, that is a bad idea near a thin wall. At the end of the path the contact with the material changes, and extra feed can cause vibration, burrs, or edge breakout. It is better to go more gently over the last millimeters than over the main contour. The time loss is small, but the chance of keeping the edge is much higher.
How can you tell from the first part that the strategy really works?
Measure the lip thickness, look at the tool exit mark, and check whether there is a shiny rubbing line. If the edge is already starting to drift, you will see it before the size actually goes out of tolerance. Then repeat the part once more and compare the result. One good run proves nothing, but the same result on several repeats shows that the strategy works.