Setup photos and videos: what to shoot and what to write in the card
Setup photos and videos help shifts only where a frame captures disputed moments. Let’s look at what is better to shoot and what should be written in the card right away.
What is the problem here
Photos and videos seem like convenient insurance. Take a shot, record a short clip, send it to the chat - and the next shift should be able to get to work quickly. In practice, this only works when the materials are collected in a clear system. If there are too many files, they are not labeled, and they are mixed together, the operator spends not five minutes getting started, but half an hour looking for the one useful angle.
Confusion usually starts when the setup card and the footage say different things. The card lists one tool overhang, but the photo shows a different insert. The table shows one correction, but in the video the operator says an old value. The shift does not know what to trust and starts checking everything manually.
The camera is often overrated. It shows the part position, clamping, tool approach, and sequence of actions well. But video does not replace numbers: dimensions, corrections, modes, work offset, or tolerance on a critical feature. These data need to be visible right away, not buried in a recording that has to be replayed several times.
There is also the opposite extreme. Some people record everything: the general machine view, the screen at every moment, repeated passes, tooling boxes, and conversations at the panel. The number of files grows, but the value is almost zero. Extra shots make it harder to notice what really affects startup: jaw position, where the part is resting, where the base is, and which tool is working now.
The usual situation looks familiar. The day shift leaves 18 photos and 6 short videos, but does not label anything. The night shift opens the folder and sees similar shots from different parts and old setups. Instead of a quick start, the operator rebuilds the picture piece by piece.
The problem is not the camera itself. The problem is trying to use photos and videos instead of a clear structure. The camera should support the card, not argue with it or repeat it line by line.
When a camera really helps
A camera is useful where words can be understood in different ways. If the next shift needs to see in a few seconds how the tooling is set or how the part is clamped, a photo works better than a long explanation.
A picture is especially helpful when the geometry of the setup matters. It immediately shows how the jaws are positioned, where the stop is, in what position the tool holder is fixed, and how the part is oriented after basing. What would take several lines in the card and still raise questions, one good photo shows at once.
A good example is a restart after a pause. One operator writes, "base the part against the face and stop," and another understands that in a different way. A photo removes the guessing. It shows which face is the reference, how the part sits in the chuck, and whether there is anything small that may cause the size to drift later.
Video is useful in another situation. It is not for a general overview, but for the order of actions. If a unit is assembled in two or three steps that are easy to mix up, it is better to record a 15-20 second clip. For example, how the operator brings the tool to the check point, moves the fixture into working position, or in what order the elements are clamped.
There is another benefit. A good photo quickly settles disputes between shifts. If in the morning someone says the tooling was set differently, and in the evening someone else is sure of the opposite, a photo with a clear angle and a date removes unnecessary talk. Instead of "it seemed that way," you are left with a fact.
Only record what helps someone make a decision at the machine. If a person can repeat the setup faster and more accurately from the photo or video, the camera is needed. If not, the material only gets in the way.
What is better left in the card
The camera shows the part position and the overall working method well, but numbers and startup order are better kept in the card. If the data needs to be found quickly, checked, and handed over without disputes, text is more reliable than photos and videos.
The card should record everything the shift must read the same way: tool number, correction number, actual overhang, active offset, and the size after the first part. These things should not be left to memory and should not be hidden in a video. On video, the operator may say one thing, while in the job another value is already set.
Sizes, tolerances, and check points are also better written down. A photo is useful for the overall view of the part, but it does a poor job of showing which size was checked first, exactly where it was measured, what tolerance was held in the last run, and what has already reached the edge of the range. When the shift opens the card, it does not need a pretty picture, but a clear note: which size to watch, with which tool it is maintained, and after how many parts to check it.
After the machine stops, the startup order should also live in text. Especially if the machine cannot just be turned on and started. If the spindle must be warmed up, the clamp checked, an axis moved to a safe point, the first cycle run at reduced feed, or the first pass checked separately, it is better to write that step by step.
Usually five blocks of information are enough in the card:
- tools and corrections by operation;
- dimensions with tolerances and check points;
- startup order after a pause, alarm, or tool change;
- the reason the shift deviated from the standard method;
- who made the change and when.
The last point is often skipped, but it should not be. If the shift changed the feed, moved the check to another stage, or replaced the tool with the neighboring pocket, the reason should be written down briefly. Otherwise the next shift will think it was a random mistake and return to the old method.
A good note looks simple: "T08, correction D08, after 40 parts the size drifted by +0.02. Check size 32.00 after the finishing pass. After the night stop, warm up for 10 minutes first, then run dry. Change made by Ilyin, 14.05, 22:40." This format takes half a minute to read and makes sense without calling the supervisor.
What should be photographed
Photos are needed where the person taking over should quickly understand the current state of the machine. One good shot often answers the question faster than a long note in the card.
The best photos are not the "pretty" ones, but the clear ones. Shoot only what helps repeat the setup without guessing.
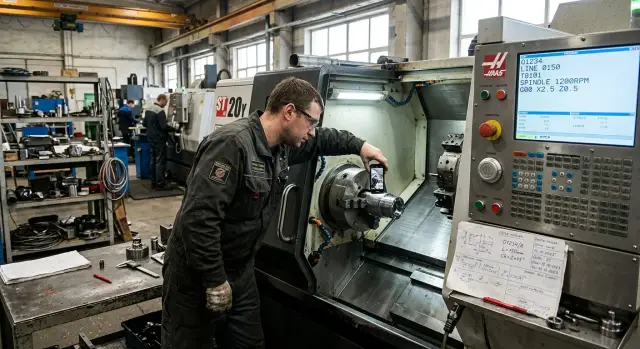
First, you need an overall view of the work zone before startup. The frame should include the chuck, tool, part, and machining area. Such a photo immediately shows whether there are any extra spacers, extensions, or temporary fixes that were forgotten in the description.
Next, show the part position in the chuck or fixture. It is important to see how deep it is clamped, how much overhang was left, and how the blank is oriented. On a lathe, this is often more useful than any text note.
Separately, take close-up shots of the base stops, jaws, and clamps. The frame should make it clear where the part rests and what exactly holds it. If the jaws are bored for a specific part, that should be visible right away.
It is also useful to photograph the tool. It is best when the photo clearly shows the pocket numbers and markings. Otherwise, the new shift can easily mix up the insert, drill, or offset, even if the program is selected correctly.
Another simple but necessary shot is the control screen before start. It should clearly show the program number and, if relevant, the active offset. This is a very common mistake: the part is clamped correctly, but the wrong file is started.
If the part is complex, add another shot with a clearly visible reference point. For example, when the blank sticks out far from the chuck, a photo with the face and jaws visible helps quickly check the overhang.
One and the same shooting order works well: overall view, part clamping, tooling, tool, screen. Then the shots do not turn into chaos, and the next shift immediately understands what belongs to what.
What makes sense to record on video
Video is needed where movement, sequence, and sound matter. If the operator needs to understand not only the result but also the setup process itself, a short clip is more useful than a photo.
The first scenario that often helps is a dry run after a changeover. Such a clip shows how the machine runs the program without cutting: where the approach happens, at which points the slide comes closest, and whether there is enough clearance near the chuck, jaws, and tooling. Usually 15-30 seconds is enough.
It is also worth recording the tool approach to the first part. Not the whole cycle, but the moment where the next shift needs to see the entry path, safe distance, and the tool behavior at the base. This is especially useful on a new part or where the tolerance is tight.
There are operations where the order of actions is everything. Fixture changes are worth recording if the person has to repeat the sequence without guessing. For example: first remove one support, then reposition the stop, then check the clamp, and only after that start the dry run. In the card this can be described, but on video it is much faster to understand.
Another useful clip is coolant flow and chip evacuation. What matters here is the process itself: where the stream hits, whether the tool blocks it, whether chips stick in the cutting zone, and whether they pile up in the trap. A photo shows this poorly.
Sometimes a short sound clip helps too. Five to ten seconds is enough for the next shift to hear whether the unit sound is normal or whether there is already an extra noise from the spindle, tool drive, or feed.
A good video always answers one question. That is why several short files are better than one long three-minute clip. If a video cannot be understood without long explanations, it is already weak.
How to organize the material without confusion
Problems start not because of the camera, but because of disorder. If the shift receives ten files with names like "video_1" and "photo_new", such material is almost useless.
At the start of recording, it is better to immediately name the date, machine, and part number. This takes a few seconds, but later there is no need to guess which batch the clip belongs to. If there is a machine tag or route sheet in the frame, show it right away.
Then keep the same order. First the overall view: machine, work zone, blank position. Then the main components: chuck, jaws, tool, stops, and coolant point. That way, the new shift understands the situation faster and does not have to piece together the meaning.
There is no need to say on video what is already visible. If the jaws are in the frame, there is no need to spend time describing their shape. It is better to say what the camera does not show by itself: which tool is active now, at which operation the change was made, and where the operator should pay extra attention.
A useful rule is simple: one video, one action. Record the jaw setup separately, the tool approach separately, and the first check pass separately. Such material is easier to review the next day and even a month later.
Files also need a common template. Label them immediately after recording, while everything is still fresh in memory. For example:
- 2026-04-12_ST1_part154_overview
- 2026-04-12_ST1_part154_jaws
- 2026-04-12_ST1_part154_firstpass
- 2026-04-12_ST1_part154_measurement1
If the shop already has a setup card, the file naming logic should match it. Then the operator, mechanic, and setter all look at the same set of labels. In a proper shift handover, a person opens the folder and in a minute understands what was done, what was checked, and which file is needed now.
Example on one part
The day shift turns a batch of bushings on a CNC lathe. In the middle of the day, the setter changes the jaws for a new blank and resets the clamping. If this is handed over only verbally, the night operator will almost certainly waste an extra 15-20 minutes checking what was already set.
In this situation, photos and video only help when used together with the card. A photo preserves what needs to be quickly checked by eye: how the part sits in the jaws, how far it protrudes, where the stop is, how the tool is brought in, and which tool was used to finish the size. One overall shot and two or three close-ups are usually more useful than ten random phone photos.
Video also needs to be short here. It is enough to record the first test pass after changing the jaws and clamping. In such a clip, the next shift can see whether there is extra vibration, how the chips flow, whether the machine takes the stock calmly, and whether the part is being pulled out of its base.
And the card stores the numbers without which you cannot work. It should not say "we adjusted the size a little," but specifically: the outer diameter correction X was changed by 0.04 mm, the first check was done after the test part, and the size is checked every 10th bushing after that. If the shift also measures the length, that is written down just as precisely.
A good shift handover looks simple. The operator opens the card, sees the latest corrections and the measurement frequency, then checks the photos of the setup and tooling, and if needed, plays the short video of the test pass. If one of these three elements is missing, the guessing starts.
Where mistakes happen most often
The most common mistake is recording a lot, but not what will actually help later. The next operator opens the folder, sees a six-minute video, a couple of photos without context, and a note in the card like "everything was set, size is holding." Such a handover is hard to use for a quick start.
Another typical mistake is one long video instead of two short ones. In one clip, the tool, chuck, screen, finished part, and commentary all appear at once. Then no one can find the needed moment. Separate files work much better: one for the position of the setup, another for a short pass or tool approach.
Photos are often taken too late, when the unit has already been disassembled or loosened. The tool holder was removed, the part was taken out, the tool was moved away, and only then someone decided to take a picture "just in case." Such a shot does not show the original position and no longer helps repeat the setup.
The same goes for the card. If it contains general words instead of numbers, it loses its meaning. Phrases like "the clamping is fine," "the correction was slightly adjusted," or "the speed was reduced" do not help. You need specific values: correction number, size after the pass, feed, speed, stop position, and tool overhang.
Another miss is not recording the screen with the program number and the required offsets. Because of that, the shift has photos of the tooling, but no answer to a simple question: which program was actually running. On a lathe, that kind of small omission creates confusion within the first few minutes.
And finally, the material often gets mixed up. Photos of one part sit next to videos of another, and a name like "final2" explains nothing. If there are several machines or similar jobs in the shop, the mistake is almost guaranteed.
Simple rules help here: record the state before disassembly, make short clips for one task, write numbers in the card instead of vague phrases, include the machine number and program in the frame, and sort the files into folders right after the shift.
Quick check before handing over the shift
Before leaving, three to five minutes is enough for a quick check. Those minutes often save the next shift half an hour and remove unnecessary calls at night.
Look at the material as if the machine is being taken over by someone who has not touched this part today. If the photo does not make it clear how the part is clamped and where the base is, the shot is almost useless. If the screen does not show the program number, the video will not save it either.
Check a few things:
- can the clamping, stops, and basing be seen in the photo without guessing;
- is the program number readable on the screen;
- does the card contain dimensions, corrections, and tool notes;
- can the next shift repeat the startup without calling the setter;
- are duplicates, empty clips, and random shots removed.
Shift handover most often falls apart in small details. The operator recorded a good clip, but the screen with the program did not appear in the frame. Or they attached a photo of the chuck, but kept the first-part size only in their head. As a result, the person on the next shift spends time not on work, but on reconstructing someone else's logic.
A good rule of thumb is this: photos and video should answer the question "what do I see," and the card should answer "what do I set and check." The camera shows the part position, the tool, the screen, and the order of actions. The card stores the numbers: overhang, correction, size after the first part, and notes on the pass.
If, after this check, the startup can be repeated calmly and without clarification, the shift has been handed over properly. If even one point raises a question, it is better to shoot one short extra clip and add two lines to the card than leave your colleagues a puzzle.
What to do next
Start with one rule: every shift should have the same set of materials. If one setter records the chuck, another records the screen, and a third records nothing at all, the process quickly turns into guesswork.
It is better to approve a short list of required shots for the shop floor. Not a vague "record everything important," but a precise set: what is always photographed, what is recorded only when something changes, and what is written directly in the card without using the camera.
Usually a simple standard is enough:
- 5-7 required photos for every setup;
- 2-3 short videos only for movements that are hard to describe in words;
- a separate list of data stored only in the card;
- one file naming scheme: machine, part, shift, date.
After that, separate the storage. The card is for working data: program number, corrections, tools, basing, and size notes. The photo and video archive is for what a person needs to see quickly with their eyes: jaw position, tool overhang, unusual clamping, and the action sequence in a tricky unit.
It is best to test such a system on one machine and one part. Take a repeatable setup and run the new order for several shifts in a row. If the next operator has fewer questions and calls less often about minor issues, the system works. If there are more files but no more clarity, the shot list should be shortened.
If you are starting a new machine, it is useful to discuss the documentation format with the EAST CNC service team. The company supplies CNC lathes and provides consulting, selection, delivery, commissioning, and service support, so at the start you can immediately agree on which shots will really help the shifts and which data should stay only in the card.
A good result looks simple and without unnecessary polish: the shift opens the card, checks a few needed photos, if necessary plays one short video, and calmly continues working.
FAQ
Should setup even be recorded in photos and video?
Yes, but not instead of the setup card. The camera helps where the next shift needs to see the part clamping, jaw position, stop, tool, or the sequence of actions right away. If the frame does not help someone repeat the setup faster, do not record it. Extra files only slow the startup down.
What should stay in the card rather than in photos and video?
Keep in the card everything that must be read quickly and without guessing: tool number, correction, overhang, active offset, dimensions, tolerances, check points, and the startup order after a stop. Also write who made the change, when, and why. These things should not be hidden in a video.
Which photos are mandatory before handing over a shift?
Usually an overview of the work area, the part position in the chuck or fixture, a close-up of the jaws and stops, a photo of the tool with readable markings, and the control screen before start are enough. Take the same shots in the same order. Then the next shift will immediately understand what it is seeing.
When is video more useful than photos?
Use video where movement needs to be shown. This includes the dry run, tool approach to the first part, fixture change step by step, coolant flow, chip evacuation, or a short sound check of the unit. For the general state of the machine, photos are usually better. They are faster to open and do not need scrubbing.
How much material is enough to avoid chaos?
Keep it short and focused. For a normal shift handover, 5–7 photos and 2–3 short videos of 15–30 seconds are often enough. One long file is almost always worse than several short ones. It is hard to find the right moment in it.
What is the best way to label photos and videos?
Name files right after shooting. Put the date, machine, part, and the meaning of the shot in the file name, for example overview, jaws, or first pass. If there is already a setup card, use the same labels. That saves the operator from decoding the files.
Should the control screen be recorded separately?
Yes, record it almost always. From the screen photo, the next shift can immediately see the program number and, if needed, the active offset. Without that, you can end up with the correct clamping and the wrong startup. That mistake happens often.
What should you do if the card and the footage say different things?
Trust not assumptions, but the last verified record. If the card and the footage do not match, stop and confirm what is actually on the machine. After checking, update the card and reshoot the disputed moment. Do not leave the mismatch for the next shift.
How can you quickly check a shift handover before leaving?
Look at the materials as if the machine is being handed over to someone who has not touched this part today. They must understand the clamping, base, tool, program, and control numbers. Then delete duplicates and empty shots. If there is still a question, shoot one short clip and add a couple of lines to the card.
How do you introduce a unified shooting order on the shop floor?
Start with one machine and one repeatable part. Set a simple package: which photos are always taken, which videos are shot only for difficult actions, and what data goes only in the card. After a few shifts, review the result. If there are fewer questions and startup is faster, the system works. If there are many files but little benefit, cut the template down.