Parts for Automatic Loading: What to Check at the Machine
We explain which parts for automatic loading are suitable for a robot at the machine: geometry, mass, blank orientation, common mistakes, and quick checks.
Why not every part is suitable for a robot
A robot at a machine likes repeatability, not complexity. It is easier for a person to pick up a part, turn it slightly in their hand, and place it where it needs to go. A robot does not work like that. It repeats the same movement and expects the blank to be in the same position every time.
That is why a part that seems "convenient" is not always right for automatic loading. From the outside, everything may look simple, but in the gripper the blank can shift, rotate, or hang at an angle. This usually happens with shapes that have no clear reference surfaces, slippery finishes, protrusions, or an off-center weight distribution.
The problem often starts before the machine. In a tray or buffer, parts may settle differently, catch on each other, roll to the other side, or tilt at an angle. For an operator, that is a minor detail. For a robot, it is already a different situation, and it picks the part in a way the program did not expect.
In EAST CNC projects, when selecting an automated cell, the first thing we look at is how the blank behaves, not just the machine or the robot itself. That is a practical approach: if the part is unstable in feeding, problems only build up from there.
You can usually spot the risk by several signs:
- the blank does not have a clear supporting surface
- front and back are easy to mix up
- the gripping area is round or slippery
- the mass is distributed unevenly
- a thin protrusion or a long section makes it hard to hold the part straight
Even one such blank can stop the whole cell. The robot picks it on the second attempt, loads it into the chuck with a slight offset, the sensor detects an error, and the cycle stops. The operator then sees not a "small glitch" but a full line stoppage.
For this reason, parts that sit calmly in the tray, orient clearly, and do not change position in the gripper are better suited for automatic loading. If the blank already behaves unpredictably during feeding, things will not get easier at the machine.
What geometry works more smoothly
A robot likes predictable shapes. The simpler the part contour, the easier it is to grasp in the same way ten, a hundred, or a thousand times in a row. That is why parts for automatic loading are most often simple cylinders, bushings, rings, bars, and prisms.
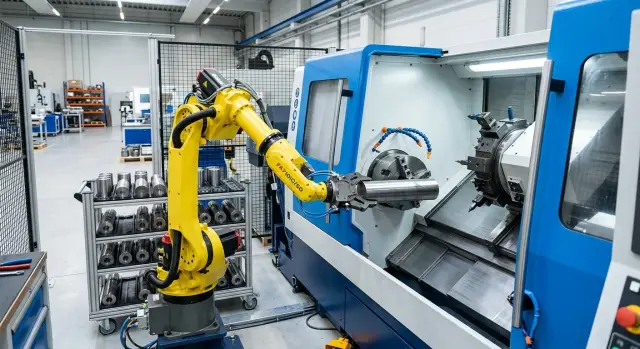
On a CNC lathe, this is obvious right away. A short cylindrical blank is picked up cleanly, brought to the chuck quickly, and does not waste time on extra rotation. A prismatic part has the same advantage: it has clear flat surfaces, and the gripper does not have to search for a random contact point.
The most difficult parts are the ones with strong asymmetry. If one side has a heavy protrusion and the other a thin wall, the blank often settles into the tray differently each time. Because of that, the robot at the machine may pick it up in a different pose every time, and that is already a risk for accurate loading into the chuck or fixture.
Problems are often caused not by the whole part, but by individual features. A thin flange bends under the jaws. A long nose or protrusion catches on a neighboring part. A narrow collar gives too little area for gripping. As a result, the robot seems to hold the blank securely, but during transfer it rotates slightly.
Chamfers also matter. A large smooth chamfer or fillet looks harmless, but the gripper has nothing to "bite" on there. The contact area is smaller and slipping is more likely, especially if the surface is freshly machined and the part has oil on it.
Smooth geometry usually has a few simple traits:
- a repeatable outer contour with no unnecessary protrusions
- flat or cylindrical zones for a secure grip
- one clear side for feeding into the machine
- elements that do not bend or catch during transfer
- a base or hole that makes it easy to define positioning
Holes, recesses, and reference faces often make the job much easier. A through hole helps center the part, and a flat base gives a clear orientation in the cassette or holder. If the part is new and its shape can still be adjusted, sometimes it is enough to add a small flat, a shoulder, or a technological hole. A small change like that saves a lot of setup time later.
What to check for weight and balance
If you are evaluating parts for automatic loading, do not look only at the number in kilograms. The robot is not just lifting weight; it is handling the part together with its center of gravity, length, shape, and the way it behaves during acceleration.
The most common mistake is simple: the part passes the weight check, but does not hold well in the gripper. That happens when the center of gravity is shifted away from the gripping point. The robot starts moving, the part pulls downward or sideways, and the jaws are already holding it at the limit.
A short heavy blank is often more convenient than a long light one. The reason is not the overall weight, but the leverage. A long part creates extra moment even with a small mass, especially if the robot picks it up away from the center. On the way to the chuck, that quickly causes misalignment.
On a CNC lathe, this is easy to see. A 400 mm bar or shaft weighing 2 kg may behave worse than a compact blank weighing 4 kg. The first one swings, while the second moves more calmly if the gripper is close to the center of gravity.
What to check in practice
Check these four things before the trial cycle:
- where the center of gravity is relative to the gripping point
- how the part behaves with a sudden start and stop
- whether it twists in the jaws because of oil on the surface
- whether the weight changes because of stock allowance, chips, or coolant residue
- whether the robot and gripper still have enough load capacity
Reserve capacity is always necessary. In a real shop, a part is rarely "perfect." Oil gets on it, chips remain in cavities, and dimensions vary within tolerance. If you sized the system with no margin, a small issue will quickly turn into failures.
A good rule is simple: use not the nominal weight, but the upper limit. If the drawing says the blank weighs 6 kg, but after cutting and transport it can gain another 200–300 g because of coolant residue and dirt, include that in the calculation. The same applies to the gripper: the holding force must keep the part secure not only while still, but also while moving.
Also pay close attention to deceleration. Many people check how the robot lifts the part, but forget about the stop before loading. That is exactly when a shifted center of gravity most often yanks the blank out of the grip or causes a slight rotation, after which the part no longer lands correctly.
If you are unsure, do a simple test. Take the part, set the robot to normal speed, then repeat the cycle with sharper acceleration and braking. If the part shifts even a little in the jaws, the problem is already there. In production, it will only become more visible.
How to keep orientation clear
A robot works calmly only when the blank reaches it in the same position every time. If today the part sits with the chamfer facing up and tomorrow it is turned the other way, the gripper starts searching for an option that is not in the program. At the machine, this quickly turns into misalignment during loading, an extra check cycle, or a stop.
Symmetry is usually the cause. A bushing, ring, or short shaft can look the same from both sides, even though the machining differs: one end is already faced, while the other has a chamfer, groove, or hole. A person notices that almost immediately, but a robot without a clear marker can mix up the sides. That is why it is better to intentionally break the symmetry with a simple mark: a different chamfer, a small notch, a recess, or another visible feature.
A clear base for gripping and feeding also works well. The robot needs a surface it can grab the same way every time, without guessing. If the part rolls, spins in the tray, or rests on a random edge, stable orientation will not happen even with a precise gripper.
Usually a short check before startup is enough:
- the part in the buffer settles in only one position
- the gripper always picks it up from the same base surface
- a sensor or camera sees exactly the end or face you use for orientation
- the machine fixture does not change the part position, but only seats it precisely
It is better to decide right away who sets the orientation. In one cell, the tray does this by placing the blanks the right way. In another, the gripper itself does it with a mechanical stop. Sometimes the fixture defines the orientation if it accepts the part only one way. The bad option is when the tray, gripper, and fixture all "help a little." Then the mistake stays hidden until the first batch change.
For a CNC lathe, a simple example looks like this: a cylindrical blank has the same diameter, but only one side has a chamfer for clamping. If the sensor does not see that end, the robot will occasionally feed the part the wrong way around. One small mark on the end and a clear base in the tray solve the problem faster than a complicated program edit.
Where blank stability is lost
A robot only works consistently when the blank lies in the same position every time. If it rocks in the cassette, shifts in the tray, or changes angle by a few degrees, the failure starts not in the program, but in feeding. The gripper picks the part a little differently, the chuck receives it at an angle, and the error repeats in a loop.
A common issue is play in the storage area. On the table, everything may look fine, but in the cycle the robot approaches, slows down, touches the part, and it shifts slightly. For a person, that is a small thing. For automation, it is enough to move the reference point and ruin repeatability.
Oil and chips make things worse. An oil film changes friction, so in one cycle the blank sits firmly and in the next it slips. Fine chips under the part lift one side by fractions of a millimeter, but that is enough for the gripper to land unevenly. If you checked the feed on clean parts and then ran the real batch, behavior often changes.
Round parts like to roll. If the tray has no simple stop or V-support, a cylinder may stop in a different spot after each touch. The robot at the machine will not fix that. It repeats the same movement, but the part is already lying differently.
Thin-walled blanks create a different failure. Even when the gripper is chosen correctly, the part itself may deform under pressure, especially if it is held in a weak area. From the outside, it is barely noticeable, but after loading into the chuck the part no longer keeps its shape properly. Then the problem looks like poor centering, although the real cause is the blank’s stiffness.
It helps to test not one perfect cycle, but a series of identical repeats. A simple test is usually enough:
- place the blanks exactly as they will be used in the shift
- do not clean them too thoroughly; leave the surface in a realistic condition
- run at least ten identical cycles
- after each cycle, check whether the angle, height, or seating changes
- inspect the first and the tenth blank separately
If by the tenth repeat the part sits just as it did at the start, the feed is already close to production-ready. If not, the part is not yet ready for automatic loading, even if the first two cycles passed without errors.
How to check a part before starting the robot
It is better to understand whether the parts are suitable for automatic loading not from the drawing, but from a short shop-floor test. For this, take not 2–3 nice blanks, but 20–30 pieces from the real batch. That way you will immediately see size variation, oil traces, small burrs, and differences in how the part settles into the feed.
Lay out the blanks exactly as they will go into the cell every day. If the feed will come from a tray, use the tray. If it comes from a bin or cassette, use the same container and the same height. Often the robot at the machine works fine on a setup table, but starts getting confused when the parts are packed tighter than expected.
Check the surface separately. First try gripping a dry part, then repeat the test on a part with lubricant or emulsion residue. The difference can be big: the jaws hold firmly when dry and start to drag the part with the slightest twist when the surface is slippery. If the blank is heavy or its center of mass is shifted, it will show up right away.
Do not start cutting on the first run. First you need a series of calm repeats without haste: pick, lift, move, place in the base, and release. It is better to do several dozen cycles in a row than one fast, impressive demonstration. For parts for automatic loading, this test is more useful than any visual estimate.
During the repeats, track two things: how many times the part shifted in the gripper and how many times it rotated relative to the required orientation. Even a small rotation can ruin seating in the chuck, stop, or fixture. If a failure happens 2–3 times in a short series, it will not be a minor issue in the shift; it will be a stoppage.
After the test, inspect the part. Marks from the jaws and stops say a lot about the gripping scheme. A light mark is not always acceptable, and dents, scuffs, and shiny lines on reference surfaces already indicate a problem. Usually that means one of three things: the jaws are pressing too hard, the gripping point was chosen poorly, or the blank orientation itself is unstable.
A good result looks simple: there are no random flips in the batch, the part holds equally calmly on dry and lubricated surfaces, and after a series of repeats there are no marks that would interfere with machining. Then you can move on to the next step and fine-tune the cycle for real production.
A simple shop-floor example
At one CNC lathe, the team decided to install a robot for loading four blanks: a bushing, a short shaft with a collar, a thin ring, and a forging. On paper, everything looked simple. On the shop floor, the difference became obvious on the first day.
A bushing with a straight outer diameter usually behaves more calmly than the others. It sits predictably in the tray, does not catch on neighboring parts, and rarely changes position during gripping. If the length and diameter do not vary much, the robot at the machine picks up such a blank almost without surprises.
A short shaft with a collar is not so smooth. The collar shifts the weight, and the part can rotate differently even if it looks simple from the outside. If the gripper takes the shaft closer to the thin section, the part may dip slightly downward, and that already creates misalignment during feeding into the chuck.
A thin ring often seems convenient because it is light. In practice, it can flex, bend slightly, and stick to a neighboring part after storage in a bin. If there is lubricant on the surface, rings sometimes come out of the stack two at a time, and the robot does not always notice without separate control.
A forging behaves even worse than a turned blank. Its shape varies, edges can be different, and the center of gravity is not always where you expect it. For a person, that is a small matter: they adjust the part by hand. For a robot, it is a source of failures every few cycles.
For such cases, the operator usually has a short check before startup. It takes 15–20 minutes, but often saves half a shift:
- place 20–30 parts in the same tray the robot will use at work
- see whether they settle the same way after a light shake
- check whether the grip changes after washing or applying lubricant
- run several dozen dry cycles without cutting
Even the same parts for automatic loading can behave differently after washing, preservative oil, or simply a change of container. That is why the shop floor looks at more than the drawing. First they check how the blank sits, slides, rotates, and enters the chuck in the real cycle.
Where mistakes happen most often
Most failures start where people trust the drawing more than the real batch. On paper, the part looks identical from piece to piece. In the shop, it is different: one blank has a burr, another has slight ovality, and a third has a rougher edge after cutting than usual. The robot does not "fill in" these deviations. If the gripper and feed are designed only for the ideal model, the cell will start stopping on small details.
People often look at the part weight and relax. That is too rough a check. For a robot, weight is not the only thing that matters; the center of gravity matters too. A 1.5 kg part can behave worse than a 2 kg part if the heavy side is shifted. Then the blank twists in the jaws, hangs at an angle, or hits the stops during seating in the chuck.
Another mistake is tied to how the blanks arrive at the machine. On the drawing they lie flat, but after transport in a box, some parts are already turned, some have stuck together because of oil, and some have landed on edge. If this is not checked in advance, the robot at the machine starts confusing orientation within the first ten cycles. This happens especially often with short cylindrical blanks and parts that look almost symmetrical from the outside.
Another issue is over-tight clamping. The logic is understandable: you want to eliminate the risk of slipping out. But too much force dents the edge, leaves a mark on the clean surface, and changes the part’s seating. After that, the machine may clamp it in a way the technologist did not intend. On a turning cell, this quickly turns into runout and unstable size.
Many people also waste time because they start the cell after just a couple of successful pick-ups. That is not enough. You need a series of repeats on different parts from the same batch and neighboring batches. Otherwise, you are testing a lucky case, not the process.
A good quick test looks like this:
- take parts from the beginning, middle, and end of the batch
- check the grip after normal transport, not after manual placement
- run several dozen cycles without hand correction
- look at clamping marks and seating repeatability
If at any stage the operator feels the need to "help" the part by hand, the automatic loading is not ready yet. That is not a small flaw, but a direct sign that the gripping geometry, container, or orientation method needs to be improved.
What to do next
Before starting a project, do not argue about the robot in general terms. Take one real part that is used most often and check it against a simple set of criteria. This test quickly shows whether the parts are suitable for automatic loading, or whether the shop is still better off with manual feeding.
First, look not at the promised speed, but at predictability. A robot at the machine works calmly when the gripper sees the same shape every time, picks up the part without misalignment, and places it in the machining zone without hand adjustments. If the blank rolls, sticks to the next one, or lands in the tray differently every time, problems will start in the first shifts.
The check usually comes down to six questions:
- Does the part have a clear gripping area where the jaws or gripper do not slip?
- Do the part weight and balance fit within the reserve of the robot, gripper, and feed system?
- Does the blank orientation produce the same result with every feed?
- Does the blank stand stably, or does it roll, flip, or catch on neighboring parts?
- Does a trial cycle pass without shifting, crushing, or reloading?
A good sign is simple: the operator loads the batch into the feed, and the system does not ask them to adjust every third part. A bad sign is easy to spot too. The robot picks up the blank, but sometimes turns it in the air, loses time searching for position, or places the part into the chuck at an angle.
In practice, it is useful to run at least 20–30 repeats in a row. One successful pick-up proves nothing. If no shifting, double pickup, or feed jam appears over a series of repeats, then the geometry, part weight, and blank stability are already close to a workable solution.
If doubts remain, it is better to discuss not just the robot, but the whole chain: the machine, the feed system, the gripper, and the tooling. EAST CNC specialists work with selection, supply, commissioning, and service of CNC machines, so the discussion should start from your part and your cycle, not from catalog numbers. That way the decision will be calmer and cheaper than reworking everything after purchase.