Part passport: how to bring a series back into production after six months
A part passport helps bring a series back after six months without a long setup: which datums, offsets, and tool data should be recorded right away.
Why a restart gets delayed
The problem is usually not the part itself and not the program. After a few months, the shop remembers the general workflow but forgets the little things that make a fast start possible. Those are what later eat up a shift, and sometimes two.
The first thing that disappears is the working notes. The archive may still have the CNC program, the process sheet, and even a photo of the finished part. But the setter does not have a note about which datum was used on the real setup, where the part zero was shifted after the first trial blank, or why the original scheme was abandoned. In the end, people search for a stable setup all over again, even though they already found one by experience.
The tooling often gets in the way too. The old fixtures may have been scrapped, re-sharpened, or replaced with something similar. The numbers in the machine magazine and the numbers in the old notes no longer match. On paper everything looks familiar, but in reality the turning tool is in a different pocket, the drill gives a different length, and the old tool offsets no longer work.
A photo does not always save the day either. A shot of the part after machining is useful, but it does not show a clear setup scheme. From one photo it is hard to tell where the supports were, how the batch was clamped, what holder overhang was considered normal, and where the control point was. That is why a series restart quickly turns into a set of guesses.
After that, a chain of small losses begins. One missed offset means an extra dry run. Then the operator measures the part, adjusts the shift, runs the first part again, and measures once more. If the error is in the datum but people look for it in the tool, scrap appears right at the start.
The usual picture looks like this: the program opens in five minutes, but getting the part back into production takes half a day. While the team restores datums and part zero, checks the fixture, and matches offsets, the machine sits idle. That is why a part passport is not for the archive. It is there so that six months later the shop does not have to remember the process from memory, but can restart it from a clear working record.
What to include in the part passport
The part passport should answer one question: how do you bring this job back into production without a full new setup from scratch? If the document does not help you quickly restart a successful series, it is of little use, even if it has many pages.
At the top, keep the data that removes confusion right away: the part code, full name, program number if it is tied to this job, drawing revision, and the date of the last successful series. Six months later, this is often more useful than long comments. The shop can immediately see which version was used and when the result was good.
Do not leave the material to memory. Write the grade, the blank condition, its dimensions before machining, and the working allowance. If the blank changed by supplier or shape, note that too in one line. A couple of millimeters of difference in allowance can easily change the cutting parameters and setup time.
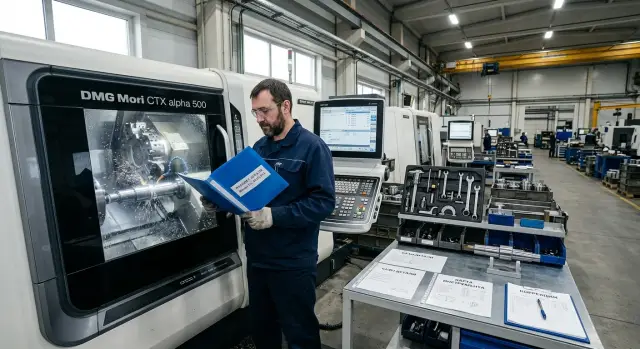
A separate block is needed for the setup. Briefly describe how the part was mounted: in which jaws or fixture, by which datums, where the part zero is, and from which surface the measurement was taken. Precise wording such as "G54, zero on face A and spindle axis" works better than vague phrases. One clear screenshot or setup photo often saves more time than a paragraph of text.
Tooling and offsets are best kept in one table. When the data is spread across different sheets, the setter loses an extra 15-20 minutes just on checking.
| Position | Tool | Holder | Offset | Note |
|---|---|---|---|---|
| T0101 | turning tool | VDI40 | X/Z | finish pass |
| T0303 | 12 mm drill | collet chuck | length | with coolant |
In the note, keep only what affects a restart of the series: overhang, working wear, insert replacement to a different grade, feed limit. This kind of part passport saves not abstract convenience, but real hours on a return run.
How to record datums and zeros
If another setter picks up the same part six months later, they should immediately understand where datum A is, where X0 and Z0 come from, and how the blank was seated in the chuck. If that information is missing, a repeat startup almost always goes through trial cuts and extra scrap.
Start with the name of the main datum. Write it exactly as in the drawing: "Datum A", "Datum B", without your own labels such as "face on the chuck side". When the part passport and the drawing use different names, people waste time checking and mix up the part sides.
Right after that, write what the part zero is taken from. Phrases like "zero on the face" are too vague. You need a precise reference: the finished face after facing, the stop in the jaws, the spindle axis, or the fixture plane. If the zero changes after the first operation, note it separately, give the new value, and explain why.
It is just as useful to record the clamping method. State how the blank is held: three-jaw chuck, collet, soft jaws, mandrel, or vise. Next to that, write the blank overhang in millimeters and the seating depth. Even a 3-5 mm difference can change rigidity, shift the size, and ruin repeatability.
A photo of the first setup is also worth adding to the part passport. That photo is for work, not for reporting. Take a front and side view, then add simple marks: the reference face, the axis direction, the contact point used for zeroing, and the actual blank overhang. One clear photo is often more useful than a long description.
Record separately what must not be changed without a new setup. For example, do not use a different jaw type, shorten the overhang, move the zero from a finished face to a raw face, or change the mounting side. On paper this looks minor. On the machine it changes the entire reference.
The check here is simple: if someone who did not run the first batch can set the blank up the same way and hit the same zero without guessing, the note is good.
How to record tooling and offsets
Six months later, most of the time is lost not on finding the program, but on simple questions: which tool was in position T0202, what its overhang was, and why the operator shifted the offset during the trial. If the part passport only says "turning tool" or "adjust in place", the restart will again begin almost from zero.
Each tool needs a fixed number and a short name that is immediately clear at the machine. It is better to name the job, not use general terms: "external roughing", "3 mm groove", "12 drill", "parting off". If the numbering in the shop is unified, do not change it from batch to batch. This reduces confusion and saves time already at the CNC setup stage.
For each tool, use the same set of fields: position number, short name, holder, insert type, nose radius, overhang, working offset, wear, and possible replacement. When the structure does not change, the passport is read faster and there are fewer mistakes.
Overhang is the one people most often lose track of. The same turning tool with a different overhang can give different rigidity, a different cutting sound, and a different size after the first pass. So write not only the number, but also from which point it was measured. Otherwise the next setup will start guessing why the old tool offsets no longer match.
Keep the working offset and wear separately. The working offset shows the value from which the series actually started cutting to size. Wear shows what the operator changed during production. If you mix those notes, no one will know what to start from six months later.
After trial cuts, record changes immediately. Instead of a vague "adjusted it", write something specific: "X -0.08", "Z +0.03", "changed insert from R0.4 to R0.8", "reduced feed on the finish pass". This kind of note is usually more useful than a long explanation.
It is also worth listing spare tooling, even if it was not used in the series. If the main tool has been discontinued, the insert has run out, or the holder has gone to another machine, the replacement is already at hand. For a repeat startup, this is one of the most practical lines in the entire part passport.
How to build the passport step by step
Do not start from a blank template. Start with what has already worked on the shop floor. Open the last working program, pull up the drawing, and find the record for the batch that gave a good result. If you take the data from memory, six months later confusion almost always appears: an old NC program version, a different tool overhang, or a shifted zero.
Working sequence
First, compare the program with the drawing. The revision number, material, blank size, reference surfaces, and clamping must match. If even one dimension was changed in the drawing for facing or finishing, enter it in the part passport right away instead of writing it on a separate scrap of paper.
Then check the datums and part zeros on the real setup. Do not write only "G54" or "zero on the face". Record exactly where the zero was taken from: the left end of the blank, the turned datum, the chuck center, or the fixture support surface. If the setter uses a stop, note both the stop and the distance to zero. Details like this have the biggest impact on a restart.
After that, copy the tool table directly from the control, without abbreviations or "it is obvious anyway". For each tool, you need the position number, holder type, insert, actual overhang, nose radius, geometry offsets, and wear offsets. If a tool was changed in the middle of a batch, mark that separately. Otherwise the next run will start with unnecessary trial parts.
Add setup photos to the passport. Usually shots of the chuck, jaws, clamping scheme, and the first good part after setup are enough. It is better to take the photos from the same angle and label them right away: which jaws are installed, where the soft jaw is, how much blank overhang was left. One photo often saves more time than half the text explanation.
Final check
At the end, open the passport on the machine together with the setter and go through it point by point. Not in the office, but at the equipment. That way it becomes immediately clear where the note is too general, where a dimension is missing, and where the photo does not help explain the setup.
If it takes 10 minutes to read the passport and the setter has no questions left, the document is put together well. If they start asking which zero was used, which jaws were installed, and why the offset has a different value, the passport is still rough.
Example: a return series after six months
Six months later, the customer asks for the same part again. A agreed sample is on the shelf, and the production folder still has the program number. Without proper notes, that is not enough: people no longer remember which jaws were installed, where the zero was taken from, or why the first setup shifted the tool by almost two tenths.
With a part passport, the picture is different. The setter opens one file or one folder and immediately sees that this series needs soft jaws machined for a specific diameter, and a stop with a set blank overhang. There is no need to remove someone else’s fixture at random and check three options in a row.
The setup photo also saves a lot of time. The shot shows exactly how the blank sat in the chuck, where the stop was, what overhang was left, and how the part was oriented. The operator sets the first blank without guessing instead of rebuilding the setup from memory.
In a good part passport, a few short notes are usually enough: the program number and revision that already produced a good series; the part datums and zeros; the jaw set number or a photo of the jaws after boring; the tool list with positions in the magazine or turret; the last working tool offsets by size. This minimum solves half the typical problems before the first start.
After that, the history of the previous setup helps. If the passport says that tool T03 worked with a small X correction, and the parting tool needed a Z adjustment after warm-up, the first part comes closer to size right from the start. It is not always perfect on the first touch, but it is no longer a lottery.
In practice, the difference shows quickly. Without a passport, the operator spends time looking for jaws, tries the old program, makes extra measurements, and often gets one or two scrapped parts. With a passport, the restart is calmer: the fixture is found immediately, the datums and zeros are set the same way as before, and the recorded offsets cut down the number of trial passes.
In the end, the trial startup may take not half a shift, but an hour or an hour and a half. For a return series, that is the main gain: fewer pauses, fewer extra measurements, and less scrap on the first parts.
Where people make mistakes most often
After six months, a series rarely comes back in exactly the same form. People remember the general flow, but lose the little things that stretch the setup across an entire shift. The first confusion usually starts with zeros: the passport lists the machine zero, although the setter needs the part zero and a clear link to the datum.
A note like "X0 Y0 Z0 per drawing" is almost useless. You need to write which surface was used as the datum, what it was touched with, which gauge, mandrel, or tool was used, and in what order the axes were set. Otherwise a restart turns into a new debug session, as if the part were being made for the first time.
The second common mistake is simpler, but no less damaging. The passport has the tool number, but not the overhang. On paper it is the same tool, but in use the same cutter with a different overhang behaves differently: rigidity changes, depth changes, and surface finish changes. In turning, the same issue appears with the holder, insert, and the real position of the tip.
The drawing revision is also often forgotten. The series stopped on one version, and six months later another version goes into production. If the passport still has the old revision, the setter may take the old program, the old setup dimensions, and the old inspection sheet. The part looks familiar, but the first pieces already go to rework.
Another problem is that photos are stored separately from the passport. Some shots stay on the setter’s phone, some in a messenger app, and some in a folder without a date. Later no one knows which photo belongs to the needed series. If a photo shows the position of the jaws, stop, or part in the fixture, it should be stored together with the passport, not live its own life.
Another common failure is recording a new offset without stating the reason. A note like "Z -0.08" by itself explains nothing. The offset may have been changed because of insert wear, a different material batch, machine warm-up, or a burr after the previous pass. Without the reason, the next shift will simply repeat someone else’s number by guesswork.
If the passport does not make it clear where the part zero is, what the tool overhang was, which drawing revision was in use, and why the offset was changed, then the document does not speed up the setup. It only creates the appearance of order.
A short check before startup
After a pause of several months, a series is most often held back not by difficult machining, but by one small thing: the wrong version of the data was used. Before the first setup, it is better to spend 15 minutes checking than to later remove scrap and chase the size again.
If the part passport is well prepared, most answers are already in one place. All that remains is to quickly check a few points:
- the drawing revision and blank size;
- the setup photo, jaw number, and stop position;
- the full tooling list, including insert, length, and overhang;
- offset transfer into the control without manual edits from memory;
- who approves the first good part.
If the series runs on a CNC lathe and the part has been produced before, this short check usually saves far more time than it seems. One missed jaw number or an old drawing revision can easily eat up half a shift.
The good sign is simple: after the check, the setter does not search for data in folders and chats, but immediately puts the machine to work and knows what to use when approving the first part.
What to do after startup
Right after the first good startup, do not close the job with words like "it is running". This is exactly when the part passport should be updated with the facts, while the setter and operator still remember what had to be changed on the machine, in the tooling, and in the datums.
Save the final values, not the calculated ones, after the first good part. For a repeat startup six months later, this is often more important than the initial setup sheet. The part passport usually records the actual zeros, shifts, tool overhang, position numbers, clamping notes, and the sequence for checking the first piece.
If during startup you moved away from the original offsets by 0.02-0.08 mm, write down that final result. Otherwise, on the next return run, the shift will go through the same path again: trial part, extra measurements, new edits. On one series this is a small thing, but across several similar parts it starts to cost hours.
Note separately any tool that wears faster than usual. Do not write a vague phrase like "monitor wear". It is better to record it precisely: tool T3 started shifting size after 18 parts, drill T7 needed replacement earlier than planned, the finish pass had to be repeated at a reduced feed. These notes make the next startup much easier.
A single passport template for similar parts also helps. If you have a group of parts with similar fixtures and the same datum logic, people get less confused by the fields and find the right data faster. The template does not need to be long. It only needs what is actually used on the shop floor.
The working sequence here is simple: after the first good part, save the final offsets; after the shift, add the actual notes; after the series, record the worn tool and replaced positions; and before archiving, attach the setup photo and layout if that is the normal practice at the station.
If return series come in regularly, it is also useful to look at the organization of the area itself: how well the machine suits such jobs, how conveniently setup data is stored, and how quickly service closes startup issues. EAST CNC, the official representative of Taizhou Eastern CNC Technology Co., Ltd. in Kazakhstan, works with CNC lathes, commissioning, and service support. For shops where series keep going out and coming back, that often affects stability just as much as the machining program itself.
FAQ
What is a part passport and why is it needed?
A part record is needed to bring a series back into production quickly without setting everything up from scratch again. It is not an archive for the sake of archiving: it holds exact data on setup, part zero, tooling, and the final offsets that already worked to size the series.
What data should be recorded first?
First enter the part code and name, the program number, the drawing revision, the date of the last successful run, the material, and the blank size. These lines remove confusion right away and help avoid opening an old version of the data.
How should the datums and part zero be recorded correctly?
Write the datum exactly as it appears on the drawing, without your own abbreviations. Then note which surface was used for X0 and Z0, where the stop was located, and whether the zero changed after the first operation.
Should setup photos be added?
Yes, if the photo shows the setup and not just the finished part. Take front and side views, and mark the reference face, the blank overhang, the stop, and the zeroing point.
What must be recorded about the tools?
For each tool, record the position, short name, holder, insert, tip radius, actual overhang, and working offset. If a permitted replacement exists, add it right away so you do not have to search for it in a hurry later.
Why should working offset and wear be separated?
The working offset shows the value from which the series actually started cutting to size. Wear shows what the operator changed during production, so it is better not to mix those records.
How do you know the part passport is put together well?
Open the part record at the machine and give it to someone who did not run the previous batch. If that person can set the blank, find the right tool, and understand where to take the zero from without guessing, the record is useful.
What mistakes most often break a repeat startup?
The most common issues are confusing the machine zero with the part zero, forgetting tool overhang, not recording the drawing revision, and keeping photos separate from the part record. Then people waste hours on extra measurements and trial cuts.
What should be checked before restarting a series after a long pause?
Before starting, check the drawing revision, blank size, setup photo, jaw number, stop position, and tool list. Then transfer the offsets into the control without relying on memory, and agree right away on who approves the first good part.
What should be updated in the part passport after the first successful startup?
Right after the first good part, save the final zeros, shifts, real offsets, and clamping notes. If any tool starts pushing size off quickly or needs early replacement, record it as it happened so the next shift does not go through the same long path.