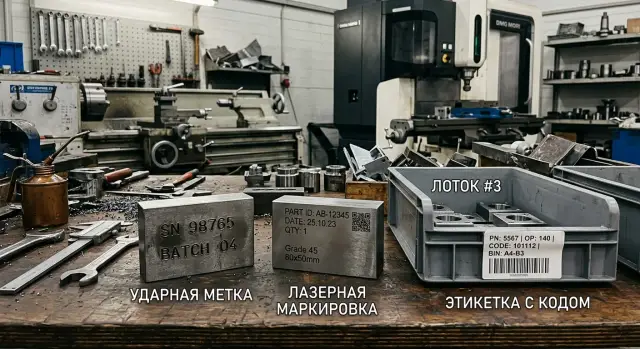
Marking parts after machining: laser, impact or label
Part marking after machining affects tracking, readability and acceptance. We compare laser, impact stamping and labels for durability, cost and shop requirements.
Why marking becomes a problem
Confusion usually starts not at the machine but later — after washing, preservation and packing. While parts sit next to the routing sheet, everything is clear. But after cleaning, a dozen identical housings, bushings or flanges are easy to mix up, especially if they differ only by batch, revision or a hole diameter by a few tenths.
At that point marking stops being minor. The mistake is no longer just "the wrong box." It leads to extra inspection, resorting, disputes with the warehouse and sometimes re-checking the whole batch.
The customer typically needs a readable batch number, serial code or internal index, not just a formal mark. If the operator places the mark too small, in an awkward spot or on a rough surface, it becomes hard to read at acceptance. And when the code is needed for traceability, any unclear digit creates risk during claims and service.
The warehouse sees the problem even more simply: a part must be identified within seconds. No one wants to search for a number under oil, spin a blank in their hands or check dimensions against a drawing when nearly identical items sit on the shelf. The harder the mark is to read, the slower receiving, picking and shipping go.
There is another constraint: the mark must not damage the part. You can’t place it on a datum surface, in a press-fit zone, under a coating or where an inspector checks geometry. A too-deep impact mark can interfere with assembly. A label can fall off after oil or washing. A laser mark can lose contrast after final finishing if the spot was poorly chosen.
So the debate is rarely about whether to mark, but how to reconcile four requirements: readability, speed, traceability and no harm to the part. If process engineers, warehouse and customer don’t agree in advance, confusion usually starts with the first production batch.
What to clarify before choosing a method
Marking is often chosen too early: people first look at equipment cost, then discover the code is unreadable after washing or painting. Start by understanding the conditions the part will face.
Material matters. On aluminum a laser often produces a neat mark, but on some alloys contrast can be weak and settings must be tuned. On hardened steel impact marking holds up well, but on a thin part it can introduce stress or a noticeable dent. For stainless with strict cleanliness requirements, a deep impact mark isn’t always suitable.
Geometry is equally important. If there’s no flat area, the code goes on crooked and cameras can fail. It’s especially noticeable on cylindrical surfaces. Sometimes a marking area exists but is too close to a chamfer, hole or radius and some characters lose clarity.
What to check in advance
- which metal and alloy the part is made of and how the material reacts to heat or impact;
- whether a stable marking area exists: a flat pad of the right size and easy access;
- how long the mark must stay readable — until shipment, in the warehouse or for the part’s lifetime;
- what happens to the part next: washing, oil, painting, assembly, friction;
- who will read the code — an operator, a handheld scanner or a line camera.
The required durability is often underestimated. If the code is only needed for internal moves, a label can be enough. If the part goes to the customer, then to a warehouse and may return a year later for a claim, you need a much higher durability margin.
The reading method changes the choice. A person can decipher an imperfect mark. Scanners and cameras are stricter: they need contrast, module size and a flat orientation. If the customer requests a Data Matrix, test it on the real surface, not on a sample of a different metal.
A simple example: after turning the part is washed, oiled and put into a box. A paper label in this chain quickly degrades. Laser or impact marks cost more up front but later avoid inventory confusion and returns.
When to choose a laser
A laser fits where the mark must be neat, even and readable at a glance. For a finished part it is often the best choice: no dents, no impact marks, and sharp character contours. If the customer cares about both appearance and the code itself, a laser usually solves the problem better than other methods.
It’s especially useful where marking space is limited. On a small bushing, flange or housing you can fit a serial number, date, short batch code or Data Matrix without large characters or big margins. When the marking zone is only a few millimeters, space becomes the main constraint.
Lasers also work where the surface must not be deformed or scratched. This is important for thin-walled parts, visible faces and press-fit areas. There is no mechanical contact, so the part won’t be deformed by the marking process.
Another advantage is variable data. If the code changes from part to part, a laser makes it easy to change serial numbers, dates, shift numbers or Data Matrix codes without swapping dies. For serial tracking this significantly reduces mix-ups.
A good example is a small turned component for an automotive or medical assembly. You need a small traceability code and there is almost no free space. If the surface is already finished, a laser gives a clean mark without disturbing the metal.
But lasers have one simple requirement: check readability on your actual metal and after all finishing operations. A code may look great on a sample but lose contrast after washing, anodizing or light polishing. It’s better to see that on a test batch than on completed orders.
When impact marking is appropriate
Impact marking is chosen where the number must survive the shop, the warehouse and real part use. Oil, dirt, chips and abrasives quickly make weak marks unreadable, while indented characters usually last longest. If the part will be rubbed, soiled or stored without special care, this option is often more practical than a laser or a label.
It’s especially handy when the number is read by eye, without a scanner. A foreman, storekeeper or inspector can see a short code right on the metal and isn’t dependent on a camera or a label that may fall off. For internal tracking this is straightforward and reliable.
Impact marks also work well when the part is painted or coated. If characters are made to a proper depth, the marking remains visible after painting. This is convenient for housings, brackets, flanges and other parts where the number must stay readable after finishing.
But impact marking isn’t suitable everywhere. The surface must tolerate a dent. If the wall is thin, the area is a precision fit, there’s a nearby edge or risk of microcracks, choose another method. On a visible finished part this mark also may be unacceptable for cosmetic reasons.
Typically impact marking is chosen when several conditions match: the part operates in a dirty or oily environment, the number must last, the mark must remain after painting, and the marking area does not affect geometry or fits. If a short text or serial is enough for tracking, this is often the safest option.
For example, a workshop producing batches of identical steel parts on CNC lathes finds it easier for the operator to visually check a stamped number than to read a faint code on a dirty surface. If appearance is not the priority and durability is, impact marking usually wins.
When a label is enough
A label is useful more often than you might think. If the number is needed only until assembly, kitting or shipment, marking the tray, box or bag is usually simpler than marking the metal itself.
This option fits where traceability ends within the shop or warehouse. For example, an operator just needs to avoid mixing batches, assemble a kit and pass it along. After assembly a mark on the individual part no longer helps.
Labels are especially convenient for small parts. On tiny bushings, pins or thin rings there may be no room for a readable code. Polished surfaces also cause issues: mechanical marking spoils the look, and a noticeable laser mark isn’t always allowed.
There’s a practical plus: labels are easy to replace. If a resorting happens, the batch changes or a number error is found, a storekeeper can correct the marking in minutes. You can’t do that with a laser or a stamped mark.
For serial tracking a label often works better at the container level than on each unit. One tray with clear labeling, quantity and batch number is easier than dozens of small parts with hard-to-read marks. For internal logistics this is usually enough.
But there’s a strict condition: the label must survive the entire part route. If it peels off due to oil, coolant, dust or frequent handling, the method quickly creates confusion. Then it’s better to mark the metal itself.
How it works in serial tracking
In practice you often need not one method but a combination of two. Otherwise the warehouse sees one thing, assembly another, and during a claim finding the root batch takes too long.
Imagine a batch of shafts after turning. First they arrive at the warehouse, then are split and sent to two assemblers. On the box level staff need a batch number to receive, record and track quantities. On the part level you need a short code so that months later you can identify which batch a particular shaft came from.
In that scheme a label guides the box and a laser marks the shaft. The label is easy to print large: batch number, date, quantity, shift. The storekeeper reads it immediately. The part only needs a short code linked to the batch in the inventory system.
This is practical: one box goes to the first assembler, the second to another. If one later reports defects, you don’t have to check a week’s output. You look at the code on the part, find the batch and see which other shafts to inspect.
For shafts the laser is often convenient because marking area is small. But if parts are later painted or coated, the situation changes. After painting a laser mark can be harder to read, especially if it’s shallow and the surface is dark or uneven. In that case an impact mark often lasts better because it leaves relief.
A typical workflow is simple: label the box for warehouse and shipping, apply a short code on the part for claims and traceability, and decide before coating whether the laser will survive the cycle or you should use impact marking. It’s not the prettiest approach, but it’s clear for shop, warehouse and service.
How to choose the method
Start not with habit but with what the customer must see on the finished part. One batch may need just the order number and date, another a serial number, Data Matrix or batch code. If people will read the mark by eye, character size and contrast matter. If a scanner will read it, repeatability and stable shape are more important.
For turned and milled parts this quickly narrows the options. A laser gives a neat mark in a small area. Impact marking is better where depth and durability matter. A label works for warehouse and internal tracking — but only if it won’t meet oil, washing or painting.
Follow a simple sequence. First fix the mark content: not "we’ll add something," but the exact data set — serial number, batch code, date, logo, QR or Data Matrix. Then inspect the part and find a flat area away from chamfers, radii and functional surfaces. After that compare the chosen method with real shop and shipping conditions. If parts are washed, oiled, painted or stored outdoors, a weak label usually drops out first.
Next step: test several parts from the batch, not just one perfect sample. One piece can look fine while the same settings on another blank produce weak contrast or a blurred code. Finally, give the finished parts to warehouse and QA to read or scan without hints. If they must peer closely, the method has already failed.
A small example: for a series of bushings coming off CNC with oily surfaces and little marking space, a label is ruled out. Impact marking survives oil but can deform a thin part. A laser often wins if the code remains visible after washing.
This process quickly ends the "we’re used to it" argument. A short test usually shows which method gives readable marks, doesn’t damage the part and doesn’t create extra work for the warehouse.
Common mistakes
Marking problems usually arise from small oversights rather than the method itself. In the shop a mark looks fine, but after washing, painting or transport it’s hard to read.
The first mistake is placing a code on a curved, rough or simply inconvenient surface. On a cast skin, a radius, a tool mark or near a chamfer a laser gives uneven contrast, an impact mark slips, and a label only sticks by the edge. It’s better to allocate a flat marking zone in advance and not leave this decision to the machine operator.
People miss labels even more often. If the part comes out warm, oily or goes through washing, an ordinary sticker quickly becomes useless. Adhesive flows, corners peel, numbers smear. For internal moves it may be tolerable, but for serial tracking and traceability this method is too weak.
Another frequent error is using too small a font. When you try to fit a long number, date, batch and order code into a tiny field, readability drops first. On paper everything fits, but on metal people squint and scanners start to fail.
Many forget the next stages. They apply the mark, look at the fresh part and consider the task complete. Then a coating arrives and the picture changes: paint eats contrast, oxidation darkens characters, and impact dots fill with coating. Check not right after marking but after the whole cycle.
Sometimes a laser serial on a small bushing looks perfect in the shop. After conservation oil and packing parts reach the customer and some numbers are readable only under a lamp. The shop then loses time on manual checks.
Before starting, answer four questions: where is the marking zone, what temperature/oil/dirt will it face, what happens after coating or washing, and how will the part survive packing and transport. With those answers upfront, rework is much less common.
Pre-launch check
It’s better to catch small failures before production than to remark a whole batch later. Marking errors often show up not immediately but at the warehouse, in assembly or at the customer.
Check several things on a real part, not just a sample in the office:
- the code is read immediately without searching for the right angle, light or distance;
- the marking location is recorded in technical documentation, not left to the shift;
- the mark stays clear after washing, drying, conservation and packing;
- the number format is consistent across operators;
- the warehouse knows where to look for the code on the part.
A simple test: take a part from the first batch, send it through washing, then packing and to the warehouse. If at each stage people find and read the code without hints, the process is ready. If any step fails, fix the location, format or method right away.
What to do next
First, collect all customer requirements in one document: what to mark, where the marking should be, how it will be read, and whether it must survive washing, painting, oil, storage and transport. If some parts go into serial tracking and others only need internal control, separate those cases now.
Then check results on a trial batch. Use identical parts, the same surface and the same data. Compare four things: readability, speed, durability and the cost of an unreadable code.
Then fix the marking location, font size, depth or contrast and an acceptance rule: what counts as readable and what must be reworked. Better approve the marking zone on the drawing or routing card immediately. Otherwise today the code will be on the end face and tomorrow on the side and the argument restarts.
If you select a new machine, cell or line for machining, discuss marking before launch. Include the equipment supplier early. For example, EAST CNC supplies CNC lathes, machining centers and automated lines and supports projects from selection to commissioning and service. That lets you plan the marking place and method in advance and avoid rework later.
FAQ
When to choose a laser?
Choose a laser when the code must fit a small area and you must avoid dents. It's good for finished bushings, flanges and housing parts where the customer cares about both readability and appearance. Test on your actual metal and after washing or polishing. A sample often looks better than a real production piece.
When is impact marking better?
Pick impact marking if the part will work in oil, dirt or after painting and the number must last. A relief mark is easier to read by eye in the shop and warehouse. Don’t place it on thin walls, tight fits or visible finished surfaces — the mark can damage the part.
When is a label sufficient?
A label is fine when the number is only needed inside the shop or until shipment. It’s often easier to mark a box, tray or bag than every small part. This only works if the adhesive doesn’t meet oil, washing or frequent handling. If the sticker peels off, move to a direct mark on the metal.
Where on the part is it best to place the code?
Look for a flat area with easy access. Keep the code away from chamfers, radii, holes, datum surfaces and press-fit zones. If the marking area is small or curved, symbols lose clarity and cameras make more errors. Approve the location on the drawing or routing card instead of leaving it to the machine operator.
What to check before choosing a method?
First consider material, geometry and how long the mark must last. Then account for washing, oil, painting, storage and who will read the code: a person, a handheld scanner or a camera. If the customer asks for a Data Matrix, test it on the actual surface from the same batch. A sample from a different alloy can be misleading.
Why is the mark visible in the shop but later hard to read?
Usually it’s not the marking method but the next process. Washing, conservation, polishing, oxidation and paint change contrast or fill relief. Check the code after the complete part route, not immediately after marking. That reveals weak points before full production.
Do you have to mark every part?
Not always. If traceability ends at the box or tray level, a sticker on the container and a batch number in the system is enough. If a part may return for a warranty claim or long service, give it a short code on the metal so you can quickly find the correct batch.
What is most convenient for the warehouse?
The warehouse needs a code that staff can find in seconds. So put a large label with batch, date and quantity on the box, and a short number on the part for checks and returns. This combination speeds up receiving and avoids making people handle every single blank.
What code size should I use?
Don’t try to cram a long number into a tiny field. When characters get very small, people squint and scanners fail more often. Reduce the code to the essentials and test it on the real part in normal light. If staff can read it without searching for the right angle, the size is OK.
How to test marking before series production?
Take several parts from the first batch and run them through the full route: washing, drying, oiling, packing and warehousing. Then give the part to an operator, a storekeeper and QA without hints. If everyone immediately finds and reads the mark, you can start. If someone hesitates, change the location, format or marking method.