Oil Traces Under the Machine: When It Stops Being Normal in the Workshop
Oil traces under the machine do not always require an immediate stop. We’ll show you how to tell a harmless seep from a dangerous leak and what to check the same day.
Why you shouldn’t ignore a stain under the machine
Oil traces under the machine often seem minor. A workshop always has dust, chips, old grime, and against that background a new stain is easy to miss. But that is exactly how problems start to grow: first a few drops, then a slippery area near the work zone, then downtime and extra repairs.
Old grime and a fresh leak look different. An old stain is usually darker, drier, and denser to the touch. There is no wet shine around the edges, and a layer of compacted dust has already settled on top. A fresh CNC machine oil leak looks different: the surface shines, the edge of the stain looks “alive,” and nearby you can see separate drops or a thin trail from the point where the oil is escaping.
Oil quickly collects everything that is flying around or falling nearby. Chips stick to it almost immediately. Fine metal dust, abrasive particles, and dirt from shoes also settle on top. As a result, what appears under the machine is not just a puddle, but a thick sticky mixture. It makes it harder to understand the true size of the leak, gets on cables and hoses, and sometimes hides the spot where the problem started.
Even a small puddle creates a normal everyday hazard. An operator steps back, turns toward the tool, or pulls a cart, and the foot slips on a thin oil film. You do not need a big puddle to fall. An area the size of a palm is enough, especially if the floor is smooth or fine chips have already stuck to it.
If you delay the check, the workshop loses more than cleanliness. Oil is lost, wear increases in the unit, parts get dirty, and time is spent cleaning instead of working. Sometimes the machine is still cutting, and that is misleading: it feels like you can hold out until the scheduled machine maintenance. In reality, a small leak often turns into a repair that stops the area for a full day within just a couple of shifts.
For EAST CNC and any CNC machine service, this is familiar: it is cheaper to inspect a stain the same day than to later replace a seal, hose, and damaged consumables all at once. If oil traces under the machine have appeared for the first time or have clearly grown, it is no longer wise to treat them as “just dirt.”
Where the oil usually comes from
Oil traces under the machine usually do not appear from a “mystery spot,” but from four common areas. If you know them, you can find the source quickly, even without disassembly.
The first area is the centralized lubrication system and the guides. Oil is supplied here in small amounts, so a leak often looks less like a puddle and more like a chain of drops or a damp trail along the frame. Moisture is often visible near the lubrication distributor, tubes, fittings, and under the guide covers. A small trace after the lubrication cycle does not always mean a failure, but it should not be unevenly dry either: if one side is clearly wetter than the other, look for a loose connection or a cracked tube.
The second common point is the hydraulic unit, hoses, and fittings. Here the oil is usually more visible: it gathers around the tank, pump, under the pressure gauge, and near hose connections. If a hydraulic line is leaking, the surface is often not just damp but shiny, with a drop at the lowest point of the hose or nut. This kind of leak often gets worse after startup, when the system builds pressure. That is why the machine may sit dry in the morning and leave a stain after just an hour of work.
The third area is spindle seals and covers of the units. Oil from here is often visible inside the work area: on the front part of the spindle, near the chuck, under protective covers, near the gearbox, or another enclosed housing. This spot is tricky because the oil mixes with chips and coolant, and the leak can look like “dirt after a shift” for a long time. If an oily film appears again after cleaning, the issue is usually no longer a dirty workshop, but a seal or gasket.
The fourth group is the tray, drain points, and filters. Sometimes it seems like the machine itself is leaking, but in fact oil is coming out through a drain plug with a worn washer, a loosely tightened filter, or overflowing from the tray because the drain is blocked. In these places, the stain often appears below, while the upper units stay dry. That can be confusing: the source is low down, but the cause may be simple.
One useful rule: look for the highest wet point. Oil almost always flows downward and sideways, so a puddle on the floor rarely shows where it actually started.
How to judge urgency in 10 minutes
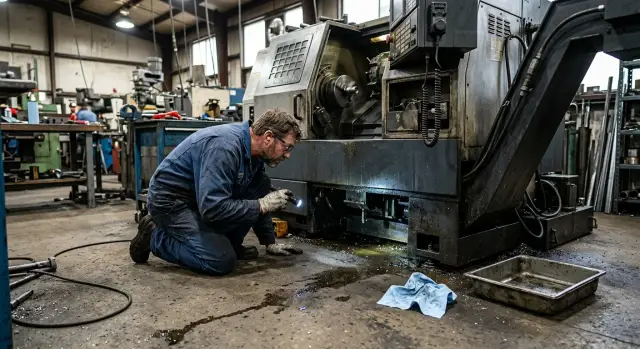
If oil traces under the machine appear on the floor, do not guess based on how the stain looks. A quick check gives more value than arguing at the machine about whether it “has always been like this.” In 10 minutes, you can decide whether to wait for scheduled maintenance or call service today.
First, remove old traces. Wipe the floor, tray, and lower part of the machine dry so yesterday’s dirt is not confused with a new leak. If the oil is mixed with chips and coolant, clean that area too. Otherwise, the source can be missed easily.
Then follow a simple sequence:
- Note the time and see how large the first fresh stain was.
- Check the oil level in the tank, crankcase, or sight glass. Even a small drop already shows the leak is not accidental.
- Let the machine run normally, without sudden loads or experiments.
- After a few minutes, come back and see where the new drop appears.
- Trace the oil upward, not only downward. A stain on the floor rarely shows the exact leak point.
Most often, urgency is shown not by the stain itself, but by how fast it grows. If one drop appears in 10 minutes and the oil level does not change, the problem can usually wait until the nearest maintenance window. But if the stain spreads before your eyes, drops keep coming one after another, and the level in the sight glass is falling, do not wait.
It is also useful to look at the operating mode. At idle, there may be almost no leak, but after warm-up, oil supply, or axis movement, it becomes noticeable. That is why checking “with the machine off” often gives false reassurance.
There is a simple rule of thumb. A drop that appears in the same place after every startup usually points to a specific unit: a fitting, hose, seal, cover, or connection. An oily film spread over a large area usually makes finding the source harder, not easier.
If you cannot find where the oil is coming out, take a photo right after cleaning and again after 10 minutes of operation. That is more useful for the service team than a vague description like “it’s leaking somewhere underneath.” For CNC machine owners, this saves both time and unnecessary shutdowns.
When you can wait for the maintenance window
A small oil trace does not always mean the machine must be stopped immediately. Sometimes the leak is slow and hardly changes from shift to shift. This happens with a connection that is slightly sweating or with a seal that is worn but still does not let oil escape quickly.
You can wait until planned maintenance only under one condition: the situation stays stable. Watch not the stain itself, but its behavior. If after a full shift it has not gotten wider, the oil level holds without topping up, and only an occasional drop appears under the machine instead of a constant trail, the risk is usually low.
The machine itself should also behave normally. If there is no new noise, the units are not getting hotter than usual, and feed and movements are smooth, the situation can often be monitored until the next service window. For the topic of “oil traces under the machine,” this matters more than the size of the stain on its own.
There is also a simple everyday sign. Oil should not get into the walkway where someone might slip. It should not get onto belts, pulleys, or nearby units. Even a small CNC machine oil leak can quickly turn from a minor issue into an expensive repair if the oil spreads through the mechanics.
A good habit is to check three things at the end of the shift:
- has the stain changed in size;
- has the oil level dropped during the day;
- have noise, overheating smell, or splashing appeared.
A small example from the workshop: an operator noticed a thin oil trace near the rear of a lathe. The next day the stain was almost the same size, the tank did not need topping up, the belts were dry, and the machine sound had not changed. In that case, repair is usually scheduled for the nearest machine maintenance window instead of stopping production right away.
Even a calm leak should not be forgotten. Record the date, location, and approximate size of the stain, take a photo, and show it to the mechanic or service team. If the stain grows the next day or the machine starts behaving differently, the rule changes — waiting is no longer a good idea.
When it is better to stop the machine today
If the stain is growing before your eyes, there is nothing to argue about. It is better to take such a machine out of service the same day, even if the shift is busy and the order is urgent.
A little oily dust or an old mark after maintenance can still be checked calmly. But fresh oil traces under the machine that become wider or darker within an hour already point not to “sweating,” but to oil loss. The longer the machine runs in this mode, the greater the risk that the problem will spread further — to the bearings, guides, hydraulics, or lubrication system.
Another bad sign is when the operator has to top up oil much earlier than usual. If the level used to last a week, but now the oil is gone in a day or a shift, the cause is almost always more serious than it first seems. People often get used to simply topping up and waiting until the planned window. That saves an hour today, but can easily cost several days of downtime later.
Another special case is oil on the floor near the working aisle. Then the issue is not only the machine, but also people’s safety. One wrong step, and an operator or setter can slip near running equipment. In such a place, even a small leak is no longer a minor issue.
If drops are flying or running onto belts, cables, sensors, or protective parts, stopping is also justified. Oil does not damage everything, but it collects dirt, reduces belt grip, and makes it harder to see where the leak is coming from. Then one failure leads to another.
The smell of burnt oil, light smoke, or a new noise is the most alarming combination. Humming, whistling, or scraping that was not there before often appears together with a lack of lubrication or oil getting where it should not be. For a CNC machine, that is no longer something to watch — it is a reason to stop and look for the source.
After stopping, it is best to take a few simple steps:
- note exactly where the oil appears;
- check the level and the time of the last top-up;
- photograph the stain and the leak point;
- do not start the machine again until a mechanic inspects the unit.
In real CNC service visits, the most expensive failures often start with a “small” stain that someone decided to wait out until a more convenient day.
Mistakes that cause serious leaks to be missed
Most often, the problem is missed not because of a complex failure, but because of habit. In the workshop, people see oil traces under the machine, sigh, wipe the floor, and decide it is an old stain. If the oil appears again in the same place after cleaning, it is no longer “leftovers from the previous shift” but a fresh leak.
Another common mistake is looking only where it is easy to see while standing up. From the top, everything may seem fine: the tank is in place, the hoses are dry, and the level is still holding. But oil often collects under the tray, along a hidden joint, at a lower fitting, or near the pump. Because of that, only a small stain is visible from the outside, while the real leak has already been running for hours.
The worst habit is simply topping up the oil and moving on. When the operator does not record the time and amount of topping up, consumption becomes “normal background.” A week later, nobody remembers when the level started dropping faster. Yet rising consumption often shows the problem before a large puddle appears on the floor.
People also confuse the liquid itself. After washing or near the coolant supply area, it is easy to see a wet mark on the floor and assume it is water or emulsion. But oil behaves differently: it is thicker, leaves a slippery film, and does not dry as quickly. If you wipe the stain with a clean cloth, the difference is usually obvious right away.
Sometimes the problem is simply hidden. Rags, cardboard, or a small tray are placed under the machine to make the floor look cleaner and keep people from slipping. That makes sense for safety, but it only works for a short time while the source is being found. If rags stay there all the time, they solve nothing and only make it harder to see where the CNC machine oil leak is coming from.
The most common mistakes that lead to serious leaks are:
- not checking whether the stain appeared again after cleaning;
- not looking underneath the tray and at lower connections;
- topping up oil without logging it;
- mistaking oil for coolant or water after washing;
- covering the area with rags instead of finding the source.
One simple routine works better than any guess: clean the area, note the time, check the level, and look at the machine again after 20–30 minutes. If the trace comes back, there is no point guessing.
A simple workshop example
The shift had just started, and the operator noticed not a puddle, but a thin line of oil under the machine. That is easy to dismiss as an old mark after washing or a few drops from yesterday’s maintenance. He did not guess: he wiped the floor, looked at where the trace was coming from, and noted the time.
That simple action often solves everything. If the trace does not appear again, you can keep watching it according to the schedule. But if fresh oil traces under the machine come back quickly, it is no longer a minor issue.
Forty minutes later, the line appeared again. This time it was longer and headed toward the walkway where people move and carts are rolled by. At that point, the question is no longer about floor cleanliness. Oil is leaving a unit, and the risk of slipping on the area is rising.
The operator called the setter and carried out a quick inspection together, without long disassembly. They checked where the surface was wet and where only old splashes remained. Almost immediately they found a damp fitting on the hydraulic unit. Nothing was leaking from the housing, the hose was intact, but the connection was clearly sweating and producing a fresh drop.
This is where it becomes clear when to stop the machine. If oil returns in less than an hour after cleaning and the stain grows, waiting for the maintenance window is risky. Especially if the trace is moving toward a walkway or a place where oil could get on the workpiece, belts, or electrical parts.
The machine was stopped that same day. The fitting was tightened, the seal was checked, the contaminated area was cleaned, and a test start was performed. After that, the unit was inspected again after 15 and 30 minutes. No new traces appeared.
A case like this only seems minor at first. In fact, the operator did everything right: noticed the change, recorded the time, did not stop at a rag, and followed the check through to the cause. If the service team is called in later, this sequence saves a lot of time when searching for the leak.
Quick daily checklist
Daily inspection takes 5–10 minutes, but it often helps catch a problem before an emergency stop. If oil traces under the machine look the same every day, that already gives you a useful reference. Any change from the usual picture is better noticed in the morning, not after the shift.
It is easiest to do the same check in the same order every time. Then no small detail slips by.
- First, look at the floor under the machine before startup. It is important to tell whether the stain is fresh or left over from yesterday after cleaning.
- Then compare the oil level with the usual mark. Do not look only at the minimum limit — look at the normal level for this machine.
- After that, go over the accessible hoses and connections with a glove on. Fresh oil film on your hand often says more than a shiny spot on metal.
- Check the tray and drain. If there are chips, dirt, or a thick buildup there, oil may not be leaking out, but overflowing because the drain is blocked.
- At the end, write down three things: the date, the location, and the approximate size of the stain. A short note in a logbook or in the operator’s notes is enough.
There is a simple rule of thumb: if the stain is the same today as yesterday and the level has not dropped, you still have time to watch it calmly. If the stain is wider, a new spot appears, oil drips more often, or the level drops noticeably during the shift, that is no longer a normal picture.
It is also useful to add one phone photo from the same angle to the note. After a few days, the difference is obvious right away. By eye, many people underestimate how much a stain has grown, especially when the workshop is busy.
For example, on one lathe a small trace was found near the right support in the morning. On the first day they simply wiped it off. On the second day, the operator recorded the size and noticed that the stain had almost doubled, and a fresh trace had appeared on the nearby hose. That kind of small detail gives the service team a solid starting point. For a company like EAST CNC, this is also convenient: with a clear note and a photo, it is easier to decide whether an urgent visit is needed or whether the check can wait for the maintenance window.
What to do next
Do not just wipe the stain away and hope it disappears on its own. First, record the picture: where exactly the oil traces under the machine appeared, when you noticed them, and how quickly the stain grows after startup.
It is better to gather simple data right away than to try to remember it later. Even 5 minutes of observation often helps you tell whether it is an old seep from the previous shift or a fresh leak that is already picking up speed.
Write down and photograph:
- the leak location and the overall view of the area under the machine
- the time when the stain was first noticed
- the approximate amount: a few drops, a thin trail, or a puddle
- the oil level before and after the shift
- the operating mode: warm-up, normal cutting, or high load
These details should be passed straight to the foreman or mechanic. Do not stop at “it’s leaking oil.” It is much more useful to say: “After two hours of work, a trail appeared near the front of the machine, the gauge level dropped a little, and it leaks more under heavy load.” With that description, it is easier to understand what to check first.
If the leak is still small and the machine shows no other warning signs, do not delay the repair until some convenient moment a month from now. Schedule it before the next large batch, when downtime will cost more in both time and scrap. A small leak often stays quiet only for a short time, then suddenly turns into a puddle and a missed shift.
Before the repair, it is useful to clean the leak area and look once more at where the oil is coming from. That way the mechanic can find the source faster, and you will not confuse a fresh leak with old traces.
If you need an outside look at a CNC machine, that is a normal step too. At EAST CNC, you can discuss not only CNC machine service, but also commissioning, maintenance, and equipment selection for your needs. This is especially helpful when the leak keeps returning and each time the cause seems “small.”
One photo, one time note, and one oil-level check often help more than an extra day of guessing.