Multi-Tool Operations on a Turning Center Without Interference
Multi-tool operations on a turning center require precise path checks, setup, and operation sequencing to eliminate collision risk.
Where the risk of interference grows
The risk appears not during cutting, but a little before or after it. Tools are more likely to collide during approach, position changes, and retraction. At that moment, the operator watches the cutting edge and loses sight of the toolholder body, the drill shank, or the long boring bar.
In multi-tool operations on a turning center, the danger usually appears where two tools enter the same area of the part from different heights and with different overhangs. If one cutting tool has already left the cut, that does not yet mean it has left the danger zone. A long bar may still be close to the chuck while a neighboring tool starts feeding in.
The most common mistake is comparing only the cutting points. You need to compare the full envelope: holder, turret, drill, bar, adapter. Even a 20–30 mm difference in overhang noticeably changes the situation, especially near chuck jaws and when machining parts with a large protrusion.
You also need to look at everything around the part. Dangerous geometry is created not only by the tools, but also by the chuck, protruding jaws, the workpiece itself, the tailstock, and the steady rest. On a long part, the tailstock quill or the steady rest body can easily consume the clearance that looked fine on the screen.
The risk usually grows in four places:
- during the first approach of a tool to the part;
- when switching the tool to an adjacent position;
- when retracting along the Z axis after an operation;
- when moving from external machining to drilling or boring.
Problems are especially common during Z-axis retraction. The operator sets a safe retract, but does not check where the neighboring tool is at that moment. The cutting edge has already moved back, but the holder corner passes too close to the jaw or to the second tool.
It helps to mark not only dangerous zones, but also dangerous moments. For example, one tool machines the outer diameter while another prepares to drill a cross hole or approaches the next operation. If their paths do not cross on paper, that still guarantees nothing. What matters is where the real envelopes come closest.
In practice, this kind of review often shows a simple cause: the problem is not the cutting program itself, but an overlong overhang or a poor turret position. Fixing that before startup is always cheaper than repairing damage to the chuck or bar after a collision.
What data to collect before checking
Errors start before the first cut, at the moment the program is checked against an approximate model rather than the real setup. This is especially risky in multi-tool operations. One extra millimeter at the jaw or holder quickly turns into a hit on the part, turret, or chuck.
First collect the actual geometry of everything involved in the job. You need not catalog dimensions, but what is mounted on the machine right now: tool overhang, holder length, cutting toolholder shape, drill height, jaw size, spacer, steady rest, bar, and any unusual fixture. If the jaws are bored for the part, record their working profile, not the original size.
Then verify the setup zero. The part zero and tool zeros must match the setup sheet, not an agreement made verbally at the machine. If the operator shifted the zero after a trial part, that shift must be entered into the check immediately. Otherwise the simulation will show clearance that no longer exists on the machine.
Before checking the tool paths, it helps to list four groups of data in advance: the real dimensions of the tools and fixtures, the part zero coordinates and offsets for each tool, the safe retract points for each turret position, and the spindle stop points when changing operating mode.
Do not guess the safe retract points. For each tool, record where it goes before turret indexing, before the counterspindle approaches, or before switching to the other side of the part. One common retract for all positions often only creates a false sense of safety. The risk zones are different for a long drill, a parting tool, and a boring tool.
Also check spindle behavior separately. Where it fully stops, where orientation starts, and when it switches from normal rotation to the mode for a driven tool. These points are often missed, although this is exactly where a tool can intersect with the chuck or a protruding part of the workpiece.
It helps to make a short table before checking the CNC paths. It should contain not general notes, but exact values: X, Z, overhang, angle, clamping length, and safe retract. Such a table takes only a few minutes, but it saves hours later when you are searching for the source of an error after the first dry run.
How to check the setup before the first start
A collision often starts not in the program, but in the setup. On the screen everything looks correct, but the machine has a different tool, a different overhang, or the blank sits deeper than expected.
First compare the turret with the program in practice. The pocket number, tool name, and offset must match what the CNC will call up. If the program sends a cutting tool to T0303, but a drill is mounted there in the turret, an error is almost guaranteed. It is better to spend ten minutes checking than to later change jaws, the holder, and the part.
What to check on the machine
After mounting, measure the overhang of each tool again. Do not rely on old setup notes, even if the holder looks the same. It only takes slightly different clamping, a rotated holder, or a changed bar, and the actual length will already be different. In practice, those small differences are exactly what often adds an extra 2–3 mm, which is later missing for a safe pass.
Then check how the part is clamped along the full length of the planned travel. Look not only at the starting point, but at the entire section where the tool moves along the part, approaches the face, or goes past a shoulder. If the blank is long, make sure the jaws, chuck, and fixtures do not enter the path of the cutting tool or drill during full travel.
After that, manually run through the most dangerous zones. These are usually the area near the chuck, the approach to the face, and the sections with shoulders where the tool changes direction. It is convenient to do this at a low feed and with extra room in Z and X, so you can immediately see where the gap is already too small.
Before the first start, a short check is enough:
- match the turret tool order with the program;
- measure the actual overhangs after tightening;
- check how the part sits across the full working travel;
- manually guide the tool through the dangerous points.
This sequence is especially useful for parts with several transitions. It is simple, but it usually removes most major collisions before the first cut.
How to arrange the operation sequence
Multi-tool operations on a turning center run more smoothly when each next step gets more free space around the part. If the order is reversed, the cutting zone quickly becomes cramped: long chips hang around, the chance of an X and Z intersection grows, and it becomes harder for the operator to understand where the tool can retract safely.
It is better to remove the larger stock first. At this stage, the part is still far from its final size, but there is still material to work with and room to maneuver. This is also the right place for operations after which long chips often remain. While the contour is still simple, they are easier to spot and clear away.
Roughing and finishing passes should be separated not only by time, but also by working zones. One tool forms the outer contour and shoulders, and another comes in later, when there is less chip load and the remaining stock is clear. If you mix these steps, the finishing tool will work under unstable conditions and lose size more quickly.
Usually, the following order works well: first rough turning on a simple contour, then the base surfaces, then the operations that open access to internal or narrow areas, and only after that the finishing passes.
The most common mistake appears where two motions end almost at the same point with no pause. On screen, it may look neat, but on the machine one tool has not yet moved to a safe position while the second is already entering the same area. It is better to leave a clear margin in both time and coordinates: first a definite retract of the first tool, then the approach of the second.
After each cycle, define not a vague retract, but a specific move to a preselected point. A simple rule usually helps: finish cutting, move out in X, then retract in Z, and only then hand the zone over to the next tool.
If the program looks too tight, that is not always a good sign. A little extra retract is often cheaper than one hit to the holder, chuck, or part.
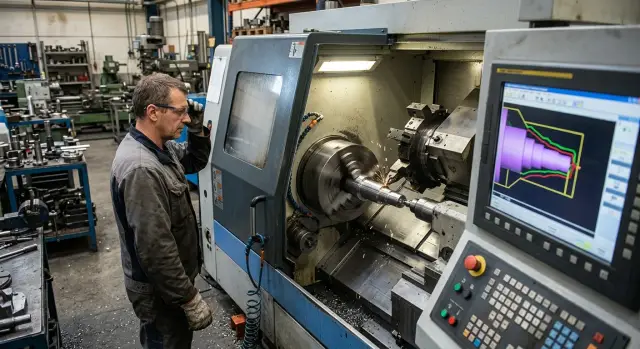
How to check tool paths without collisions
When checking tool paths, it is not enough to look only at the part contour. The risk more often appears when the holder moves close to the chuck jaws, a neighboring tool, a steady rest, or an already formed shoulder.
Start with a simulation where the machine model matches the real setup. Set the tool length, overhang, holder shape, jaw height, blank length, stop position, and axis limits. If even one real dimension is missing from the model, the screen can easily show a clean pass where the machine will actually hit.
In the simulation, stop the cycle at the tightest points. Look at more than the tool tip. Check the full moving envelope: holder, shank, drill body, turret, chuck, and the part after the previous transition. A 1 mm gap on the screen often disappears because of an extra overhang or a zero shift.
After the simulation, do a dry run above the part. Raise the tool to a safe distance above the contour, switch off coolant, and stand where you can see the jaws, the workpiece face, and the tool itself all at once. A clear view is more important here than the habit of starting the cycle by sound.
The first loaded run is better done at a reduced feed. It takes a few extra minutes, but it usually saves a broken cutting tool or a damaged jaw. If a section looks questionable, use step mode and stop the machine before entering the danger zone.
At close-clearance points, it helps to measure the actual gap. Stop the cycle, hold the axes, and check the distance with a feeler gauge, a set of shim plates, or a template if one is available in the setup. This kind of check quickly shows where the program, the setup, and the real geometry do not match.
If you still have doubts, increase the idle approach first and only then reduce it. An extra 3–5 seconds during debugging is much cheaper than a half-shift machine stop.
Example with a shaft and a cross hole
Imagine a shaft that first needs its outer diameter turned and then a cross hole drilled near the chuck. In such a task, the time savings are obvious, but a few millimeters of error can easily cause a hit on the chuck, the part, or a neighboring unit.
The dangerous moment usually appears not during machining itself, but when the two tools move closer together. The cutting tool is still near the part after rough turning, while the drilling unit is already approaching the hole position. If the holder has a large overhang and the drill approaches from a different point, both tools can enter the same area near the jaws.
In practice, it is safer not to combine these motions. First the cutting tool fully finishes rough turning of the outer diameter and moves to a preselected retract point. Only then does the machine bring the drill to the side surface at a position where there is no holder in the way and no risk of catching the chuck during axis movement.
The working sequence here is simple: turn the outer diameter, move the cutting tool to a separate safe point in X and Z, check the spindle and axis positions for drilling, and then bring the drill in along its own path without crossing the cutting tool’s route.
Separate retract points are especially important in this type of operation. One common point looks convenient, but in a real setup it does not account for the different envelopes of the holder and the drilling chuck. External machining needs one point, while the move to the cross hole needs another, with much more clearance from the jaws and the chuck face.
If the shaft is short, the risk becomes even higher. The tool works very close to the chuck, and even a small zero shift or overhang error changes the picture. That is why it helps to run this section at a low feed before the first start and watch not only the tool tip, but also the entire fixture body.
This example shows a simple rule well: finish the rough work in the tight zone first, then bring in the second tool. When each unit enters the working area along its own path and with its own retract point, the chance of collision drops noticeably.
Errors that lead to collisions
Collisions are rarely caused by one major reason. More often they come from a chain of small mistakes that seem harmless on their own. One dimension is not updated, one safe point is set too close, one check is not completed—and that is already enough.
What is missed most often
The most common mistake is using the tool length from a previous setup. The tool may have the same number, but after regrinding, changing the holder, or a different seating position, its actual overhang no longer matches the record. A difference of a couple of millimeters may be fine on a rough pass, then cause a hit on approach to the part or during turret indexing.
Another typical problem is changing the jaws but not updating their dimensions in the check. A new set changes the real outer contour of the chuck and the area where the tool still passes safely. On the screen everything looks clear, but on the machine the tool catches a jaw during retract or rapid movement.
The way the safe point is defined is also risky. If it is placed too close to the face of the part, there is only enough margin for an ideal scenario. If the part sticks out a little more, the jaws have a different projection, or the tool approaches at another angle, the space is no longer enough. The safe point must work in the real setup, not only on the drawing.
Why checking separately is not enough
Many people test each tool on its own. That is convenient, but not enough. A collision often happens not during cutting, but between transitions: one tool leaves, the next is already indexing into position, the spindle changes state, the slide moves to a new point. If you look at the motions one by one, these intersections are easy to miss.
You need to check the whole chain: tool approach, machining, retract to a safe point, indexing, and the next approach.
A simple example: after boring, the tool moves not upward, but first in X with only a small margin. Then the move to drilling a cross hole begins, and the turret passes close to the jaw. Each step is acceptable on its own, but the full sequence is already dangerous.
If you have not rechecked the full sequence after any change to tooling, jaws, or tools, the program cannot be considered ready to run. This is exactly where the collisions usually appear that could have been avoided with ten minutes of calm checking.
Short checklist before a production run
Before starting a production run, it is better to spend 10 minutes on a short check than to replace jaws, tools, and parts after a collision. In these operations, a small mistake grows fast: one wrong zero, 3 mm too much overhang, or a forgotten bar can ruin the whole cycle.
This list is not for formality, but for a calm first cycle:
- match the program zeros with the setup sheet;
- record the overhang of each tool after measuring it, not from memory;
- include everything that enters the working zone in the check: jaws, bars, adapter sleeves, drill chucks, and steady rest;
- run a dry cycle at reduced feed and watch the tool change, approach, retract, and synchronized motions carefully.
Pay special attention to moments when one tool has not yet reached its safe point and another has already started moving. That is where the risk of interference most often appears. On the screen everything may look clear, but in the real setup the chuck, a long shank, or turret rotation gets in the way.
A useful rule is simple: if even one item is not confirmed, do not start the run. First correct offsets, lengths, the operation sequence, or the fixture model in the check.
What to do after the check
If the trial run went cleanly, the work should not be considered finished. The most useful step at that moment is to record everything that helped avoid contact while the details are still fresh in memory.
In the setup sheet, write down the safe retract and approach points for each tool, the axis limits, the order of auxiliary functions, and short notes on the risk zones. Mark where the tool passes close to the chuck, jaws, steady rest, tailstock, or neighboring slide. A week later, those notes save time and help prevent the same mistake from happening again.
Also note where the operator should look during the first cycle. It is better to write not general phrases, but specific moments: the first drill approach, the pass near the jaws, tool change after parting off, return to the change position. Then the first start is calmer, and the operator does not try to watch everything at once.
You can also leave a short note block in the setup sheet: where to expect the smallest clearance, which frame to use to check synchronized motion, when to lower the feed for the first pass, and at which point to keep your hand near pause rather than start.
If you are starting a new part, it is useful to discuss the machine layout and fixtures before the shift begins. It is better to spend 10 minutes at the machine than to move the tool in a hurry later. Check the overhangs, holder height, stop positions, clamping length, and how the units move during servicing.
A short review after the check also works well: the setter says where the risk was expected, the operator says what was actually seen, and the technologist says what should change in the program or the fixture. That conversation takes only a few minutes, but it quickly removes weak points before production.
If it becomes clear at this stage that the problem is not in the program, but in the machine’s layout margin itself, it is worth returning to the equipment choice. EAST CNC, the official representative of Taizhou Eastern CNC Technology Co., Ltd. in Kazakhstan, supplies CNC turning machines and helps with selection, commissioning, and service support. This is useful in cases where a new part has already outgrown the current machine’s capabilities, not just the setup.
FAQ
Where does the risk of mutual interference usually appear?
The risk usually appears during approach, tool changes, and retracting after an operation. Areas near the chuck, jaws, tailstock, and steady rest are especially dangerous because there is very little room left there.
Why can’t you check only the cutting point?
Because it is not only the tool tips that collide. The toolholder, drill shank, boring bar, adapter, and even the turret can come too close, even if the cutting point itself looks fine.
What data do you need before checking the tool paths?
Record the real dimensions of everything mounted on the machine: tool overhang, holder length, holder shape, chuck jaw size, workpiece position, fixtures, steady rest, tailstock, and any special setup. Use actual measurements, not old notes or catalog data.
Do you need to measure tool overhang every time?
Yes, it is better to measure it again. A small shift after tightening, changing an insert, or replacing an adapter can easily add 2–3 mm, and that is already enough to cause contact in a tight area.
How do you check the setup before the first start?
First match the pocket number, tool, and offset with the program, then check how the part sits and manually run through the dangerous areas at low feed. If there is any doubt near the chuck or on a shoulder, stop and check the clearance directly on the machine.
How should the operation sequence be arranged?
The usual calm sequence is: rough the simple contour first, then the base surfaces, then the internal or narrow areas, and finish with the cutting passes. Leave a clear retract move between tools instead of switching them too tightly.
How do you safely check the path on the machine?
Start with a simulation where the machine model matches the real setup, then do a dry run above the part. For the first run, keep a low feed, watch the entire fixture, and if needed measure the gap with a feeler gauge or template.
What do people usually miss before startup?
People often forget to update the overhang after a tool change, the dimensions of new jaws, and the zero shift after a trial part. Another common mistake is checking each tool separately and not watching the full chain from retract to the next approach.
What should you do if the operation runs very close to the chuck?
Do not run the motions too tightly together. First move the first tool completely to its safe position in X and Z, then check spindle position, and only after that bring the second tool into the area near the chuck.
What should you record after a successful trial run?
Write down the safe retract and approach points for each tool, the axis limits, the order of auxiliary functions, and short notes about the risky zones. These notes save time during the next setup and help avoid the same mistake again.