Milling Thin Stiffening Ribs Without Wall Deflection
Milling thin stiffening ribs requires the right pass sequence. Learn how to keep support in place until the end, reduce wall deflection, and reach finishing cleanly.
Why the wall moves before the finishing pass
A thin wall is often ruined not by the last pass, but by what happens several operations before it. While a solid block of metal still remains around the rib, the workpiece keeps its shape. When that support is removed too early, the wall is left almost unsupported and can start moving even during roughing.
Usually it begins like this: on one side the material has already been removed, while on the other side it still holds the stiffness. The cutting force pulls the wall sideways, and after the pass the part is no longer where it was before engagement. After that, finishing does not correct anything. It only repeats the mistake.
This is especially easy to see on long, tall ribs. The greater the height relative to thickness, the easier it is to deflect the wall. If roughing is aggressive and the side load is high, the metal flexes slightly during cutting and then takes a different shape after the cutter exits.
Another issue is a long tool overhang. The tool itself starts behaving like a spring, deflects to the side, and adds vibration. Even if the feed looks moderate, the actual side load on the wall can be higher than it seems.
Clamping also often causes hidden deformation. If a clamp is too close to the rib, it bends the part before the first finishing pass. While the workpiece is still clamped, this is barely visible. But after loosening or removing the part, the stress changes and the wall moves. Then it looks like the program or the cutter is to blame, although the part was already distorted during setup.
A simple example: a plate with a tall rib along the edge. If one side is opened almost completely first, then a deep pass is made with a long overhang, and the part is clamped hard near the rib, the wall will almost certainly be pulled off line. At that point, finishing is already working on a part that has lost its correct shape.
That is why the root cause should be found earlier than the last touch of the cutter: when the wall lost support, where the side force came from, and how clamping changed the part shape before machining.
What keeps the rib supported until the last pass
A thin rib is held not by a "careful finish pass," but by the right machining sequence. While a block of metal still remains nearby, the part resists bending better, and the cutter does not pull the wall sideways during semi-finishing.
The first support is the metal at the base. If you completely remove the material around the rib and leave only a thin wall, it becomes soft right away. When there is still stock below and beside it, the rib behaves like part of a solid blank, not like a separate plate.
On long sections, one base is not enough. Small bridges help then. They are left where the rib is most likely to "wander": closer to the middle of the length or at the free end. They are removed at the very end, when the size is almost complete and the load is lower.
An even allowance on both sides also works well. If one side is already almost to size and the other still has a thick layer left, the part starts to pull. Even a small shift is easy to see later during finishing. A symmetric stock allowance keeps the stress more balanced.
Simple rules help too. Do not separate the rib from the main mass too early. Leave supports on long and free sections. Remove material from both sides roughly equally. Open free areas gradually, not in one pass along the whole length.
The machining order matters as well. It is better to start with stiffer zones where there is a base, bosses, or clamping points. Only then move to the areas that are less supported. That lowers the risk of a long wall starting to flex right before finishing.
If you picture a pocket with a 120 mm rib, the mistake becomes obvious. If both sides are opened to full depth right away, the middle will almost certainly shift. If you leave stock at the base, keep equal allowance on both sides, and leave one or two bridges, the rib survives to the final stage in a much calmer state. Then finishing removes a thin layer instead of trying to fix what was already damaged.
Stock-removal order
The task is simple: keep metal around the rib as long as possible so it works like support. If the wall is opened from both sides too early, it loses stiffness and moves even before the light finishing passes.
A typical working sequence looks like this:
- First remove most of the material roughly, but do not bring the rib to final size yet. Let the wall stay thicker than the drawing for now.
- Then machine the neighboring pockets, but do not go right up to the rib. Leave allowance on the side walls and do not clean everything to the bottom in one step.
- Remove material in steps. Move from areas where the part is better supported toward the more open edge. That way the load on the wall rises gradually.
- Before finishing, remove the extra bulk that is no longer needed for roughing, but keep small bridges in place.
- At the end, make a light finishing pass on the wall and rib. Only after that remove the bridges with short, gentle passes.
If a rib sits between two pockets, do not fully machine one pocket first and only then move to the second. It is better to alternate sides by layers or depth. Then cutting forces and internal stresses change more smoothly, and the thin wall behaves more calmly.
Another common mistake is chasing the final thickness too early. During roughing and semi-finishing, it is better to leave a small reserve. While there is still metal around the rib, that reserve does not hurt, but it helps a lot with keeping the geometry.
A good sign of the right order is this: until the very last passes, the rib is not hanging on its own. It is held by the adjacent mass, the bridges, or both.
Where to leave bridges
Bridges work best not where they are easiest to cut later, but where the wall loses support during machining. That is usually on long straight sections. That is where the cutter pulls the middle, the edge no longer holds shape, and finishing starts to show a wave instead of a flat surface.
It is better to place bridges at even intervals. If one part of the wall is supported often while another section has a long free span, the deflection will start exactly in that weak spot. Equal spacing between supports keeps stiffness much better than two or three random bridges.
Corners and areas that will later be finished on a visible surface are better left alone. A bridge in a corner often leaves extra stress and a mark after it is cut away. It is much calmer to leave support on the straight section nearby and machine the corner without extra interruptions.
On a simple long part, the setup looks like this: roughing clears the pocket, the rib opens gradually, and small material bridges remain at regular intervals. Until the end of the operation, they keep the wall from bending. After finishing the wall, those bridges are cut separately with a light pass, without aggressive engagement.
Before starting, it helps to quickly check four things: where the wall has the longest free section, whether the support spacing is even, whether a bridge is sitting in a corner or on a finish surface, and whether the leftovers can be removed with a separate gentle pass.
Example on a simple part
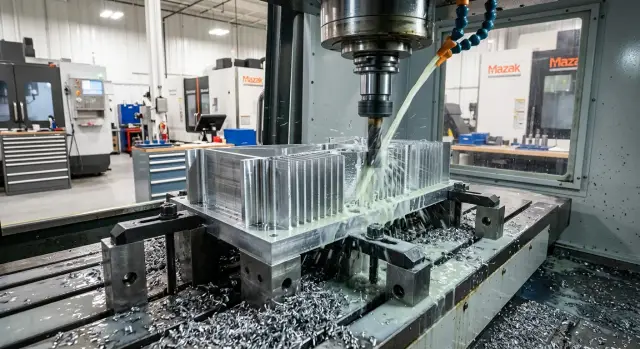
Take an aluminum plate with a long rib in the center and two pockets on the sides. The geometry looks calm, but it clearly shows why a thin wall starts to move before finishing.
If both pockets are opened to full depth right away, the rib almost immediately loses support. After a few passes, the wall may shift slightly. Sometimes this is barely visible during machining, but by the time finishing starts, the size is already drifting and one side of the surface becomes worse.
A much better sequence works differently. First, most of the pocket material is removed in steps, not all the way down at once. A strip of material is left in the center along the rib. Two small bridges are also left closer to the ends or in the areas where the free span is longest. Only then are the pockets brought close to final size and moved to a light finish.
The central strip keeps the rib from moving sideways, and the bridges prevent it from shaking along its length. More material remains in place, but that is exactly what keeps the geometry stable until the last minutes of the operation.
It is better to finish the rib by alternating sides. Do not bring one side all the way to final size and then move to the other. It is calmer to remove a small allowance from one side, then the same amount from the other, and repeat if needed. That keeps the load closer to balance and stops the wall from being pulled to one side.
On a part like this, a large finishing allowance usually does more harm than good. If you leave a little material after roughing and do not rush the final passes, the rib comes out straighter and the risk of deflection is much lower.
Once the shape is stable on its own, the bridges are removed at the very end. After that, usually only a light cleanup remains where they joined the wall and the pocket floor.
What to check before finishing
If the wall already feels a bit "alive" after roughing, a finishing pass will not fix it. It will only reveal the mistake made earlier: too little stock left, poor clamping, a long tool overhang, or too much heat in the part.
A short check is enough before finishing.
- Look at the remaining wall thickness and allowance. If the wall is already close to final size and there is still a noticeable layer left on one side, the cutter can easily pull it sideways.
- Check the clamping. A jaw, clamp, or support near a thin zone often bends the part before cutting starts.
- Evaluate the tool overhang. Use the shortest overhang the access allows. An extra 10–15 mm often causes noticeable tool deflection.
- Reduce radial load before the last pass. It is better to make a light pass with a small side engagement than to try to reach size in one shot.
- If the part has heated up after roughing, let it cool. A warm wall holds size worse than it seems.
A simple rule of thumb: if after roughing the wall is already 1.5 mm thick and the remaining allowance per side is 0.3–0.4 mm, the risk is high. In that case, it is better to rethink the route than to rely on a careful finish pass.
Walls usually bend for the same few reasons. The support stock was removed too early. All the allowance was left on one side only. Full depth was taken too close to the thin wall. The part was sent to finishing while hot. Or it was clamped in a weak area. Each mistake alone may seem acceptable, but together they quickly push the size out of line.
Before starting, it helps to ask two questions: what is supporting the wall now, and what will support it after the next pass? If there is no answer to the second question, the program should be corrected before machining begins.
What to do next
If you find a pass order that keeps the wall stable until the end, do not leave it only in the operator’s memory. Save the sequence for similar parts: where you leave stock, when you open pockets, when you cut bridges, and which pass you use for finishing. Usually, a short process sheet together with a CAM template works best.
It is better to test on the first part, not on the whole batch. Even a good process can behave differently with another alloy, a different tool overhang, or after changing vises. It is much cheaper to stop after roughing, measure the wall, and correct the toolpath than to get several parts shifted in the same way.
On the first part, four checks are usually enough: how much stock is actually left before finishing, whether the wall moved after opening neighboring areas, whether there is any extra heat and chip re-cutting, and whether the part still holds size after the bridges are removed.
If the shift has already appeared by even 0.05–0.1 mm, do not expect the final pass to fix it on its own. More often, you need to change an earlier stage: the machining sequence, the engagement width, the depth per axis, or the point where the part still has enough rigidity.
When thin walls are a regular job, it is better to solve the problem more broadly, at the level of the machine, fixture, and cutting conditions. Weak clamping, long tool overhang, and excessive feed can break even a correct pass sequence. In such cases, it helps to review the whole chain in advance: machine, workholding, tool, and trial route.
For these kinds of tasks, it also helps to rely on the experience of the equipment supplier. EAST CNC supplies CNC lathes, machining centers, and automated lines for metalworking, and also helps with selection, commissioning, and service. If parts like these are produced in series, that kind of discussion often helps solve the problem not just in one program, but across the whole process.
FAQ
Why does a thin wall deflect even before the finishing pass?
The wall is often deflected not by the last pass, but by losing support too early. If you have already removed material from one side while the other side is still holding the part, cutting force pulls the rib sideways, and after the pass it stays in a new position.
When is it better to open pockets on both sides of a rib?
Do not open both pockets to full depth at once. Remove material in layers and keep as much metal around the rib as possible for as long as you can, so the wall does not lose support too early.
Are bridges needed if the rib is long?
Yes, on long sections bridges often save the geometry. Place them on straight areas with the longest free span, preferably at even intervals, and avoid leaving them in corners or on visible finish surfaces.
Why does a careful finish pass not fix wall deflection?
A finish pass removes only a thin layer and repeats the shape that is already there. If roughing or semi-finishing bent the wall, the final pass will not straighten it; it will only show the error in size and surface quality.
How do you know the allowance before finishing is too large?
Look at the relationship between wall thickness and the remaining stock. If the wall is already close to final size, but there is still a noticeable allowance, for example 0.3–0.4 mm per side with a wall around 1.5 mm, the risk is high.
How much does tool overhang matter?
Very strongly. A long overhang makes the tool less rigid, the cutter bends sideways and adds vibration, and the wall gets extra side load. If access allows, use the shortest overhang possible.
Can clamping itself ruin a rib?
Clamping can easily bend a thin zone before cutting starts. If a clamp sits near the rib, the part keeps its shape only while it is clamped, and after release the wall moves. It is better to move the clamping force to stiffer areas and avoid pressing near the thin wall.
What machining order is safest for a thin rib?
Usually this sequence works best: first remove the main bulk, but do not bring the rib to final size; then approach the neighboring pockets in steps, keep a balanced allowance on both sides, and only at the end make a light finish pass. After that, cut the bridges off with a gentle pass.
What should be checked before finishing to avoid bending the wall?
Check four things: the wall should not be too thin before the finish, the clamp should not press near the rib, tool overhang should be as short as possible, and the part should not go into finishing while hot. If even one point is questionable, it is better to adjust the route in advance.
What should you do if the wall has already shifted on the first part?
Do not wait for the next pass to bring the size back. Stop, measure the part after roughing, review the stock-removal order, reduce side load, shorten the overhang, and change the support point. On the first part, that is cheaper than ruining the whole batch.