Milling Steel Plates After Plasma Cutting Without Excess Removal
Milling steel plates after plasma cutting requires a precise reference, gentle clamping, and a path that accounts for thermal warp.
Why a plate after plasma cutting does not give a flat base
After plasma cutting, a plate almost never stays as flat as it was before the blank was cut. The edge gets intense and uneven heating. The metal near the cut expands quickly, then cools and pulls on the surrounding zones. Because of that, the shape changes during cutting itself.
What happens next depends on the contour. Long cuts, internal openings, frequent piercings, and dense cutting near the edge make the distortion worse. But the plate does not move the same way every time. One part may lift at the corners, another may bow in the middle, and a third may develop a local wave near a cutout while the rest of the surface still looks almost normal.
That is the problem. The blank may seem flat because it rests on the table at just a few points. That is enough to create a false sense of a flat base. But the milling cutter works with the real shape of the metal, not with an impression.
The first pass often does not correct the bend; it simply follows it. If you use an already distorted surface as the reference, the tool removes metal according to the geometry the blank took under its own weight or under clamping force. After that pass, the plate still does not give a reliable base for the next operation.
Strong clamping usually only hides the problem. It presses down a corner or forces the middle down, and on the machine everything looks better than it really is. But that is temporary. As soon as the clamps are released, the internal stresses move the metal again, and the machined plane no longer matches the shape of the free part.
In practice it looks simple: a plate with slightly raised corners is clamped hard to the table, the top layer is removed, the clamps are loosened, and one corner rises again. Formally the surface has been machined, but a truly flat base for precise work still has not appeared.
So after plasma cutting, you should not treat the starting plane as a finished support just because it sits on the table. First you need to understand how the metal warped. Only then should you decide where to take the reference from and how to run the first pass.
What to check before the first pass
After plasma cutting, a plate is rarely ready to go straight onto the table for a finish pass. Before milling, you need to remove anything that distorts the support: scale, buildup, and spatter on the underside and along the edge. Even a small bump of 0.3-0.5 mm changes how the plate sits and later looks like a crooked base.
Start by cleaning not the whole part, but the future support points and clamping areas. That is where the metal must sit honestly, without debris or a hard crust. If the plate is large, it helps to mark with chalk where it touches the table and where gaps remain.
Then check the bow with simple tools. A straightedge quickly shows the overall picture, feeler gauges give the gap size, and an indicator helps you scan the plate along its length and diagonals. After plasma cutting, the distortion is often not one smooth arc but a skewed shape, so one measurement in the center is not enough.
Thickness should not be judged by eye either. Measure the plate in several spots: near the edges, in the middle, and close to the piercing points. If one corner is left at 19.8 mm and another at 20.6 mm, the same stock removal across the whole surface easily turns into unnecessary loss.
Mark the plasma entry and exit zones separately. That is often where local buildup, a hard crust, and small dips from piercing remain. If you do not mark those places in advance, the indicator will later show a jump, and the operator will start looking for a setup problem when the cause is actually the thermal trail.
Usually four actions are enough: clean the future supports and clamping points, check the bow with a straightedge, feeler gauge, and indicator, compare thickness in at least 5-6 spots, and mark the entry, exit, and all visibly uneven areas.
It also helps to choose the base side right away. Most often that is the plane with less warp and fewer plasma marks. If you put that decision off, it is easy to lose your place during the job and remove metal where there is already too little.
This preparation saves both material and rework time. A few precise checks before the first pass immediately show where the plate sits properly, where it has warped, and from which side it is reasonable to build the base.
How to tell where the metal warped
Do not look at the plate from just one point. After plasma cutting, it is rarely bent evenly. Usually there are two issues at once: the overall bow of the plate and local bumps near the outer contour, holes, or internal cutouts.
First, place the plate on the table without clamps and let it settle as it wants. That is the most honest test. If you clamp the sheet right away, you hide its real shape and get a surprise on the first pass.
See which points the plate rests on by itself. Sometimes it rocks diagonally. Sometimes it sits on two corners and the middle of a long side. Even from that seating, you can tell where the overall bend is and where the local high spots are.
How to get the real picture
One measured point is not enough. Scan the plate in a grid. At minimum, check the center, all four corners, and both long sides in several places. If the part is long, the long sides often show the distortion better than the center.
An indicator makes this faster, but a long straightedge with feeler gauges also gives a usable picture. The goal is not a pretty report, but finding the highest points. Those are the first places the cutter will meet and they define the real zero for removal.
Next, separate the overall bow from local bumps. Overall bow looks like a smooth arc across the length or width. Local bumps usually sit near the plasma-cut zone. They are short, and the readings change sharply over a small area.
The rule of thumb is simple. If the whole measurement line rises, it is probably an overall warp. If the jump is only near the edge or a cutout, it is a local bump. If one corner is higher than the neighboring points, check whether the thermal trail from the contour is pulling it. If the center is lower and the edges are higher, do not try to remove the whole surface to one depth right away.
After measuring, it helps to draw a stock-removal map directly on the plate. Mark the high spots, note the approximate height difference, and separately circle the areas near the contour. That layout saves time: the operator can immediately see where a light touch is enough, where a rough pass is needed, and where the metal should be left alone for now.
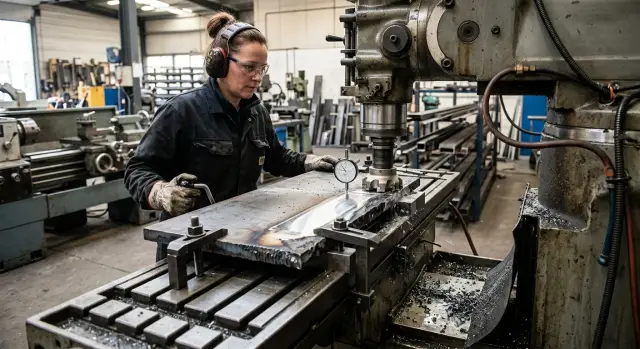
How to clamp the plate without creating new deformation
After plasma cutting, the plate often does not lie across its full surface on the table. If you clamp it down however you can, the machine will start machining a part that has already been forced into an artificial bend. Then when you release the clamps, the base will move again.
First find the points where the plate naturally wants to sit. Usually these are 3-4 natural contact points. That is where the supports should go. There is no need to stack shims under every corner and force the sheet into a perfect zero. That will not remove thermal warp; it will only hide it until the first loosening of the clamp.
The working method is simple: set the plate on supports under the actual contact points, remove unnecessary shims, bring the clamps down until they touch, and tighten them gradually, one by one. It is better to leave the area for the first pass open.
This point is often missed. If the first pass must remove the highest area, the cutter should reach it without obstruction. When a clamp is too close, the operator shifts the start, changes the path, and ends up removing more than necessary.
Another common mistake is pulling the plate down with one strong clamp in the center or at the edge. From the outside, it looks like the blank has sat flat. In reality, the metal has taken on new stress. After machining, the plate may spring back by several tenths, and the flat base will exist only on the machine, not on the part.
That is why clamps are tightened gradually, in a cross pattern or simply one after another, and after each step you check how the plate behaves. If one corner drops too quickly, it is better to stop and rethink the supports. Usually the problem is not weak clamping, but the support being in the wrong place.
After tightening, check the bow again with a feeler gauge. Go not only along the edges, but also across the center, especially near the cut zone and local heating areas. If the gauge suddenly no longer fits in one place and the gap grows next to it, you have already deformed the plate during clamping. It is better to spend another five minutes moving the supports than to remove an extra millimeter from the whole surface.
How to adjust the milling path to thermal warp
If the plate warped after plasma cutting, the path should be built not from the ideal drawing geometry, but from how the metal sits on the table. Otherwise the cutter will remove too much where the plate has already dropped and do almost nothing where a high spot remains.
Start with the most stable high area. Usually that is not the edge, but a section closer to the middle or to the area where the plate rests better on the supports. If you start from a soft corner, the tool will first cut through air and then suddenly run into metal. That kind of start ruins both the surface and the logic of further removal.
The first pass should be light. Its job is not to make the surface clean, but to show the real height map. After that touch, you can immediately see where the cutter is already cutting metal and where dark untouched areas remain. For steel plates after plasma cutting, that is often more useful than trying to guess the warp with a straightedge.
How to move through the zones
After the first pass, it helps to mentally divide the surface into height zones. First machine the highest and most stable area. Then move to the neighboring zones with only a small difference in height. Leave the edges and corners, which are being pulled up or down the most, for last. If the center and edges differ a lot in height, do not run one long pass across the whole plate.
That route has a simple effect: metal is removed where it is actually needed, not everywhere equally. That helps preserve thickness and keeps the plate from being pushed into a new twist.
Do not try to get a clean surface across the whole area in one cycle. After rough removal, the stress often redistributes, and the plate changes shape slightly. So after the first passes, it is better to map it again with an indicator or the machine probe and only then remove the remainder.
A simple example: after plasma cutting, the middle of a plate is raised by a few tenths, and one corner is clearly pulled out of line. A logical sequence would be to take a light cut across the center zone, extend the machining to the neighboring areas, and leave the problematic corner until the end. After the first cut, that corner often no longer looks as high, because the picture across the plate changes.
A good path goes from stable height toward the problem spots. It is better not to argue with thermal warp. First let it show itself, then remove metal based on what is actually there.
How to choose stock removal without unnecessary loss
The most common mistake is always the same: the operator wants to get a clean flat surface across the entire area right away. After plasma cutting, that is a risky path. The plate has already been heated locally, and the metal has risen unevenly. If you try to remove everything on the first pass, you waste material, time, and tool life.
It is better to use the first pass as a reconnaissance pass. It should only remove the peaks and show the real picture. Often after that it becomes clear where the warp is strongest and where the metal is almost in place.
The rule is simple: do not fight the whole surface at once. First remove the high points, then check the contact pattern, and only after that decide whether another pass is needed. This approach usually removes less stock than trying to go across the whole plane in one shot at one depth.
In practice, the same logic works every time: make the first pass shallow, schedule the second only after a recheck, and do not increase stock removal just because dark areas remain at the edges. You can stop when you have a base that sits stably in the next setup.
What often gets in the way is the desire to make the surface look perfect right away. But for a base, a consistent support matters more than a fully shiny surface. If the plate sits securely, does not rock, and gives a clear geometry for the next operation, that is already enough.
Another source of loss is excess heat during machining itself. A long pass without pauses, a dull tool, or an overly aggressive feed creates friction, heats the plate again, and moves it slightly. Then the metal is removed not only because of the plasma-cutting effects, but also because of the milling itself.
It is better to keep the process predictable from part to part. If the same group of plates comes in after similar plasma cutting, use the same sequence: clamping, checking, a light first pass, a recheck, and then finish removal based on the actual result. That makes it easier to compare outcomes and avoid building in too much extra allowance.
A simple example: after plasma cutting, a plate has about 0.3 mm of crown in the center. If you immediately set 0.4 mm of stock removal across the whole area, you will lose metal where it was not causing trouble. If you first remove 0.1-0.15 mm from the peaks and then recheck the plane, often one more small pass is enough. The base is achieved, and the extra allowance stays on the part instead of becoming chips.
A simple part example
A 20 mm plate after plasma cutting rarely sits on the table across its full surface. Suppose two corners are lifted and the center stands slightly above the plane you need for the base. If you clamp the blank hard right away and machine the whole surface at the same depth, the cutter will remove extra metal, and after unclamping the plate may change shape again.
The operator first checks how the plate lies without force. He sets three supports so the blank settles into its natural position and does not rock. That is a simple practical method: three points do not pull the plate into a new geometry and do not create unnecessary stress.
He makes the first pass shallow and runs the cutter not across the entire surface, but across the raised center. The goal of this pass is not to get a clean base right away. It removes metal only where the surface prevents the plate from resting calmly. The contact pattern immediately shows where the real rise is and where the metal should be left alone for now.
After that, the operator moves the clamps. Now the zones near the edge can be gently tightened down, which was too risky before. The plate behaves more calmly because the central crown has been removed. Then he finishes the edge with separate passes and only after that makes a light finish cut across the required area.
Usually he watches four things: whether the plate rocks on the supports, where the cutter left the first mark, whether a clamp is pulling one edge down, and how much thickness is still left to remove without loss.
The result is usually better than a rough pass over the whole surface. The base comes out flat not because of a large stock removal, but because the metal is removed in order: first the crown, then the edge, then the finish cut. On a simple part, that often saves thickness, time, and the blank itself.
Where mistakes happen most often
Most defects show up not at the cutter, but at the moment when the plate is treated as almost flat already. That confidence usually costs a lot: extra metal is removed, time is lost, and a stable base still does not appear.
A common mistake is over-tightening the corners. The plate has already taken on thermal warp, and a hard clamp adds a new arc. While the part is clamped, the surface seems flatter than it really is. After the clamps are released, it springs back, and the plane shifts.
In practice, it looks simple: one corner is raised by 0.5 mm, the operator pulls it down to the table, and immediately starts machining. In the clamped state, the indicator shows an acceptable picture. After machining and unclamping, the center rises, and the base has already drifted.
Not less trouble comes from the habit of using the bottom side as the base without measuring. After plasma cutting, the underside is not necessarily better than the top. Sometimes the underside has more local bulges near the cut line, piercing point, and edge. If that side is taken as the reference, the whole route is built on false geometry.
Another mistake is machining the whole area to the same depth. That removes not only the high metal, but also the normal areas. As a result, stock removal grows, the part becomes less rigid, and the plane is still questionable because the issue was not the overall height, but a few bumps.
Three zones are often missed: bumps near the pierce point, a local rise at the edge after cutting, and places where the metal has pulled around an internal contour. If the cutter meets such a bump first, it may look like the whole plate is the problem. In reality, sometimes it is enough to remove the local peak, check the supports again, and only then decide how much to remove from the entire base.
The last typical mistake is measuring the plane only while clamped. The check is needed in two states: how the plate lies freely and how it behaves after gentle clamping. The difference between those two pictures quickly shows where the real thermal warp is and where the deformation was created during setup.
Quick check before starting
Before machining, it is better to spend a few minutes checking than to remove extra metal later. A plate rarely sits the same before and after clamping. If you do not see that in advance, the roughing pass will start correcting the setup error, not the base.
First compare the bow map in two states: when the plate is free and when it has already been clamped. You do not need a complex setup. A few indicator readings at clear points are enough to see where the peak moved and where a new rise appeared after clamping.
Then look at the supports. They should sit under the real contact points, where the plate already holds itself, not where it is simply convenient to place them. If a support hangs in the air or presses into a curved zone, the clamp itself will add a new deformation.
Short checklist before startup
- Bow measurements are taken before clamping and after it.
- Supports are placed at the actual contact points.
- The first pass removes only the highest areas.
- The path goes from the stable zone toward the warped area.
- Stock remains for the finish pass.
The first three items protect against unnecessary removal. The last two help you stop arguing with the metal. If you start from an area that already sits calmly, the plate usually behaves more predictably. When the cutter goes straight into the problem zone, the part may shift slightly while cutting.
Checking stock is simple too. Suppose you see a height difference of about 0.6 mm after plasma cutting and clamping. There is no need to immediately set a 1 mm pass just to be safe. It is more logical to remove the high points, stop, measure the plane again, and only then decide how much to leave for finish machining.
A good startup looks almost boring: the plate sits honestly, the first pass does not try to do everything at once, and after roughing you still have margin for a clean base. That calm preparation is usually what saves the part.
What to do next
If you find a setup that lets the plate sit calmly and gives you a flat base, do not keep it only in the operator’s memory. This kind of work needs a short, live process map. Good results here depend on repeatability, not on a one-time lucky setup.
It is enough to write down a few things: where the supports go and what height they need, in what order the plate is tightened, where the first pass starts, what stock is taken on the first and next passes, and where the most stressed area usually remains.
That record saves time on the next part. A week later it is easy to forget a detail like the fact that the right rear corner should not be tightened first. And it is exactly those small details that later create extra removal.
After that, it is useful to compare the result on at least several plates from the same batch. Not just one, but three to five. If they behave similarly, you have a solid basis for a repeatable setup. If one plate is flat, the second is acceptable, and the third pulls in a completely different way, the cause should be looked for not only in milling, but earlier too.
When thermal warp varies a lot, look at the plasma cutting itself and at the stock allowance. It makes sense to check the cut sequence, pauses between cuts, pierce points, and whether too little metal was left for leveling the base after plasma cutting. Sometimes it is better to add a little allowance or change the cutting path than to remove extra millimeters on the machine.
If the work is batch-based and the plates are heavy, manual corrections quickly become expensive. At that point, it helps to look not only at the cutting parameters, but at the entire process. EAST CNC supplies CNC lathes and machining centers for metalworking, and also helps with selection, delivery, commissioning, and service. In the east-cnc.kz blog, the company publishes industry news, equipment reviews, and practical advice that can also help when preparing parts like these.
A good sign is simple: several plates in a row go through the same setup, and after machining you get a predictable plane instead of a new surprise. That means the process is built correctly.
FAQ
Why does a plate look flat after plasma cutting even though the base has already shifted?
Because the table hides part of the deformation. The plate touches the supports at only a few points, so it looks calm, but the real shape of the metal has already shifted after heating and cooling near the cut.
What should be checked before the first pass?
First clean the future support points and clamping areas. Remove scale, spatter, and buildup from the underside and along the edge, or even a small bump will create a false seating surface.
How can you quickly tell where the metal warped the most?
Place the plate on the table without clamps and see how it sits on its own. Then check it with a straightedge, feeler gauge, or indicator at the corners, center, long sides, and diagonals to separate overall bow from local bumps.
How do you choose the base side?
Usually the side with less warp and fewer plasma marks is chosen. It is better to decide right after measuring so you do not remove metal from the thinner or more problematic side.
How do you clamp the plate without creating a new bend?
Set the supports under the points where the plate already touches the table by itself. Bring the clamps down until they just make contact and tighten them one by one without heavy force, or you will bend the part during setup.
Where is the best place to start the first pass?
Start with a light touch on the most stable high area. That pass shows the real height map: where the cutter already engages the metal and where the surface is still better left alone.
How should the milling path be adjusted for thermal warp?
The route is best built from the stable zone toward the problem areas. Do not run one long pass across the whole plate if the edges and center differ a lot in height, or you will remove extra material where the metal is already low.
How do you choose the stock removal and avoid losing too much thickness?
Do not try to get a clean flat surface across the entire area at once. First remove the peaks with a light pass, then measure the plate again and only then decide how much more to take off.
What mistakes most often ruin the base after plasma cutting?
The most common mistakes are over-tightening the corners, using the bottom side as the base without measuring, and machining the entire area at the same depth. Another frequent mistake is measuring only while the plate is clamped and not checking how it sits freely.
What should be recorded after a successful machining setup to repeat the result?
Record the support layout, the clamping sequence, where the first pass starts, and the actual stock removal per pass. If several plates from the same batch behave similarly, that record quickly gives repeatable results and saves setup time.