Milling Hardened Surfaces with Ceramic: When It Makes Sense
Milling a hardened surface with ceramic is not always the right choice. We break down allowance, workpiece rigidity, and chipping risk under interrupted cutting.
Why this method causes debate
Milling a hardened surface with ceramic is controversial for a simple reason: it removes metal fast, but it does not forgive mistakes. When the allowance is even, the clamping is rigid, and the cut is smooth, ceramic works cleanly and delivers a high pace. But as soon as vibration, runout, or weak workholding appears, the cutting edge can chip in a matter of seconds.
The problem usually starts not in theory, but on the real part. A hardened layer is rarely uniform across the whole surface. In some areas the hardness stays consistent, while in others you get heat-treatment transitions, local overheating, or traces of the previous operation. That is already unpleasant for carbide. It is even worse for ceramic, because it handles impact loads poorly.
That is why one successful trial proves very little. On the first sample, everything may run smoothly: the temperature reaches the working range, the size holds, and the surface comes out clean. In production, the picture changes. A different batch of blanks comes in, the allowance is slightly larger, the clamping loosens, the spindle starts to wear — and the setup that looked solid in the morning starts producing chips by the afternoon.
People also often argue about what fails first: the size or the insert. In practice, with weak clamping, ceramic often gives up before the operator even sees the size drift. The part shifts slightly, the cutter enters with a bump, and the edge is damaged. After that, the process goes downhill: cutting forces rise, the surface gets worse, and the next insert lasts even less.
So the question is not whether ceramic can cut a hardened layer. It can. The real question is whether the process can survive the whole batch without extra stops, chipping, and expensive scrap.
When ceramic makes sense
This method gives the best result where the process is already stable. Usually that means finishing or near-finishing machining of hardened steel, when the allowance is small and almost unchanged from part to part. If, for example, you only have 0.15–0.3 mm left on the surface, the setup is easier to hold, and the edge works more calmly.
Another good condition is rigid clamping. Ceramic likes calm mechanics: short tool overhang, a clear toolpath, a rigid table, and repeatable datum setup. Any play in the fixture quickly eats up the benefit of high cutting speed.
It performs best on an almost continuous surface, where the cutter stays in contact for a long time and rarely crosses slots, holes, or steps. That is why ceramic often works well on long passes across a hardened flat surface or along an outer contour with an even load.
The benefit shows up fastest in serial production. If the shop removes the same small allowance from the same parts every day, even 20–30 seconds saved per part becomes significant by the end of the shift. For one-off work, this setup is rarely worth the effort. For a repeatable operation, it can be.
The method is usually justified if all four conditions are met at once:
- the allowance is small and known in advance;
- the blank is clamped rigidly, without chatter or re-clamping;
- the cut is almost continuous;
- the goal is to speed up a repeat operation, not remove a large amount of metal.
If even one point is missing, the economics quickly get worse. Then speed no longer saves you: tool life drops, and the result starts to vary.
When it is better to choose another method
Ceramic handles rough conditions poorly. If a large allowance remains on the part after heat treatment, it often loses out. At high speeds and moderate material removal, ceramic is strong, but a thick layer of metal creates a heavy impact on the edge and quickly eats up tool life.
Problems also start with the part itself. A thin wall, a tall blank, or a long overhang makes the cut unstable. The part flexes, the cutter picks up vibration, and ceramic hardly tolerates those oscillations. In that situation, grinding, CBN, or a more forgiving carbide tool is usually the safer choice.
The toolpath matters too. If the tooth keeps entering slots, holes, steps, and windows, the cut becomes interrupted. For ceramic, this is one of the most unpleasant modes: the edge heats up, then takes a hit, and chipping follows very quickly. On a smooth surface, the chance of stable operation is much higher. On a broken contour, it becomes a lottery.
The machine itself also matters. If the spindle has runout, the feed is jerky, or there is play in the axes, even a good result will be accidental. Ceramic needs a rigid system: the machine, holder, tool, and part must work without chatter.
Usually another method is more sensible when at least two of these conditions match: the allowance after hardening is too large, the part vibrates noticeably under load, the toolpath is often interrupted, and the machine cannot maintain a smooth feed.
There is also a simple calculation. If one broken insert costs more than the time saved over several cycle minutes, it is not worth the risk. In small batches, that is obvious right away. In large batches, the mistake costs even more: you lose tools, size variation grows, and part scrap wipes out all the cycle-time savings.
How to decide before the first trial
The first test only makes sense after a quick check of the part and the path. A mistake in judging the allowance or rigidity often costs more than the trial itself.
First, measure the real allowance not in one spot, but across the whole machining area. On a hardened part, it often varies, and that changes the load more than the drawing suggests. If one area needs 0.2 mm removed and another already needs 0.6 mm, ceramic may pass the first area easily and fail on the second.
Then look at where the cutter will enter and leave broken surfaces. Slots, holes, chamfers, traces from the previous operation, and uneven edges create interrupted cutting. For ceramic, that is a bad scenario, especially if the part is not clamped very rigidly.
Before starting, a few simple actions are usually enough:
- shorten the tool overhang as much as the setup allows;
- remove unnecessary overhang from the part or fixture;
- choose a short test section instead of starting the full program right away;
- use a gentler entry if impact contact is expected;
- after the pass, check both the insert edge and the cut mark immediately.
The cut mark often tells you more than the cutting data table. If the surface has shiny patches, you hear ringing, and a small chip appears on the insert corner, continuing is risky. If the edge is clean, wear is even, and the mark has no tear-out or streaks, you can expand the setup gradually.
A short test on one section quickly answers three questions: can ceramic handle your amount of material removal, does the blank withstand impact load, and are there dangerous zones with interrupted contact along the toolpath?
How the amount of material removed changes the calculation
The allowance changes the whole calculation. When only a very small amount needs to be removed after hardening, ceramic often works better than expected. A thin layer comes off quickly, the edge rubs less against the hard surface, and the size stays more consistent.
If a lot of metal has to come off at once, the picture changes sharply. Heat rises, cutting force increases, and the edge takes a harder hit. On paper, such a pass looks efficient, but in practice the insert can chip before it delivers the needed result.
Looking only at depth of cut is not enough. Width of contact matters just as much, and sometimes more. A pass at 0.2 mm across a large width can load the tool more heavily than a deeper but narrower pass. That is why with this type of machining, you evaluate the whole contact area, not just one number in the setup sheet.
A common mistake is trying to save time with one heavy pass. On a hardened surface, that choice often becomes more expensive. Two calmer passes usually give a more even load, heat the edge less, and reduce the risk of sudden chipping.
A simple example: after heat treatment, a part still has about 0.3 mm of allowance, but the surface hardness varies because heating was uneven. On the softer area, the cutter runs smoothly; on the harder area, the load spikes suddenly. If you plan one pass for the whole allowance, the tool gets hit with a load jump at the worst possible moment.
Before starting, it helps to check three things: how much metal really needs to come off, what contact width the toolpath will create, and whether the part has areas of different hardness. If there is any doubt in even one of these points, it is better to start with a lighter setup and inspect wear after the first parts.
What determines workpiece stability
When machining with ceramic, the workpiece must be clamped rigidly. If the setup moves even slightly, the cutting edge takes a hit every time it enters the metal. For carbide, that is unpleasant. For ceramic, one such hit is often enough to start chipping.
A visual check is almost useless. The clamp may look fine until the tool applies a real side load. That is why, before the first trial, it is better to make a short pass with the same feed, overhang, and depth planned for production, and look not only at the sound but also at the cut mark.
If the part rings even at idle, do not use ceramic. That sound rarely disappears on its own. It usually turns into chatter, surface marks, and an edge that crumbles too early.
First of all, look at clamping rigidity under load, tool and fixture overhang, adapters and spacers, and the rigidity of the setup in different directions. The system may hold well along one axis and move noticeably along another.
This is especially clear when machining a thin wall, a flange, or a long plate. From the outside everything may look calm, but under side load the part shifts by fractions of a millimeter. For ceramic, that is enough.
There is another trap: the clamp itself can distort the part. For example, the jaws hold firmly but slightly squeeze a thin-walled ring into an oval. When the spindle is stopped, that may not be visible. During cutting, the shape starts to “breathe,” the contact changes, and the tool receives an unstable load. In that case, do not lower the speed and hope for the best. Rework the setup.
In the shop, these problems are often solved more simply than people think: remove an unnecessary adapter, shorten the overhang, change the support point, or add support in the weak direction. One such correction often helps more than a long search for cutting data.
Where interrupted contact breaks the edge
The hardest case for ceramic is not hardness itself, but constant impacts on the cutting edge. They appear where the cutter passes through a slot, hole, casting cavity, or sudden step. Every new entry into the metal creates a short but hard shock.
With milling a hardened surface using ceramic, this is especially obvious. Ceramic handles heat well, but impact poorly. If contact breaks often, the edge first gets a small chip, then it quickly grows into edge breakage. Sometimes the tool looks fine after the first pass, but by the second it starts to crumble along the whole insert length.
The machine usually shows that the setup is wrong. The sound becomes sharp, with a dry crackle, and the mark on the part loses its smoothness. In the first seconds of a test pass, you should watch not only the chips but also the machining path itself.
Interrupted cutting usually shows four warning signs:
- a ringing, uneven sound instead of a steady hiss;
- shiny points and scratches on the toolpath;
- small chips on the same part of the edge;
- a rapid increase in vibration after each entry.
If contact breaks happen often, carbide often behaves more calmly. It does not like heat at very high speed as much, but it handles impact entries better. That is why on parts with windows, keyways, or many crossings, it is not always worth chasing ceramic.
The more sudden entries into the metal, the higher the risk of chipping. On a continuous smooth surface, ceramic can work very confidently. On a broken contour, the price of a mistake is usually too high.
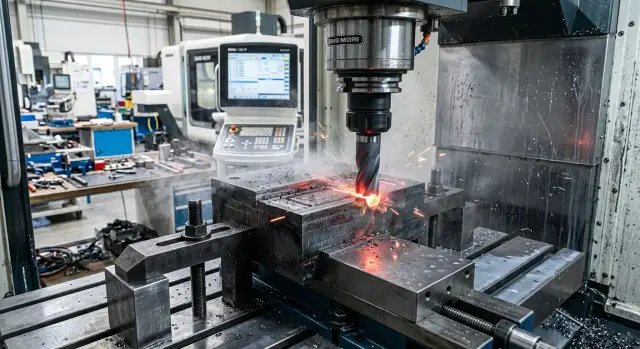
A simple shop-floor example
After heat treatment, a thin hardened layer remained on the end of a shaft. It needs to be removed before the next operation: take off the hard skin and true the face. The shaft is clamped rigidly, the overhang is short, and the support is solid. The cutter contact is almost continuous, without deep interruptions.
In this setup, ceramic is often justified. It likes high speed and a calm cut. If you do not try to remove too much in one pass, cycle time usually drops. Where a carbide insert moves cautiously and slowly, ceramic lets you pass the section faster.
But the same part can easily change the picture. Suppose there is a keyway slot on the face, and the clamping is weaker than needed. Then the cut is no longer smooth: the cutter enters the metal, leaves it, and hits the edge again. For ceramic, that kind of interrupted cutting is dangerous. Chipping can appear in seconds, even if the part hardness is the same.
A machinist usually looks at three things: how much material is removed per pass, whether the clamping holds the part without chatter or micro-shift, and whether the path includes slots, holes, or other breaks in contact.
If the allowance is small, the blank is clamped rigidly, and the surface is almost continuous, ceramic gives a fast and clean result. If the face crosses a slot and the part moves slightly in the clamp, the risk rises sharply. In that case, it is better to reduce the cut, change the clamping, or choose another tool.
The hardness of the layer matters, but by itself it decides nothing. The final result always comes from the entire cutting setup.
Mistakes that get expensive
The most expensive mistake is trusting the catalog more than the real cut. Table values only work when the part geometry is similar, the clamping is rigid, and the contact is predictable. If the work includes exits from the cut, windows, steps, or a thin wall, ceramic can chip in the first seconds even when the speed and feed look correct.
The second common mistake is trying to remove too much in one pass. On paper, it saves time; in the shop, it often causes an edge impact, a temperature spike, and then surface scrap. When machining hardened steel with ceramic, excess greed almost always costs more than one extra pass.
Many people look for the problem in the insert and ignore the machine mechanics. Holder runout, play, a worn spindle, weak part clamping — all of these quickly destroy even a good ceramic grade. If the blank “breathes” under load even a little, interrupted cutting turns into a lottery.
Another expensive habit is keeping the insert in service until obvious scrap appears. Ceramic rarely gives a soft warning. First a small chip appears, then cutting forces rise, and then the edge crumbles and ruins the part in one pass.
It is better to stop the process if the cutting sound becomes sharp and broken, spots or streaks appear on the surface, the size starts drifting, or micro-chipping is visible on the edge after a short run.
And do not blame the ceramic grade right away. Very often the cause is the part clamping, tool overhang, or the way the cutter enters the material. First check the rigidity of the whole system, and only then argue about the insert.
Quick check before startup
Ceramic does not like rushing. Before the first pass, it is better to spend 10 minutes on checks than lose the insert after one impact. This is especially true for parts with uneven allowance or traces of previous machining.
Before starting, a short checklist is enough:
- measure the allowance in several places;
- make a short test cut at a shallow depth;
- check the toolpath in advance for hidden slots, holes, and sharp exits from the material;
- keep tool overhang to a minimum;
- have a backup plan if the test goes badly right away.
After the test pass, look not only at the tool, but also at the part. If the edge has small chips and the surface has started to ripple, the cause is almost always a combination of three factors: uneven allowance, weak workpiece stability, and impacts at entry or exit.
Do not try to force the process if you already hear a hard ringing sound during the test. One careful trial pass does more good than a long calculation on paper.
A simple rule is this: even allowance, rigid clamping, and a clean toolpath give ceramic a chance to work calmly. If even one point does not fit, you need a backup plan before startup.
What to do next
Do not run the first test directly on an expensive part. It is better to choose a safe section where a possible chip will not ruin the whole order, and make a short pass with the same hardness and allowance you plan to use later.
For this check, do not change everything at once. Keep one clear setup and watch how the insert behaves at entry, in the middle of the pass, and at exit.
After the first pass, it helps to record four things: how quickly the edge wore, whether the sound was smooth or became impact-like, what happened to the surface, and whether small chips appeared in areas of interrupted cutting. These notes are often more useful than a general catalog recommendation.
Then compare the result with carbide. Look not only at speed, but at the full calculation: how long the pass took, how much scrap risk costs, how often the insert will need replacing, and how stable the machine is at holding the setup.
Sometimes ceramic wins on time over a small area. But if the blank is only moderately clamped and the contact is interrupted, carbide often gives a calmer and more predictable result.
If the question is no longer about the insert but about equipment rigidity and process repeatability, it is worth discussing it with the EAST CNC team. The company supplies CNC machines for metalworking and helps with selection, commissioning, and service, so it is better to have that conversation before starting a series, not after the first chips.
A good first test takes little time, but quickly shows the main thing: whether this method has enough reserve for your job or whether it is better to take another route right away.
FAQ
Can hardened surfaces be milled with ceramic at all?
Yes, it can, if the process is already stable. Ceramic works best with a small, well-defined allowance, rigid clamping, and an almost continuous cut. If the part vibrates, the allowance varies, or the cutter often enters slots and holes, the chipping risk rises too quickly.
What allowance is best for ceramic?
Ceramic usually performs best in finishing or near-finishing operations. In practice, that means a small allowance that does not change much from part to part. When the hardened layer is thick, the load rises sharply and the cutting edge wears out much faster.
When is it better to choose another method right away?
Do not choose ceramic if the part flexes, the machine feeds in jerks, or the toolpath is frequently interrupted. It is also a poor choice when a large amount of metal remains after heat treatment. In that case, CBN, grinding, or a more forgiving carbide tool is usually safer.
Why does interrupted cutting damage the edge so quickly?
Because ceramic does not handle impact well. On a smooth surface it tolerates heat easily, but every time it re-enters the metal it takes a hit, and a small chip can quickly turn into edge breakage. The more often the cutter crosses windows, slots, and steps, the lower the chance of a stable run.
How can you tell whether the problem is the part and clamping, not the insert?
Watch not only the clamping itself, but also how the part behaves under load. If you hear ringing, see ripples on the surface, or notice chips on the same part of the insert, the problem is often in the workholding, tool overhang, or play in the system. If the insert fails almost immediately, do not rush to blame the grade. First check the mechanics of the whole setup.
Is it worth removing the whole allowance in one pass?
Usually not. One heavy pass on a hardened surface often looks efficient only on paper. Two calmer passes usually create a more even load, reduce edge shock, and lower the risk of sudden scrap.
How do you make the first test with less risk?
First measure the allowance in several places and choose a short safe section. Then make a test pass with minimum tool overhang and without risking an expensive part. Do not run the full program right away. A short test shows much faster whether the process can handle the real load.
What should you check after a test pass?
After the pass, look at the cut mark, the sound, and the cutting edge itself. A smooth surface without tear-out and clean wear mean the setup can be developed further. If you hear a dry ringing sound, see spots, stripes, or small chips on the insert corner, it is better to stop and rebuild the setup.
What should you use instead of ceramic on a difficult part?
On a difficult part, carbide often behaves more calmly because it handles shock loads better. If you need to work on a very hard surface without milling, CBN or grinding often helps. The choice depends on more than hardness alone. First assess the allowance, rigidity, and toolpath shape.
When does ceramic really save time and money?
Ceramic pays off where the operation repeats day after day and the conditions stay almost the same. Even a small time saving on one part becomes noticeable in a series. If the insert breaks before you gain time on the cycle, the method no longer pays for itself.