Milling Cutters for a Weak Spindle: Large Tooth Pitch or Tight Tooth Spacing
We break down how to choose milling cutters for a weak spindle: compare cutting sound, load, chip evacuation, and tool life in real use.
Why a weak spindle quickly runs into the cutter
The problem usually starts the moment the cutter enters the metal. The spindle has not yet stabilized the cut, and the tool already gets a sharp jump in resistance. If the pass is deep or the width of engagement is too large, the motor sags almost immediately, even when the rated power seems sufficient on paper.
A weak spindle is especially sensitive to how many teeth are cutting at the same time. The more teeth there are, the smoother the cut can be, but the higher the total resistance becomes in one rotation. On a light machine, you hear it quickly: the speed drops, the sound gets heavier, and the chips come out unevenly.
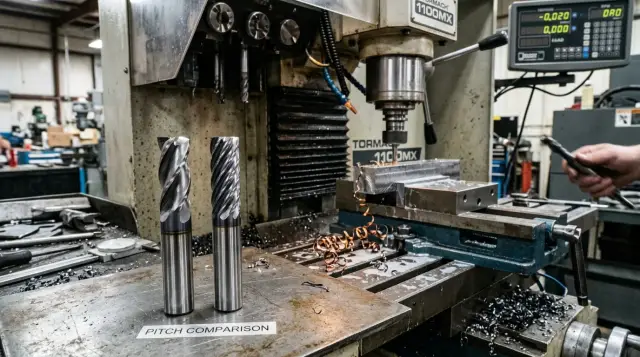
That is why you should not choose a cutter by diameter and material alone. Two cutters of the same size can behave completely differently. One has larger teeth and more open space between them. Another has tighter spacing, more teeth, and the load is distributed differently. A catalog shows the geometry, but it does not show how your machine will handle a real entry into steel, aluminum, or stainless steel.
Usually the machine does not give up right away. First the speed drops. Then the operator reduces the feed to get rid of chatter and squeal. After that, the part surface suffers: stripes appear, matte patches show up, or a fine ripple forms on the wall or the bottom of the pocket. The first warning is more often heard than seen.
So when the tool enters the cut, it helps to watch not the table, but the process itself. Has the sound changed? Is the spindle holding speed without a heavy hum? Is the chip coming out short and predictable, not torn and blue? These signs show the real load more accurately than a catalog description.
Choosing by catalog often goes wrong for a simple reason: the catalog gives the tool’s general capabilities, not its behavior on your specific machine. It does not know the rigidity of your axis, the real power at the required speed, the condition of the bearings, or even how confidently the machine holds feed on short moves. That is why the same cutter runs calmly on a heavy machining center but starts to make noise and pull the spindle down on a compact machine.
If the spindle is weak, the choice starts not with promised productivity, but with how gently the cutter enters the cut and how long the machine can keep the mode without hum, overheating, or vibration.
What a large tooth pitch gives you
For a weak spindle, a large tooth pitch often gives the biggest benefit in roughing. There is more space between the teeth, so not every edge engages the material at once. The spindle has an easier time holding speed, especially when you need to remove extra metal quickly.
There is another reason too. This kind of cutter has more room for chips. The chips leave the cutting zone faster, are less likely to get crushed, and are less likely to get caught by the edge again. That is especially useful for a weak drive: the machine spends its force on the actual cut, not on extra friction and heat.
In practice, it usually looks like this: the motor holds speed more steadily, the chips leave a slot or pocket more easily, and the cutter rubs less if the material produces long chips. On rough stock removal, the difference can be very noticeable.
But this choice has a cost. If the depth of cut is small and the pass is almost a finishing pass, the surface often comes out rougher. The reason is simple: there are fewer teeth, so the mark from each tooth is more visible. The part is left with stronger lines, especially if the machine itself is not very rigid.
There is another common mistake too. Large tooth spacing does not forgive an excessive feed per tooth. If you keep the same feed per minute after switching from a tighter pitch, each tooth will take a larger chip load. Then the weak spindle will start to sag again, and the whole point of the tool is lost.
In a small workshop, this shows up right away. You put a rare-tooth cutter on a machine that struggles with roughing, and the cut becomes calmer while the chips stop packing the flutes. But on a shallow finishing pass, that same cutter is no longer impressive: the surface needs another pass with a finer tool.
That is why a large tooth pitch is usually chosen for confident stock removal, not for a pretty finish on the first try. If the spindle drops quickly under load, this option usually works better than tight spacing.
When tight tooth spacing helps, and when it gets in the way
Tight tooth spacing can work better than it seems, but only within its own task range. On a weak spindle, it gives a smoother run if the cut is shallow, the feed is moderate, and the full cutter width is not engaged.
The reason is simple: more teeth share the work, and each one removes less metal per pass. The shock to the spindle is smaller. The sound is usually more even, without sharp clicks, and the surface is often cleaner.
When it helps
This kind of tool performs well on finishing and semi-finishing passes, with a small depth and a narrow contact path. If you machine a flat surface with a light side cut, tight spacing often leaves a calmer trace. There is less ripple, the sound is steadier, and the motor does not jerk on every tooth.
This is one of the few cases where a fine pitch really helps a weak spindle. But only as long as the cut stays light.
When it gets in the way
Problems start where chips need to be cleared out of the cutting zone quickly. With a tightly spaced cutter, the gap between teeth is smaller, so chips pack into a narrow slot much faster. At first the sound becomes dull, then friction rises, and the tool starts rubbing instead of cutting properly.
On a wide engagement, the weak motor gets tired even faster. More teeth are cutting at once, the average load rises, and the spindle loses speed. Usually you notice it not from numbers, but from how the machine behaves: the sound gets heavier, the chips darken, and a smeared mark appears on the slot wall.
This is especially obvious with ductile materials that do not break chips easily. In those cases, tight spacing may give a nice surface for only the first few seconds, and then the flute spaces fill up fast. After that, the cutter wears out much faster than expected.
In short, tight spacing likes a light and careful cut. For shallow machining, it is often more convenient. For full slotting, wide engagement, and narrow grooves on a weak spindle, it is safer to lean toward a more open tooth pitch.
How to read sound, chips, and the mark on the part
The first signs of good or bad cutting appear almost immediately. On a weak spindle, your ears are often more useful than the catalog. If the sound is even and soft, the cutter is usually working calmly. If a sharp squeal replaces the soft hiss, the tool is no longer cutting properly; it is rubbing, heating up, and pulling the spindle down.
You hear a drop in speed before you see it. The operator has not even looked at the panel yet, but the sound has already become lower and heavier. That is a common sign that the tooth is taking too much, especially if a large-pitch cutter is running at too high a feed or depth.
A dull knock should not be ignored either. It usually does not mean heavy cutting, but overload on a single tooth. On a weak spindle, that quickly turns into vibration and then chipping on the edge. If the sound comes in waves, the system is already oscillating, and a clean surface is not likely.
It is just as useful to look at the chips. Bright or even chips usually mean the mode is close to normal. Dark, blue, or burnt chips suggest excess heat. The cause is usually one of two things: the spindle is not holding the cut, or the cutter is sitting too tightly in the material and cannot clear the chips in time.
The mark on the part only confirms what you already heard. Small, even marks are often acceptable. Waves and ripple show vibration. Matte patches appear when the cutter is rubbing more than cutting. Separate deep lines usually point to impact cutting on one tooth.
It helps to make a short test pass at a safe depth and compare two cutters on the same blank with a similar feed. The one that cuts with a steady hiss, makes cooler chips, and leaves no waves is almost always the better choice, even if another tool looks more productive on paper.
The catalog shows the tool shape. Sound, chips, and the mark on the part show how that shape behaves in your shop.
How the material and the cutting mode change the choice
The same cutter behaves differently on aluminum, stainless steel, and ordinary steel. On a weak spindle, you see this right away: the sound changes, heat rises, and the power reserve disappears faster than the catalog would suggest.
Aluminum likes a free chip exit. If you use a tightly spaced cutter and give it a normal depth, the flutes fill up quickly, the chips start recirculating near the edge, and the spindle begins to sound dull and heavy. For aluminum, a larger tooth pitch often wins: fewer teeth are engaged at once, chip evacuation is easier, and the sound is calmer.
Stainless steel brings another problem. It does not forgive rubbing without a proper chip load. When the feed is too low and there are many teeth, each tooth removes too little and rubs more than it cuts. At first you hear a thin squeal, then temperature rises, and the edge dulls too soon. In that situation, tight spacing often does more harm than good, even if it looks gentler for the machine on paper.
With ordinary steel, you also need to look at the width of engagement, not just the material. If the pass is narrow and the cutter only engages part of its diameter from the side, a fine pitch can work smoothly and cleanly. But in a full slot or a wide pocketing cut, the picture changes: too many teeth engage at once, and the spindle load rises quickly.
The depth of cut also changes the choice more than many people expect. The deeper the cut, the more careful you should be with a cutter whose teeth are packed closely. A weak spindle usually handles a smaller depth and a stable feed better than a deep cut with a quiet feed, where the teeth are no longer cutting and are basically rubbing the metal.
In simple terms, the picture looks like this. For aluminum, people usually choose a more open tooth spacing and make sure chips can escape freely. For stainless steel, they keep the feed high enough for the tooth to cut rather than rub. For steel, they first look at the width of engagement and only then at the tooth count. And if the feed had to be reduced a lot, extra teeth usually only add friction.
If you choose a cutter without considering the material and the mode, it is very easy to make a mistake. The same tool can run calmly on aluminum and then choke the machine on stainless steel.
How to choose a cutter step by step
The catalog rarely tells you how a cutter will behave on a machine with only a small power reserve. In that situation, it is better not to start from a nice description, but from a simple check: how much load the machine can handle without humming, losing speed, or leaving a torn mark on the part.
First, assess the machine honestly. If the spindle struggles with a sharp entry into the metal, and the frame or part clamping gives even a small vibration, too tight spacing will often only add resistance. In that case, it makes more sense to look at a more open tooth pitch, so fewer edges engage at once.
Then set the real cutting mode, not the rated one. What matters is not only the cutter diameter, but also the actual width and depth of cut. The same cutter behaves very differently at 2 mm and 8 mm of side stock removal. On a weak spindle, the mistake most often starts right there: the tool is chosen for a light material, but the width of cut is left too large.
A simple approach is handy:
- Choose the diameter for the job, not with extra reserve.
- Estimate how many teeth will be in the metal at the same time.
- If there are many teeth, first look at a cutter with a larger tooth pitch.
- Make a short test pass over a small length.
- Evaluate the sound, chips, and mark, then adjust the mode.
A test pass tells you more than a table. A steady low sound without vibration usually means the load is close to normal. Ringing, squealing, or a wavering tone means the cutter is either overloading the spindle or rubbing instead of cutting. If the chips are tiny, dusty, and darkening, the feed is often too low for the chosen geometry.
After the test, do not change just one parameter at random. If the spindle is struggling, first reduce the depth of cut a little, then adjust the feed. If you only reduce the feed, the tooth starts rubbing, the sound gets worse, and heat rises. For a small workshop, the safest path is this: a short test, one adjustment, and another short test.
A real example from a small workshop
A small workshop machines a steel plate after cutting. The edge is not ideal: there is scale in some places, and the allowance varies in others. The machine works, but the spindle does not like a sudden rise in load. On this kind of job, the difference between tight spacing and a large tooth pitch shows up almost immediately.
At first they install a fine-pitch cutter because it looks universal in the catalog. For the first few seconds everything is fine, then the sound becomes hard and high. The edge of the part heats up, the chips come out small, and the spindle starts to work under strain. The operator reduces the feed a lot, but the process still does not become calmer.
The reason is simple: several teeth are entering the metal at the same time. For a weak spindle, that is extra load. It does not go into fault, but it cuts unevenly and the tool wears out faster.
On the same machine, they switch to a cutter with a larger tooth pitch. The speed stays about the same, and the feed is reduced only slightly to avoid a shock at entry. The cut sounds lower and steadier. Chips come out more freely, and the pass is calmer, even if the allowance on the plate varies a bit.
Usually the difference is obvious right away: less noise, the spindle holds speed more steadily, the edge after roughing looks cleaner, and the cutter heats up more slowly.
That does not mean tight spacing is always bad. It often gets in the way specifically in roughing, when the machine is weak and the material left after cutting enters unevenly. But on a finishing pass, that kind of cutter can leave a more even trace if you remove a small layer and do not force the feed.
So in a small workshop, a simple approach works well: remove the main allowance with a cutter that has a more open pitch, then switch to another tool for the finishing pass. That way the machine runs more calmly, and the tool lasts longer.
Mistakes when choosing from the catalog
A catalog can easily lead you in the wrong direction. The page shows diameter, length, coating, and edge shape, but it hardly shows how the cutter will behave on a weak spindle under real load. As a result, people choose a tool that looks good on paper but cuts hard in the machine.
The first common mistake is to look only at diameter and forget about tooth pitch. Two cutters of the same diameter load the spindle very differently. If one has a larger pitch, it usually cuts more calmly at the same stickout and depth. If the other has tighter spacing, a weak machine is more likely to start humming and lose ease of motion, especially when chip evacuation is poor.
The second mistake is choosing more teeth just because it seems like a cleaner solution. Yes, more teeth can sometimes give a beautiful surface. But on a low-power spindle, that often turns into extra load. The tool cannot clear chips fast enough, friction rises, the sound gets harsher, and the final surface often gets worse anyway.
Another trap is trying to fix overload by reducing speed only. That does not always help. If you keep the same width of engagement, the same holder stickout, and the same feed per tooth, the problem does not go away. The spindle just starts cutting less confidently, and the cutter may move into rubbing.
There are also more practical things that are easy to forget. The catalog does not show your actual holder overhang, but the machine feels it immediately. The longer the overhang, the easier it is to get vibration and extra load. The same goes for width of engagement: a narrow pass and an almost full slot are completely different conditions, even for the same cutter.
The last mistake is drawing conclusions from one test pass, especially on a different material. If the cutter ran quietly on aluminum, that says almost nothing about how it will work on steel. If one pass was successful at a shallow depth, that does not mean the mode is suitable for production. It is better to compare at least two close variants on the same material, with the same stickout and a clear feed.
A quick check before starting
Five minutes before the first pass often save the cutter, the spindle, and the part itself. If you are choosing a tool for a weak spindle, look not only at tooth pitch, but also at how it will behave on your machine.
First check the speed. If the diameter is already chosen, the machine should provide a speed at which the edge cuts the metal instead of rubbing it. On a weak spindle, a large diameter quickly eats up the speed reserve. Then even a good cutter starts to sound dull, and the surface loses its shine.
Then think about where the chips will go. This is especially important in slotting: if the flutes are narrow and the chips have nowhere to escape, they will return under the cutting edge. In sound, that often feels like a scratchy noise with jerks. For a full slot, a larger pitch is usually safer because there is more space between the teeth.
Next, look at the overhang. A tool that is too long shakes the system even in a gentle mode. On a weak spindle, you hear it right away: the cut does not go smoothly, but trembles, as if the sound is floating. If you can shorten the overhang by even 10–15 mm, it is better to do that before the test pass.
The test cut should be short and calm. You need some sound reserve. If the cutter is already on the edge in the first seconds, there is nowhere to increase the feed. A normal sound is even, without ringing or sharp drops. A bad sign is when the machine seems to pull and then release.
After a short pass, stop and check the edge. It should not heat up quickly. If the tool is hot almost immediately, the edge is rubbing more than cutting. On a weak spindle, this often happens with tight spacing, when there are many teeth but not enough speed or rigidity.
If several points raise doubt, do not start a long program. First change the diameter, shorten the overhang, or try a different tooth pitch. That short test is almost always more accurate than the catalog.
What to do next
If you are choosing milling cutters for a weak spindle, stop trusting a single line in the catalog. It is much more useful to gather your typical jobs into a short table and use it for every purchase. It is enough to record the part material, cutter diameter, tooth count, overhang, speed, feed, depth of cut, and a short note about sound, chips, and the mark on the part. After a few runs, that table will work better than any general advice.
It makes sense to keep one cutter for stock removal and another for finishing. On a weak spindle, one universal cutter often does both jobs only so-so. For roughing, you usually need a tool that cuts more gently and does not choke the spindle. For finishing, you want a calm cut and a smooth trace, even if the stock removal is very small.
Do not look only at the surface after the pass. The first seconds of a new cut tell you more. If the sound immediately turns sharp, with a howl or vibration, then the mode or the cutter does not fit the real load. A good cut can be heard almost at once: the sound is even, there are no drops, the chips come out predictably, and the machine does not sag.
If, after such tests, it becomes clear that the limit is no longer the cutter geometry but the machine itself, it is better to solve the problem more broadly. At EAST CNC, you can discuss selecting a machining center for your material, part type, and real operating modes. The company is the official representative of Taizhou Eastern CNC Technology Co., Ltd. in Kazakhstan and handles not only supply, but also commissioning and service.
It also helps to read practical breakdowns of equipment and machining. The east-cnc.kz blog brings together industry news, reviews, and metalworking tips. It is a good next step if you want to remove guesswork and rely on real operating modes instead of catalog promises.
FAQ
What is usually better for a weak spindle: large tooth pitch or tight tooth spacing?
For roughing on a weak spindle, a cutter with a larger tooth pitch usually works better. It enters the cut more gently, clears chips more easily, and is less likely to pull the spindle down. Tight tooth spacing is more suitable for light passes, when the depth is small, the contact is narrow, and you want a smoother finish.
Why does the spindle often slow down right at the moment of entry?
The problem usually starts at the moment the cutter enters the metal. The tool sees a sharp rise in resistance before the spindle has time to settle into a stable cut. If the depth or width of engagement is too high, the motor drops speed right away, even when the rated power looks fine on paper.
When is tight tooth spacing really useful?
Tight tooth spacing helps with finishing and semi-finishing passes. When the stock removal is small and the cutter is not fully engaged, a higher tooth count often gives a smoother sound and a cleaner surface. But this kind of tool likes a light cut. In a slot, with a wide engagement, or in sticky chip conditions, it quickly starts to work against you.
How can you tell from the sound that the cutter is not a good match?
Listen to how the tone changes. A steady, soft sound usually means the cut is going smoothly, while a sharp squeal, a dull knock, or a wavering tone points to overload, rubbing, or vibration. If the sound becomes lower and heavier within the first seconds, the spindle is taking too much load.
What can chips tell you about the cutting mode and the cutter choice?
Normal chips come out predictably and do not look burnt. Dark, blue, torn, or very fine chips often point to overheating, rubbing, or poor chip evacuation. For a weak spindle, that is an early sign that you need to look at tooth pitch, depth, and feed.
Why doesn’t simply reducing the feed always help?
Because if the feed is too low, the tooth stops cutting properly and starts rubbing the metal instead. Noise increases, the edge heats up, and the surface often gets worse. If the spindle is struggling, it is usually smarter to reduce the depth of cut a little first, rather than choke the feed down to almost nothing.
How does the workpiece material change the cutter choice?
For aluminum, people usually choose a more open tooth spacing so the chips can escape more easily. For stainless steel, it is important not to lower the feed too much, or the tooth will rub more than it cuts. With ordinary steel, the width of engagement matters too. A narrow side cut can work well with a fine pitch, while a full slot can overload the spindle very quickly.
Can you choose a cutter by catalog alone?
No, the catalog alone is not enough. It shows the tool geometry, but it does not know your machine’s rigidity, the real power at the required speed, the holder overhang, or the condition of the spindle. That is why two cutters of the same diameter can look similar on paper and behave completely differently in use.
How can you quickly test a cutter before a long program?
Make a short test cut at a safe depth and do not change every parameter at once. Watch three things: sound, chips, and the mark on the part. If the cutter hums, heats up, and leaves ripples from the first seconds, do not start the long program. First shorten the overhang, reduce the depth, or try a different tooth pitch.
Do you need separate cutters for roughing and finishing?
Yes, on a weak spindle that is often the calmest option. For roughing, people usually choose a cutter with a larger tooth pitch, while finishing calls for a tool that leaves a smoother trace. If the machine still loses speed and vibrates after that, the limit may be the equipment itself. At EAST CNC, you can discuss the selection of a machining center, commissioning, and service for your materials and tasks.