Measuring Surface Roughness on the Shop Floor Without Disputes with QC
Measuring surface roughness on the shop floor: how to choose the measurement point, sampling length and record batch results without unnecessary disputes with QC.
Why disputes occur at inspection
A dispute at inspection usually doesn’t start because of the part itself but because of different measurement conditions. The part is the same, yet the numbers differ. For the shop floor it looks like nitpicking; for QC it looks like nonconformity. In practice both sides often measure by different rules.
The same surface can easily give different values at different spots. On a turned cylinder one area can be smoother, another rougher because of tool entry, insert wear, or marks from stopping the feed. If the operator checked the middle of the section and the inspector measured nearer the end face, the measurements are no longer the same.
Confusion also starts with the choice of point. The operator remembers: "we measure here", while QC understands it differently. In the end both look at the same part but not the same area. Sometimes a difference of a few millimeters changes the result more than it seems.
Another common cause is old instrument settings. A profilometer may still have parameters from the previous check: a different sampling length or evaluation length. Someone picks up the device, sees a familiar screen, and assumes everything is fine. Later it turns out the measurement was taken in the wrong mode.
Data storage makes things worse. Some results are in a notebook at the machine, some in an Excel file with the supervisor, some remain in the instrument memory. When a question about a batch arises, no one can quickly show a single clear record. Searches, cross-checks and arguments begin over which result should be considered correct.
A typical picture looks like this: the operator recorded Ra 1.4, QC recorded Ra 1.9. Same part, similar instrument, different conclusions. Usually it’s not that someone is "wrong" — it’s that the shop didn’t fix in advance the measurement location, the instrument settings and the way to record batch results.
What to agree before the first measurement
The dispute usually starts not with the instrument but with different readings of the drawing. One person looks at Ra, another by habit writes Rz, and QC then compares different parameters. Before the probe touches the surface fix what you are controlling on this surface: Ra, Rz, Rp or another parameter specified on the drawing.
It’s best to copy the requirement without paraphrasing. If the drawing says "Ra 1.6", the route card, control card and journal should show the same entry. Formulations like "finish 1.6" or homemade abbreviations only confuse. At some point the discussion shifts from the real result to a dispute about words.
Also specify the operation. One shift may measure the surface after roughing while QC checks after finishing. So next to the requirement indicate after which operation the control is allowed. For a turned part this can be a simple entry: "op. 030, finishing turning." (use the same operation code the shop uses).
It’s useful to collect everything into a short sheet once: which parameter is controlled, what tolerance applies, which surface is checked, after which operation the measurement is allowed, where the point is on the sketch and how the result is logged. Such a sheet saves more time than it seems.
A sketch simplifies work greatly. Even a simple outline of the part with a mark "point A" is better than an explanation by the machine. If the zone is wide, mark not only the place but the measurement direction. On a cylinder this is especially useful because results along the axis and across it can differ.
Agree on the journal format in advance too. Some record only the average of three passes, others require each pass separately. Both work if everyone does the same. For a new batch or a complex surface it’s calmer to record each pass and the average. More entries but fewer later questions.
If the drawing states "Ra 0.8" for the mating diameter after operation 030, then documents should read exactly that: "Ra 0.8, diameter D40, op. 030, point A on sketch, 3 passes, record each pass and the average." After such fixation there is usually nothing left to argue about.
How to choose the measurement point
Do not pick the point by convenience. Choose it where the surface actually functions in the assembly. If the operator measures on a free area and QC checks near the contact zone, numbers will easily differ even on a good part.
First find the working area of the surface. On a shaft this may be the bearing journal or the place for a seal. On a bushing — the inner surface that contacts a mating part. Do not take a random nearby area even if it’s easier to place the probe.
Exclude some zones right away. Don’t put the probe on a chamfer, radius, groove or the very edge. There the instrument reads not only the machining marks but the part geometry. Then the dispute is already about a wrong point choice, not surface quality.
A simple rule with a consistent offset from the edge works well. If you agreed: "measure 5 mm from the end face", do that across the whole batch. Not 3 mm on one part and 8 mm on another. Otherwise you compare different areas.
For shafts add a reference for which generatrix the control follows. If the surface is circular, indicate an angular position or at least the side relative to a reference mark. This removes disputes when one side is slightly cleaner due to tool setup or insert wear.
On a long part don’t leave point selection to the eye. Set the scheme once and apply it to the entire batch. Usually a short note in the route sheet or control card is enough: one point 20 mm from the left end, a second in the middle, a third 20 mm from the right end. Also indicate the measurement direction: along or across the machining marks.
For turning this is especially convenient on long shafts. Today one operator measures, tomorrow another, later QC checks the part. If the scheme of points is recorded, everyone gets comparable results and the discussion focuses on numbers, not impressions.
How to choose the sampling length
Do not pick the sampling length just because "that’s what the instrument shows." Choose it according to the drawing and the process. The instrument memory is convenient but it doesn’t know whether you measure a journal, an end face or a mating surface from another operation. If the setting does not match the documents, a dispute with QC is almost inevitable.
The idea is simple. The sampling length defines the section over which the instrument evaluates surface irregularities. If it’s too short the instrument can overemphasize individual peaks. If it’s too long it will mix roughness with waviness. This occurs constantly on turned parts.
What not to confuse
Sampling length and overall evaluation length are different things. Sampling length refers to a single measurement segment. Overall evaluation length is several such segments in a row over which the instrument outputs a final value.
Because of this confusion journals often record only one number. Later the operator is sure they measured "0.8" while QC opens the instrument report and sees the final value calculated over a different evaluation length. To avoid this, record both values.
Do not change the setup mid-batch for one part and another. Otherwise the first half of the batch will be checked under one set of conditions and the second half under another. Comparing such results is pointless even if the same instrument was used.
If the instrument offers an auto mode, don’t leave selection to the device for every new part. Choose the mode together with QC on the first agreed part and fix it. After that the whole batch uses the same setting.
In the control card the entry should be short and clear to any employee. Usually it’s enough to indicate the parameter, sampling length, overall evaluation length and whether auto mode is used or a fixed value. For example: "Ra, sampling length 0.8 mm, overall evaluation length 4.0 mm, do not change auto mode." One such line removes many inspection questions.
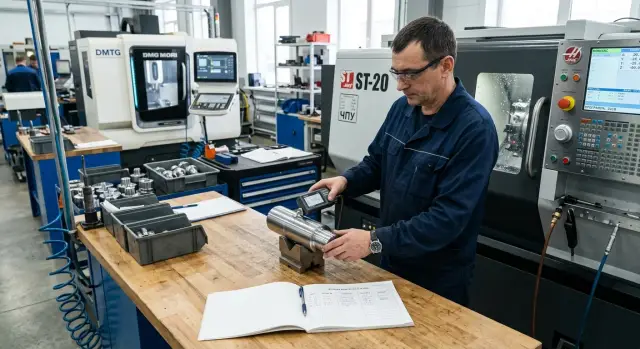
Measurement procedure on the shop floor
A single repeatable sequence of actions removes half the disputes with QC. When an operator measures differently every time, even a good instrument gives numbers nobody trusts.
First prepare the part. Remove oil, fine chips and dust from the control area. A clean wipe is usually enough. If an oil film or chips remain, the probe will pass over contamination rather than metal.
Then check the part temperature. Immediately after machining the metal is often still warm. Results can vary in that state, especially if the part was just taken off the machine. It’s easier to let it cool to the shop’s normal temperature than to argue about a few hundredths in Ra later.
One often-broken rule: place the probe across the machining marks. If you move it along the scratches, the instrument may show the surface as better than it really is. This is especially noticeable for turning.
A short repeatable routine suffices on the shop floor. First pick the agreed measurement point. Then place the part consistently, without tilt or vibration. Do the first pass and check for obvious interference. If a repeat pass is required for the batch, perform it following the same rule — not at a new point and not in a different direction.
A repeat pass is not to hunt for a prettier number but to verify the result. It can be done always or only when the value approaches the upper tolerance limit. The important thing is that the rule works the same for all shifts.
Record the result in the journal immediately. Not in the instrument memory, not on a random scrap, not "later after setup." Write the batch number, the part, the measurement point, the result and the name of the person who measured. In practice this entry usually settles a dispute faster than re-measuring.
How to store batch results
Disputes with QC often start not because of the instrument but because of the records. If two days later nobody can understand which part was measured, where and with what settings, the result is almost useless. A batch journal should allow quick reconstruction of the entire measurement.
For each entry fix a minimum: batch number, part or drawing number, operation and shift. This is important when similar parts go through different process steps. The same dimension after roughing and after finishing gives different roughness results.
Store the instrument settings alongside the result. Don’t rely on the operator’s memory. For roughness measurement this usually includes the evaluation parameter, sampling length, number of samples and other settings that affect the outcome. If QC repeats the measurement in a different mode, a dispute is almost certain.
Describe the measurement point so another employee understands it without extra questions. A short description plus a simple sketch or photo with the spot marked works well. An entry like "at the end face" is too vague. Much clearer: "outer diameter, 12 mm from the right end, sector between the keyway and chamfer."
A single note of "OK" or "reject" is insufficient. Better record the actual value, drawing tolerance and, if needed, the number of repeat measurements. Then the supervisor immediately sees whether the part passed comfortably or sits on the limit.
If you use one template for entries, the journal reads quickly. Usually date and time of measurement, batch, part, operation, shift, actual result, tolerance, instrument settings and description of the point are enough. For disputed parts it’s useful to save a photo of the instrument screen or a printout. It takes a minute and saves hours later. This is especially helpful for the first part of a batch, borderline values and after setup changes.
If the journal is paper, don’t store photos only on the operator’s phone. Attach them to the batch number. If the journal is electronic, attach the file directly to the entry. Then any employee sees not only the final number but the whole measurement trail.
Example for a turned part
A batch of shafts after finishing turning arrives for inspection. The drawing lists Ra 1.6 for the bearing journal. If the operator measures the journal and the inspector measures the end face or a chamfer, a dispute is almost guaranteed. These zones are machined differently so the instrument shows different numbers even on the same part.
To avoid this the shop fixes one measurement point in advance. In this example check only the working journal specified in the drawing. Place the probe in the mid-zone of the journal, avoiding the chamfer, transition radius and the edge at the end face. Then everyone on the shop floor looks at the same point and results can be fairly compared.
Handle sampling length the same way. Set one configuration for the whole batch and don’t change it from part to part. If one person chooses one value and another chooses a different one, the numbers cannot be correlated. Therefore record the instrument program number, the parameter and the sampling length in the journal before starting batch control.
Borderline parts are better checked according to a pre-recorded rule. For example, if a result approaches the upper limit the inspector makes two more measurements on the same journal, each time rotating the shaft about one third of a turn. Then record all three values and calculate the average or median — as specified in the shop instruction. This rule should be in the folder beforehand, not created after a disputed part.
One batch journal noticeably reduces tension between the operator and QC. Usually it needs only a few lines: batch and part number, which journal was checked, instrument setting, one or three obtained values, the decision for the part and signature. When the batch is closed with such a journal, the discussion follows the record, not memory.
Common shop-floor mistakes
Most disputes start not because of the instrument but because of little habits. The number on the screen seems exact, but if the operator changes point, direction or settings, you can’t compare such measurements.
The first common mistake — running the probe along the machining marks. One person then gets one value, while QC measuring across the marks sees another. This is common for turning, milling and grinding. Agree the measurement direction in advance and don’t change it from part to part.
The second mistake is even simpler: picking the first convenient spot. Operators choose a flat area where it’s easy to place the instrument. The problem is the drawing or technical requirement often refers to a specific surface: a seating area, a mating diameter or the zone after finishing. If the point isn’t tied to the sketch, a dispute is almost inevitable.
The third mistake — changing settings between parts and not recording it. Today one operator set one sampling length, tomorrow another chose a different cutoff, and the journal contains only the Ra number. After a week nobody explains why values differ.
Confusion also appears in tables. Data from different batches are placed in one file or one sheet without clear separation. Later parts look similar, operation numbers match, and results can’t be tied to a specific batch, machine or shift. With several CNC lathes working, such disorder appears quickly.
The worst practice is repeating the measurement many times until a "good" number appears. That’s not control, it’s selecting a convenient result. If the value jumps, find the cause: wrong point, contaminated surface, uneven probe placement, vibrating part or changed machining mode.
To avoid returning to these mistakes, keep a few simple rules: measure in one agreed direction, position the instrument only at the sketch-tied point, do not change settings without recording them, separate results by batch and shift, and for disputed results repeat the measurement following the same rule rather than searching for a more convenient value.
Quick check before handing over a batch
Before handing the batch to QC spend a few minutes checking rather than arguing over every part later. Usually problems arise from small recording mismatches: a different parameter, a different measurement point or different sampling length inside one batch.
The check should be the same for all operators. If one writes Ra and another looks at Rz, a dispute is almost guaranteed even if part surfaces look similar. The journal and the drawing must show the same parameter.
Before handing over, quickly run through a few questions: does the parameter in the journal match the drawing? Is the measurement point marked the same for all parts in the batch? Did the sampling length change from part to part? Are borderline results marked and rechecked immediately? Does the number of entries in the journal match the number of parts actually checked?
Borderline values should not be left unexamined. If a part gives a result near the tolerance, repeat the measurement on the same surface following the same procedure and then record both results. This greatly reduces the chance that QC will pick a different point and get a different number.
A simple guideline: if you can’t quickly answer three questions for a batch — what was measured, where it was measured and with what sampling length — the inspection is poorly documented. Even a good batch looks disputable at inspection.
This is especially noticeable in series turning. If the first part was checked on one track and the tenth on the next, the journal loses meaning. QC looks not only at the number but at the repeatability of the procedure.
What to do next
Now you need a short working rule, not another argument. Create a one-page instruction for the shop and QC so everyone follows the same procedure. If a document takes longer than a couple of minutes to read, people will stop opening it.
That page usually needs four points: where the measurement point is for a typical part, which sampling length is adopted for this control, how many repeat measurements to make when the value is near the tolerance, and who records batch data.
Don’t roll the procedure out to all parts at once. Start with one typical part the shop makes almost daily and test the scheme for a week. Let the operator and inspector work from the same sheet and compare not only numbers but reasons for any discrepancies at the end of the shift. Very often the dispute is not about the instrument but about different measurement points or surface preparation.
If the week goes well, fix one journal template for all shifts. Keep it simple: batch number, part number, measurement point, result, name, date and a mark for repeat check. The fewer free fields for interpretation, the fewer unnecessary discussions at inspection.
When a new machine appears on the shop or cutting regimes change, don’t treat the old procedure as permanent. Discuss surface finish requirements before launching a series, especially if tools, material or finishing allowances change.
If the company selects new CNC lathes or machining centers, agree this procedure during equipment commissioning. For EAST CNC customers such questions can be resolved in advance — during consultation, commissioning and service support, not after the first disputed batch.
Start with one part, one instruction and one journal and the procedure usually takes hold quickly. Within a few days you can see where the rule works and where it needs a minor tweak.
FAQ
Why do the operator and QC get different Ra values on the same part?
Most often the cause is not the part but different measurement conditions. People choose different points, leave old instrument settings, or move the probe in a different direction. If you lock down the measurement point, the parameter, the sampling length and the way results are recorded in a journal in advance, disagreements become much less frequent.
Where is the correct place to measure roughness on a shaft?
Measure where the surface actually works in the assembly, not where it is easiest to put the instrument. For a bearing journal, choose one agreed area at a consistent offset from the end. It is helpful to mark that point on a simple sketch and use the same spot for the whole batch.
Can I measure roughness next to a chamfer or on a radius?
No — avoid such places. On a chamfer, radius, groove or right at the edge the instrument reads geometry as well as roughness. Because of that, the argument ceases to be about surface quality and becomes about an incorrectly chosen measurement point.
How to choose the sampling length so there are no later disputes?
Look at the drawing and the process, not what is stored in the instrument memory. For one surface and one operation, pick one value and do not change it mid-batch. If the setting does not match the documents, the numbers cannot be fairly compared.
Do I need to record the overall evaluation length separately?
Yes — record both. Sampling length and the overall evaluation length affect the result, but they are often confused. When the journal contains only a single number, after a few days it becomes hard to know in which mode the measurement was taken.
In which direction should the profilometer probe be moved?
Run the probe across the machining marks. If you run it along the marks, the instrument may show the surface as smoother than it actually is. This mistake is common on turned parts, so the measurement direction should be specified in the control card.
What to do if the result is almost at the acceptance limit?
If the value is near the limit, repeat the measurement following the same rule and on the same working surface. Do not look for another place or change settings to get a more convenient number. For disputed parts it’s useful to agree a rule in advance: for example, three passes and record each value plus the average.
What must be recorded in the batch journal?
At minimum: batch number, part or drawing number, operation, and shift. This is especially important when similar parts are coming from different process steps. Also record instrument settings — evaluation parameter, sampling length, number of samples and other settings that affect the final value. If QC repeats the measurement in a different mode, a dispute is almost guaranteed.
Can I just leave the instrument in auto mode?
It’s better not to leave the instrument in auto mode at the instrument’s discretion for each new part. Agree the setting with QC on the first agreed part and keep it for the whole batch. That way you get comparable results across shifts.
What should I check before handing the batch to QC?
Before handing the batch to QC, check that the parameter in the journal matches the drawing, the measurement point is marked consistently across the batch, the sampling length didn’t change, and borderline results were rechecked immediately. If you can quickly answer what was measured, where it was measured and with what settings, the batch usually passes more smoothly.