Measuring Holes with Burrs: Why the Readings Differ
Measuring holes with burrs often gives conflicting results: the bore gauge shows one size, the plug gauge shows another. Here’s why it happens and how to check it properly.
Where the dispute starts
The dispute begins even before the measurement itself. After drilling, boring, or reaming, a small burr often remains on the entry or exit edge of the hole. It may look insignificant, but this is exactly what changes the tool’s first contact with the part.
That is where inspection logic breaks down. A bore gauge and a plug gauge touch the hole differently. A bore gauge usually works a little deeper and rests on the walls inside the hole. A plug gauge meets the edge first. If the metal at the entry is bent inward or crushed, the plug gauge will stop right away, before it even reaches the working zone.
Because of that, the same part can produce two different conclusions. The bore gauge shows a size within tolerance, while the plug gauge does not go in. From the outside, this looks like a measurement error, although the reason is often much simpler: an untreated edge.
Both tools may still be correct. The bore gauge reflects the geometry inside the hole. The plug gauge shows whether the mating part can pass through the actual profile of the hole, including the entry. For the operator, this looks like a contradiction, but for the process it is already a risk: a good part can be scrapped, while a real defect can slip through.
In production, a small issue like this quickly turns into losses. It leads to extra arguments between departments, repeat checks, and batch delays. This is especially noticeable where there are many parts and inspection has to move quickly.
What the bore gauge and plug gauge show
The bore gauge and the plug gauge are not arguing with each other. They answer different questions.
A bore gauge shows the size between the walls of the hole in the zone where it has been set correctly and expanded properly. If you measure in several sections and in different directions, you can see the real picture: diameter, taper, ovality, and variation by depth.
A plug gauge checks something else. It shows whether the hole passes through fully under real conditions, taking into account the entry edge, shape, and small surface obstructions. It does not matter that the middle is within size if the entry blocks the way.
That is why the bore gauge usually tells you about the geometry inside the hole, while the plug gauge tells you about passability. These are not the same thing. The difference is especially clear on thin parts and on holes made by drilling without edge breaking. The bore gauge touches the walls deeper inside. The plug gauge meets the edge first. If there is torn metal, a small raised lip, or crushed material at the edge, the plug gauge stops before it reaches the zone where the diameter itself is fine.
There is another side to this as well. The plug gauge does not explain the reason. It only answers “pass” or “not pass.” It will not tell you whether the cause is a small diameter, ovality, taper, or burr.
That is why it is better to use both tools together. The bore gauge helps you understand the shape and size of the hole. The plug gauge checks how the hole behaves in fit. If the readings differ, look first not at the middle of the hole, but at the entry and exit edges.
How a burr changes the result
Even a tiny burr can noticeably shift the final measurement. It raises a thin edge of metal at the entry or exit, and the tool touches not the clean surface, but this raised area.
Because of that, not only the number changes, but the whole logic of the check. When measuring holes with burrs, you are effectively comparing two different places: the edge and the working part of the hole a little deeper in.
In practice, this is what happens. The first contact point moves to the very edge. The plug gauge catches on the raised metal and stops earlier. The bore gauge, on the other hand, can go below this zone and show the size without the edge affecting it.
The plug gauge is especially sensitive to the entry. If a burr remains on the edge, the go gauge will not reach the required depth, even though the hole is already within tolerance inside. From the outside, it seems simple: the gauge does not go in, so it must be scrap. But sometimes the diameter is not the problem at all — the metal at the edge was just bent during machining.
The bore gauge behaves differently. It is usually placed a little deeper, where the surface is calmer and the reading is easier to catch. In that zone, the burr no longer affects contact much, so the instrument shows a normal size. The bore gauge does not contradict the plug gauge. It simply answers a different question.
There is one more annoying detail. A burr is not always stiff. Sometimes it bends slightly under pressure, and then the same plug gauge feels tight today, but passes a little farther tomorrow. That is why the result starts to drift, especially when different people check the part with different amounts of force.
So a mismatch between the bore gauge and the plug gauge often points not to a bad tool, but to the wrong contact point. Until the edge is cleaned up and brought back to normal, it is easy to make a false decision about acceptability.
How to inspect the hole step by step
It is better to decide whether a part is acceptable only after a short but strict check. One chip at the entry, an oil film, or a small burr can easily add extra hundredths, and then the bore gauge and the plug gauge give different answers.
A convenient sequence is this:
- Place the part under good light and inspect the entry and exit of the hole. Look for torn edges, stuck chips, lubricant, and small burrs.
- Clean the part before measuring. If you skip this, the tool will stop against dirt instead of metal.
- Check the condition of the gauge and let the part and the tool reach the same temperature if the part has just come out of machining. This also matters for tight tolerances.
- Evaluate the edge separately. A burr is not always easy to see, but it is often easy to feel with a probe or by careful touch.
- Remove the burr according to the shop’s approved process. The point is not to “adjust” the size, but to remove extra metal that blocks inspection.
- Repeat the measurement at the entry and at the working depth, then compare the bore gauge and plug gauge readings on a clean hole.
If the mismatch disappears after cleaning and deburring, the problem was not the diameter, but the edge. This is a common situation after drilling and boring, especially when the tool has already worn down or the cutting conditions were not ideal.
If the disagreement remains, look deeper: check ovality, taper, and the condition of the surface inside the hole. Sometimes it is the other way around — the plug gauge passes at the entry, but the bore gauge shows a deviation at depth. In that case, the burr is no longer the issue, and the part should be treated as a normal dimensional defect.
The most common mistake in the shop is simple: the operator measures immediately after machining, sees doubtful numbers, and sends the part to scrap right away. It is much wiser to clean the edge first, remove the burr according to the standard, and only then make the decision.
A simple shop-floor example
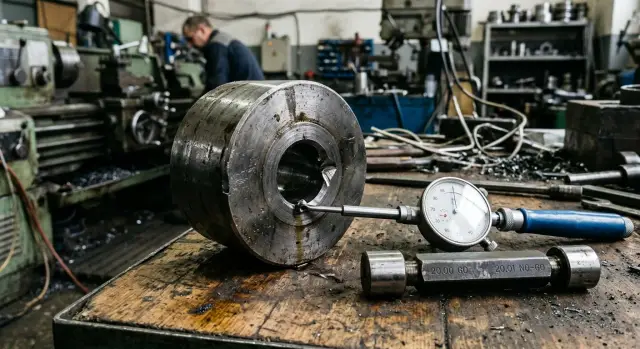
After drilling a housing part, the operator checked the hole with a bore gauge. The instrument showed a size within tolerance, and on paper everything looked fine. But the go gauge stopped almost immediately, right at the entry, and did not go past the first few millimeters.
At that moment, it is easy to decide that the hole is too small in diameter. But the operator did not rush. He looked at the entry edge under the light and saw a thin burr. It was tiny to the eye, but these are exactly the things that most often confuse hole inspection.
The logic is simple. The bore gauge measures the diameter inside the hole, a little farther from the edge, where the wall is smoother. The plug gauge meets the edge first. If metal is sticking out there, the plug gauge catches it and creates the impression that the hole is smaller than it should be. In reality, the tools are not arguing. The clean geometry of the hole is arguing with a dirty edge.
The operator did a light cleanup without trying to machine the size. He simply removed the burr and ran the plug gauge again. After that, the gauge passed without force, and the repeat bore-gauge measurement stayed the same.
This happens after drilling, countersinking, and even after a finishing pass if the tool is worn or the cutting conditions are too rough. It is especially easy to see on production parts: one passes, the next one disagrees with the plug gauge, even though the actual diameter is almost the same.
The conclusion is straightforward. If the plug gauge does not go in only at the entry, while the bore gauge shows a normal size, check the edge first. Sometimes the problem is not the hole at all, but a few hundredths of a millimeter of metal left in the worst possible place.
Mistakes that create false rejects
False rejects are usually caused not by the size itself, but by the way the part is checked. The part seems problematic, even though it is not the hole and the tolerance that are disagreeing, but different measurement points.
The first mistake is measuring only the middle of the hole. In that zone, the bore gauge can easily show a normal diameter because the wall is already clean. But at the entry or exit, a thin burr remains, and the plug gauge catches exactly there.
The second mistake is comparing measurements without cleaning. Small chips, an oil film, and dust after machining affect both the feel of the plug gauge and the reading of the bore gauge. The difference may be small, but it is enough to send a part to scrap for no reason.
The third mistake is forcing the plug gauge in by hand. If it is supposed to enter freely, any extra force already distorts the picture. After that, you can no longer tell whether the problem was a real size shortage or simply a crushed edge under pressure.
Where the mistake hides
The exit edge is often underestimated. After drilling, boring, or countersinking, the burr usually remains exactly where the tool leaves the metal. In the middle, the hole may be within tolerance, but at the edge the plug gauge stops and creates the impression that the entire diameter is too small.
This kind of dispute often appears in serial CNC machining. The operator quickly checks a batch, gets a good result from the bore gauge, then takes the plug gauge — and it does not go in. If nobody looks at the edge at that moment, the part can easily get a false verdict.
Burr or hole shape
Another mistake is to take a burr for taper or ovality. These defects behave differently. Taper changes the size along the hole length, ovality creates a difference between directions, while a burr usually sits locally, right at the edge, and blocks the entry or exit of the tool.
If the bore gauge shows different values by depth and in two axes, the problem may not be the edge. But if the main obstruction is only at the edge and the size inside is stable, remove the burr first and only then decide whether the part is acceptable. This avoids unnecessary scrap and avoids arguments between the operator and the inspector.
When the problem is not only the burr
If the disagreement remains after deburring, the cause is often deeper. The edge may only have drawn attention to another problem: the hole shape changed, the tool wore out, or the process itself became unstable.
First, look at how the diameter changes with depth. Near the entry, the hole may be fine, but farther in it may become tapered. The opposite can also happen: the entry is damaged, but the bottom size is correct. If you measure only one point, the picture will always be incomplete.
Ovality is also easy to confuse with edge influence. Measure the hole in two directions and rotate the bore gauge by 90 degrees. If the values differ, the issue is no longer the burr. In that case, the plug gauge may pass in one position and start to catch in another, even though the hole looks ordinary to the eye.
It is also worth checking for tool chatter. Ripples on the wall, circular marks, and repeating scratches change how the instrument contacts the surface. The bore gauge catches local points, while the plug gauge feels overall passability. Because of that, the number may still fall within tolerance, but the fit still seems doubtful.
Often the source of the problem is simpler than it seems: a worn drill or boring tool. A dull cutting edge heats the metal more, pulls material at the entry, and holds geometry less well at depth. In that case, the burr is not the cause, but the result.
It helps to compare not one part, but several in a row. If the issue appears on only one part, look for a stray chip, a local impact, or a one-off mistake. If the pattern repeats, check the tool, cutting conditions, and clamping. If the size shifts gradually, wear is usually the first suspect.
In the shop, this becomes clear quickly. The first parts pass the gauge cleanly, then the burr at the entry grows, the wall starts to show ripples, and the bore gauge begins to give different numbers at different depths. In that situation, it makes no sense to argue about which tool is right. You need to find what is changing the hole shape.
What to do next in production
If the measurements do not match, it is better to solve the problem in the process itself, not in a dispute between the inspector and the operator. Otherwise, the same hole may be accepted in the morning and rejected after the shift. Usually the issue is not the gauge, but the fact that the edge is not treated as a separate control point.
It is useful to update the operation sheet so that the entry and exit edges are checked before the final size decision. If a hole regularly has a burr, this should be written directly into the route: where it is checked, who removes it, and after which step the final measurement is taken.
The work sequence should be divided more clearly. After machining, the operator checks the edge and notes whether a burr is present. Then the part goes through deburring using the approved method. Only after that does inspection record the final hole size. If the measurements still do not match, the record should note which tool was used, from which side the measurement was taken, and what the edge looked like.
Doubtful cases are also better recorded in a consistent way. A short note in the log or electronic card is usually enough: part number, inspection tool, result before deburring and after, and where the gauge stopped. After a few shifts, it becomes clear where the system problem is and where the one-off failure is.
If the burr keeps appearing on the same operation, check the machine and the setup. Very often the cause is tool wear, weak clamping, runout, or lack of rigidity. In that case, it makes no sense to fix only inspection — the machining process itself has to be corrected.
When the issue is no longer about one part but about selecting equipment, commissioning, and service, an outside view helps. EAST CNC works in metalworking and supplies CNC lathes, and the EAST CNC blog regularly covers practical inspection topics like this one. In such cases, what wins is not one “correct” measurement, but a clear chain from machining to part inspection.
FAQ
Why does the bore gauge show a good size, but the plug gauge will not pass?
Most often, a burr on the entry edge gets in the way. The bore gauge measures a little deeper and sees the diameter inside the hole, while the plug gauge hits the edge first. That difference does not mean one of the tools is wrong. They are checking different areas of the same hole.
Who is right if the tools give different results?
Usually, both are right. The bore gauge shows the size and shape inside the hole, while the plug gauge shows whether a part can pass through the real opening, including the entry. To decide whether the part is good, you need more than one result. First check the edge, then compare both measurements again.
Where should I start when a hole is in doubt?
Start with the simple things: clean the hole and look at the entry and exit edges under good light. Very often the issue is not the size, but chips, oil, or a thin bent edge. After cleaning, remove the burr using the approved method and repeat the check. Only then decide whether the part is acceptable.
How can I tell that the burr is the real problem?
If the plug gauge stops almost immediately, while the bore gauge shows a stable size inside, the edge is often the reason. Another sign is that after a light cleanup, the plug gauge starts to pass and the bore gauge reading barely changes. A burr is often local. It causes trouble right at the edge, but it does not change the full diameter deep inside.
Can I force the plug gauge through?
No, that is not a good idea. If you push by hand, you can deform the edge and lose a reliable result. After that, it is hard to tell what really caused the problem: an undersized hole, ovality, or just bent metal at the entry.
Do I need to remove the burr before the final inspection?
Yes, if the route requires it. Removing the burr should not be used to “adjust” the size; it should only remove extra metal that blocks proper inspection. If you leave the edge as it is, you risk a false reject and unnecessary arguments between production and inspection.
Why does one operator say the gauge passes, while another says it does not?
That can happen when the burr is soft and bends differently depending on how hard someone pushes. One person touches it gently, another uses more force, and the plug gauge behaves differently. A dirty edge, leftover cutting fluid, and a part that has not yet reached the same temperature as the tool can also affect the result.
When is the problem no longer burr-related?
If the disagreement remains after deburring, look at the hole shape. Often the issue is taper, ovality, surface ripple, or tool wear. Check the hole at different depths and in two directions. If the readings differ, the problem is no longer just the edge.
What should I do if the same problem keeps showing up in a batch?
Then you need to study the process, not argue about a one-off measurement. Compare several parts in a row, check the tool, cutting conditions, clamping, and rigidity. If the pattern repeats, make the edge part of the normal inspection routine. That quickly reduces unnecessary returns and disputed batch decisions.
Where does the burr usually remain, and after which operations?
A burr most often stays at the entry after drilling and at the exit where the tool leaves the metal. It can also appear after boring and countersinking, especially if the cutting edge is already worn. On thin parts and at a fast production pace, this becomes much more noticeable. Even a small edge can change the way the gauge behaves right away.