Measurement Repeatability Between Operators: A Quick Test
You can check measurement repeatability between operators in one shift: a short test on one part shows where the measuring method starts to differ.
Why one part gives different numbers
This happens on the shop floor all the time: one operator measures a dimension and writes down one number, then another person takes the same part and gets a different one. A few minutes later, the argument is already about the machine, the program, and the setup. But the reason is often much simpler.
The same part can give different results even when there is no machining defect. People use different tools, place the part slightly differently, press the micrometer harder or softer, or choose another point on the surface. Measure near a chamfer, over a burr mark, or on a part that is still warm, and the numbers will start to differ right away.
Because of this, measurement repeatability between operators drops even in places where the machine is running steadily. It is especially noticeable between shifts: one person measured it near the machine, while another checked it at the inspection table after wiping and cleaning the part. Both are acting in good faith, but the measuring conditions are already different.
The problem is that a disputed dimension triggers extra action. The setter changes the offset, the operator adjusts the settings, and the supervisor asks for an urgent recheck of the batch. Time is lost, and the size may then drift for a real reason — because of an unnecessary adjustment.
On serial production, this is especially frustrating. One doubtful measurement can easily turn into a stoppage, a repeat inspection, and another restart. There is still no clear answer. Meanwhile, the spread in numbers and the tension on the shift keep growing.
That is why the first thing to check is not the machine, but the inspection method itself: who measured, with what, exactly where on the part, what the surface condition was, and whether the part had time to cool down. When the measuring conditions are made the same, half the arguments disappear on their own.
Sometimes the effect is very simple: the shop spends 20 minutes discussing and adjusting something that could have been solved with two identical measurements done by one rule.
When a quick test is needed
A quick test is needed at the moment when the argument is no longer about the part, but about the numbers on the gauge. If different people get different results on the same part, there is no point waiting for more scrap to build up. Usually, a few minutes are enough to see whether the issue is in machining or in the measurement itself.
The first sign is obvious: one operator accepts the part, while another sends it to the questionable pile. The machine is running without changes, the tool has not been changed, and the program is the same. In that case, you need to check not only the machining process, but also the measuring method.
Another sign is when the log shows the size changing from one entry to the next, even though the cutting conditions have not changed. The reason is often simple: different pressure on the micrometer, a different contact point, or a part that was measured too early.
After a shift change, these differences show up even more often. A new person may take the same tool but hold it differently, place the part against the datum in another way, or read the scale by habit. That is a normal situation, not someone making a mistake.
The test is worth running if the inspector and the operator get different numbers for the same dimension, if the size is "within tolerance" in the morning but suddenly becomes "on the edge" by the end of the shift for no clear reason, if the dispute keeps appearing on the same operation, or if the differences show up only with one gauge or one shift.
The best time to check is when the difference is still small but already repeating. It is much easier to take one part and one dimension than to sort through a whole batch of disputed parts later.
What to prepare before the check
A quick test does not need a large data set. You need one properly chosen part and one clear dimension: a diameter, a step length, a groove width, or another feature where everyone understands where to place the tool.
Do not take a random blank. It is better to choose an already machined part without burrs, oil in the contact area, or impact marks. If the dimension is next to a chamfer, radius, or rough edge, people will almost certainly measure it a little differently, and the test will lose its point.
The tool should also be the same. If one operator uses a micrometer and another uses a caliper, the comparison will not show anything. Before starting, check the zero and make sure the measuring faces are clean. Even a thin film of oil or a small chip can easily add extra hundredths.
It is better to mark the measuring point in advance. A verbal "measure roughly here" almost always creates variation. It is much more reliable to make a short sketch or simply show the area on the part so everyone places the tool in the same zone.
Also check the temperature. If the part was just taken off the machine and the tool was sitting on a cool table, the numbers will wander even with careful work. Usually it is enough to let the part and the gauge sit near each other for a while.
It is useful to prepare a simple recording sheet in advance. Not for reporting, but so nobody keeps the numbers in their head or rounds them by habit. Usually five lines are enough: who measured, when they measured, the part number, the nominal size, and the actual value.
This preparation takes five minutes, but it saves much more time than another argument by the machine.
How to run the test
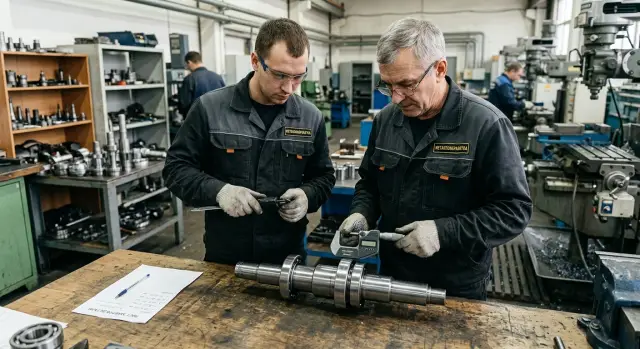
The idea is very simple: one part, one dimension, one tool, and several people who usually take measurements on the shop floor.
Choose the dimension that causes the most disputes. Do not take several dimensions at once. Otherwise, you will mix several causes of variation and will not understand what exactly went wrong.
Then everyone gets one short instruction: which dimension to measure, with which tool, at which point, and how to record the result. After that, each operator makes five consecutive measurements on the same part and writes down every number. It is better not to show the others’ results until the test is finished. People quickly start adjusting to a number they have already seen, even if they do not mean to.
Five measurements are usually enough. If one person’s numbers are steady and another person’s numbers clearly wander, the problem is more often in the measuring technique than in the part. If everyone’s results are shifted in the same direction, it is worth checking the measuring point itself, the condition of the gauge, or the conditions under which the part is sitting.
During the test, it is useful to watch not only the numbers, but also the actions. Someone may tighten the micrometer more firmly. Someone may hold it at a slight angle. Someone may wipe the measuring spot first, while someone else measures immediately. These small details are often what create the spread.
If one operator gets, for example, 24.98–25.00, while another gets 24.94–25.01 on the same part, the argument is no longer about the machine. It is about the measuring method. And honestly, that is good news: this kind of cause is usually easier and faster to eliminate.
A simple example from a normal shift
On a turning line, the argument often starts with one part. The machinist measured the outside diameter after machining and saw a size within tolerance. A few minutes later, the inspector remeasured the same part and got a different number.
Say the nominal size is 40.00 mm. The machinist pressed the micrometer a little harder than usual and saw 39.99. The inspector took the part almost right after it came off the machine, while it was still warm, and got 40.02. A three-hundredth difference already sounds like a machine or setup problem.
If you do not stop at that point, the shift can spend an hour looking for a fault that does not exist. A short check is enough: take the same part, let it cool for 10–15 minutes, wipe off the oil and chips, measure with the same micrometer, and use the ratchet instead of pressure by feel.
After that, both people make three measurements in the same area. The numbers usually come together quickly. In such an example, the machinist gets 40.00 and 40.01, and the inspector sees the same values. The machine was not the issue. The variation came from the measurement method itself.
These cases are a good reality check. Very often the problem sits in small things: one person presses harder on the micrometer, another rushes and measures the part too soon. Separately, this looks like a normal work habit. Together, they create extra hundredths and start an argument.
Common measurement mistakes
When measurement repeatability between operators suffers, the reason is usually not complicated. People measure the same part a little differently.
The most common trap is using different points on the same surface. If there are machining marks, an edge chamfer, or a slight barrel shape on a shaft, shoulder, or fit surface, measuring a few millimeters apart can already give a different number. One person places the tool closer to the edge, another uses the middle, and a third looks for the spot that feels easiest to hold with the micrometer. Different values then appear in the log, and it seems as if the part is unstable.
The second mistake is a hot part. It is removed after machining, waited on for a minute, and then measured. But one minute does not always solve the problem. The metal is still holding heat, the size is still shifting a little, and the operator is sure they are seeing the final value.
The third cause is different pressure. One person gently feels the contact, another squeezes harder. On a thin wall, a soft material, or a narrow land, this changes the result right away. The tool is not lying. It is just being used differently.
Often the problem starts even earlier: no one checked the zero before the run. The gauge came through the previous shift, took a hit, or simply collected dirt on the measuring faces. The error is small, but it carries through all the measurements.
There is also something very ordinary: rounding when writing the value down. One person sees 24.983 mm and writes 24.98. Another gets 24.976 mm and also writes 24.98. On paper the sizes match, even though the parts are actually behaving differently.
If arguments start on the shop floor, it helps to equalize the measuring method for ten minutes: one point, a cooled part, the same pressure, a checked zero, and recording the actual number without simplification. After that, the picture almost always becomes clearer.
How to tell whether the measurement or the machine is at fault
When different numbers appear on the same part, do not rush to adjust the offset. Look at the spread pattern itself. It usually shows quite clearly where to look for the cause.
If one operator gets almost the same value every time, and the other is also stable, but their results do not match each other, the machine is usually not the problem. The people are probably measuring differently: in a different spot, with a different pressure, at a different angle, or after a different cooling time.
If one person’s results vary a lot, look at their work technique. The cause is often rushing, a tilted micrometer, measuring over a burr, or a dirty surface.
If all participants get different numbers with no clear pattern, check the measuring tool first. Are the measuring faces clean, is there any play, does the gauge return to zero properly, and is the setting correct?
But if the size is normal at the start of the shift and then slowly drifts in one direction, that is when you should look at the machining process. The cause could be tool wear, part heating, cutting conditions, or how the machine behaves over time.
It helps to keep a simple rule in mind. If two people are stable but do not match each other, the measuring method is different. If one operator’s numbers jump around, the problem is probably their technique. If everyone shows a different pattern, start with the gauge. If the size drifts gradually during the shift, go back to the machining process.
This approach saves a lot of wasted effort. Otherwise, the supervisor adjusts the machine when the first step should have been to make the inspection consistent.
Short check before drawing a conclusion
Before arguing with the machine or sending the part back for reinspection, check five things.
- Everyone is measuring the same part, not "a similar one from the batch".
- Everyone is using the same tool.
- The measuring point and pressure are the same.
- The part has cooled down.
- The numbers were written down as they are, without rounding.
If even one of these conditions does not match, it is too early to draw a conclusion. In that case, you are not comparing one measurement result, but different conditions.
This short checklist takes just a couple of minutes, but it often saves half a shift.
What to do after the test
After a quick check, there is no need to discuss who was right. It is more useful to turn the result into one short rule so the whole shift measures the same way.
A very simple 4–5 line instruction is enough: which dimension to check, with which tool, at which point, with what pressure, and how many times to repeat the measurement. If the rule cannot be read quickly by the machine, people will not use it.
Then it is best to show that rule on one part right at the workstation. One employee measures, another watches, then they switch. This demonstration works better than a long explanation because people can see the exact hand movement and tool position.
After that, lock in the process: leave a short reminder near the inspection station or machine, agree on one tool for that dimension, and ask two operators to repeat the measurement using the new method. After a few days, it is useful to repeat the same short test on another dimension or on a similar part from a new batch. One careful check does not prove everything.
If the difference is still there, move to the next step: check the measuring tool itself, and then look at machining stability during the shift. If the size keeps drifting even with the same method, then the issue really may be in the process, not in the operator’s hands.
In that situation, an outside perspective helps. EAST CNC, the official representative of Taizhou Eastern CNC Technology Co., Ltd. in Kazakhstan, offers not only metalworking equipment but also practical experience in startup and service. And in the east-cnc.kz blog, you can find materials about size control and shop-floor work without unnecessary theory.
The main idea is simple: before looking for a problem in the machine, make the measurement consistent. Very often that is already enough for the dispute to end and the numbers to start matching.
FAQ
What most often causes differences in measurements between operators?
The numbers usually differ because of the measurement itself, not the machine. People measure different spots on the part, apply different pressure on the micrometer, measure on oil or burrs, or check the part while it is still warm.
When should a quick test be done?
Run it as soon as two people get different numbers on the same part. Do not wait until the issue turns into machine adjustment or a batch stoppage.
How many parts and dimensions should be used for the check?
For this check, one part and one disputed dimension are enough. If you take several dimensions at once, you will mix the causes and only make the picture harder to read.
Why can’t you measure a part right after it comes off the machine?
Because the metal is still holding heat, and the size can still change a little. Let the part and the tool sit nearby for a few minutes, and the reading will be more stable.
Should everyone measure with the same tool?
Yes, it is better for everyone to use the same tool. If one person uses a micrometer and another uses a caliper, you are comparing different checking methods, not people.
How many repeats should each person do?
Usually five repeated measurements on the same part are enough. That is enough to see who gets stable numbers and who has variation because of their measuring technique.
How do you know whether the dispute is about measurement or the machine?
Look at the pattern of the spread. If each person stays stable within their own set of measurements, but their numbers do not match each other, the cause is usually the measuring point, pressure, or tool position, not the machining.
What should be recorded during the test?
Write down who measured, when they measured, which part was used, which dimension was checked, and the exact number without rounding. That way you see the real difference, not just what people remember.
What should be done if the test shows that people measured differently?
Turn the result into a short rule for the shift right away. Describe one measuring point, one tool, the same pressure, and the number of repeats, then show it on the part next to the machine.
What if the spread remains even after everyone measures the same way?
Then check the tool itself and watch how the size behaves during the shift. If the number slowly drifts in one direction even with the same measuring method, the cause is more likely tool wear, heating, or setup.