Manufacturability of a 5-axis housing part without unnecessary rotations
The manufacturability of a 5-axis housing depends on internal radii, datums and tool access. We explain how to eliminate extra setups and special fixtures.
Where parts lose time on the machine
On 5-axis machining, cycle time is often eaten not by the amount of metal removed but by the part geometry. A housing may look convenient in CAD, but a few small choices in the model force the machine to stop, rotate the table and change tools more often. The part takes longer to make and the cost rises without benefit.
The first source of loss is unnecessary rotations. If walls, pockets and holes face different directions without clear logic, the process engineer has to split the work into more setups. Each additional rotation adds time and increases the risk of losing size between setups.
The second problem is enclosed zones. A narrow pocket under a tall wall or a deep side ledge forces using a long cutter. It cuts slower, is less rigid on size and often requires more passes where a short end mill would finish faster.
A lot of time is also lost to small internal radii. They look neat on the drawing but on the machine they demand a thin cutter, smaller removal per pass and a long finishing operation. If the radius is smaller than needed for the part’s function, those minutes repeat on every piece.
Another common source of loss is random datums. When the designer sets them so that the first setup is awkward, the operator has to create an intermediate scheme or order special fixtures. After that it becomes harder to keep coaxiality, flatness and repeatability between setups.
A simple example: a housing has a deep pocket, sharp internal corners and a side hole at a separate angle. For the pocket they choose a long end mill, for the corners a smaller diameter, and for the hole they add a rotation. The metal removal itself is fast, but the transitions and changeovers take significantly more time.
You can usually spot a well-thought geometry by one sign: the machine processes the maximum number of surfaces with the minimum number of setups and without complex fixtures. If nearly every feature requires a separate tilt, a long tool or a new datum, losses begin before the program is even run.
What is manufacturable for 5 axes
For 5-axis machining, a convenient housing part doesn’t force the shop to rescue the model with extra rotations, long tools and custom fixtures. It starts with a simple thing: the machine must reach the needed surfaces with short, stiff tools, and the process engineer must quickly understand how to mount the part and what to measure from.
If a housing can be done in 1–2 setups instead of three or four, that’s already a good sign. But a 5-axis machine alone doesn’t solve everything. It doesn’t remove blind corners, narrow pockets or dimensions scattered across unrelated planes without clear datums.
In practice a manufacturable model usually looks like this:
- the main faces, holes and fits have direct access without excessive tool overhang;
- dimensions are tied to 1–2 clear datums that are convenient for both fixturing and measurement;
- part rotation is only used where it truly opens access or helps hold accuracy;
- clamps and supports do not block zones that need machining in the same setup.
This is especially visible on housings. Suppose you have an aluminum housing with side holes, a pocket and several mating surfaces. If all critical dimensions reference the bottom datum and one side wall, the machining route is clear. If some dimensions reference one plane, others another, and some a theoretical axis, unnecessary checks, rotations and the risk of errors start.
The difference between a convenient and inconvenient model is apparent at first glance. In one case the process engineer immediately sees the datum, the first setup and zones where the tool will fit. In the other, it’s obvious where the part will need turning simply because geometry blocks access, not because the operation requires it.
A good 5-axis model doesn’t have to look simpler on screen. Its value is practical: it saves shop time, reduces disputed dimensions and removes reasons to order a fixture for a single awkward zone.
Radii that save passes
The internal radius in a pocket often determines how long a part stays on the machine. If a designer specifies too small a radius, the process engineer must choose a cutter with smaller diameter. That cutter removes metal more slowly, requires more passes and often moves at safe retracts.
On 5-axis machining this is especially noticeable. The B or C axis doesn’t help if the tool is too thin and long. It holds loads worse, vibrates more and forces reduced feed.
A simple rule: choose internal radii to match standard cutter diameters. If you plan to use a 10 mm end mill, make the internal radius at least 5 mm. Specifying 2 or 3 mm without a reason immediately complicates the route.
A sharp internal corner almost always looks good only in the model. In metal it usually means an extra pass with a small tool or a separate finishing operation. If the corner isn’t required for fit or assembly, round it from the start.
It helps to keep the same radius in similar pockets and cutouts. Then the process engineer can use one tool for them, change cutters less often and avoid rebuilding the program because of a single small difference. Even a 1 mm variation can break a convenient route.
The same applies to transitions at edges, bosses and pocket bottoms. A sharp joint often forces a long tool or an extra setup. A small smooth transition lets the cutter reach deeper and leave a cleaner surface.
Simple example: a housing has four identical pockets. If three have a 6 mm radius and one has 3 mm, the whole cycle may switch to the smaller cutter. The cost of that "minor" difference is extra minutes per part and higher risk of vibration marks.
How to open access for the tool
A cutter seeing the cutting zone doesn’t mean the whole assembly — collet, holder and required overhang — will fit. On 5-axis machines this mistake shows up immediately: the machine makes extra rotations, the operator reduces feed, and sometimes the part ends up in a special fixture simply because the model left only a few millimetres of clearance.
A good guideline is simple: the tool must approach the surface from above and the side without the holder hitting a wall before the cutting edge. For deep pockets avoid tall narrow walls unless they are functionally required. The freer the entry, the shorter the overhang and the calmer the machining.
Narrow windows and necks are most often the problem. They look harmless on the drawing, but on the machine it quickly becomes clear that a thin cutter fits while rigidity is gone. The shop then reduces the depth of cut, spends more time and accepts vibration marks.
The same happens when pockets are only partially open at the top. Technically there is access, but the holder cannot follow a safe trajectory. That leads to an extra rotation or a different setup.
If a feature does not affect assembly, strength or fluid flow, it’s usually worth simplifying: widen the opening a bit, lower the wall height, increase the top entry or remove a local narrowing deeper in the pocket. Even a small edit can noticeably shorten the cycle.
Consider not only cutter diameter but the whole tool path: required overhang, where the holder will pass and at what angle the spindle approaches. Often the issue is not the cutting edge but an adjacent rib or wall that is too close.
Example: a housing has a side pocket 14 mm wide and 40 mm deep. On paper a 10 mm cutter fits, but in reality that requires a long overhang and rigidity drops. If you widen the window to 18–20 mm or open the pocket from above, the material will be removed faster and cleaner.
A small geometry change often gives more benefit than trying to salvage the part later with a different tool. If a narrow opening serves no function, remove it at the modeling stage.
Datums without special fixtures
If a datum is chosen by a convenient CAD plane rather than a stable surface on the part, the machine pays with time. For 5-axis machining this is noticeable: every extra rotation and every unstable clamp adds risk to size and surface finish.
A good datum sits on a solid, obvious surface. It doesn’t spring, get cut away by the first pass or disappear after a flip. This is usually an outer face, a boss, a machined end or a mounting area that is kept to size anyway.
It’s a poor idea to hide the datum at the bottom of a deep pocket. A probe can reach it, but clamping is awkward and checking repeatability is even harder. If the datum sits deep inside, you almost always end up creating a custom fixture or adding an extra setup.
Dimensioning logic should follow the datums that the part will actually use on the machine. If the designer gives main dimensions from one system while the shop clamps from another, the chain of dimensions breaks. The operator then chases errors not by cutting but by repositioning.
Before releasing the model ask some simple questions. Does the part have 2–3 solid surfaces to use as datums? Will those surfaces remain after the roughing pass and first setup? Can ordinary jaws, V-blocks or soft pads clamp it without a custom fixture? Can a probe reach the datums without a long thin extension?
Example: a housing has a deep internal pocket and two machined outer faces. If you base the part on the pocket bottom the part must be lifted, a long tool is needed and clamping becomes complex. If you use the outer faces and an end face as datums, the part is easier to mount, flip and hold dimensions between holes and fits.
Manufacturability usually grows not from special fixtures but from normal datums that are visible, measurable and clampable without tricks.
How to quickly check the model
It’s easier to check the part in 3D than from the drawing alone. You can quickly see where the route breaks on simple things: the cutter won’t reach, the datum is awkward or a radius forces a smaller tool.
First look at the model from the directions the part will actually be machined. Top and side views often hide issues; a slight tilt can instantly reveal a closed zone or a dangerous overhang. If a pocket, opening or rib only opens with a strong spindle tilt, that’s a reason to consider a geometry change.
A short checklist helps:
- Mark zones where the tool needs a long overhang — deep pockets, narrow wells, tall walls and internal corners near edges.
- Verify internal radii against the cutters actually used in the shop. Too small a radius almost always forces a thinner, slower tool.
- Estimate the number of setups. If one side is only reachable by flipping and another only with a special clamp, the model already asks for extra time.
- Check datums after the first operation. The part should sit reliably on the next datums without special fixtures and without risking dimension loss between features.
There’s also a quick mental test: pick the datum planes and run the route from the first to the last setup in your head. If at any step a dimension holds only because of repositioning, an adapter plate or a questionable datum, revise the route before CAM.
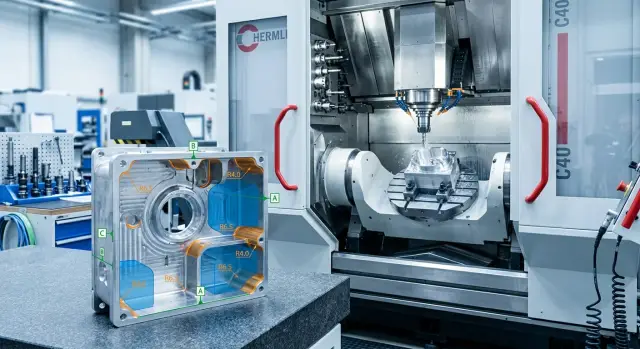
Example with a real housing part
Take a typical housing: a top pocket, several side holes and a bottom support face. On screen it looks neat. On the machine it quickly reveals weak points.
The first problem was the corners of the top pocket. The designer set small internal radii and the process engineer had to use a thin long end mill. It reached the bottom but worked softly: feed had to be reduced, more passes were required and the tool tended to wander in the corners. Cycle time increased not because of removed volume but due to geometry.
Then we looked at datums. The original datum was not the bottom face but a less convenient surface. Because of that the part was mounted using an intermediate plate. The plate solved the issue but added a chain: fixture manufacture, inspection, setup and checking. When the datum moved to the bottom support the part was clamped more simply and more rigidly. The intermediate plate was no longer needed.
Another extra move hid at the side. A side opening was too narrow and the tool could only enter after an additional rotation. Slightly widening that opening removed the constraint. Holes and adjacent faces could then be machined in the same setup without another rotation.
A rib caused a typical problem. It changed nothing for the part’s function but prevented the cutter from approaching with a short overhang. After a small shape change the engineer could use a shorter, stiffer tool. Cutting became calmer and the surface cleaner.
The part function wasn’t changed. We modified a few radii and datums and saw tangible results:
- fewer long tools used;
- one rotation removed;
- the intermediate plate eliminated;
- dimension stability between holes and pockets improved.
That’s how a successful model tweak usually looks: not a "more complex machine" but fewer needless moves, fixtures and tool compromises.
What most often adds cost
An expensive housing often starts in the model, not on the machine. Several seemingly small choices can turn a normal process into a series of extra rotations, long passes and special fixtures.
The first common mistake is leaving all internal corners sharp. It looks neat in CAD, but in metal a sharp corner requires a small cutter. That cutter removes metal slower, vibrates more and holds size worse at depth. If the part doesn’t need that corner for function, design radii for a standard tool.
The second mistake is dimensioning from random planes that do not work as real datums. Then the process engineer and operator keep remapping references and inspection spends time on extra measurements. Cost rises not because the part is complex but because there’s no clear datum logic.
The third problem is deep narrow pockets and holes hidden behind tall walls. Access may exist on paper, but in practice the tool approaches at an awkward angle and the programmer must find a workaround. If a pocket can be slightly wider or shallower without losing function, the machine will cope much easier.
Another cost item is custom fixtures where a simple clamp would suffice. If the model lacks obvious support faces, clamping locations or usable datums, production invents nonstandard fixturing. That adds time before the first cut. For small batches this approach is particularly costly.
There’s also a very practical error: mismatches between the drawing and the 3D model. For example, the model shows R6 while the drawing lists R4. The programmer chooses one value and the inspector checks another, and the part goes back for rework.
What to check before launch
Don’t release the drawing immediately after the first good 3D model. Compare at least two geometry variants and count simple things: how many setups, how many rotations, where a long tool is needed and whether a special fixture will be required. At this stage the difference between a convenient and inconvenient model is easiest to spot.
A quick pre-CAM check usually comes down to five questions:
- do internal radii match standard tools?
- does the cutter reach bottoms and side walls without a large overhang?
- do working dimensions align with real fixturing datums?
- can the part be clamped without a complex fixture?
- are the drawing and 3D model consistent?
If the answer is no for at least two items, it’s better to fix the model before production. That’s cheaper than paying for extra machine hours, changeovers and fixture rework.
A productive review meeting is usually short. Open the model and walk the route together with the designer, process engineer and CNC programmer. At the intersection of these three views unnecessary rotations, awkward datums and hidden risks for the batch quickly surface.
If you need to compare the model with the capabilities of a real 5-axis centre and understand where cycle time will be spent, at EAST CNC we usually start with that check: datums, tool access and number of setups. For shops in Kazakhstan and other CIS countries this is often more useful than trying to solve problems after the part is already in production.
FAQ
Why can a 5-axis part take a long time to machine?
Most of the time the cycle time is eaten not by removing metal but by extra rotations, tool changes and awkward setups. If geometry hides access, uses tiny radii and spreads dimensions across unrelated planes, the cycle grows on its own.
How many setups are normal for a housing part?
A good benchmark for a housing part is 1–2 setups. If the model needs three or four setups only because access, datums or narrow areas are inconvenient, the part should be revised before CAM.
What internal radii are best for pockets?
Match internal radii to standard end mill sizes, not smaller for no reason. If you plan to use a 10 mm end mill, make the internal radius at least 5 mm; otherwise the shop will choose a thinner cutter and spend more time.
When is a sharp internal corner actually required?
Keep a sharp internal corner only where it’s truly needed for fit, assembly or another function. If the corner serves no purpose, rounding it is almost always cheaper and easier to machine.
How can I tell in advance that a tool will struggle to reach a zone?
Look not only at cutter diameter but also at the collet, holder and required overhang. If the zone opens only with a strong spindle tilt or there are high walls nearby, the tool will likely reach it slowly and with risk of vibration.
Which datums are best for 5-axis machining?
Choose stiff, obvious surfaces that are easy to clamp and measure: outer faces, ends, bosses or mounting faces. Don’t hide a datum deep in a pocket — that usually creates extra clamping complexity and repeatability issues.
When is special fixturing unavoidable?
Special fixtures are needed when the part can’t be reliably clamped with ordinary means because of poor datums or support areas. If a few model changes provide normal clamping and access, it’s better to change the geometry than to design a custom fixture.
What should I check in the model before sending it to CAM?
First check setups, tool access, overhang, internal radii and datum logic. Then compare the 3D model with the drawing to ensure radii, holes and datums match. Fixing issues in the model is cheaper than paying for extra machine hours or tool changes later.
How do I reduce the number of part rotations?
Consolidate more surfaces into one setup and remove rotations that do not open new access. Simple edits often help: widen an opening slightly, increase a radius, lower a wall, and reference dimensions from two clear datums instead of random planes.
What most often makes a housing part more expensive?
Small radii, deep narrow pockets, random datums and custom fixtures raise cost most. Even a single inconvenient feature can force the shop to use a long tool, add a rotation and spend extra time on setup and tuning.