Machining Duplex Stainless Steel: Why Cutting Parameters Go Off Track
Machining duplex stainless steel requires different cutting parameters. Here’s why tool load rises and what to adjust first.
What’s wrong with the usual settings
With duplex stainless steel, people often make the same mistake: they take settings from regular stainless steel and expect similar behavior. For the first few seconds of the cut, everything may look fine, but then the load rises faster than the sound and chip flow suggest. The machine starts working harder, the cutting edge heats up, and tool life runs out sooner than expected.
The reason is the material itself. Duplex steel combines high strength and toughness. It is harder for the insert to cut cleanly, the chip breaks less easily, and heat stays near the cutting zone. The load goes straight to the cutting edge, the toolholder, and the spindle assembly.
Because of that, tool wear can be misleading. The insert is still cutting, but not the way it should: it heats the part, smears the surface, and drags the chip instead of making a clean cut. By sound, the process may still seem manageable, but in reality tool life is already dropping fast.
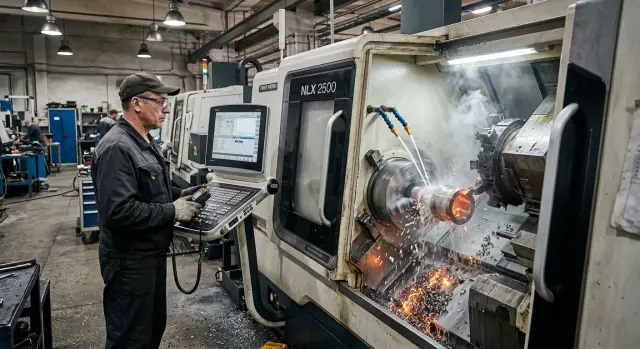
Long chips are another problem. They don’t just block visibility. They hold heat near the edge, wrap around the part, and quickly ruin the surface. On turning operations, this shows up almost immediately: lines appear, the finish changes, and the size starts to drift more than usual.
Another weak point is system rigidity. Tool overhang, stock allowance, and feed that worked fine on another stainless steel can cause hum, vibration, and surface chatter on duplex. The material pushes the process to the edge faster, where the machine no longer has enough stiffness reserve.
The first warning signs are usually simple:
- load rises and the cutting sound changes;
- chips stretch and build up near the tool;
- the insert wears out before the expected time;
- the surface darkens, shows lines, or comes out torn.
That’s why duplex stainless steel rarely forgives old “proven” settings. The numbers in a handbook may look close, but in real work the reserve for heat, rigidity, and tool life runs out much sooner.
What makes duplex harder to cut smoothly
After regular stainless steel, duplex may seem only a little more demanding. In practice, the difference is much more noticeable. It has higher strength, while toughness remains high as well. For the insert, that is a difficult mix: the edge has a harder time entering the metal, and the chip behaves less predictably.
Because of this, the tool can easily shift from cutting into rubbing. From the outside, this doesn’t always look like a failure. The cut keeps going, size may hold at first, but the surface is already getting worse and temperature at the edge is rising. That is usually where the trouble begins.
Why the cutting edge wears out so fast
Duplex has a strong tendency to work-harden. If the feed is too low, the edge has already dulled, or the tool pauses on exit, the surface layer hardens. The next pass then cuts through a harder zone, and the load on the insert rises almost immediately.
Then the process accelerates step by step: cutting force rises, vibration appears, and wear progresses faster than the operator expected. The insert itself doesn’t always look completely destroyed. It just loses sharpness and starts hurting surface quality and size.
Heat also works against the process. Duplex does not carry heat away from the cutting zone as quickly as you’d want. If the settings push the tool into rubbing even a little, the temperature at the edge jumps very quickly. That’s why the insert may still look usable while already smearing the surface and cutting heavily.
Why a small mistake has a big effect
With duplex, there is less room for error. Increase the speed a little too much, reduce the feed a bit too far, or deliver too little coolant, and tool life drops much sooner. Where regular stainless steel would still allow a few more parts, duplex often starts causing problems on the first passes.
A good example is a finishing pass after a poor roughing cut. If the roughing pass rubbed more than it cut, the finishing tool meets a work-hardened layer. It heats up more and leaves a torn trace. From the outside, it may look like the problem is the insert geometry or the machine, but the cause started earlier.
Duplex doesn’t like working “roughly near” the right setting. If the edge cuts confidently, the process stays calm. If the edge starts rubbing the metal, problems build very quickly.
Which parameters to change first
When the settings go off on duplex, the first thing to check is usually cutting speed. This material does not tolerate extra heat well. The edge loses sharpness quickly, work-hardening grows on the part, and tool life drops before the operator can even understand why.
So it’s better to start by lowering speed, not by frantically changing everything at once. In many cases, reducing it by 15-25% compared with the setting used on regular stainless steel is enough. It isn’t a universal rule, but the logic is almost always the same: remove overheating first, then fine-tune the rest.
Feed is where people often make the opposite mistake. They hear noise or see a poor surface and immediately reduce it. On duplex, that often makes things worse. The insert starts rubbing instead of cutting, the layer hardens, the temperature rises, and chips tear or stretch.
A typical check order looks like this:
- first reduce cutting speed;
- then check whether the feed became too small;
- next review cutting depth;
- after that, check the tool, overhang, and coolant delivery.
Depth of cut is often underestimated too. A very shallow pass may look safe, but on duplex it can easily turn into edge rubbing. If the stock allowance is small, one stable pass is usually better than several almost-empty touches.
After the numbers, it’s worth looking at the mechanics of the process. The insert geometry should make a confident cut, not just press into the material. A long tool overhang adds vibration even under careful settings. Coolant should reach the cutting zone directly, otherwise the heat stays at the edge.
This order saves time. It helps restore normal chip flow, a stable surface, and predictable tool life faster instead of adjusting every parameter at once without a clear reason.
How to set the process step by step
Settings that worked for 304 or 316 are not a good starting point here. The operation may look almost the same from the outside, but duplex puts much more load on the cutting edge from the first seconds. If you start from a random table or immediately go for the upper speed range, the tool will overheat before you even understand what went wrong.
It’s safer to start calmly and adjust in small steps. That makes it easier to find the working point, and the insert doesn’t get sacrificed to guesswork.
A practical sequence
It’s best to start with the tool manufacturer’s data specifically for duplex. The feed should not be “careful,” but enough for real cutting. If it is too low, the insert polishes the surface instead of removing metal properly, and heat builds up fast.
A test pass is better done short and at one depth. Watch not only the size, but also chip shape, sound, heat, and machine behavior. Change only one parameter at a time: speed, feed, or depth. Otherwise it becomes hard to tell what actually helped.
If the cut becomes smooth and predictable, the setting can be raised in small steps, usually by 5-10% per test. There’s no advantage in rushing here. A couple of extra test parts often save a whole box of inserts.
The chips give a lot of clues. If they darken, tear, or stick, the process is drifting the wrong way. If the surface looks decent but the insert wears out quickly, the problem is often not speed, but feed that is too low.
It helps to keep a simple note after each test: speed, feed, depth, insert grade, and what you saw in the chip and on the surface. Even a few notes like that make the next setup much easier.
A simple example on a turning operation
On a typical part, the difference between 316 and duplex shows up quickly. A shaft is loaded, a program that used to run smoothly on 316 is started, and at first it seems like the same result should be possible. Same operation, same tool, familiar passes. But differences appear on the very first part.
The insert loses sharpness faster. Chips come off unevenly: sometimes they stretch, sometimes they break too late. Size starts drifting along the length of the cut. The operator often first blames overhang, rigidity, or a random insert issue. But the real cause is often the setting itself.
If the speed was left at the 316 level, the edge overheats sooner. If the feed is too small, the insert doesn’t cut confidently and starts sliding across the surface. After that, the top layer work-hardens, and the next pass goes through a much tougher zone. That is when size starts moving and the surface loses consistency.
The fix is usually simple, but precise. Speed is lowered a bit so the edge doesn’t overheat on the first pass. Feed is often increased slightly so cutting becomes more confident. At the same time, you remove the extra light pass that was harmless on 316 but only damages the top layer on duplex.
After that adjustment, the picture changes quickly: chips break more evenly, the sound becomes calmer, the surface comes out more stable, and the size stops drifting from part to part.
On turning operations, that is a good benchmark. If a program for 316 suddenly starts eating inserts on duplex, the first things to check are speed, feed, and overly light passes. That is usually where the cause is hiding.
Where people most often make mistakes
Most problems start before the machine even begins cutting. The operator takes a setting sheet from 304 or 316, lowers speed a little, and expects a familiar result. That is not enough for duplex. It work-hardens faster, heats the edge more, and handles cautious, sluggish cutting much worse.
Another common mistake is cutting speed too much and choking the feed at the same time. It seems like the process will become gentler. In reality, the tool starts rubbing the surface. Heat rises, the layer under the edge hardens, and tool life drops even faster. It is usually better to reduce speed moderately while keeping enough feed for the edge to enter the metal confidently.
Repeated light passes cause a lot of trouble too. On regular stainless steel, they can sometimes help bring the part to size or improve finish. On duplex, that approach often harms both size and surface. If the first pass already created a work-hardened layer, the next tiny cut may not remove it; it may only heat and scratch it.
Coolant mistakes are very common as well. People cut flow to save coolant, use a weak stream, or aim it away from the cutting zone. Then overheating quickly moves to the insert tip, chips become unstable, and the surface loses its finish. If coolant hits the part or the chip instead of the edge, it won’t help much.
Another frequent cause of vibration is excessive tool overhang. After that, the operator keeps changing speed and feed, trying to fix a mechanical problem with settings. Usually, the right place to start is not with numbers, but with shortening the overhang, checking the clamping, and improving the overall rigidity of the setup.
Before blaming the material, it helps to quickly check a few things:
- is the duplex grade correct;
- did you cut feed too much along with speed;
- does the finishing pass actually remove real stock;
- does coolant reach the cutting zone directly;
- can the tool overhang be reduced.
Duplex is demanding, but not capricious. It simply handles rubbing against the surface very poorly when it should be cutting cleanly.
Signs that the setting is drifting
A setting problem on duplex usually shows up in the job, not in a table. First the chips, sound, and surface change. Size often drifts later. That is why it pays to notice the early signs instead of waiting for scrap.
What you can see during cutting
The earliest sign is usually the chip. If it comes off as a long ribbon, darkens, and starts sticking to the part or tool, cutting is becoming difficult. The cutting zone is overheating and the process is losing stability.
Sound changes earlier than many people manage to check the size. Instead of a steady hiss, you hear a hum, a whine, or a light vibration. That is usually a direct hint that the system is under strain.
Another sign is cutting edge wear that comes too fast. The tool doesn’t even last through the expected share of life, and the part already shows dull bands, burrs, or a torn trace. On turning operations it often looks like this: the first pass is still clean, but the next one is already noticeably rougher even though the program didn’t change.
What you can see after a few parts
Size often drifts gradually. Part after part, the cycle stays the same, but diameter or length starts moving in one direction. Usually that points not to a program fault, but to heat, edge wear, and harder-than-expected cutting.
It helps to look at the combination of symptoms, not just one. If the chip got longer and darker, the sound turned into a hum, the surface started tearing, and size drifted after a few parts, the setting is no longer holding properly.
On duplex, don’t count on “just a couple more parts.” It is much cheaper to stop after the first changes, inspect the edge, and correct the setting than to sort through a batch of scrap and extra tool consumption later.
A quick check before starting a batch
A duplex batch can fail on the very first part. A size that looks good after a test pass does not mean the setting is right. For this material, you need to look wider.
First, verify the exact material grade from the documents and the blank marking. Small differences between similar alloys change chip behavior, heating, and insert wear. If the setup sheet says one grade and the batch is another, the rest of the tuning becomes guesswork.
Then check the tooling setup. On duplex, small things become problems fast: too much tool overhang, weak insert clamping, or the wrong coolant angle. If the stream doesn’t hit the edge, overheating comes quickly.
Before the batch, it helps to run a short checklist:
- confirm the material grade;
- make sure the insert suits the operation;
- reduce tool overhang to a reasonable minimum;
- aim coolant directly at the cutting zone;
- record the starting settings and expected tool life.
It is also worth removing unnecessary motion in the tool path. Repeated touches, entry pauses, and extra finishing passes over an already work-hardened layer quickly damage the edge on duplex.
Another useful step is to start a simple test log right away. Four lines are enough: speed, feed, depth, and the number of parts until a clear drop in performance. It’s better not to rely on memory here. After a couple of hours, it’s hard to remember exactly which setting made the chips turn blue and the size start drifting.
The first part should also be judged by more than just tolerance. Look at chip color and shape, sound, the trace on the surface, part temperature, and the condition of the cutting edge after the pass. If the size is okay but the chip comes off torn and the insert is already chipping, the batch won’t last long.
What to do after the first trial parts
After two or three trial parts, don’t leave the setting as “close enough.” On duplex, that almost always ends with another setup in the middle of production. The edge wears sooner, size starts drifting, and the surface changes from part to part.
It’s better to lock in a working window for that part, that tool, and that setup. It helps to record not just one good number, but a range: the speed where wear doesn’t grow too fast, the feed where chips break predictably, and the depth of cut where the machine doesn’t start vibrating.
After the first parts, you usually want to record:
- the speed and feed where size stays stable;
- the number of parts or the length of cut before changing the insert;
- the actual cycle time;
- the condition of the chip, edge, and surface.
Then you can look at the economics. For duplex, it’s not enough to say, “the setting cuts.” You need to know how long the tool lasts and how much time each part takes. Often a slightly calmer speed gives much better tool life, and the batch ends up cheaper and more consistent.
If these jobs come up regularly, it’s worth turning the best trial settings into a standard sheet. Then you don’t have to start from scratch on the next order. If the issue is no longer just the settings, but the machine’s rigidity, coolant delivery, or the stability of the whole operation, it’s time to look broader. In such cases, EAST CNC specialists help with equipment selection, startup and setup, and service for metalworking tasks where repeatability matters.
The bottom line is simple: duplex doesn’t break because of one random parameter. It exposes the weak point in the process. Most often that is too much speed, too little feed, light passes, poor coolant delivery, or insufficient rigidity. When those points are put in order, the material cuts much more calmly and predictably.
FAQ
Why do cutting parameters from regular stainless steel work poorly on duplex?
Because duplex stainless steel is harder to cut. It has higher strength, it heats up the cutting edge more, and it work-hardens faster when the tool isn’t cutting confidently. What still works reasonably well on 304 or 316 often wears the insert out quickly and hurts surface quality on duplex.
What should I change first if the insert loses life quickly?
Start by lowering the cutting speed. That alone is often enough to reduce excess heat and restore tool life. Then check whether the feed is too low, because on duplex a very small feed often makes things worse.
Should I immediately reduce feed if noise appears?
Don’t rush to cut the feed. On duplex, that often turns cutting into rubbing, and the surface layer work-hardens even more. It’s better to remove excess speed first and then check whether the feed is still high enough for a clean cut.
Why are very light passes bad for duplex stainless steel?
Because a light pass may not actually cut the metal cleanly. It can just heat and scratch an already work-hardened layer. After a roughing pass goes poorly, a finishing pass like that is especially risky: size starts drifting and the surface tears.
How can I tell that the tool is rubbing instead of cutting?
Usually by looking at the chips, sound, and surface. Chips stretch into long strings, darken, or stick, the sound turns into a hum, and the part shows dull bands and a torn finish. At that point the tool may still be cutting, but it’s already working badly.
How do I choose cutting parameters on duplex without wasting inserts?
Start with a calm setting and change only one parameter at a time. Make a short test pass, watch the chips, sound, heat, and cutting edge, then raise or lower the speed in small steps. That is usually cheaper than chasing a fast cycle right away.
What should I do if chips on duplex come off long and sticky?
Look at the cause, not just the shape. Long sticky chips often show up when the edge is overheating, the feed is too low, or coolant isn’t reaching the cutting zone. First remove excess speed, check the feed, and bring coolant directly to the cutting edge.
How much does tool overhang affect the result?
Too much overhang quickly reduces rigidity. Even careful settings start to hum, chatter appears, and the part comes out with waves or bands. If you can, shorten the overhang first and check the clamping before changing speed and feed.
What should I check on the first part before starting a batch?
Check the material grade, the tool, the overhang, and coolant delivery. Then look not only at size, but also at the chip, sound, part temperature, and the insert after the cut. If the first part is within tolerance but the edge is already chipping or the surface is dulling, don’t start the batch yet.
When is the problem no longer the parameters, but the machine or tooling?
That usually means you’ve already corrected speed and feed, but the process still hums, size drifts, and the surface stays unstable. Then the weak point is likely rigidity, clamping, coolant delivery, or the tooling setup itself. Duplex exposes those issues very quickly.