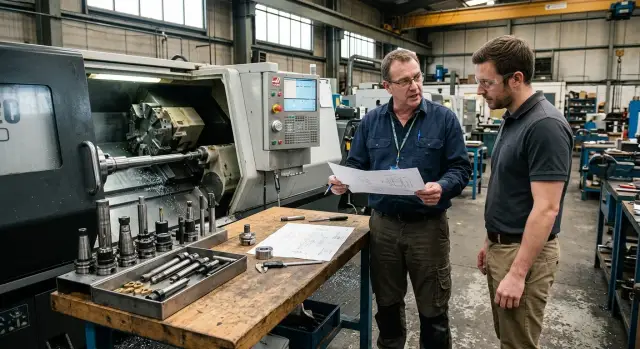
Machine stiffness before purchase: what to discuss with the supplier
Before ordering, check machine stiffness: which test parts, tool overhang, material and cutting regimes you should agree with the supplier.
Why you can't postpone the stiffness question
Machine stiffness affects the real result on the part, not just numbers in a catalogue. If some assembly "plays", dimensions shift, the surface gets chatter, and the finishing pass no longer gives the required quality. That's easy to miss during a demo.
A weak spot often shows up only on your specific operation. The supplier may show a neat part made of an easy material, with a short tool and a calm cut. In your shop you might have a long shaft, deep boring, thin wall or interrupted cutting. In those conditions the machine behaves differently.
Catalogues usually give axis travels, spindle power, maximum work diameter and weight. These are useful, but they don't answer the main question: what happens with a long tool overhang and at your cutting regimes. For a boring bar that sticks far out of the holder, the difference between two models is often more visible than the difference in their spec sheets.
A common scenario: at a demo the machine precisely turns a short steel sleeve. After purchase you run a part with a deep internal bore and tight diameter tolerance. Vibration, taper and extra passes appear. At first you may blame the cutting mode or the insert, but often the cause is simply that the machine has little stiffness margin.
So it's better to resolve contentious points before choosing the model. If you show the drawing, material, stock allowance and the real tool overhang in advance, the conversation becomes specific. The supplier can honestly say whether the machine is suitable, whether a heavier model is needed or whether the processing scheme should be changed.
If the supplier helps not only with sales but also with selection, commissioning and service, such a conversation is especially useful. At EAST CNC it usually starts before the final offer. One precise call before the deal often saves more money than a long search for the cause of vibration after start-up.
Which parts to show the supplier
Saying "we have a regular turning load" is not enough. For a meaningful discussion you need 2–3 real parts that you already make or will definitely run after purchase. This quickly shows whether the machine has enough stiffness margin and where vibration, dimension drift or surface problems might begin.
Don’t build an "average" part from different orders. That kind of example almost always smooths out difficult areas. It's far more useful to show real drawings or 3D models and immediately mark zones where the machine load is heaviest.
If your range is large, pick not the most common but the most demanding part. Usually that is a part with long cuts, heavy metal removal, thin walls, deep holes or strict finishing requirements. Such a part will show most quickly how much margin you need in the bed, spindle, tooling assembly and fixturing.
On the drawing, mark areas that cannot be discussed "roughly": zones with tight diameter tolerances, runout or concentricity requirements, thin walls, deep holes and bores, and long finishing passes where any loss of stiffness is immediately visible.
If the part belongs to a family, show the extreme cases. For example, next to a short simple piece include a long sleeve with a deep bore and thin wall. Then the machine will be chosen for the real load, not the easy variant.
A good conversation is built on specifics. Not "we need accuracy", but "this diameter must hold X tolerance after the finishing pass." Not "there's a hole", but "the depth is Y mm and the tool has Z mm overhang." After that you can discuss the test part, cutting modes and processing scheme.
What to tell about material and the blank
The same machine behaves differently on 45 steel, stainless, cast iron and heat-resistant alloys. So the supplier needs more than just the part size. Give the exact material grade and, if possible, the hardness. For some operations a difference between 28 HRC and 38 HRC already shows in spindle load, vibration and surface finish.
If hardness varies from batch to batch, say so. Shops often plan for an average value, and problems come with a "heavier" batch. For assessing stiffness margin this is more important than a neat test on a convenient blank.
Blank form also changes the picture. Bar stock usually machines more predictably. Forgings and castings have variable stock, scale and shock loads. Tubing adds risk of deflection and vibration, especially on long cuts. If you plan to machine forgings or castings rather than bar, say so without simplifying.
A common mistake is understating the stock allowance when talking to a supplier. On paper a part may look like an easy finish cut, while in practice you often have to remove 3–5 mm from an uneven surface. State the real stock on diameter, face, pockets or external contour. That makes it easier to understand what the machine can handle without shuddering.
Also call out areas of interrupted cutting: casting skin, slots, holes, keyways and cuts through windows in a tube. Such zones quickly reveal whether the machine has margin in its components, tool clamping and overall stiffness.
It's convenient to send a short summary: material grade and hardness, blank shape, minimum and maximum stock allowance, interrupted-cut zones and what matters most for this part — metal removal, dimension or surface finish.
A simple concrete example beats a general description. If you turn a shaft from 40X after forging, write: "40X, forging, hardness about 32 HRC, up to 4 mm stock per side, occasional scale." After such a note the discussion goes straight to the point.
Which tool overhangs to discuss in advance
Tool overhang often affects the result more than the machine's spec sheet. With a short cutter everything looks calm, but with a long bar that same assembly starts to ring. It's in those conditions that the machine's real stiffness becomes visible.
So don't ask for a test "with a similar tool." Fix the overhang in millimetres for each case: turning tool, drill and boring bar. You need the exact distance from the clamping point to the cutting edge, not a vague description.
Send your working dimensions. For example: external turning tool 32 x 32 mm with 55 mm overhang, 18 mm drill with 95 mm overhang, 32 mm boring-bar with 180 mm working overhang. If there's a problematic operation, list it separately with real numbers.
Long, thin holders should be discussed separately. They are more prone to vibration, dimension drift and poor surface. If you bore deep internal diameters or work near chuck jaws, a short tool will simply not represent your real load.
Don't accept a demo with reduced overhang if you won't use that in production. Otherwise you'll buy the machine based on a pretty test and then have to cut much more cautiously.
Ask directly how feed and depth of cut should change as overhang increases. If a boring bar extends 180 mm instead of 120 mm, which regimes does the supplier consider safe and why. A normal answer should include numbers, not vague words.
If you discuss a CNC lathe, request the test at your working overhang. Then you'll see not a show result but the machine's behaviour in conditions close to your shop.
Which regimes to use for checking
Stiffness is seen not from one neat pass but from a set of regimes similar to your regular work. If the supplier only shows a very gentle cut, you won't understand the machine's behaviour under normal load.
It's better to test the same part in at least two variants: roughing and finishing. That shows not only metal removal but whether the machine holds size and surface after heavier work. One finishing pass proves almost nothing.
Record numbers for each operation: cutting speed or spindle RPM, feed, depth of cut, number of passes and machining time. If it's not on paper, later it's hard to compare machines and even harder to understand why your part behaved differently.
A short table is enough: part material, blank diameter, roughing regime, finishing regime, grade of insert or tool and actual cycle time.
A calm regime is useful only as a lower bound. After it you need a working variant close to your real shift. If you usually turn steel at 0.25 mm/rev feed and 2 mm DOC, don't accept a demo at 0.08 mm/rev and symbolic cut. Almost any machine looks better on such a test than in real life.
Watch not only that the cut happened. Listen to the sound, watch for vibration, inspect the chip, and measure size after roughing and after finishing. If size begins to "float" or the surface suddenly roughens in the working regime, the margin is small.
One more useful trick: compare results with new and with your usual tooling. A new insert often hides weak spots. Ask to see work with the tooling you will realistically use in series, not only a demo set.
How to run the conversation with the supplier step by step
The conversation becomes useful when you discuss your real part, not the catalogue. Before buying, send the supplier the drawing, a photo of the finished part or a similar shop part and state the planned output per shift or per month. The same machine is evaluated differently for 20 parts a day and for continuous production without long breaks.
Then narrow the talk to the operations with the highest risk. No need to describe the whole routing. Better to name the specific places where you expect vibration, size drift, taper, surface marks or finishing problems. Then the supplier understands where stiffness matters and where power is the key issue.
A convenient order is:
- Send the drawing and mark problem zones.
- State material, blank and the operations: roughing, finishing, boring, threading, grooving.
- Name the real tool overhangs and fixturing.
- Request a test in a scheme close to your processing in feed, depth of cut and clamping.
- Before the test agree what result you will consider acceptable.
The last point often decides everything. If you don't agree in advance on tolerance, surface finish and cycle time, each side will see the test as a "success" in its own way. Better to fix it up front: size without adjustment after each part, cycle no longer than 3 minutes, no visible chatter on the finished surface.
After the test ask not for general impressions but for a factual breakdown. Check how the machine holds size over several consecutive parts, how long the cycle took and what the surface looks like in the problematic area. If the supplier calmly discusses these figures, the talk usually goes to the point. If instead you are shown only an "ideal" part without processing conditions, dig deeper.
One precise test is almost always more useful than ten general promises.
A simple shop example
Imagine a housing with an internal bore. Outside everything looks simple, but inside there's a long reach where the tool has to go deep. On roughing this often isn't scary: stock is removed, the sound is steady and the machine carries the load without surprises.
The problem starts on the finishing pass. The operator fits a boring bar with a large overhang, reduces feed and expects a steady size. Instead they get surface trembling. Chatter appears, and the size hits sometimes and drifts on subsequent blanks.
This case shows a simple fact. Stiffness can't be judged only by spindle power or by how the machine behaves in roughing. While the overhang is short everything may be fine. But as soon as the bar goes deeper the whole system becomes softer: the tool deflects more, the cutting zone starts to vibrate, and the finishing result depends not on catalogue numbers but on the machine's actual margin.
If you discuss the purchase in advance, describe this scenario to the supplier. Not just "we need boring", but diameter and depth, length of internal reach, finish-pass overhang, size tolerance, surface requirements, material and batch size.
With those data the conversation becomes easier. The supplier can say at which regimes the machine usually holds such an operation, what overhang is best not to exceed and where the vibration risk starts. If the company provides supply, commissioning and service, it's easier to pick a machine for a specific tricky operation rather than "a machine in general."
A simple rule of thumb: if roughing is fine but finishing with a large overhang makes size float, the margin is small. For a production part this quickly turns into extra adjustments, scrap and lost time.
Where buyers most often go wrong
Most money is lost not on the machine price but on vague conversations before the deal. If you want to understand stiffness, you can't rely on general promises and pretty videos.
The first mistake is watching a demo without exact test conditions. A video proves little if you don't know material, blank diameter, depth of cut, feed, RPM and tool overhang. The same machine behaves very differently on aluminium and on steel.
The second mistake is comparing machines "by picture." One supplier shows a short steel sleeve, another a long stainless shaft. Formally both are turning operations, but the machine load differs and the comparison is meaningless.
The third mistake is staying silent about an infrequent but heavy operation. Most of the time parts may be easy, but sometimes you need to bore a long hole with a big overhang or remove a large stock on a heat-resistant alloy. Those cases later become the source of vibration, scrap and disputes.
The fourth mistake is accepting a convenient test. The supplier fits a short overhang, a rigid blank and a mild regime. On the screen everything looks clean. In your shop the overhang will be 30–50 mm longer, the part thinner and the feed higher. The result differs.
And one more point: don't confuse spindle power with overall stiffness. A big number in the spec sheet looks impressive, but it won't fix vibration on its own. If the bed, spindle assembly, turret and tooling are at the limit, extra kilowatts won't give a clean surface or stable size.
A proper check looks boring, and that's good: the same part, the same material, a clear overhang and honest regimes. That's how you see whether the machine suits your work.
Short checklist before the test
Before the conversation collect one file or one email with what you will actually be machining. If the discussion only revolves around power and axis travels it won't be very useful.
Check five things:
- Choose 2–3 real parts or at least the most demanding zones: long boring, thin wall, deep pocket, finishing pass for an interference fit.
- Specify exact material and blank condition: hardness, stock allowance, blank shape and clamping method.
- Fix the tool overhang as it will be in production.
- Ask to list cutting regimes by operation: RPM, feed, depth of cut and number of passes.
- Agree in advance what counts as success: size, tolerance, surface finish, roundness, runout and cycle time.
If you choose a CNC lathe, it's convenient to summarise in a table: operation, tool, overhang, regime, expected size and time. Suppliers who manage the project from selection to commissioning usually move faster. At EAST CNC this is a standard part of working with machine tools and post-sale service.
A good sign is simple: after the talk you have not a promise but a clear test scenario.
What to do next
After the conversation you should have not a set of vague words but a data package for the test. At this stage it usually becomes clear whether the machine has enough stiffness for your part, tool and regimes.
Put one folder together and send the same package to all suppliers. That makes answers easier to compare without confusion. Usually a drawing with tolerances and form requirements, a photo of the part or a similar blank, material and blank condition, surface and accuracy requirements, and an example of current scrap or a problematic area are enough.
Don't postpone the test discussion until the machine is almost selected. Agree first how the check will be done and only then finalise the configuration. Otherwise you may pick a spindle, turret or tooling that looks good on paper but doesn't suit your work.
It's useful to ask for a written confirmation. Let the supplier record which test part they will use, what material and blank, what tool overhang they accept, which cutting regimes they will check and what result they consider acceptable. That document greatly simplifies the pre-purchase check. If answers change later, it will be obvious.
If the supplier resorts to vague phrases and refuses to lock test conditions in writing, that's a bad sign. Such answers make it hard to understand what is actually promised.
If you need help analysing your parts, EAST CNC can assist with consultation, machine selection, commissioning and service. In that conversation it's best to show one real part from your production. Usually the decision becomes clear faster than from catalogues and general figures.
FAQ
Which parts are best to show the supplier before buying a machine?
Send 2–3 real parts that you already make or definitely plan to run. The most useful example is the one that is hardest on the machine: long boring, thin walls, large stock allowance or tight tolerances. Don’t assemble an “average” part from several jobs — that hides weak points.
What should I tell about material and blanks?
Give the exact material grade, hardness and note if hardness varies between batches. Also state the blank shape, real stock allowance and any interrupted cutting zones — because forgings, castings and tubes stress the machine differently than a smooth bar.
How to discuss tool overhang correctly?
Specify the distance from the clamping point to the cutting edge in millimetres for each tool. A vague phrase like “long boring bar” doesn’t help; you need a number, e.g. a boring-bar overhang of 180 mm on the finishing pass.
Which cutting modes are best to use to check stiffness?
Ask for at least a roughing and a finishing pass on the same part, not a single tidy cut. For each operation record spindle speed or cutting speed, feed, depth of cut, number of passes and cycle time — otherwise it’s hard to compare machines later.
Is a demo video of the machine enough?
No. A video proves little unless you also know the material, stock, tool overhang and cutting parameters. Videos often show a convenient part and calm conditions that hide real problems.
If I have a large variety of parts, which one should I pick for discussion?
Choose not the most common part, but the one that is hardest for the machine. Rare but heavy operations usually reveal whether the machine has enough stiffness without extra adjustments or scrap.
What should be considered a successful test result?
Agree this before the test. Usually you check size over several consecutive parts, surface finish in the problematic area and cycle time — not just whether the machine cut material once.
Why can’t stiffness be judged only by spindle power?
Because spindle power alone doesn’t remove vibration. If the bed, spindle assembly, turret or tooling are at their limit, extra horsepower won’t give a stable size or a clean surface — stiffness is the system property, not just power.
Can I agree to a test with a smaller overhang or easier cut?
Don’t accept a demonstration with a reduced overhang or gentler regime if that isn’t how you’ll work. Short overhangs, a rigid blank and calm cutting make tests look better than real shifts, and after purchase you’ll have to cut much more cautiously.
What is best to send the supplier in the first message?
Send the same package of data to all suppliers in identical form. Usually a drawing with tolerances, a photo of the part or blank, material and hardness, stock allowance, clamping method, tool overhang, target cuts and a note about any recurring scrap or problem area is enough.