Machine placement on the shop floor: how to choose without later relocations
Choose a machine location by aisles, raw-material delivery, service access and chip removal. A simple layout to avoid unnecessary relocations.
Why a free corner almost never works
Choosing a spot for a machine on the shop floor often comes down to the simplest sign: where there's empty space now. On a plan that looks convenient. In practice it usually turns out the opposite.
A free corner rarely works on its own. At first it seems quiet and unused, but after start-up you find it's awkward to deliver raw material there, the operator can't open doors comfortably, and a cart blocks the aisle. If chips are discharged nearby or a coolant tank sits there, that spot quickly becomes a bottleneck.
The problem isn't just area. A bad location breaks the internal routes. People start walking around the machine in long arcs. Carts wait for a passage to clear. Raw material zigzags instead of following a straight path from receiving to processing. Even a single poorly placed machine can add 10–15 minutes to each shift just on extra movements.
Later come costs nobody counted at first. You have to re-mark the floor, move power feeds, find a new place for pallets, change storage order for blanks and finished parts. Added to that are downtime and idle workers. The machine stands while people wait, and schedules slip.
Usually the mistake starts by looking only at the machine's footprint. That's not enough. Before installation check four things:
- aisles for people and carts without constant crossings;
- delivery of blanks and removal of parts by short routes;
- a service area where doors, hatches and components are easily accessible;
- chip removal and coolant handling without dirt, blockages or unnecessary manual work.
If any one of these is missed, the location will almost certainly need rework. For a shop it's usually cheaper to spend an extra hour measuring and drawing a simple scheme before installation than to fix it later.
What to measure before marking the floor
Mistakes start with the tape measure, not with installation. If you place the machine by eye on the plan, you often have to correct it after delivery when moving it is hard and expensive.
Measure more than the passport dimensions. Measure the actual contour the machine will occupy in operation: the body, control cabinet, swing of open doors, access to the chuck or table, travel of protective guards. If there's a chip conveyor, coolant tank or a separate cabinet nearby, include them in the plan right away.
A useful rule is simple: draw two shapes, not one. The first shows the machine itself. The second shows the area needed when doors are open and the operator is working. The second outline is most often forgotten and later you find it hits a column, wall or neighboring equipment.
After that mark everything that cannot be moved: columns, load-bearing walls, gates, doors, windows, switchboards, fire cabinets, crane runways and existing equipment. If the load is delivered by crane, mark not only the crane path but also the points where the load is picked and placed at the machine.
Check internal transport separately. The width of a pallet truck, cart or forklift with a load matters more than the width of the empty machine. If a blank is long, count not only straight passage but also turning space at the machine. A common mistake is: the delivery passes straight in, but there's no room to turn.
Test the scheme with a simple example. Suppose a lathe stands by a wall and a pallet truck brings a pallet. On the plan it looks tight but acceptable. In reality the truck needs clearance for approach, and the operator needs a step back when loading. Those extra 40–60 cm often solve the problem.
Finally, mark utility connection points: power, compressed air, coolant, lighting and cable routes. Otherwise the machine might sit where aisles are fine but connections are inconvenient. Then you end up with hoses across the floor, extra detours and temporary fixes that stay for a long time.
If the shop has multiple pieces of equipment, draw the plan to scale. This is the simplest way to spot bottlenecks in advance and avoid moving heavy machinery after start-up.
How to keep aisles free from crowding
Crowding doesn't come from the machine itself but from movement around it. On paper everything looks fine, but once running a cart, pallet, parts bin, toolbox and open cabinet doors appear nearby. The aisle narrows quickly.
Give pedestrians and deliveries different paths. If the operator walks the same route used to bring metal, the aisle will be blocked constantly. This usually happens in front of the machine where the cart stops and the finished part is removed.
A practical layout is simple: the pedestrian path runs to the side or slightly away from the loading zone, and deliveries take a route where a cart can approach, stop and leave without extra maneuvers. Then people don't get in each other's way and the machine layout doesn't become annoying a month after start-up.
Before marking the floor check practical details. Does the control cabinet door open into the aisle? Does a pallet of blanks stay by the machine longer than one operation? Does a coolant tank, chip conveyor or pallet protrude into the passage? Does a cart block the way exactly when the operator is loading a part?
In front of the machine allow turning space for the cart. It isn't enough for it to arrive in a straight line. There must be an area to turn, line up at a convenient angle and not hit the handle on a neighboring machine or stand. If blanks are heavy, give a little more room than trying to fit everything tightly.
A useful trick is to mark the aisles on the floor temporarily. Tape or chalk is enough for a first check. Mark the pedestrian path, the pallet area and the spot where the cart parks for loading. This shows problems before installation.
If a passage already seems almost okay, it's often still too narrow. Removing one extra pallet from the route is easier than moving a machine half a meter later.
How to organize raw-material delivery and finished-part removal
If raw material is brought to the machine along the same narrow aisle used to remove finished parts, jams appear quickly. The operator waits. The storeman maneuvers. A pallet is left in the aisle. People think the machine is the problem when the issue is actually the route.
It's better to separate raw material and finished parts to different sides. Even with a single passage, you can make the flow circular: deliver from one side, remove parts from the other. That prevents pallets from piling up at the door, the panel or the loading zone.
When choosing a location mark not only the machine footprint but also the pallet, cart or forklift route. The plan should show four points clearly: where raw material is stored before work starts, where the operator takes the next blank, where the finished part is placed immediately after processing, and where batches accumulate before removal.
Keep the pallet of blanks closer to the loading side but not flush to the machine. The operator needs room to step back and the service area needs access. Finished parts are better stacked separately, slightly to the side or further along the flow. If everything stands together, the service area becomes a storage spot quickly.
Allow a buffer area for 1–2 pallets for temporary accumulation. This helps when inspection, packing or the next station is busy. Place the buffer near the removal route, not at the machine. That keeps aisles free.
Long and heavy blanks
Long materials need a separate route. Don't move a bar, tube or shaft where people walk. Check the turning radius of the cart, the turning area and the point where the material can be safely delivered to the machine.
Heavy loads should also use their own route. If the forklift crosses the work area every time, the machine layout will obstruct itself. It's usually easier to give the heavy flow an outer aisle and a short approach to the loading point. That saves more time than packing machines tightly together.
Where to leave the service area
One common mistake is to look only at the machine body and forget the people, doors and parts that need daily access. The machine may look well placed, but setup, measurement and service become inconvenient.
The service area isn't empty space—it is needed for normal work. The operator approaches the chuck, places the blank, changes the tool, opens hatches, checks the first part and clears chips safely. If these actions require turning sideways or stepping into the aisle, the spot is wrong.
A lathe usually needs most space on the side where the operator works with the chuck and the machine door. That's where setup and first-check measurement happen. If there's a tailstock, allow room for its service too. It should be reachable without detours and without crowding.
Check access to the control cabinet and service hatches separately. They must open fully. If cables, hoses or coolant lines run at the back, don't push the machine tight to the wall. Otherwise even small tasks turn into moving pallets and extra downtime.
Around the machine plan space for four things: the operator during setup and tool changes, doors and hatches to open, a service technician with tools, and temporary placement for a cart, measuring tools or fixtures.
A simple check works well. Mark people’s working positions on the floor. Stand where the operator will change a tool or measure the first part. Put a cart nearby. If two people are already cramped, it won't get better after start-up.
How to plan chip removal and coolant work
Chips break even a well-planned layout if you think of them only after start-up. Buckets appear on the floor, carts sit in the aisle, the operator spends minutes cleaning, and dirt and oil gather near finished parts.
Decide where chips will go after each shift. You need a clear route: from the machine's bin to a container, cart or conveyor, then to a temporary collection point and out of the shop. If this path crosses the main pedestrian route, you'll likely get slippery floors and constant crowding.
Usually answer three questions: who removes the chips, what do they use to remove them, and where does the container stand between shifts. Containers can't be placed arbitrarily—they need a fixed zone so the operator doesn't move them every day.
A working scheme looks like this:
- chips exit on the side away from the main pedestrian flow;
- there is space for a container, cart or conveyor intake nearby;
- the removal route doesn't pass through the finished-parts area;
- the bin is approachable without turning around or detours;
- the floor nearby is easy to clean and coolant spray doesn't hit neighboring workstations.
The same logic applies to coolant. Place pans, tanks, filters and pumps so they can be serviced without acrobatics. If cleaning a pan means moving boxes, pushing a pallet truck or walking around pallets every time, the spot is wrong. Refill, inspection and hose checks should be routine, not a special problem.
In practice the mistake looks the same: they place the machine conveniently for loading but leave too little space at the back. Chips are taken out across the main aisle and the coolant tank is serviced from the side in a bent position. After a month there's a dirty narrow ring around the machine and the location must be revised.
If the machine is planned for intensive use from the start, allocate space not only for the operator but also for proper cleaning. A couple of extra square meters usually costs less than constant moving of containers and stoppages for cleaning.
Step-by-step place selection
Most mistakes happen like this: they see an empty patch of floor and put the machine where it fits. Later the cart hits a corner, the operator walks around a pallet every time, and blanks are carried across the whole shop.
It's more reliable to start from the plan and real routes.
First take the shop plan and mark everything that can't be moved: columns, gates, walls, cabinets, switchboards and crane paths. If the machine will be next to an existing line, draw its working zone too.
Then draw four movements: how the blank arrives, where the operator walks, how the cart or forklift moves, and where the finished part leaves. If these lines meet at one point, there's likely to be a jam.
Choose a spot so flows cross as little as possible. The operator shouldn't constantly collide with deliveries, and finished-part removal should go to a separate side. Even an extra 3–4 meters of walking per cycle can quickly add up to noticeable time loss.
Next make a trial marking on the floor with chalk, tape or temporary lines. Mark not only the machine footprint but also doors, approach to the control cabinet, the pallet spot and the chip collection zone.
Walk the route yourself. Push an empty cart, open all doors, stand where the operator stands, imagine a tool change and the removal of a part. If at any point someone must wait or turn awkwardly, fix the layout now.
Only after this check move the installation point into the final plan. Lines on paper are easy to change. A machine after installation is not.
Common placement mistakes
Most errors are not from complex calculations but from small things nobody checked on site.
The first mistake is looking only at passport dimensions. The machine takes more space in operation: doors open, the operator approaches from the side, the technician reaches filters, and the electrician needs cable access. On the plan everything fits, but in a shift the area is uncomfortable.
The second mistake is placing the pallet of blanks where people walk. It may start as temporary, but temporary becomes permanent. The aisle narrows, the cart hits the pallet, and the operator must walk around it every time.
The third mistake is routing chip removal through the main passage. Wheels spread dirt through the shop, floors get slippery and material delivery slows.
The fourth mistake is forgetting service access. Pumps, coolant tanks, filters, hatches and cable entries need regular access, not once a year. If equipment is placed tight to a wall just because it fits, even small work later takes extra time.
A quick on-site check helps:
- open all machine doors fully and mark the real approach area;
- place a pallet or cart of the size you use daily on the floor;
- walk the pallet truck route and separately the chip removal route;
- check access to pump, filters and cables without moving neighboring items;
- compare passport dimensions with measurements taken on site, not instead of them.
If a scheme looks good only on paper, it probably has a weak spot. Better to spend an hour marking the floor than to stop production and move heavy equipment later.
Example for a small shop
Imagine a shop of 120–150 m² with one set of gates, a receiving area for blanks by the entrance and one lathe. In such a space place the machine not in the center but so the flow is nearly straight: the blank comes in, reaches the machine and the part leaves without turns and fuss.
Place the machine with its side to the long wall. Leave a free passage in front for the operator and the cart, and keep a short route from the gates and shelving on the loading side. If the stock is at the entrance, deliver material from the side where it won't cross the operator at the control panel.
Take finished parts to the opposite side. That way raw material and finished products don't mix in one tight spot. Even in a small shop this reduces confusion.
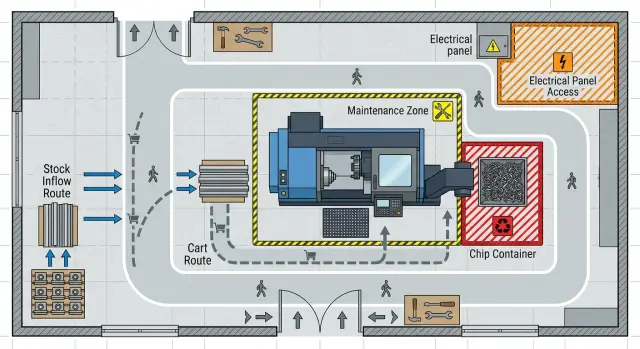
How it looks on the plan
For a small room the working scheme is usually:
- blanks and receiving at the gates;
- a straight approach from the gates to the machine for pallet trucks or carts;
- an operator working area in front of the machine at least 1.2–1.5 m wide;
- space on the opposite side for bins with finished parts;
- the chip container located closer to the exit, not directly behind the machine.
Place the chip container so it can be pulled out by a short route. If removal requires going around the machine, it will eventually block both people and deliveries. The same applies to coolant: allow side access to the tank and service points, not through storage or finished-parts areas.
What to keep nearby
The operator needs a clear view: the machine door, the panel, the parts pallet and the aisle. A tool cart should be one or two steps from the work area but not in front of a cabinet or in the aisle. Position the control cabinet so it can be approached for checks and repairs without moving pallets.
Simply put, a good small-shop plan looks like this: raw material enters on one side, processing happens in the center of the route, parts leave on the other side, and chips go out by their own short path.
Quick check before installation
Even a reasonable plan falls apart on small details. On paper everything fits, but in the shop a cart won't pass, the operator walks around the pallet, and there's no room for the chip container.
Before final marking check four things:
- people and equipment move without crowding;
- blanks can be delivered by a short, clear route;
- there is access to all daily service points;
- chips and coolant are handled without temporary buckets, pallets or detours.
Then walk the route. Use chalk, tape or cardboard to mark the machine, control cabinet, pallet, parts bin and door openings. Walk the raw-material path from unloading to the first setting and separately the operator's path during a normal shift. If you find an extra turn, an awkward cart turn or a cramped spot for two people, the problem is already visible.
Plans are often drawn to catalog dimensions, but real obstacles cause trouble. Check not only the machine outline but everything that sticks out or moves: chip conveyors, doors, the chuck, fixtures, cable entries and the loading area for crane or pallet truck. In a small shop an error of 300–400 mm quickly becomes a lasting inconvenience.
A practical tip: run a trial day without installing the machine. Mark the spot, place a pallet, empty bins and a cart, and run the usual route. In half an hour you'll see where a jam will form.
If you are still choosing a machine, it's better to resolve these questions before ordering. At EAST CNC we usually help to discuss real dimensions, service clearances and a placement scheme specific to your shop. This is especially useful when you need to consider installation, commissioning, service and chip removal from the start.
FAQ
Can I just put the machine in a free corner?
Almost always no. A corner looks convenient only on the drawing. After start-up it becomes hard to deliver raw material there, the operator is cramped when opening doors, and a cart can block the aisle.
What should I measure before marking the floor?
Measure more than the catalog size. Measure the machine body, control cabinet, open doors, access to the chuck or table, guards, the coolant tank and chip collector if they are separate. Then mark columns, gates, switchboards and crane paths on the plan.
Why draw two outlines instead of one?
Draw two outlines. The first shows the machine itself; the second shows the area needed when doors are open and the operator is working. If you forget the second outline, the machine will hit a column, wall or neighboring equipment.
Should pedestrian paths and raw-material delivery be separated?
Yes. The shop runs more smoothly when pedestrian routes are a bit separate from delivery aisles. That way the operator doesn't meet the cart at the control panel and doesn't wait for the way to be cleared.
Where should the pallet with raw material be placed?
Keep it closer to the loading side, but not tight against the machine. The operator needs room to step back, and service must have access. If the pallet sits at a door or next to a cabinet, the aisle will quickly narrow.
Where is best to place the container for finished parts?
Give them a separate place slightly to the side or further along the flow. Don't stack finished parts beside the loading and service area. Otherwise the area around the machine will quickly turn into a small warehouse.
How to plan chip removal and coolant handling?
Decide the route up front: from the machine’s bin to a container or cart, then to a temporary collection point and out of the shop. Don't route chips through the main pedestrian aisle and don't place containers wherever convenient. Coolant tanks, filters and pans should be in an area accessible without awkward moves.
How do I know if the service area is enough?
Leave room where the operator loads the part, changes tools and measures the first piece. Check that doors and hatches open fully and that the electrician or technician can reach the panel, pump and filters without moving pallets. If maintenance must be done from a cramped angle, the spot is wrong.
How to test the layout before installing the machine?
Mark the machine, doors, pallet, cart and chip container with tape, chalk or cardboard, then walk the full route. If someone has to wait, hit an angle or turn awkwardly, fix the layout before installation.
What are the most common placement mistakes?
Most often they only check the catalog dimensions, put the pallet in the aisle, forget turning space for the cart, or press the machine against the wall. Another frequent mistake is routing chip removal through the main aisle. These small oversights lead to extra detours, dirt and downtime.