Lighting at the Machine: How It Affects Inspection and Safety
Lighting at the machine affects measurement, tool setup and cleaning. We explain where low light causes misses and how to quickly check a station.
What poor lighting does at the machine
Poor lighting changes more than the picture in front of your eyes. It changes how the operator behaves: people squint, lean in, and take longer to find a mark, an edge or a fastener. On a simple operation this costs minutes, and on a risky one it increases the chance of a mistake.
Small parts suffer the most. With little light or side lighting, a shadow easily blends with the real edge of a part. The operator can mistake shading for a chamfer, miss a thin chip on the surface, or misjudge how the blank sits in the chuck.
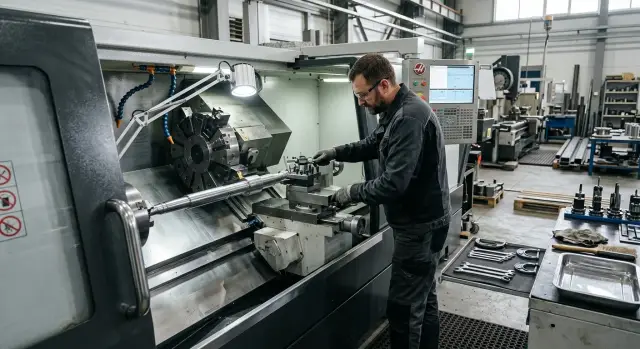
On a CNC lathe this is especially noticeable where metal, the chuck, the tool and coolant are close together. A glare on a wet surface can hide exactly what you need to see immediately: a protruding fastener, a burr, a sharp edge or a tiny chip. The eye sticks to the bright spot while the dangerous place stays out of focus.
Problems usually look the same: chips seem part of the table or tray, an edge appears 'broken' because of shadow, a screw or clamp is not seen at first. As a result the operator looks where it is brighter, not where the risk is.
There is another effect, simpler but just as unpleasant: fatigue comes faster. When a person constantly peers, they lose accuracy even on familiar tasks. After a few hours of a shift this becomes clear. They change posture more often, bring their face closer to the work area and hold their hands near moving parts for longer.
Good lighting is not 'just for comfort'. It is needed so the eye immediately separates an edge from a shadow, a chip from dirt, and a dangerous projection from a normal reflection. If the work area is lit evenly, without drops in brightness, the operator notices risk faster and makes fewer unnecessary movements.
Where mistakes appear during measurement
Measurement errors often start not in the instrument, but in the fact that the operator cannot clearly see the scale or the part edge. Poor lighting at the machine adds extra hundredths where they should not be, and the person blames the caliper or micrometer while the cause is nearby.
Even a simple dimension becomes a problem if there is not enough light. It is hard to catch the mark on a caliper quickly, and on a micrometer the sleeve and reference line are hard to read. The operator squints, turns the tool, changes the angle. Two consecutive measurements can then give different results even though the part has not changed.
Shiny metal brings a different error. If light hits the surface directly, a glare appears and the part edge seems smeared. This is common on faces, chamfers and thin edges. The eye latches on the bright spot instead of the real edge. Because of this, dimensional checks become inconsistent: one time the size 'fits', the next it causes doubt.
A shadow interferes just as much as a glare. When the operator brings a hand to the part or leans in, they block the light. A shadow falls on the caliper jaws, on the micrometer contact line or on the reference mark itself. The reference point visually shifts, even if only slightly. In rough checking this might go unnoticed, but in precision work these small shifts quickly add up.
Errors most often occur in the same places: measuring the outer diameter of a polished part, checking a shoulder or groove, reading a worn scale on an instrument, and working deep in the area where the top light hardly reaches.
A simple sign that the problem is lighting: the operator repeats the same measurement without a clear reason. They rotate the part, place the tool again, look once more and still don’t trust the number. This is not carelessness. It is a signal that the eye does not get a clear picture.
A common scene: after a pass the operator checks the diameter with a micrometer. On a matte surface the size reads immediately. On a shiny area with a glare they spend twice as long and still take a second measurement. Poor lighting thus adds both errors and extra minutes to each shift.
Why tool setup becomes harder
When setting a tool the operator looks at very small things: the insert tip, the edge, wear marks, and the seating in the holder. If lighting is weak or blinds the eyes, these details disappear. Everything may look fine, while in reality the edge is seated slightly low or the insert is not fully home.
Lighting often interferes when you need to quickly set height and overhang. The difference can be tiny, but that small amount later causes extra vibration, size drift or poor surface finish. With good lighting the operator gets it right first time. With poor lighting they lean in, change the viewing angle and still hesitate.
The problem is not only darkness. A strong glare on metal also obstructs. The holder shines, the toolpost reflects, and the eye cannot tell if there is a tilt or a small gap.
In practice this shows up as:
- the insert tip blends with the background and wear is noticed too late;
- difficulty in knowing if the tool is exactly at the correct height;
- glare covering the insert seating or clamping area;
- fine chips hiding near the toolholder and under supporting surfaces;
- after clamping there is doubt whether the tool seated evenly.
Fine chips near the toolholder are especially dangerous. They are almost invisible if the lamp is on the side and creates a deep shadow. This can cause the tool to be clamped on a dirty surface. The first part then shows the error: size shifts, vibration appears, and the edge does not behave as expected.
One extra minute before start usually pays off. It is better to remove chips, check seating without glare and look at the edge under direct light. For turning this is a simple rule, but in a rush it is often skipped.
What changes during cleaning the work area
Poor lighting is noticed more during a cut, but it interferes with cleaning no less. After a shift chips, coolant splashes and small debris blend with shadows, and the work area looks cleaner than it actually is.
Because of this, chips stay where they are hardest to see: in corners, under the chuck and at hood edges. On a CNC lathe thin curled chips may lie almost unnoticed until the operator runs a hand or reaches for a tool. Even through a glove such contact can easily end in a cut.
Coolant behaves similarly. If the light is dim or comes from one side only, a thin film on the floor or casing is not visible. A person steps on it, sets their foot on a slippery patch or places a rag there, then spreads the mess further around the shop.
Lighting also affects order around the machine. At the base of the machine, rags, a wrench, a brush and small fixtures quickly get lost. When they are hard to see, people start searching by touch. The hand goes where it should not: under the chuck, behind the screen, where chips and sharp edges remain.
After cleaning, quickly check a few places: the floor at the machine and the operator turning area, the lower corners of the hood, the space under the chuck, the place for keys and the brush, and handles, buttons and door edges where coolant often remains.
If the area is poorly lit, the next shift gets a dirty zone and extra doubt. It is unclear whether that puddle is old or new, whether the chip has been there a long time or just appeared. People spend time not on work but on re-cleaning and re-checking what could have been seen immediately.
Good lighting alone does not make cleaning perfect. But it helps spot leftover debris before it becomes a cause of cuts, slips or rushed work at the machine.
How to check lighting step by step
Check lighting not by eye or by a feeling of "seems okay", but in the mode people work in during the whole shift. Light that looks sufficient in an empty shop often creates shadows, glare and dark zones near the chuck, tool and chip tray.
First, turn on the machine and general shop lights as in a normal day. Do not change the setup for the check. If a door or panel usually casts a shadow, that will show immediately.
Then follow these steps:
- Look at the work area with doors closed, then with them open. With an open door you sometimes get more light, but the operator sees the part through glass, coolant drops and reflections.
- Check scales, marks, tool markings and fixtures without a flashlight. If you need a phone or handheld light for normal reading, the lighting is insufficient.
- Make a trial measurement on two parts: one shiny and one matte. On a shiny surface a glare often 'breaks' the edge. On a matte surface the boundary is harder to read in shadow.
- Put your hand into the tool setup area and see where the shadow falls. Repeat the same near the chuck and the toolpost. If your hand blocks the area you look at, the local light needs to be moved.
- Walk the whole cleaning path: the tray, the area under the chuck, the hood corners and the space around the chip conveyor. Those are usually the dark spots where fine chips, broken inserts and oil streaks remain.
After this check, mark where you need general lighting and where local lighting is required. General light helps see the whole work area without sharp contrast. Local lighting is needed where measuring, tool setting and inspection happen.
Two signs are enough: the person squints and changes posture to see better. That alone means the lighting is a problem, not a minor issue.
Most common lighting mistakes
The most frequent mistake is to look only at brightness and not notice how light falls on parts, tools and the floor near the machine. Because of this, there may be light but working is still inconvenient and risky.
The first typical problem is one very bright lamp right above the operator. Such light casts harsh shadows from hands, the chuck and the toolholder. When the setter brings a tool in or checks an edge, the shadow hides small details and the eye starts to err.
The second problem is strong glare on metal. A smooth surface reflects the lamp almost like a mirror, and instead of the real contour you see a white spot. In that moment it is easier to miss a measurement, not notice a burr or misjudge the cutting edge position.
Third is dirty diffusers and protective glass. Dust, oil film and fine mist do not turn off the lamp but noticeably eat up the light. After a couple of weeks the work area seems 'normal' because the eye adapts, although contrast is worse and inspections slow down.
Another common situation is leaving lighting only inside the machine. This is inconvenient not only during cutting. There is also a lot of work outside the enclosure: setting the tool, taking a gauge, removing chips, inspecting chucks and checking the floor at the door. If it is dim outside, mistakes move from the cutting area into routine tasks between operations.
Finally, many do not check how the section looks on the night shift. During the day some shop light helps; at night only local fixtures remain. If they cause glare, shadow or a dull picture, the operator gets tired faster and squints more. On paper this looks minor. In a real shift these small issues cause extra touches, missed chips and a slippery floor near the machine.
Example from a normal shift
The shift runs calmly. An operator at a CNC lathe finishes a series and decides to change the insert because the edge is worn. There is light above the work area, but the lamp hits at an awkward angle and creates a glare on the toolholder.
On that glare it is easy to miss a small detail. The operator looks at the insert, thinks the edge is fine and puts it to work. A small chip remains unnoticed though in good light it would be seen at once.
Then what is often written off as a 'finicky' measurement begins. The first part after the tool change goes to inspection. One measurement shows one value, the next taken immediately shows a slightly different one. The difference is small but enough to start doubts: is it the part, the tool, or the measurement itself?
Often the problem is not the micrometer or the operator's hands. When the light blinds, the eye catches the reference mark, part edge and tool location worse. The person studies longer, changes angle, reapplies the instrument and wastes extra minutes. An error of a few hundredths usually appears during such pauses and rechecks.
Next comes cleaning. The machine is stopped and the operator clears the area, but a thin strip of chips stays at the stop. In half-light it almost merges with the surface. On the next setup the blank no longer seats as cleanly as it should, and the cause again seems unclear.
After that they change not the cutting mode but the lighting. They rotate the lamp, remove the direct glare from the setup area, wipe the protective diffuser and add light where measurement and cleaning occur. The same operation immediately runs smoother: the chip on the edge is visible, the repeated measurement stops 'floating', and the chips at the stop no longer hide in shadow.
Lighting is rarely called the primary cause of such failures, but in a normal shift it often saves more time than another program check.
Quick checklist before starting work
Check the light for a minute before starting the machine rather than searching for the cause of rejects or setup misses later. Poor lighting seldom jumps out immediately. It is usually noticed later, when a size drifts, a mark reads incorrectly or chips remain in a corner.
Stand at the machine in your usual working posture and quickly check five points:
- the part edge should be visible without tilting your head or trying to catch the contour from another angle;
- scales, marks and tool markings should read at once, without squinting or trying to block the lamp with your hand;
- the measurement point should not have a harsh shadow from the chuck, carriage or your hand;
- the tool seating should be visible in full, not in pieces;
- after a quick clean the tray, corners and the area behind fixtures should not fall into dark spots.
If at least one item fails, do not start the shift as is. Often it is enough to turn the luminaire, wipe the protective glass or move the object that casts a shadow. If the lighting itself is weak, report it immediately rather than after the first ruined part.
Good lighting is especially helpful where small mistakes are easy to make. For example, an operator sets a cutting tool, sees the seating only from the side and slightly offsets its position. The machine runs normally, but size must be corrected with extra passes. Those same two minutes checking light at the start of a shift usually prevent this.
A simple rule: the part, the tool and the cleaned work area should be visible calmly, without extra head movements or guessing.
What to do next
Don't postpone the check. It is easier to evaluate lighting not by feeling but by the traces it leaves in work: extra measurements, setup misses and dirt noticed too late.
Start by observing during one shift. Photograph the work area at the start and again at the end from the same points. In photos you quickly see where light creates shadows, where glare hides an edge, and where the floor near the machine merges with debris and chips.
Then check spots where the operator most often repeats measurements. If a dimension is double- or triple-checked in the same place, the cause may not be skill or the instrument. Often the eye simply sees the part differently each time. This is most visible on faces, internal diameters and where coolant reflects.
Pay special attention to the chuck area, the toolholder and the changeover spot, as well as the floor and chip tray. There shadows and glare most often turn into errors, cuts or repeat cleaning.
If doubts remain, run a short test. One operator sets the tool and makes a control measurement under the usual light, while a second watches where they squint, change posture or bring their head closer. Those movements quickly show that light is insufficient or misdirected.
If you are choosing a new machine, raise this question early. EAST CNC supplies CNC lathes for metalworking and supports the project from selection to commissioning and service, so visibility requirements for the work area, measurement and maintenance are best discussed before startup.
A good check result looks simple: the operator leans less, repeats measurements less often and notices debris in the work area sooner. If that is not yet the case, start not with a big redesign but with the single spot where errors repeat most often.
FAQ
Why can it be bright at the machine but the part still looks bad?
Because it is not only about brightness. One strong lamp often creates harsh shadows from the hand, chuck or toolholder, and wet metal also creates glare. Look at the actual work point, not the lamp. If the part edge, scale and tool seating are visible evenly, the lighting is positioned well. If you have to view the contour from different angles, adjust the light.
How do I tell if a measurement error comes from lighting and not the tool?
You usually see it in repeated measurements without a clear reason. The operator puts the gauge down, spins the part, and still does not trust the number. Check the same dimension on a matte and a shiny area. If the result starts to 'float' on the shiny area, the problem is often the light, not the micrometer.
Where does glare cause the most problems?
Glare causes the most trouble on faces, chamfers, thin edges and polished surfaces. The eye grabs the bright spot next to the contour and loses the true edge. A simple fix helps: turn the lamp so the light does not hit the metal directly. After that the edge and wear marks are much easier to see.
Why does the operator start leaning closer to the work area more often?
Poor light makes a person squint and look for an angle with better visibility. That makes them lean in, keep their hands closer to moving parts longer and get tired faster. If the operator frequently changes posture, that is already a sign. Don’t wait for rejects: check where the shadow from the hand and machine body falls.
What should I check before installing a tool?
First remove chips from the toolholder and supporting surfaces. Then inspect the insert tip, seating and any gap under direct light, without glare. If you can only see the seating from the side or in pieces, do not clamp the tool right away. Spending a minute on lighting is better than chasing size and vibration later.
How to quickly check lighting before a shift?
Stand at the machine in your normal working posture and look at five things: the part edge, the instrument scale, the measurement point, the tool seating and the corners after a quick clean. Each of these should be read immediately without squinting or extra head movement. If at least one area falls into shadow or is blinded by glare, adjust the lamp or wipe the protective cover before starting.
Why do light-related errors show up more at night?
Daylight and workshop ambient light hide some problems. At night only local lamps remain, so shadows, glare and dark spots become more visible. Check the night shift separately. If the operator squints more often and takes longer to find a mark or a chip in the evening, the lighting is already affecting the work.
What is most often missed during cleaning because of poor light?
Thin curled chips in corners, under the chuck, at the housing edges and near stops are most often missed. Also thin films of coolant on floors, handles and door edges are frequently overlooked. After cleaning, quickly inspect these spots. That helps spot cut-hazard chips and slippery patches earlier.
Is it enough to just put a brighter lamp?
No. One very bright lamp above the operator often makes things worse by creating deep shadows and blinding reflections on shiny metal. A better approach is even general lighting combined with local light where measurements, tool setup and inspection happen. Then the eye sees the work area, not a bright spot.
Where to start if you don't want to change the whole lighting at once?
Start with the place where errors repeat most often. It can be measurement at a shiny face, setting an insert or cleaning under the chuck. Turn the lamp, remove direct glare, wipe the diffuser and test the operation again. If the operator stops squinting and repeats measurements less, you found the issue.