Launching a Machine at a Branch Without a Technologist: What to Prepare
A machine startup at a branch will go more smoothly if you gather setup sheets, fixture photos, inspection templates, and a communication plan in advance.
What is the problem if the branch has no technologist?
When a branch does not have its own technologist, the first day is spent not on the first part, but on clarifications. The operator may know the machine well, but not your setup scheme, the fixture set, or the inspection steps after the first pass.
Because of that, even a simple startup can stretch into hours. One person looks for the right jaws, another checks the program number, and a third calls the main office trying to explain in words what is in the chuck and how the blank is clamped.
Most often, work stops not because of breakdowns, but because of gaps in the description. Again and again, the branch asks the same questions: where should the part zero be set, which tool is in each pocket, how should the blank be oriented, which program version is current, what should be measured on the first part, and which tolerance counts as normal.
These questions may seem minor only until the first startup. In practice, one unclear dimension or an old program version can easily eat 20-30 minutes. If everything is explained over the phone and without photos, time disappears even faster.
There is another problem too: the gap between commissioning and everyday work. The supplier may start the machine, check the mechanics, and show the basic operations. But after that, the branch must repeat the setup every day without the process author nearby. This is especially noticeable at remote sites where there is no permanent on-site technical support.
That is why, before shipping the machine, it is worth describing not only the machine itself, but also all the working logic around it. The branch needs clear answers to three questions: what the machine should be equipped with, how to set the part, and how to know that the first part came out correctly.
If there is no such package, the startup gets derailed by very ordinary things: the wrong tool stickout, an unclear clamping scheme, a missing inspection template, or a dispute over which fixture photo belongs to the current batch. In the end, the branch does not launch the process; it spends the whole day collecting the missing information piece by piece.
What should be included in the startup package?
For a machine startup at a branch without a technologist, you need more than a file archive. You need a working package that can be opened and understood quickly. A person on site should be able to figure out within 10 minutes what to install, how to locate the part, and how to check the first pass.
This package is usually built together. The setup technician prepares the setup sheet and photos of the working positions. The foreman or area manager checks the contents of the package. The inspector or quality control adds the inspection templates. But one person should approve the final version. Otherwise, the branch will get three similar files and start guessing which one is current.
What to put in the startup folder
The package usually includes a setup sheet with locating, tooling, stickouts, and installation order, fixture photos, the control program or its version number, a first-part inspection template, and a short startup sheet with checks before and after the first cut.
Some materials should be digital, while others are better kept on paper right by the machine. There is no need to print the whole archive. Usually, the setup sheet, one inspection sheet, and 2-3 photos that clearly show the fixture are enough.
Confusion often starts with file names. It is better to set a simple naming format right away: Part_Operation_Machine_Version_Date. The same order works well for photos: 01_overall_view, 02_part_clamping, 03_tool_T0101. If you cannot quickly tell what is inside from the file name, the name needs to be changed.
Where to store the materials
It is better to keep the package in one place, not in email, messengers, and a flash drive at the same time. One folder for the part or project works well. Inside it, you can create separate sections for the setup sheet, photos, inspection, and program.
The branch and the main shop should have the same version. A simple rule works best: any photo, sheet, or template should open without calling the author. If the machine is started after delivery and commissioning, this approach saves not minutes, but half a day. People do not search for the right file or resend old versions to each other.
How to build a setup sheet
A setup sheet is not for reporting; it is for the first confident startup. If the operator at the branch opens it and immediately understands what to install, where to locate the part, and which settings to start with, the document is done right.
In a situation where the startup happens without a technologist on site, the sheet should answer questions without calls to the main office. The fewer vague words it contains, the faster the work will go.
On the first page, it is best to give a short operation passport: the exact machine model, CNC system, program number or name, part material, and fixture revision. If the jaws, mandrel, or fixture have changed, that should be visible immediately. Otherwise, the branch will assemble the old setup and lose half a shift.
After that, the locating should be shown so that a new operator can understand it. One sentence is not enough. You need a simple part diagram, support points, clamping, zero point, and clear axis references. If there is a risk of mixing up the installation side, it is better to label directly where the chuck is, where the stop is, and where the reference face is.
A good setup sheet usually has four blocks: operation passport, locating diagram, tool installation order, and first trial run settings with spaces for measurements.
The tool installation order is better written step by step, not as a general list. Which tool goes in first, which comes in the second position, which stickouts are accepted, where to check the offset, and which holder number to use. For a CNC lathe, this noticeably cuts down setup time. The operator does not guess whether the tools can be swapped and does not invent their own logic.
The first trial run settings should be set cautiously. Specify reduced feed and speed, a safe approach point, the dry-run sequence, and the moment when the operator should stop for the first measurement. If the part is sensitive to vibration or dimension drift, add a short note on the most problematic transition.
At the bottom of the sheet, leave a field for edits after startup. That is where the actual tool stickout, the real size correction, clamping notes, and the date of the change are entered. A month later, these notes often save the repeat startup.
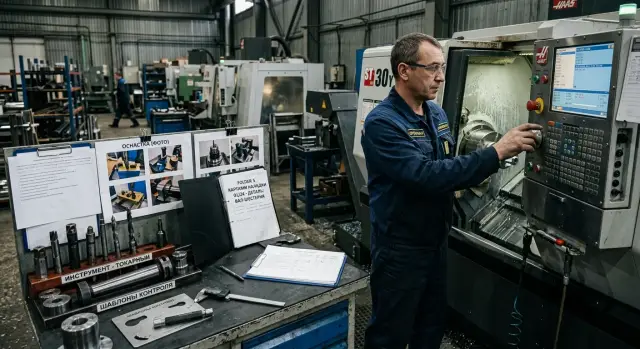
Which fixture photos really help?
One setup sheet is not enough. During remote startup, people are more likely to get confused not by the text, but by small details: which holder is in position T3, how the tool is turned, where the needed spacer is, and where to bring the probe for the first check. Good photos answer half of those questions.
Start with a wide shot of the work area. It should show the machine, the turret or tooling area, the place where the fixtures are stored, the measuring tools, and the blanks. This photo helps quickly understand the layout logic.
Then take a close-up of each holder. The photos do not need to be beautiful; they need to be clear. The frame should show the holder itself, the tool, fasteners, stickout, shims, and the orientation of the cutting edge. If a holder block can be installed in two ways, photograph the exact version needed for startup.
Usually, this set is enough: one overall photo of the work area, one close-up for each tooling position, a separate shot with the position number, several photos of the places where mistakes happen most often, and a photo of the fully prepared setup before startup.
Label the photos with the same terms used in the setup sheet. If the sheet says T4 - 2 mm cutoff tool, the photo should be named almost the same, without loose wording. It is also best to keep the file order the same: 01_overall_view, 02_T1, 03_T2, and so on. Then the operator can simply scroll through the folder and compare it with the sheet.
Take separate photos of the places where mistakes happen most often: the jaw installation direction, the stop position, the collet seating, the drill stickout, and the probe approach point. One such photo can sometimes save an hour of back-and-forth messages.
A very simple check is useful: will a person seeing this machine for the first time understand from the photos what goes where? If the answer is not obvious, the shot is better retaken.
How to prepare an inspection template
The inspection template exists for one thing: so that the operator and the inspector at the branch understand in the same way whether the part is acceptable or not. If the sheet is overloaded, nobody reads it. If it contains too little information, the calls begin after the very first part.
It is better to make a separate template for the first part right away. During commissioning, that part shows whether the tool, offsets, and base are set correctly. The first part needs a full sheet with the dimensions that affect fit, runout, length, diameter, and surface condition.
What to leave on one sheet
A good template usually fits on one page. For most parts, that is enough. The sheet should include the part name, drawing number and revision, a list of dimensions for the first-part incoming inspection, the measurement point and measuring tool for each dimension, the tolerance next to the dimension, and a line for date, shift, and signature.
It is better to choose first inspection dimensions based on risk, not on the principle of "check everything." For a shaft, you usually check outer diameters, overall length, groove width, thread, and support-face runout. For a housing part, the base, center distance, hole depth, and flatness matter more.
Next to each dimension, it is worth writing what to measure with and exactly where. Not just "micrometer," but "25-50 mm micrometer, measure on the journal after the finishing pass." Not just "indicator," but "indicator on a V-block, check runout on journal A." Such specifics are especially helpful if the startup is taking place on the night shift without a technologist.
Tolerances are best placed right next to the dimension. Then the inspector does not need to flip through the drawing and search for a separate table. If there is a special condition, write it in plain words: "measure the dimension after the part cools" or "check roughness only on surface B."
At the bottom, it is useful to leave space for the shift signature, the operator and inspector names, and a short "note" field. If a dimension drifts on the first two parts, the branch can immediately record the problem, and the main office gets a clear note instead of a phone summary.
Step-by-step startup order
When the branch starts the machine on its own, the biggest time drain is not the difficult operations, but the small mismatches: the wrong tool in the holder, an old program version, a missing dimension in the inspection sheet. That is why it is better to follow one startup scenario, without omissions or guesses.
First, the team looks not at the part, but at the machine itself after installation. You need to check the power, air, and lubrication connections, make sure the axes move without errors, and confirm that the sensors, clamping, and coolant system are working normally. Even if the supplier already did the commissioning, it is useful for the branch to repeat this check with its own checklist.
Next, compare the actual fixture with what is shown in the setup sheet and photos. Check the tool positions, stickout, jaw type, stops, chuck, fixture, and measuring instrument. If something similar is installed but not the right fixture, it is better to stop immediately. One such "almost right" setup later turns into hours of extra calls.
After that, load the control program and check the file versions. The branch should see the program number, the revision date, the setup sheet revision, and the current offsets. If the program is new and the sheet is old, the first part is almost certain to be scrap.
Then comes the safe motion check:
- Run the cycle without a blank.
- Check the base, tool changes, and approaches to the points.
- See whether the clearances are enough during rapid moves.
- Compare the actual sequence with the setup sheet.
- Record any differences immediately.
Only after the dry run do you load the first blank and make the first part at reduced feed, if the process allows it. This part should not be treated as a small trial. It is used to check dimensions, surface finish, tool references, and clamping stability.
All changes should be recorded in one place: what offsets were changed, why they were changed, and who made the change. It is useful to add 2-3 photos of the finished setup and the first part with inspection marks. This approach helps both the branch and the service team understand more quickly what has already been checked on site.
Example of a branch startup
A new CNC lathe arrived at a branch that had no technologist of its own. On site there were only the operator and the shift supervisor. In a normal situation, the first day would have gone to phone calls, searching for dimensions, and arguments about which fixture to install first. But this time the branch received the startup folder in advance.
Inside were not general instructions, but materials for a specific part and a specific machine. The operator opened the setup sheet and immediately saw the tool installation order, position numbers, and basic offsets. Nearby were photos of the chuck, jaws, holders, and the completed setup from several angles. The supervisor did not have to guess whether the tool was positioned correctly or which way the stop should face.
The first shift passed with almost no pauses. The operator assembled the fixture using the photos, installed the tools according to the sheet, and made a trial part. The shift supervisor took the inspection template, checked the dimensions in order, and noted two points: one dimension was off by a few hundredths, and there was a question about the finishing pass in the second operation. That is no longer a long chain of calls, but two precise clarifications.
The first call to the main office was about the tool offset. Using the photos and the measurement, they quickly found that the problem was not in the program, but in a shift in one position. The second call was about the cutting mode on the first batch. After a short answer, the branch kept working on its own, without constant supervision.
This example shows one simple thing well: a machine startup at a branch without a technologist does not require miracles. It needs clear documents, good photos, and an inspection template that lets the supervisor and operator see the same thing.
Mistakes that make the branch call all day
Most calls are caused not by the machine itself, but by disorder in the materials. When the startup is prepared in a hurry, the operator has to guess which tool is in position T3, which mandrel is current, and how to check the size after the first part.
It usually looks dull, but it hurts badly. The branch gets a dozen phone photos, a couple of old screenshots, a table in one chat, and notes in another. On site, people cannot see the full picture and start calling about every step.
Five things usually break the startup. Photos are sent without labels. Old and new fixtures are placed in the same folder. The inspection template does not say what to measure with. Files are spread across different chats and emails. After the first part, the changes are not recorded at all.
One simple example. The main shop sent the branch fixture photos with names like IMG_4581 and new_tool. The operator sees two similar holders, installs the wrong one, gets a different stickout, and the dimension drifts. Then a chain of calls to the supervisor, setup technician, and quality team begins. One photo label and one line in the setup sheet would have been enough.
If you have a service team or you are starting the machine together with the supplier, set one rule: every file must have an owner and a date. For remote sites, this is especially useful.
A short check before shipping
Problems usually begin not at the control panel, but earlier. One sheet is missing, the photo was taken on the old fixture, the inspection template is in the supervisor's office, and the night shift cannot open the files. Because of this, the branch spends half a day on calls instead of making the first trial run.
Before sending the package, it is worth doing a short check. It takes 10-15 minutes and quickly reveals weak spots.
- Each operation should have its own setup sheet.
- The photos should show exactly the fixture that will go to the branch.
- The inspection template should be kept not only in the shared folder, but also next to the machine.
- One person should be responsible for the startup by name, not "everyone a little bit."
- The night shift should have access to all files without asking in a group chat.
If even one item is not met, the package is not ready yet.
What to do after the first startup
After the first startup, the package almost always needs changes. What was clear in the main shop is often read differently at the branch: one photo does not show the stop, the sheet is missing the order of actions, the inspection template is missing one measurement point. That is why it is better to update the package right after the first two shifts, while the operator still remembers everything clearly.
It is better to collect notes not in a group chat and not from memory a week later. It is easier to ask the operator to leave short notes directly in the documents. Where the question came up, that is where the comment goes. This makes it faster to see what is actually blocking the startup, instead of getting a vague "everything seems fine."
Usually after the first startup, four things are checked and corrected: the setup sheet with the exact installation and locating order, fixture photos with clear angles, inspection templates with measuring points and tolerances, and the list of tools, offsets, and typical stop causes.
After that, it is useful to lock in one template for all new startups. There is no need to assemble a package from scratch for every branch if the operation is similar. It is easier to keep one common format and change only the variable parts: the machine model, fixture, tools, and inspection dimensions. Every document should have the date, version, and the name of the person who made the changes. Then nobody will accidentally use an old sheet.
Sometimes one extra photo is enough for the operator to stop calling every half hour. If the photo shows how the part sits before clamping and where the base rests, there are clearly fewer questions. The same is true for inspection: one clear template with a note like "measure after the fifth part" is more useful than a long instruction with no specifics.
If, after this review, it becomes clear that the branch needs a new machine or on-site commissioning, you should look at more than just the purchase price. Much more important is who helps with selection, startup, and service after commissioning. EAST CNC covers this entire cycle: consultation, selection, delivery, commissioning, and service support. For companies launching CNC lathes in Kazakhstan and other CIS countries, this often reduces the number of problems in the first shifts.
The bottom line is simple: the better you prepare the setup sheet, fixture photos, and inspection template, the less the branch depends on phone calls. A good startup begins not on the day of commissioning, but at the moment you assemble the document package and review it through the eyes of the person who will work without a technologist nearby.
FAQ
What should you do if there is no technologist at the branch during startup?
Prepare the startup package in advance and review it through the eyes of someone seeing the process for the first time. If the operator understands within 10 minutes which fixture to install, where the part zero is, and what to measure on the first part, the startup will go smoothly without extra calls.
What materials are needed for the first startup?
At minimum, you need this set: a setup sheet, fixture photos, the current program or its version number, a first-part inspection template, and a short pre-cut checklist. Paper copies of the setup sheet and inspection sheet are best kept right by the machine.
Is one setup sheet enough?
No, one setup sheet is usually not enough. Text without photos does not answer questions about jaws, tool stickout, part orientation, or the measuring point.
What is the best way to name the files so there is no confusion?
Give the files clear names using one template, for example `Part_Operation_Machine_Version_Date`. If the name does not immediately show what is inside, the operator will quickly open the wrong file.
Where should the startup package be stored?
Keep everything in one folder for the part or project, not in email, chats, and flash drives at the same time. The branch and the main shop should have the same version without manually forwarding old files.
What must be included in the setup sheet?
Show the machine model, CNC system, program, part material, fixture revision, the setup scheme, the tool installation order, and the first trial run settings. Leave room at the bottom for changes after startup so you do not lose the actual corrections.
What fixture photos actually help the operator?
Take a wide shot of the work area, each tool position up close, and the places where mistakes happen most often. The photos should show not beauty, but stickout, tool orientation, part clamping, and the stop position.
What should be included in the first-part inspection template?
Make a separate sheet just for the first part. On one page, list the dimensions, tolerances, measuring point, what to measure with, and where to place the indicator or micrometer so the operator and inspector are reading the same thing.
What is the correct order for starting the machine after installation?
First check the machine after installation, then compare the fixture with the setup sheet and photos, then load the program, and only after that run a dry cycle. Put in the first blank only after checking the travels and run the part on cautious settings if the process allows it.
What should be changed in the package after the first startup?
Update the setup sheet, photos, and inspection template right away while the shift still remembers the problem spots. If one size drifted or the stop is not visible in the photo, fix it in the package that same day, or the next shift will repeat the same mistakes.