Insert Geometry for Rough Turning Without Cycle Losses
Insert geometry for rough turning affects chip formation, feed and cycle time. We cover how to choose by material, depth of cut and initial trials.
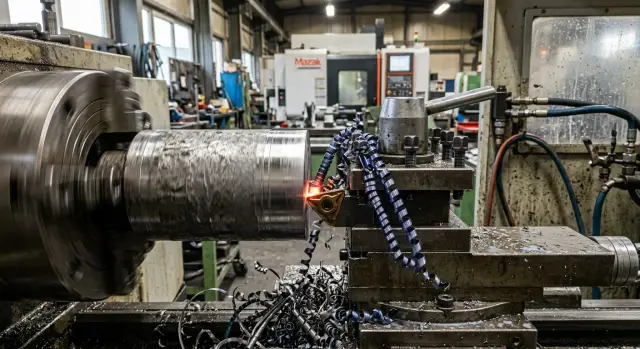
Where cycle time is lost
Cycle time is often lost in places you don’t expect. The issue is usually not the machine’s nameplate numbers or a single feed value, but how the insert cuts under real load.
The same feed can behave differently even on the same steel. With one insert the cut runs smoothly, chips break, and the spindle handles the load calmly. With another insert the feed may be the same, but the sound is harsher, the chip stretches into a ribbon, and after a couple of passes the operator reduces the regime to protect the edge.
If the geometry chosen for the rough pass misses the right window, the machine rarely reaches the calculated cycle time. On paper everything may look fine. In practice that turns into extra seconds on every pass.
An unsuitable insert cuts slower not only because the operator is cautious. It may not enter the metal well at the required depth, it may heat the edge more, and it may produce unstable chips. Then you have to reduce feed, reduce depth, or add an extra pass where it wasn’t needed.
Long chips eat time quickly. They wrap around the part, catch on the chuck, interfere with automation and force stops for cleaning. If one stop costs 20–30 seconds, on a batch that becomes minutes or sometimes hours.
Usually losses add up from several small things: feed is cut after noisy passes, chips don’t break, the edge wears earlier, dimensions start to drift, and an extra pass is kept as a safety. Each issue alone seems tolerable. Together they make the roughing cycle noticeably longer.
Edge wear also steals time quietly. The insert still cuts, but not like at the start. Build-up appears, friction increases, and the machine struggles to remove the same allowance. Then the insert is changed early to avoid scrap, and the cycle grows again.
A wrong insert choice rarely looks like one big failure. More often it’s a chain of small losses: slightly lower feed, one extra stop, earlier edge change, and another pass for safety. That’s how a slow roughing cycle is built.
What insert geometry does
Insert geometry changes more than the chip shape. It affects cutting force, heat, edge behavior and how the machine holds feed under load. If the geometry doesn’t suit the task, cycle time increases not because of the program but because cutting resistance is higher.
The rake face determines how the metal leaves the cutting edge. A lighter geometry cuts easier: the spindle finds it easier to pull the cut, load is lower and the surface is usually calmer. But in rough conditions that shape loses strength quickly. If the allowance is uneven, there is scale or the cut starts with a blow, a thin edge loses life sooner than expected.
A tougher geometry works firmer. Cutting forces are higher, but the edge withstands impacts and interruptions better. That’s why for roughing steel, forgings or parts with a hard layer, this option is often chosen even if it doesn’t cut as easily.
The chipbreaker controls chip curl and evacuation. It must roll the chip into a short coil and move it out of the cutting zone. If it doesn’t operate in the working window of feed and depth, the chip forms a ribbon, wraps on the part, hits the toolholder and prevents a stable regime.
Put simply: the rake affects cutting softness and machine load. The chipbreaker controls chip curl and evacuation. The edge shape and thickness show how much impact the insert can take without chipping. One geometry forgives uneven allowance; another demands a smooth, calm cut.
A good example is a rough pass on a steel blank with variable allowance. An insert with a sharp, light geometry may run fast while the material is removed evenly. But when the tool meets a step in the allowance, the impact on the edge increases and its life drops. A tougher insert in that regime often delivers better results across a shift, even if its catalogue feed numbers aren’t the highest.
So geometry isn’t chosen by the promise "cuts faster." First look at the allowance, how even the cut will be, and where the chips will go.
How to select an insert step by step
Don’t try to find one insert "for the whole shop" right away. Better take one actual part with a clear process and focus on the heaviest rough pass. That separates the insert’s influence from tooling, program and material batch issues.
First fix the initial conditions. You need more than a general claim like "we turn steel": at least the material group, allowance per side, depth per pass and target feed. For roughing the difference between 2 mm and 5 mm depth affects the choice far more than a debate between two brands.
Then honestly check the machine itself. How much spindle power is available, how rigid is the workholding, what is the tool overhang, is the chuck weak or is the part long and slender. If the machine or clamp is soft, an overly aggressive geometry will give vibration and quick edge wear rather than a gain.
You don’t need ten variants. Usually 2–3 close geometries for the same regime are enough. For example: one insert with a freer chipbreaker for easier cutting, a second slightly tougher for large allowance, and a third intermediate. This test quickly shows what suits your cut and what only works in averaged recommendations.
Compare by three clear signs: the chip produced, how long a single pass takes, and the edge condition after a series of identical parts. A feeling of "it cuts lively" helps little here.
Give each insert the same short test, for example 5–10 passes on one part or identical blanks. If one geometry keeps feed at 0.35 mm/rev without whistling or chip wrapping, and another forces you to drop to 0.25 mm/rev, the time loss is visible without complex calculations.
That’s usually how selection should be approached. At EAST CNC these checks look at the "material - allowance - machine rigidity" combination, not only the catalogue. This approach often saves many trial runs before a large purchase.
How material, depth and feed connect
Material, depth of cut and feed work together. If one parameter falls out of this trio, cycle time rises not because of the machine but because the insert is wrong.
For ductile steel you usually need geometry that reliably breaks long chips. If you use an overly calm or too sharp insert, chips form ribbons, catch on the part and prevent keeping feed. Cast iron behaves differently: chips are short by nature, but the edge receives impact loads. There you often gain with a stronger geometry rather than the sharpest one.
Depth of cut changes insert behavior strongly. With deep cuts load is higher, temperature rises faster, and a thin sharp edge often crumbles sooner than it provides a time gain. For that regime you usually take a tougher insert. With small depth the opposite error occurs: a heavy roughing geometry is used where very little is removed. The chipbreaker may not operate in its window, the insert begins to rub instead of cut, and feed has to be reduced.
Feed must match the nose radius. A large radius likes higher feed, a small radius dislikes a rough regime. If feed is too low for the chosen radius, the edge rubs the metal. If it’s too high, load hits the nose and the edge chips.
Simple example: on a ductile steel part you remove 3 mm per pass. If you fit a very sharp insert with a small radius and apply feed meant for a heavy cut, the nose will fail quickly. If you choose a very strong geometry but cut only 0.5 mm, the insert won’t cut stably. The usual result sits in the middle: geometry for the material, strength for the depth, feed for the radius.
This trio most often decides whether the rough pass runs fast and even or starts costing minutes on each part.
How to read chips and cutting sound
Chips and sound almost immediately show whether you’re in the right regime. For roughing this is more useful than any catalogue argument. The machine gives a clear signal if you watch chip shape and listen to the cut.
A long ribbon usually indicates poor chip break. This happens when the insert doesn’t match feed and depth or when the regime is too soft for that geometry. On steel such a chip will quickly catch on the part and cost time for stops and cleaning.
Short chips behave calmer. They’re easier to evacuate from the cutting zone, they rarely wrap on the chuck and they interfere less with automatic operation. In a series this almost always gives a more predictable cycle.
Color also tells a lot. Fine blue chips often signal overheating. That’s not always an emergency, but a good reason to check speed, feed and coolant flow. If the edge also loses life quickly, the problem is excess heat left in the cutting zone.
What the sound shows
Cutting should sound even, without whistles and bangs. Whistling often appears with vibration. It also shows when the edge is too sharp for a heavy rough cut and instead of a steady removal the tool chatters at the contact.
Dull hits and torn sound are more dangerous than they seem. Usually they come with torn chips, signs of unstable cutting and rapid edge wear. In that regime the insert doesn’t cut evenly but endures shocks. In a series this quickly leads to extra tool changes and size scatter.
Watch three signs together: chip shape after several passes, its color and sound at entry and on the steady part of the pass. If one sign is bad and two are normal, you can usually tune feed or depth. If all three are bad, the geometry itself usually missed the window.
Example from the shop: turning a steel shaft with a decent allowance. If the chip runs as a long ribbon, you hear a whistle, and the edge loses life after a few parts, don’t blame the machine first. Often the geometry is too light for that cut or the regime is below the window where the chipbreaker works properly.
A good sign looks boring: even sound, short chips, edge holding without surprises. For rough turning that is the desired result.
Example on a steel part
Imagine a common steel shaft. You need to remove 4 mm per side in a rough pass, quickly and without extra stops. On paper the job is simple, but here insert choice often eats cycle time.
In the first try an insert is fitted that cuts softly but doesn’t break chips well at that depth. The machine runs fine at first, then a long chip forms and catches on the work and cutting zone. Then the predictable happens: the operator reduces feed to avoid wrapping.
The problem is the cycle length immediately grows. Instead of one confident rough pass the area gets longer processing, pauses for cleaning and extra operator attention. The insert may be cheap, but the part ends up more expensive.
Next step is obvious: fit a tougher geometry with a strong cutting edge. It withstands impact and doesn’t crumble on heavy cuts, especially on steel with variable skin or lower-quality bar. But this option has its cost. The insert cuts harder and loads the machine more.
If spindle power and rigidity are low, the spindle works at its limit, load rises and feed must be cut again. Formally the edge lives longer, but part cycle time doesn’t decrease. Sometimes it even grows.
Often the intermediate option wins: a medium chipbreaker. It’s not as heavy as the most forceful insert, but it also doesn’t produce long ribbons on deep cuts. For roughing steel this often gives the most even result across a shift.
The difference is visible not in the catalogue but in operation: chips come out shorter, the operator stops the machine less, feed isn’t reduced out of fear, and spindle load stays reasonable. Time per part becomes more stable, and that matters more than attractive specification numbers.
So when choosing an insert it’s useful to calculate not the cost of one piece but the cost of the whole pass. If an insert is slightly cheaper but adds even a minute per part, there’s no saving. On a batch that quickly becomes hours of extra work.
Mistakes that lengthen the cycle
The most common mistake is simple: picking an insert by price per piece, not by cost per part. A cheap insert can soon deform chips, whistle or force lower feed. On paper there’s a saving, but on the shift the machine runs longer and stops more often.
With roughing geometry this becomes visible fast. If an edge can’t hold the required feed and depth, metal isn’t removed as planned. A 10–15 second difference per part seems small until the batch reaches hundreds.
Another common mistake is trying to cover steel, stainless and cast iron with one geometry. Convenient for stock, but usually not for production. Steel, stainless and cast iron have different chip and edge needs. A universal insert almost always requires lowering regimes so the process at least doesn’t fall apart.
People also underestimate the depth of the first pass. If an insert is designed for heavier cuts but the first pass is small, the chip may not break correctly. The edge starts rubbing, heat rises, sound gets unpleasant, and feed is reduced. Cycle time climbs immediately.
The opposite extreme is familiar too. Feed is raised to speed processing without watching chip form. If a long ribbon appears instead of short controlled chips, seconds won by higher feed are eaten by stops to clean the cutting zone. Sometimes adjacent surfaces get damaged as chips wrap and strike the blank.
Another mistake is counting only insert wear. Look wider: how much time was spent removing chips, how many reapproaches after alarms, how often feed was reduced for noise and vibration, how many extra tool changes and whether scrap appeared after an unstable first pass. Often these losses make the cheap insert the most expensive.
In practice the better insert is the one that gives a steady cycle without extra pauses, not the one with record-long life. On CNC lathes this shows quickly: stable chips and predictable sound are usually more valuable than the lowest purchase price.
Checks before a batch
The first 3–5 parts are usually more honest than any table. In this short run you see if the geometry fits the material and regime or if the cycle will soon spread out because of chips, overload and early wear.
Look at a combination of signs. If the chip is short, ejects to the side and doesn’t hang on the part or chuck, that’s a good sign. If it runs as a ribbon and wraps, the operator will soon lose time on stops and cleaning.
Spindle load speaks directly. In a normal rough pass the machine holds the regime evenly, without notable spikes and without the feel of the drive choking on certain areas. If the load indicator fluctuates and the sound goes from dull to sharp, the problem is usually in the combination of feed, depth and geometry rather than a single feed value.
At the start of a batch check a few simple things: does the chip break, does the machine perform the rough cut without sharp load spikes, does the edge chip on the first parts, does the operator frequently stop for cleaning, and is the remaining allowance even for the next step.
Watch edge wear by plan rather than feel. If an insert is expected to last, for example, 20 parts before flipping or replacing, it shouldn’t crumble on the sixth. A random chip is nearly always more expensive than the insert itself: time is lost, size drifts, sometimes a nearly finished part is ruined.
Check the allowance after the rough pass separately. If the surface is torn, wavy or some areas are cut deeper than expected, the finishing stage must correct others’ mistakes. That adds seconds per part and hours per batch.
A quick good test is simple: run several parts back to back without operator intervention between cycles. If the cutting zone stays clean, chips are controlled and the edge behaves predictably, keep the regime. If early pauses, extra noise and unstable cutting appear, adjust the insert or the regime immediately.
What to do on the shop floor next
Don’t change the whole process at once. Take one part where the rough pass repeats most often and affects shift output the most. Such a test usually shows better than general discussions which geometry fits your cell.
Make the comparison fair. Keep the same blank, material, holder and regime if the machine allows. Change only the insert geometry. Otherwise you won’t know what reduced the cycle or spoiled the chip.
Two short runs are most convenient. Choose two geometries for one operation, give each the same cut length or the same number of parts, then record cycle time, chip type, insert life and the moment the machine began to whistle, vibrate or lose stability.
Don’t look only at the stopwatch. If one insert gives a cycle 20 seconds shorter but chips or breaks quickly or wraps long chips, there may be no saving. For roughing the preferable option holds feed without surprises and doesn’t force the operator to intervene.
Recording after the test needn’t be complex: part material, depth of cut, feed, speed, insert grade, chip shape and how many parts the edge lasted. That’s enough to pick an insert by facts rather than habit.
If both geometries perform poorly, don’t blame the insert alone. Sometimes the limit is the machine: lack of rigidity, power, proper chip removal or an awkward setup for the particular part. In that case it’s sensible to look at the whole process.
EAST CNC can help here. The company supplies CNC lathes for metalworking, assists with selection, commissioning and adjustment, and provides service. If the issue is not the insert but the machine’s capability, such an analysis is often more useful than another trial purchase.
One part, two geometry options and a single results sheet usually give more benefit than long catalogue debates.
FAQ
Why does the roughing cycle often take longer than calculated?
Most often cycle time is lost to small wastes in each pass. The operator reduces feed, chips get tangled, the edge wears prematurely, and the roughing cycle quietly grows by tens of seconds.
What exactly does insert geometry change in operation?
Geometry changes cutting force, heat and how the chip breaks. If the insert doesn’t match the regime, cutting becomes harder and the operator must reduce feed or add an extra pass.
Where to start when selecting an insert for rough turning?
Start with material, depth of cut and the real allowance. Then check machine rigidity, workholding and tool overhang, and only after that compare 2–3 similar geometries on the same pass.
How to link the workpiece material to the choice of geometry?
For ductile steel you need geometry that reliably breaks long chips. For cast iron you usually choose a stronger edge because impact resistance matters more than cutting ease.
Why does depth of cut affect insert choice so much?
A deep cut loads the edge much more, so a too-sharp insert will lose edge life quickly. With a shallow cut the opposite mistake is common: using a heavy roughing geometry that no longer cuts cleanly and starts rubbing.
How should feed link to the nose radius?
A large nose radius likes higher feed, while a small radius dislikes harsh regimes. Too low a feed makes the edge rub; too high a feed concentrates load on the nose and causes chipping.
What can you learn from chips and the cutting sound?
Long ribbon chips usually mean the chipbreaker is not operating in your feed/depth window. A steady sound and short chips indicate a close-to-normal regime; whistling and torn sound often lead to vibration and fast wear.
Why shouldn’t you pick an insert only by price per piece?
Don’t judge by price per insert only — look at the cost per pass. A cheap insert that forces stops, lower feed or early changes makes the part more expensive in the end.
What should you check before running a batch?
Usually the first 3–5 parts reveal the true picture: does the chip break, does the machine hold the cut without spikes, does the edge chip early and is the remaining allowance even for the next operation?
What to do if no insert delivers a stable result?
If no insert gives a stable result, look beyond the insert: weak clamping, long overhang, a soft chuck or insufficient machine rigidity often eat the whole gain even with proper geometry.
How does a wrong insert choice typically make the cycle longer?
A poor choice shows up as many small effects: slightly reduced feed, one extra stop, earlier tool change, and one more pass for safety. Each seems small, but together they lengthen the roughing cycle noticeably.
What does the sound of cutting tell you?
Listen for a steady cutting sound without whistles or bangs. Whistling points to vibration or an edge too sharp for the heavy cut; dull hits and torn sound usually mean unstable cutting and fast edge wear.
How to fairly compare two insert geometries on the shop floor?
Run two short tests on the same operation: keep the workpiece, holder and regime constant and only change the insert geometry. Record cycle time, chip form, edge condition and the moment instability appears.