Hydraulic valve body: how to group operations into a single setup
Choosing the right datum and grouping the right operations in one setup keeps channels, holes and sealing planes aligned on a hydraulic valve body. Guide on selecting bases, grouping operations, inspection and practical routing.
Why one setup doesn't solve everything
A single setup for a hydraulic valve body is useful but not万能. It holds the relative positions of faces and holes that the machine sees from one datum and in one coordinate system. The moment you flip the part or place it on a new support, some of the accuracy depends not on the program but on how you re-establish the datum.
This shows up most strongly in coaxiality and hole pitch. A typical case is intersecting channels: one hole is made from the top face, the mating one from the side, and between them there may be a thread, chamfer or bore. If the first side was referenced to a cast datum and the second to a machined surface, accumulated error can easily shift results by several hundredths. For a hydroblock that's enough: a channel can reach the tolerance edge, or a thread end up too close to an edge.
It makes sense to keep finish machining of the main reference plane, mounting holes that come from it, one-sided coaxial bores and pockets accessible without long tool overhang in a single setup. These are the operations where accuracy gains are usually most noticeable.
But even a very good clamp doesn't fix everything. It does not remove deflection of a long tool, it doesn't improve chip evacuation from a deep channel, and it doesn't simplify approach to side holes. Trying to fit everything into one setup can win on reduced re-fixturing but lose on actual machining quality.
A new datum often breaks the geometry in a simple place. First you mill the top, then you flip the part and set it on that plane to work the bottom and sides. If the first plane wasn't final or the clamp slightly deformed the body, the second side is built from a datum that has already shifted. From there the error only accumulates.
How to choose datums before the first chip
For a hydraulic valve body the datum decides whether channels will meet after the second and third sides. If you choose it for clamping convenience rather than part geometry, intersecting holes will move by tenths of a millimeter and planes will contradict each other.
Usually the first datum is the working plane used to assemble the block. It best preserves the part logic: from it it's easier to maintain heights, channel positions and mating dimensions. On cast or forged blanks this isn't always the flattest surface, so you often rough out that plane first and only then use it as the working datum for finishing.
One plane alone is not enough for the main channel. It’s better to reference its axis immediately to two side planes. A practical scheme is: plane A sets the support, side B controls direction, side C removes remaining freedom. Then the longitudinal channel, threaded ports and transverse drillings live in a single coordinate system rather than several different ones.
This is especially noticeable on heavy-equipment parts. Suppose the body has a bottom mounting plane, two side faces, a longitudinal channel and two intersecting holes for fittings. If you build the datum from the mounting plane and two sides first, it’s easier to hit both the channel axis and the distances to the ports. If instead you pick a random casting boss because clamping is convenient, the dimensional chain will spread out.
Before launch check four things: whether the clamp bends the body at a thin-wall zone, whether there is enough support under a deep drilling area, whether a probe or indicator can reach critical points, and whether the same fixturing principle can be repeated on the next setup. These checks seem tedious, but they’re where a neat process most often falls apart.
Clamping stiffness is usually underestimated. Too strong a bite on a raw blank gives a nice picture on the machine but a bad part after unclamping. It’s better to spend a little more time on supports, soft jaws or prisms than later chase axis drift and plane nonparallelism.
If the datum is chosen correctly, the first setup creates the "skeleton" of the part. After that the route is easier to assemble: channels, threads and control dimensions reference the same surfaces.
Which operations to group in one setup
A simple rule: group in one setup the operations that live from the same datum and must match each other precisely. If you re-fixture the block too early, axes of channels, pocket depths and port positions relative to sealing faces usually move.
Start by machining the base planes and support pockets in one clamp. The part then gets a clear geometry, and from it you can reliably do the work related to internal channels. For cast bodies this is especially useful because the stock allowance often varies.
What’s best to keep together
The main channel is usually drilled and bored from a single reference. That makes it easier to maintain coaxiality and avoid shifts between roughing and finishing. If this channel links to a valve seat or plug bore, separating those transitions into different setups usually makes no sense.
Intersecting holes are also better done before changing the datum. Even a few hundredths of movement produces unpleasant effects: a hole leaves the channel off-center, a step appears inside, burr risk increases. That later affects oil flow and spool operation.
In practice the route for a heavy part often looks like this: in the first clamp you get the bottom support plane, a side datum and mounting pockets; then from those same datums you drill the main longitudinal channel and transverse intersections. If the machine and tooling are stiff enough, you can also add boring of plug and valve seats in this setup.
What to move to a separate setup
Port threads are better cut after finish machining sealing planes. Otherwise the thread entry can pull a burr onto the edge, and re-fixturing can damage an already finished plane. First get the correct size and plane, then cut the thread and deburr the chamfer.
Deep side channels are not always worth including in the same setup. If they require heavy tool extension or rotating the part without proper support, stiffness drops. In that case a separate setup with clear part supports is more reliable than trying to do everything at once.
In short: hold together planes, pockets, the main channel and its intersections if they reference the same datum. Move out anything that prevents a rigid clamp or may damage already finished geometry.
Example routing for a heavy-equipment part
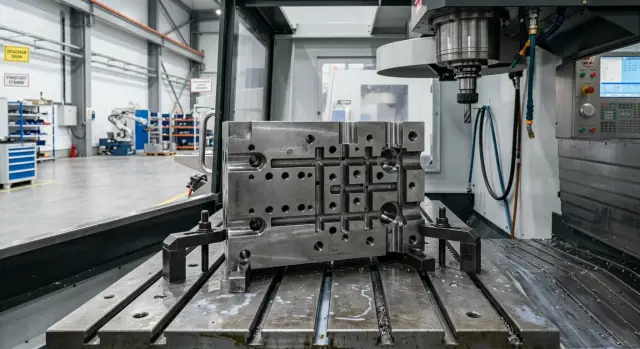
Take a hydroblock body for an excavator boom. The part is rectangular, with several working planes, a main longitudinal channel, intersecting holes and threaded ports for fittings and plugs. One setup is useful where the relative location of holes, pockets and base planes matters most.
A blank is usually taken with stock on all sides. If the finished part should be, say, 210 x 160 x 95 mm, the blank can be 3–5 mm larger on each side. This allowance helps correct geometry after first passes and reduces the risk that the finish plane will be off because of an uneven starting surface.
In the first setup the blank is placed on rough supports and datums are established. First mill the top plane, then two mutually perpendicular faces. After that you have a clear reference system: one main plane and two faces from which coordinates are set. In the same setup it’s common to remove excess material around the outside contour, but not to the final size.
In the second setup the part is flipped and positioned on the established datums. Here it’s profitable to group the most sensitive operations in one cycle: machine the main channel, drill the transverse holes and rough out pockets for valve elements. The reason is simple: if these transitions are split across setups, axis position errors accumulate. For a hydroblock that’s a poor outcome because even a small shift can spoil channel intersections or leave a wall too thin.
A practical sequence: rough out the pockets first, then drill the main channel, then the transverse holes, and only after that bore or ream where tighter tolerances are needed. This way the drill deflects less and chip evacuation is easier.
The third setup is usually for operations that need calm tool access and a finished outer geometry. There you cut threads, finish side planes to final size, deburr chamfers and carry out inspection. Check not only external dimensions but coaxiality, pocket depth, cross-channel passage and wall thickness in critical areas. If any of these items drifts, stop the batch immediately rather than after all parts are finished.
How to build the routing step by step
Build the route from the dimensions that affect assembly and sealing, not from the machine. For a hydraulic valve body these are typically the base plane, valve or spool seats and the relative positions of channels.
If you start from surfaces that are merely convenient to machine, the route quickly grows extra re-fixturings. Then it becomes hard to hold tolerances, especially with intersecting holes and side ports.
-
First mark the dimensions without which the assembly won’t fit. Usually this is one support plane, one or two precise hole axes and the distances between them. These dimensions define the first working datum.
-
Group all holes and planes that reference that datum. If a channel, a threaded port and an adjacent plane live in the same coordinate system, do them in one setup.
-
Before starting, check tool access to side ports. In the model everything often looks fine, but in the real tooling the spindle, jaws or part height can interfere. If access is doubtful, move some operations to a second setup rather than trying to save time and then rescue parts during the run.
-
Decide where the part can be flipped once and where it should remain untouched. After finish-machining the base plane and precise holes, extra flips almost always add risk. Flip only for surfaces the tool cannot otherwise reach.
-
Put inspection points in two stages. After roughing check that there’s enough stock for finishing and that the datum hasn’t shifted. After finishing measure the dimensions that affect assembly: the plane, coaxiality, distances between channels and thread positions.
For heavy parts the routine is often simple: in the first setup make the datum, top plane and main group of holes; in the second do side ports and transverse channels. If side holes are referenced to the finished datum, one careful flip is better than three “for convenience.”
This route may not be the shortest on paper, but it behaves predictably on the shop floor. Predictability is usually more important than saving a few minutes per part.
Where mistakes happen most often
Scrap on a hydraulic valve body usually starts not on a complex operation but at the first datum. The technologist picks a surface that’s easy to clamp but irrelevant to function. As a result planes and channels get correct sizes only relative to a random datum, not relative to the flow axis and mating locations.
On heavy-equipment parts this becomes visible quickly. Channels can meet on the drawing but in the metal one axis shifts by a few hundredths and the valve then works cocked. For a body with intersecting holes such a small error is not small at all.
Common mistakes are down-to-earth: choosing a convenient datum instead of a functional one, drilling side holes after changing zero, leaving too little stock for a finish plane, cutting threads before checking the channel axis, or clamping the body by a thin wall.
Changing zero before side holes often ruins the whole route. The operator flips the part, quickly finds a new reference and plans to correct the offset with an adjustment. Intersecting channels don’t forgive that. If zero moved, the holes will meet in the wrong place and you can’t fix that with a tap or reamer.
Stock for the finish plane is also frequently wrong. After roughing the body almost looks ready and there is a temptation to remove minimal metal. But with too little stock the plane begins to follow the blank’s old geometry or shifts after clamping. The assembler sees contact only at the edge and the seal performs worse.
Do threads after checking the channel axis and hole position. Otherwise you can get a tidy thread in the wrong place. That kind of defect is especially frustrating: the part looks clean but fails functionally.
Another common problem is clamping by a thin wall. On a small body this seems harmless, especially when you need quick access to two planes and a side drilling. But the wall springs, the part seats differently than in free state, and after unclamping the dimension drifts. If the wall is near a channel you can get ovality or an axis offset.
A reliable route follows simple logic: choose the datum from the part’s function, then do channels and planes that must live in the same coordinate system, and only after that cut threads and secondary transitions.
How to inspect parts during the batch
Defects in a hydroblock rarely start with a gross error. Usually one dimension drifts by a few hundredths, then a probe fits poorly into an intersecting hole, and by the end of the batch the part no longer fits the mating plate. That’s why in-process inspection is not for paperwork but to catch the first deviation before a series of bad parts accumulates.
The first part is usually checked fully. After that the operator should keep a short set of dimensions that drift first. For these bodies one of the most sensitive dimensions is the distance from the base plane to the port axes. If that moves, problems will almost inevitably appear in intersecting channels and mating surfaces.
A convenient check order is simple. After the first 2–3 parts measure the base plane and port axes. Use a probe to check where the transverse drillings came out. Verify threads with a gauge or plug while the part is still clamped. After unclamping inspect whether the plane shifted. Record the dimension that moved first: include it more often in the control plan.
The probe is not for show. It quickly shows whether an intersecting drill reached the intended point. If the probe binds or hits earlier than expected, find the cause immediately: drill deflection, depth error, tool wear or chip in the channel.
Check threads before removing the part. While clamped it’s easier to identify whether the issue is the tool, compensation or the datum. After unclamping some traces disappear and diagnosing the cause takes longer.
Measure the plane twice: clamped and after unclamping. Some bodies hold size on the table but release residual stress after removal and the plane shifts. On assembly this shows up quickly.
If the same dimension consistently drifts first, don’t argue with the part. Add it to the in-process control card, shorten the inspection interval and check it after every tool change.
Quick pre-run checklist
Spend ten minutes checking before the first part rather than chasing axis drift later.
- The datum must be singular and obvious to the operator. The person at the machine should immediately see which plane and stop define the reference.
- The tool must reach all holes without excessive extension. Check the deepest and most awkward zones in advance.
- Jaws, prisms and clamps must not block control points. At minimum, critical dimensions should be checked without removing the part.
- The program should not change zero without a clear reason. If the route has a second or third zero, document it in the setup card.
- Have an alternative clamping option ready. If one clamp interferes with drilling, threading or inspection, a second mounting method should be available.
A good check is simple: the operator places the blank, touches the datum, verifies tool access and confirms the probe or caliper can reach control sizes. On heavy parts with intersecting channels and two working planes this checklist usually reveals weak spots before the first chip.
More often problems come from small mismatches between tooling, program and inspection, not from cutting parameters. Remove those before launch and the first part will show the real picture, not a lucky result.
What to do next
After a rough routing don’t immediately release it to series. First verify it against actual blanks from the batch: what material arrives, how much stock remains after casting or pre-processing, and where dimensional scatter exists. On paper everything may look neat, but on the shop floor an extra millimeter of stock can quickly wreck the idea of grouping several operations into one setup.
It’s useful to take not one but at least 3–5 blanks from the lot and run the route on them. That reveals where the body consistently holds the datum and where the operator must chase dimensions manually. If saving a few minutes forces a complex clamp, poor chip flow or a risk of shifting intersecting holes, the consolidation usually doesn’t pay off.
Before series ask four questions: how many re-fixturings can be removed without losing accuracy, which sides must be machined in one clamp, does the machine have enough travel and stiffness, and who will launch the first batch if a hole or plane starts to drift.
Choose the machine type to suit the part, not the desire to do everything at once. For a large body with multiple sides and tricky chip evacuation a horizontal center is often more convenient. For a compact part where work is mainly on the top plane, pockets and holes, a vertical center can be easier to set up and cheaper in series.
When the choice between vertical, horizontal or 5-axis isn’t obvious, discuss the task with EAST CNC. The company works in Kazakhstan and other CIS countries, supplies machining centers and helps with selection, commissioning and service. For these parts that support is usually more useful than picking a machine from a catalog.
A good machining route for a hydroblock is proven simply: several consecutive parts come out to size without constant datum adjustments, without manual fitting and without surprises at assembly.