Housings for Marine Equipment: Bases, Fits, and Control
Housings for marine equipment require careful work with the casting base, the blank's mass and staged checks of planes and large bores.
Why housings cause so many problems
Housing parts for marine equipment rarely look complicated on a drawing. Usually they are planes, large holes, seating surfaces and fastenings. On the machine it becomes more difficult. The housing is heavy, it rests imperfectly, it can shift slightly after clamping, and roughing often changes geometry.
The first reason is the blank mass. A heavy housing is awkward to place and flip, but that's not the only issue. It can sit differently on supports, pull on clamps and move slightly after being clamped. On the rough pass this is sometimes almost unnoticed. Then the error begins to accumulate.
The second problem is the casting itself. On a drawing it may seem that the first base can be taken from the cast surface. In practice the stock varies, the casting skin is inconsistent, ribs and bosses interfere with support. So the first base is often chosen not from the nicest surface, but from the one that gives a stable and repeatable setup.
After removing a large volume of metal the housing also changes. Internal stresses are partially released and the geometry shifts. Sometimes only slightly, sometimes enough that the relation of a plane to a hole or to a second side changes. On a small part this is easier to accept. On a massive housing such a small change quickly becomes scrap.
The most expensive mistake appears at the very start of the route. If the first base is random, the machine will very accurately transfer that randomness to the rest of the surfaces. Then familiar problems surface: a bore shifts relative to a plane, parallelism exists only on paper, assembly needs fitting, and setups show scatter.
This is clear on a pump housing. After roughing the flange plane may still be within tolerance, but the bore axis can shift enough that the bearing fit and cover no longer assemble correctly.
So you shouldn't rely only on machine rigidity or operator experience. First you need to understand how the casting behaves, where the part actually bears and what will change after stock removal. Otherwise large fits and planes will diverge before semi-finishing.
What to check on the casting before the first setup
The first setup does not tolerate haste. If you start machining without understanding the casting, it's easy to end up with a shifted plane, a thin wall or a bore that moved relative to the housing.
First check the stock in the zones of the future bases, large planes and holes. You need not only nominal values but the real picture across the whole part. One side may have 6 mm, the other 2 mm, and that already changes the first setup. If a cast hole is far out, it's better to see it immediately while the routing can still be adjusted.
Then inspect the surface. Pits, flashes, mold shifts and local warpage are often visible before measurements. These defects are not trivial. A small pit in the base area gives poor contact, and a flash under a support creates false geometry. The machine will cut accurately, but from an incorrect part position.
Separately assess where the casting actually has a normal support for the first setup. You need areas that hold weight without rocking and do not indent under clamps. If the housing rests on ribs, thin edges or casting bumps, basing will be random. In such cases make a preparatory pad first and then move to the main base.
It's useful to mark zones that are unsuitable for basing. Usually these are areas with a poor casting skin, places near risers, thin flanges, warped edges and surfaces with noticeable tilt. A simple mark with a marker on the part often saves time and avoids disputes between operator and process engineer.
A quick check before the first setup is simple: compare stock, find defects, evaluate supports and separate fit base areas from unsuitable ones. If there are doubts at this stage, spend 20 extra minutes checking rather than reworking the routing later.
On a pump housing this is especially evident. If the bottom cast plane is warped and the flange has a flash, don't sit the part on those spots. First choose more honest support points, or locally remove excess metal so that the first base is stable.
How the blank mass changes the routing
The blank mass affects not only machine selection but the operation order. A heavy housing is costly and inconvenient to flip often. Each new setup takes time, requires reliable slinging and adds the risk of shifting.
Therefore the routing is usually built so that in one setup you remove the maximum stock from accessible sides and as early as possible get clear reference surfaces. With a heavy part the number of re-setups is kept down even if the program becomes longer.
There is a second side. After removing a large amount of metal a cast housing can change shape. If you go straight to final size, you may later see a plane shift or ovality of a large bore. It's much safer to split the work into stages: roughing, checking bases and dimensions, semi-finish and finally finish.
Sometimes the part is left to rest between rough and finish. Even a few hours help to understand whether geometry moved or not. For a large pump or gearbox housing this is often more useful than trying to do everything in one pass.
Mass also affects tooling. When you must reach a deep zone the tool overhang increases and with it deflection. On a large part this is noticeable: the coordinate on the machine is correct, but the tool springs and the plane or hole moves off. So deep zones are better left until you can approach them more rigidly after partial machining of neighboring areas.
A good routing for a heavy cast part usually looks calm. First form stable bases, then remove the main stock more or less symmetrically so the housing doesn't twist, and only after repeated checks move to finish planes and fits. Trying to save one operation often comes back later at inspection.
How to choose the first base on the casting
The first base sets too much to pick it by convenience. Look not at the place that's easiest to put the part, but where it will sit most calmly.
Usually thick cast pads, bosses, feet of the housing or areas near ribs of stiffness are suitable. These zones move less, hold weight better and don't change shape as much after the first stock removal.
A good first base has a few common signs. It's wide and stiff enough, free of obvious defects, you can reliably bring supports and clamps to it, and it won't disappear completely after roughing. Another practical sign is that it's convenient to link the next setup dimensions from that base.
A common mistake is placing a clamp on a thin wall or the edge of a flange. The part may seem to sit, but under load the wall springs. At this moment the machine is cutting not the real geometry but the shape created by the clamp. After release the plane or fit shifts by a few hundredths and the problem appears later.
The first base must survive roughing. If you base on a cast protrusion that will almost entirely be cut away, on the next setup there will be nothing to reference. So look for points that remain until the end of the routing or that quickly allow making clean technological bases.
Decide the dimensional scheme in advance. Main dimensions should be referenced either from the assembly plane, from the axis of the main fit, or from a link between them. If this decision is postponed, one operation will reference the casting base while another references a randomly machined plane, and the inspection won't reconcile.
In practice with a pump housing it's common to place the casting on the stiffest cast feet and bosses, produce a first rough plane and a couple of support pads, and then work from them. It's not the fastest path, but it noticeably reduces the risk of rework at the end.
Operation sequence
On a heavy housing the order of operations decides much. If you first make large bores and then remove a big stock from the other side, the part may change shape and the dimension will move.
Usually start by preparing supports and clamp points. The housing must sit steady, without rocking and without excessive force on thin walls. Place supports under stiff cast zones and position clamps so they hold rather than bend the part.
In the first setup remove rough stock from those planes that will become bases. At this stage you don't need final size. The task is simpler: get flat surfaces from which you can confidently build the next step and check geometry.
Then rebase the part onto the machined surfaces. This reduces the influence of casting skin, flashes and stock scatter. For massive housings this is normal logic: contact area is large and any random bump immediately affects the part position.
Next it makes sense to bring the large planes true and only then move to large bores. A plane sets the part position. A bore should live within that geometry, not separate from it. Otherwise a bored hole can be accurate in diameter but shifted relative to the reference plane.
After removing the main stock the housing is often left to settle. This is not formality. Metal redistributes internal stresses and the part can slightly change shape. It’s better to leave the finish pass until the housing has calmed. This makes it easier to hold flatness and mutual positions.
On paper this sequence looks slow. In the shop it usually saves time because it reduces repeat checks, extra passes and attempts to rescue already shifted geometry.
How to keep planes and large bores
The problem usually starts before finishing. A heavy housing changes geometry after a big stock removal, and with it the planes and bores drift. If you try to achieve all sizes in one setup, the plane and the bore often separate at the next step.
So separate rough and finish not only by tools but also by time. After a big cut leave the part to cool and stabilize. Sometimes a pause until the next shift is enough, sometimes the housing should be removed from the table and returned later. The step is not the quickest, but it often saves the dimension.
Measure the mounting plane after each large cut, not only at the end. If after pocketing or boring a large window the plane moved 0.05–0.10 mm, stop and check the base. It's much easier to catch such a shift immediately than to try to fix it by finishing the bore.
There is also a simple everyday factor — heating. A large housing heats slowly but cools slowly too. The tool also changes size over a long run. If you measure a warm part at the machine the numbers can deceive. On large bores this quickly turns into extra interference or clearance.
A practical sequence helps: first bring the reference plane and keep it as the main base, after heavy roughing pause and recheck, and do not finish the bore to final size while the base may still move. Check not only diameter but its position relative to the mounting plane.
On a pump housing this is clear. You can rough-bore the bearing seat almost to size, but leave the last few hundredths until after the plane has been checked post-cooling. Otherwise the diameter may be fine but the axis shifted relative to the plane where the assembly sits.
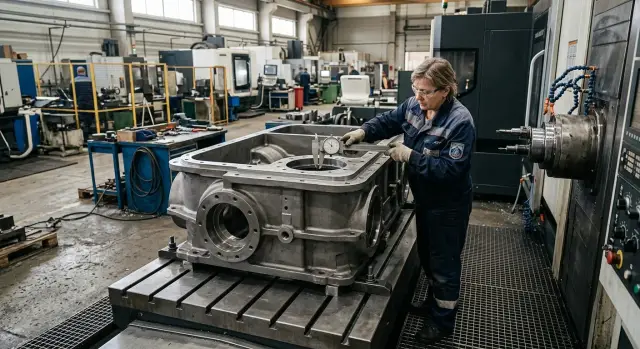
Example routing for a pump housing
Routing for a pump housing often breaks at the first setup. The casting arrives with varying stock on the feet and flange, the part is heavy, and after stock removal it can slightly change shape. If you start from a convenient surface instead of the correct base, it's hard to align planes, holes and a large bore into a single dimensional scheme.
A practical logic is this. First measure stock on the support feet, flange and the future bore zone, then choose the setup so the first operation produces the lower support plane. After that set the housing on the machined lower plane, bring the side base and only then move to the fastener holes. The large pump bore is not rushed at the first stage. You reach it after the part has two clear bases. Final inspection is also better after the housing cools to shop temperature.
This order seems slower, but in practice it's calmer. If you bore the large fit too early and then remove metal from the feet or flange, the housing can change shape by several hundredths. For a simple plate that may be acceptable. For a pump it's not: the cover will sit cocked, seals work worse and assembly becomes difficult.
A shop example is simple. The casting arrived with extra stock on one foot and almost none on the other. The operator first removed the minimum metal from the bottom, got a clean support plane and checked the part sits without rocking. Then the side base was machined, fastener holes referenced to it, and only on the next setup the large bore was finished. After cooling the QC rechecked flatness, coaxiality and diameter. If the size moved after cooling it was still possible to correct. After assembly such an error is expensive.
Where mistakes happen most often
These housings rarely forgive haste. An error in the first setup follows through the route: the plane shifts, the large bore loses position, and at final measurement there's little left to fix.
Most often it starts with an unlucky first base. The operator or technologist grabs an uneven boss because it's convenient to hook. The part ends up unstable, the indicator shows different values at different points, and all further machining references a random surface. For the first base look for an area with clear stock, a normal support area and minimal casting defects.
The second typical mistake is trying to remove all stock in one setup. On a heavy housing this is almost always a bad idea. After rough removal stresses redistribute, the part shifts a bit and a finish size that seemed fine will move. It's safer to split the work into rough, intermediate check and finish with a small remaining stock.
Clamping is another frequent issue. If you clamp the housing by a thin wall or the flange edge, the shape changes during machining. On the machine the bore looks round, after releasing the clamp it isn't. This is common on pump and gearbox housings where walls easily flex by hundredths.
Measurement also provides self-deception. After boring a large fit or milling a plane the surface is still warm, but the size is recorded in the protocol. On large diameters and long planes even slight heating gives extra hundredths and you may accept scrap as normal.
Another mistake appears at the end: no allowance left for a repeat finish. If you doubt the base, casting behaviour after roughing or setup stability, keep a small stock for a repeat pass. Otherwise any plane or bore settlement becomes final.
Stop and recheck the routing if the base behaves unstably under the indicator, the size changes after releasing the clamp, parallelism wanders on an apparently clean plane, or a measurement immediately after cutting looks much better than the one an hour later. These are clear signs the issue is in basing, clamping and routing, not only in tool offsets.
What to check before final inspection
Before acceptance don't rush measurements. If the housing has just been removed from the machine or has cooled unevenly, sizes may still drift. For large planes and bores even a few degrees difference leads to disputes at inspection.
A short discipline helps:
- let the part cool to shop temperature;
- clean support bases of chips, coolant and burrs;
- check the plane across the whole working area, not just one point;
- measure large bores with a single scheme, one instrument and from the same base;
- record in the protocol which base was used and after which setup the size was obtained.
If a base has a questionable spot, don't hope it won't affect the result. On a heavy housing a small burr gives a noticeable plane shift and then the bore size moves.
A useful habit is to record not only the final size but the measurement conditions: part temperature, instrument number and basing scheme. When a disputed dimension appears, these notes quickly show where to look.
What to do next
If a size starts to drift after roughing, don't try to fix it with a single tool offset. First review the routing: where the part loses stability, which base is weak, and whether there's enough stock after the first setup. For a heavy housing the problem is often not the cutter but that the blank, after stock removal and repositioning, seats differently.
Also budget time not only for cutting but for settling and inspection. These stages are often squeezed and then extra re-basing, re-measuring and a disputed final size occur. For large bores and long planes a pause between rough and finish often yields more value than another hour of cutting.
For a new part don't go straight to a batch. One trial piece is usually cheaper than a batch with floating geometry. On it you quickly see where the plane moves, how the casting behaves after roughing and whether the control scheme holds.
If the issue is equipment selection for heavy housings, discuss requirements with EAST CNC. The company supplies CNC machines for metalworking, helps with selection, commissioning and service, so from the drawing, blank mass and tightest tolerances it's usually possible to understand which solution to consider first.
FAQ
Why does the first base affect the whole routing so much?
Because the first base sets the position for all following surfaces. If you pick a random support, the machine will faithfully transfer that error to the planes, holes and fits.
What should be checked on the casting before the first setup?
First, measure the actual stock in the areas of the future bases, large planes and holes. Then inspect the support areas: pits, flashes, distortions and thin edges are better found before the first clamping than after roughing.
Can the first base be taken directly from the casting surface?
Not always. The casting surface often gives poor contact because of the skin, flashes and uneven stock. It's better to choose the area that holds the part stably and repeatably, not simply the smoothest-looking surface.
Should the housing be left to settle after roughing?
Yes — if the housing changes shape after roughing. A pause helps reveal whether a plane or bore has shifted and prevents wasting the finish pass on a part that hasn't stabilized.
How does the workpiece mass change the operation sequence?
Try to remove as much accessible stock as possible in one setup and get clear reference surfaces early. Extra flips on a heavy part take time and increase the risk of movement.
What clamping mistake happens most often?
A common mistake is to press on a thin wall or the edge of a flange. The part deforms under the clamp, so the machine cuts a geometry created by the clamp. After release, the plane or fit will shift.
When is it best to bore large fits?
Don't rush large bores to final size. First establish stable bases and main planes, check geometry after roughing, and only then bring big bores to final diameter.
How to correctly measure planes and bores before final inspection?
Let the part cool to shop temperature, clean supports from chips and burrs, and measure from the same base. If you measure with different schemes, you'll create scatter yourself.
By what signs should the routing be reviewed?
Stop and reassess if the base behaves inconsistently under an indicator, the size changes after releasing the clamp, or parallelism wanders despite a visually clean plane. In such cases, look for problems in basing, clamping and routing, not only in tool offsets.
Is there sense in making one trial part first?
Yes. For a new cast housing a single trial piece is almost always cheaper than correcting a whole batch. A trial quickly shows where a plane moves, how the casting behaves after roughing and whether the control scheme is sufficient.