Height Taper in a Vise: Shim and Parallel Errors
Height taper in a vise often comes not from the cutter, but from dirt, mismatched parallels, and a clamping tilt. Below is a checklist to run before the first part.
Why a height taper appears
A height taper is not seen from a single measurement, but by comparing two sides. After machining, the part is measured on the left and right, and one side comes out higher than the other. The difference can be small, for example 0.03–0.08 mm. But if it repeats in the same direction, that is no longer a coincidence.
At that point, people often start blaming the machine, the program, or the tool. In practice, the source is often right in the vise. The workpiece did not sit on one plane, a chip got under one support, the parallels were different heights, or the clamping lifted one edge slightly. The machine then simply cuts according to the base it received.
This kind of mistake can easily carry over into a batch. If the operator keeps placing the workpiece on the same dirty supports or in the same vise with a tilt, every part will get the same slope. That is why the first part is needed not only to check size, but also to check the seating itself.
What to check before setup
Start with the basics. Clean the vise base, the jaws, the steps for the parallels, and all support surfaces. One blast of air is not enough: it often pushes fine chips into a corner. A brush, a rag, and a quick visual check are more reliable. Even a thin chip under one parallel creates a noticeable tilt on a tall part.
Then check for dents and burrs. They are often missed on the lower edge of the jaws, on the vise base, and in the places where the parallels sit. A small burr lifts one side by only a few hundredths, but on a part 80–100 mm tall it is already visible in the measurement. Run your fingernail over the contact points. If it catches, the spot needs to be cleaned up.
It is better not to choose the parallels by eye either. Compare the pair with each other. The same marking does not guarantee the same height. After grinding, a knock, or long use, one parallel can differ from another by 0.02–0.03 mm, and that is already enough to create a taper.
Mixed pairs are another common problem. In one setup, people use an old parallel and a new one, a long one and a short one, a straight one and one with a dented edge. From the outside everything looks fine, but the workpiece rests differently on the left and right.
Before the first part, a short check is enough: clean the vise and the support areas, inspect the edges, compare the height of the parallels, and remove anything that looks damaged or worn. It takes only minutes. In return, you do not have to take apart an already ruined setup.
How supports and parallels create tilt
The tilt often starts not with the jaws, but with the support under the part. If the shims or parallels hold the workpiece at different heights, the vise only locks in that slope.
The most common cause is dents, stuck chips, and a crushed edge. One dent is enough to raise the part slightly on one side. You can barely see it by eye, but after the first pass the difference shows up in the dimension.
Another mistake is when the parallels rock in place. This happens when the seat is dirty, one parallel is sitting on debris, or the pair has been selected with different heights. The check is simple: press on each parallel with your finger and try to rock it. There should be no movement.
A tall support made from a random stack of thin plates also works poorly. Such a stack can shift during clamping, especially if the workpiece is heavy or the moving jaw pulls it upward. One side sits rigidly, the other starts to move, and the taper appears before the first cut.
Another frequent mistake is that the supports are not where the part should actually sit. A long workpiece is sometimes placed on points that are too narrow or too close to the edges. The metal bends slightly, its position changes after clamping, and a height difference appears even though the parallels seem identical.
If the part rests only on a narrow strip, clamping almost always changes its position. It is better to move the supports right away than to look for the reason in the machine later.
How clamping lifts one side
Sometimes everything looks clean, but the part still shifts upward. Then the cause is often the clamping itself. The moving jaw pulls the workpiece not only toward the fixed jaw, but also slightly upward if the part did not seat on both parallels or something prevents it from laying fully flat.
The usual scenario is this: on one side, the workpiece sits firmly on the parallel, while on the other side there is a barely noticeable gap. The operator starts tightening, the jaw pulls the part sideways, and one edge lifts. After the first pass, the top looks even, but when the part is flipped or measured again, the taper appears.
That is why the part must be seated down first, and only then tightened. Some people press it down by hand through a soft pad, others tap it gently with a plastic or copper hammer. The method can vary, but the idea is the same: both supports must be working before final tightening.
Check the stop as well. If it sits at an angle, rests on a burr, or touches the part above the support line, it can also lift one edge slightly before clamping. On a short workpiece, this is especially easy to miss.
A quick test is simple. Place the part on the parallels, lightly snug the jaw, and check contact on both sides with a feeler gauge, a fingernail, or a light press from above. If one edge still moves down under pressure, the part is not seated. Do not continue the setup in that state.
The check sequence before the first part
Most of these problems appear before the first pass. If the first part keeps coming out with a taper, do not change cutting modes and offsets right away. First check how the part is seated in the vise.
It helps to keep the same sequence every time and not skip steps:
- Clean all surfaces that touch each other: the vise, the parallels, the shims, and the bottom face of the workpiece.
- Lay out the supports and compare their heights before setting the part. If one parallel rocks, has a dent, or simply looks doubtful, remove it at once.
- Place the workpiece, lightly snug the jaw, and seat the part down. It should sit firmly on both supports.
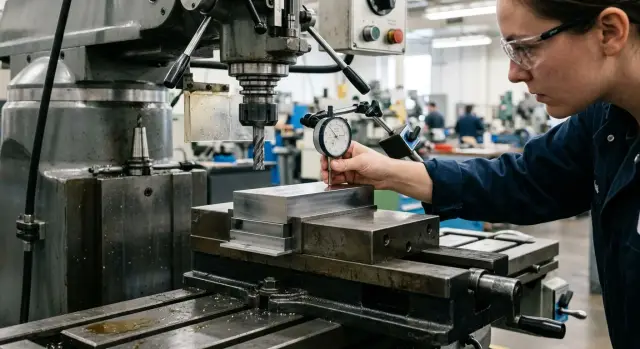
- Tighten to working force and immediately check the height on the left and right from the same base. You can take a control measurement or quickly run an indicator across the top surface.
- If there is already a difference, stop. The first pass will not fix it. It will only lock in the error.
This routine takes only a few minutes. In return, you catch the tilt before machining, not after the batch.
Mistakes that are most often missed
Most often, taper is caused not by big failures, but by small things that look harmless. Packed chips got under the far end of the parallel. One support is longer than the other. A burr remained on the lower edge of the workpiece after cutting. A temporary soft shim made of aluminum or copper bent slightly under load. Each of these small things can easily create the same tilt from part to part.
It is also worth looking at the workpiece itself. A new batch may match the drawing size, but have different scale, different roughness after cutting, or a different allowance. The old setup method no longer works the same way, even though everything looks familiar from the outside.
So before starting a series, it is useful to quickly check a few things:
- both ends of the parallels are clean, with no stuck chips;
- the supports on the left and right hold the part equally;
- the lower edge of the workpiece has no burr or buildup;
- temporary soft shims are really needed;
- the new batch goes through a trial setup and check just like the first part.
These checks are boring. But they are exactly what most often save you from recurring scrap.
A short shop-floor example
In one shop, a rectangular blank for a housing was clamped on two parallels. The setup was ordinary: base down, stop against the jaw, medium clamping force. The setup looked clean, so the first part went into rough machining without a long check.
After the pass, the height on the left and right was compared from the same base. One side shifted by about 0.06 mm. For one part that is already unpleasant, and for a batch it is ready-made recurring scrap.
At first, the machine and the program were blamed. But a repeat measurement showed that the error was stable and every part shifted in the same direction. That is a strong sign that the cause is in the setup.
When the master removed the workpiece and took the supports apart, a small layer of packed chips was found under one parallel. Almost dust. It is easy to miss even in good light. Then another problem showed up: the parallels had been taken from different sets, and one was slightly higher than the other.
That was enough to create a tilt across the whole batch. One support locally lifted the part, the different height of the pair rotated the workpiece, and the clamping simply locked that position in place.
The setup was rebuilt from scratch. The parallels were wiped clean, the seating surfaces were cleaned, the workpiece was placed back on the supports, and it was clamped with the same force. After that, the height difference dropped into the normal measurement scatter, and the result repeated on the following parts.
Cases like this quickly teach you not to look for a complicated reason where one chip under the part is enough.
If the problem keeps coming back
If the tilt appears again and again on one operation, then it is no longer a one-time mistake. It usually means there is no single standard in the setup, and each operator chooses parallels, places shims, and checks the first part a little differently.
Simple discipline helps here. Write down the found cause in the setup sheet: which parallel was used, where the burr was found, which side was lifting the part. The working pairs of parallels that give a flat seat should be marked and not mixed with the others. And the first-part check should be the same for everyone: clean supports, seating, clamping, and height control.
If that still does not solve it, look wider. Check the condition of the vise, the jaws, the clamping scheme, the shape of the supports, and the workpiece itself. Sometimes it is not one parallel that is at fault, but the entire setup scheme.
In such a situation, an outside perspective also helps. EAST CNC has practical materials on metalworking and experience in equipment selection and service. If the tilt keeps returning on the same operation, it is worth discussing not only the vise, but the whole setup sequence. Often the cause is not one measurement, but a chain of small mistakes before the first part.
FAQ
Why does height taper often come from the vise rather than the machine?
The cause is often in the setup. If the workpiece sits on a dirty support, on parallels of different heights, or with a gap on one side, the machine will simply repeat that tilt in the finished size.
What should I check first if one side of the part is a few hundredths higher?
First clean the vise base, jaws, the places where the parallels sit, and the underside of the workpiece. Then check whether the parallels are the same height and whether the part is seated on both supports before tightening.
Can one chip under a parallel cause a noticeable tilt?
Yes, it can. Even a thin, packed chip under one parallel lifts that side, and on a tall part the difference is already visible in the measurement.
How can I tell if the parallels are different heights or already worn?
Do not trust the marking alone. Compare the pair with each other, look at the edges, and try each support for rocking — there should be no play.
Why does one side of the part lift during tightening?
The moving jaw pulls the part not only sideways but also slightly upward. If the workpiece is not fully seated on the supports, one edge can lift even before the first pass.
Should I seat the workpiece before final tightening?
Yes, first seat the part down, then tighten to working force. A careful push by hand through a soft pad or a light tap with a plastic or copper mallet works well.
How can I quickly check seating before the first cut?
Lightly close the jaw and check both sides with a feeler gauge, your fingernail, or a gentle push from above. If one edge still sinks, the part is not seated and it is too early to cut.
What small things most often cause a repeating taper in a series?
Commonly missed issues are a burr on the lower edge of the workpiece, chips under the far end of a parallel, and soft shims that bend under force. Another common mistake is mixing supports from different sets.
What should I do if the taper repeats on almost every part?
Stop and look for one common cause in the setup. Usually operators choose parallels differently, place shims differently, and check the first part in their own way, so the error comes back.
When do I need to check not only the parallels but the whole clamping setup?
Look at the vise and the whole setup if the tilt remains after cleaning and replacing the parallels. Check the jaws, the stop, the support shape, and the workpiece itself, because the problem may be in the entire assembly rather than one part.