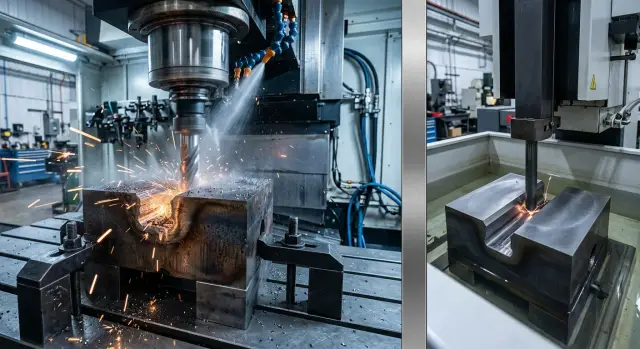
Groove in a Hardened Part: When Milling Beats EDM
A groove in a hardened part can be made with a milling cutter or with EDM. We break down lead time, accuracy, finishing, and how to choose the right method for the job.
Why this is difficult
The same groove can be made in two ways: by cutting with a carbide end mill or by EDM. On the drawing, the result often looks the same. In the shop, the difference becomes obvious quickly: lead time, scrap risk, hourly cost, and the amount of work needed after the main operation all change.
The problem starts with the part itself. After heat treatment, the metal holds size better, but it is harder to machine. A milling cutter sees impact load at the entry and exit of the groove, so any mistake in the cutting conditions can quickly cause edge chipping, overheating, or dimension drift. If the part is thin or long, vibration is added to the mix. Then the groove does not come out as even as expected.
EDM works differently. The tool does not cut the metal; it removes it with electrical discharges. Because of that, there are no normal cutting forces, but there are other limits: you need to prepare an electrode or wire, set up the program, account for the heat-affected zone, and check the surface condition. Sometimes the process itself runs smoothly, but time is spent not on machining, but on preparation and waiting for a machine slot.
Lead time is often influenced less by the cutting itself than by practical details:
- whether the right cutter or electrode is available;
- whether a separate fixture is needed;
- whether the part can be clamped without extra re-setting;
- whether a trial pass on a sample is required.
Another trap is the quality of the groove after machining. Even if the size is within tolerance, the part often still needs finishing. After milling, burrs are removed and angles and surface roughness are checked. After EDM, a thin layer may need to be removed if the surface or edge is not suitable for fit.
That is why a groove in a hardened part is rarely chosen based on one feature alone. It is not enough to ask, “which is more accurate?” Usually the whole route is counted: preparation, the operation itself, scrap risk, and how much time it takes to bring the part to working condition.
When a carbide end mill wins
If the groove is open from above, the cutter enters the cut without unnecessary complications. That is a simple but very important detail. The tool does not need to work its way into a closed cavity, and the operator does not have to build a complicated workaround, as is often the case with EDM.
A carbide end mill is especially good when the drawing does not require sharp internal corners. If a corner radius is allowed, machining becomes much simpler. You get the required geometry right away, without an extra operation that exists only to create a perfect sharp corner.
For a single part or a small batch, milling often gives a better lead time. The reason is simple: there is no need to make an electrode, wait for an EDM slot, and then return the part to the main route again. If a CNC machine is already involved in the part, the groove can be added to the same program or the next operation.
This becomes especially noticeable when a groove in a hardened part must be made quickly. While EDM is still preparing for work, milling is already removing material. For repair parts, fixtures, and prototype batches, the time difference can be very noticeable.
There is also a practical advantage: after good milling, there is often less finishing required. The surface will not always be better than after EDM, but its condition is usually more predictable for the next step. If the cutting conditions are correct and tool runout is controlled, the part can move through the route faster.
Milling usually wins in this situation:
- the groove is open from above and the cutting zone is easy to access;
- the internal radius on the drawing is acceptable;
- one part or a small batch needs to be made quickly;
- a CNC machine is already part of the overall process;
- you do not want to spend much time on finishing after machining.
A simple example: you need to make a 10 mm wide groove in a hardened part, and the designer allows a radius in the internal corners. The part is already in the route on a turning-milling operation. In that case, a carbide end mill often solves the task faster and cheaper than EDM, especially if you are making two or three parts rather than a large series.
When EDM makes more sense
If the groove is narrow and deep, a milling cutter quickly runs into its own weak point. The longer the stick-out, the easier it is for the tool to deflect sideways, and the higher the risk of chatter, vibration marks, and an out-of-tolerance size. In this kind of task, EDM is often calmer, because it does not need the rigidity of a thin cutter.
This is especially noticeable when a groove in a hardened part is narrow but very deep. For a cutter, a 2 mm wide groove with a depth of 18 to 20 mm already looks demanding. At those dimensions, EDM usually gives a more predictable process, even if it is not always faster in pure machining minutes.
Another common case is when the drawing requires sharp internal corners. A milling cutter always leaves a radius equal to, or close to, its diameter. If no radius is allowed at all, machining immediately runs into a geometry limit, and EDM removes that issue.
There are also parts that simply do not tolerate side load well. A thin wall, a long projection, or a weak zone after heat treatment all handle cutter pressure poorly. Even if the tool cuts neatly, the part can shift slightly, and that is enough to require size correction by finishing. EDM loads the part differently, and in such cases it is often the safer choice.
Material also matters a great deal. Some hardened steels and wear-resistant alloys quickly wear out a carbide cutter, especially if the groove must be cut deep with small passes. The tool loses sharpness, heat rises, and the dimension drifts. In this case, EDM may not be cheaper in machine time, but the result is usually easier to predict.
Scheduling is another separate question. If the shop can fit electrode production into the plan without stress, sinker EDM becomes a perfectly workable option. The time lost in preparation is often offset by the fact that the operator does not spend a shift on tuning cutting conditions, replacing cutters, and trying to hold accuracy in a difficult material.
EDM is usually preferred over milling when at least two of these conditions are true: the groove is very narrow and deep, a sharp corner is required, the part reacts badly to side force, or the tool wears out too fast. In such tasks, milling often wins on simple grooves, while EDM wins where geometry and stability matter more than the speed of the first pass.
What affects lead time the most
When a groove is made in a hardened part, the calendar lead time rarely depends only on cutting or burn time. More often, time is spent before the first pass: the part has to be set correctly, the datum has to be checked, and it must be confirmed that the tool or electrode will produce the required size.
If the part is complex and the setup is tricky, setup can easily eat half a day. One mistake in the datum and the groove shifts in position, leaving the shop with extra finishing or a new part. That is why an experienced setter often affects lead time more than the machine's nominal speed.
EDM has its own hidden time cost: first the electrode is made, then its size is checked, and only then does machining begin. If you need more than one electrode, for roughing and finishing, the schedule stretches even before the machine starts. A carbide end mill does not have that stage, but only if the right tool is already in stock.
Another common slowdown is the number of passes. In milling, lead time grows when the technologist plans cautious roughing, then semi-finishing, and then a separate finishing pass. EDM is the same: a rough burn removes material quickly, but finishing passes take time because they are what create the needed geometry and cleaner surface.
Pauses for measurement also change the picture a lot. After the first passes, the operator usually checks the size, looks for drift, adjusts the cutting conditions, or corrects the toolpath. That is normal work, but in small batches these stops often make the process longer than expected.
Lead time most often increases because of several things at once:
- the part takes a long time to set and recheck against the datum;
- a new electrode is made for EDM;
- the technologist adds extra roughing or finishing passes;
- the operator stops several times for measurement and correction;
- the required machine is already busy with another job.
Many people underestimate the last point. In a real shop, the winner in technology does not always win in lead time. If the EDM machine will only be free tomorrow, and the machining center can be used now, a carbide end mill often gives a shorter path to the finished part, even if the machining itself needs careful conditions.
That is why lead time should be calculated not by one step, but by the whole chain: setup, queue, machining, measurement, and possible finishing. That calculation is usually more honest than any theory.
Where accuracy and finishing diverge
With milling and EDM, accuracy often differs not in the drawing dimension, but in what is left to do after the machine. For a groove in a hardened part, this is especially noticeable: one method brings the size out faster, while the other holds the shape better where milling is already limited by its geometry.
A carbide end mill usually brings width and depth into size faster. If you need a straight groove without very thin sections and without a strict internal corner requirement, milling often gives the size right in the working range. But after that, the part is almost always checked for more than just the measured dimension. The operator removes burrs, checks roughness, and makes sure the edges have not been pulled over.
EDM is different. It holds sharp internal corners and thin contours better, where the radius of a cutter becomes a problem. On paper, this looks neater, and the groove shape can be more accurate. But after the burn, you need to check the layer left on the surface and the cleanliness of the walls. If the part works in a tight fit or under impact load, this inspection should not be skipped.
The difference is usually visible in these cases:
- If the groove is defined only by width and depth, milling often solves the task faster.
- If the groove must fit a mating part without a corner radius, EDM gives a more accurate contour.
- If the part still goes through grinding or lapping afterward, some of the surface-quality advantage is lost.
- If the groove works as a seating surface, the final result after finishing matters more than the method itself.
In practice, finishing after machining depends on the fit. For example, if the groove is for an insert with a small clearance, after milling you can remove the burr quickly and pass inspection, and that is enough. If the insert must sit almost without play and bear against a sharp corner, EDM often means less manual fitting afterward, but it adds more surface inspection.
How to choose the method step by step
If you need a groove in a hardened part, do not choose the method by habit. First look at the geometry and tolerances, then count the whole route to the finished size.
-
Check the part hardness, groove depth, and width. For a shallow open groove, a carbide end mill often gives the fastest result. If the groove is narrow, deep, and in a very hard material, the load on the cutter rises sharply, and EDM may give a calmer process.
-
Write down the tolerance not only for width, but also for shape. Straightness of the walls, bottom angle, parallelism, and edge condition all matter. If a sharp internal corner without radius is required, milling immediately hits a limitation. If a small radius is acceptable, milling often solves the task in one setup.
Many mistakes start not on the machine, but on the drawing. The groove size is specified, but it is not stated what matters more: accuracy, corner shape, or surface condition.
-
Evaluate tool access. Milling needs rigid feed, room to enter, and a normal stick-out. If the part is clamped awkwardly, the wall is thin, or the groove is located where the tool can easily deflect, the estimated time quickly stops being realistic. EDM is more tolerant of difficult access, but you usually pay for that with time.
-
Count the preparation to the end. For milling, that means setup, choosing the cutting conditions, monitoring wear, and measuring. For EDM, you also need an electrode, its production, process setup, and possible finishing after the burn. For one part, the electrode often eats up the entire advantage. For a series of identical parts, that preparation starts to pay off.
-
Combine everything into one route. If you still need to grind or manually fit the groove after milling, the fast operation is no longer fast. If EDM requires removal of the altered surface layer or edge correction afterward, that is part of the lead time too.
A simple guide is this: a 8 mm groove in hardened steel, with moderate tolerance and an acceptable corner radius, is often more economical to mill. A narrow, deep groove with sharp corners and strict shape requirements is usually better sent to EDM. You should count not the cutting minute, but the part at the end.
A simple shop-floor example
A small batch often changes the whole calculation. Suppose you need to make a groove in a hardened part that is 8 mm wide at 58 HRC. There are only a few parts, the total deadline is two days, and the designer allows rounded corners. In that situation, a carbide end mill often gives a better result than EDM.
The reason is simple: the cutter can be started almost immediately. The technologist selects the cutting conditions, the operator installs the tool, makes a trial part, and quickly moves into production. EDM usually needs more preparation: the electrode must be planned, made, checked for wear, and the process itself must be set up. When the batch is small, that start-up stage often takes more time than the machining itself.
In practice, it looks like this. The part is clamped, the groove is cut in several careful passes, then the burr is removed and the size is checked. If the tolerance is reasonable and no sharp internal corner is needed, the job ends there. Extra finishing is often not required at all. For the shop, that is a real difference: fewer handoffs, less waiting, and less chance of losing a day on fixture preparation.
Accuracy can be perfectly workable in this case too. For an 8 mm groove at moderate depth, a good carbide end mill holds the size consistently if the machine is rigid and the conditions are not too aggressive. Usually after machining, the operator checks the width, straightness, and edge condition. If the edge is clean and the size is within tolerance, the part moves on without extra finishing.
But if the geometry changes, the picture changes quickly. If that same groove is narrowed to 3 mm and made noticeably deeper, milling becomes much harder. The thin tool starts to lose rigidity, and the risk of vibration, drift, and breakage rises. In that case, EDM often takes the lead because it can hold a narrow, deep contour more easily without fighting tool deflection.
So the conclusion from this example is very practical. For a small batch, with an 8 mm groove, 58 HRC hardness, acceptable corner radius, and a tight deadline, milling usually wins on start-up time. When the groove gets narrower and deeper, EDM more often gives a calmer and more predictable result.
Mistakes that are expensive
When working on a groove in a hardened part, expensive mistakes often start even before the first pass. The most common one is using conditions that worked well on a softer steel and changing almost nothing about the material removal. In hardened material, that approach quickly heats the edge, shortens tool life, and makes the size drift after only a few parts. Usually, a lower radial load and several passes instead of one bold cut work more calmly.
The second mistake is underestimating tool stick-out. On the drawing, everything looks simple: an 8 mm groove, 18 mm deep. On the machine, the long cutter deflects, the wall gets a slight wave, and the width at the bottom is no longer the same as at the top. Then the operator starts looking for the reason in feed rate or material, even though the real issue is rigidity. The shorter the stick-out and the stiffer the holder, the fewer surprises.
Many people count only machine time and make a mistake in the lead-time calculation. Milling may take 12 minutes, but preparation can take another hour: choose the cutter, set up the part, make a trial pass, check the size, and sometimes change the tool. EDM, in pure machine time, often looks slower, but if you count the whole route, the difference is not always so large.
Finishing that is forgotten also hurts the schedule. If after machining you need to remove marks, eliminate burrs, correct the geometry, or fit the wall to a tight fit, that should be planned from the start. Otherwise the shop promises one deadline and the part comes out a day or two later. That happens more often than people think.
Another mistake is looking only at the groove width. The width may be within tolerance, but the part still will not assemble if the wall drifts, the bottom is off, or there is variation in depth. You should check not just one dimension, but at least several points.
Usually this minimum is enough:
- width at the entrance, in the middle, and at the bottom
- straightness of both walls
- depth along the entire length
- edge condition after the tool exits
In short, the biggest losses do not come from one major error, but from a chain of small ones. First the shop chooses too aggressive a cutting condition, then adds too much stick-out, then forgets about finishing and shape control. In the end, the groove is formally machined, but the part still needs rework.
A short checklist before starting
If a groove in a hardened part needs to be made without unnecessary rework, check a few things before the first operation. At this stage, it is often possible to save 20 minutes and later lose a day on a new calculation, a repeat burn, or extra finishing after machining.
It is useful to go through five questions.
- Confirm the actual hardness after heat treatment, not just the value from the drawing. A difference of even a few HRC points changes the cutting conditions and affects whether a carbide end mill can handle the job without rapid wear.
- Decide on the groove corners right away. If the drawing requires sharp internal corners without a radius, milling runs into a geometry limit, and EDM may be simpler.
- Match the batch size to the shipping deadline. For one or two parts, a long preparation stage may not pay off. For a series, the picture changes: if milling holds size, the total time is often shorter.
- Decide who will measure the groove and with what. If there is no suitable gauge, probe, or clear inspection method, the argument about groove accuracy will start after machining.
- Plan a separate operation to remove burrs or the altered layer after the burn. If this is not considered in advance, the deadline almost always slips.
It is also useful to write the tolerance for width, depth, and straightness in one place at the start. Then the technologist, operator, and inspector all work from the same numbers instead of reading the drawing differently.
A simple example: after heat treatment, the part has 60 HRC, the groove is short, the corners allow a small radius, the batch is 30 pieces, and inspection is done with a gauge block and a go/no-go gauge. In that case, a carbide end mill often gives the shorter cycle. If the part is a one-off, the corner must be sharp, and a light finishing step is planned after EDM anyway, burning may be calmer and more predictable.
This checklist does not solve everything on its own, but it quickly filters out mistakes that usually cost more than the machining itself.
What to do next
Do not argue about the method by habit. Take one specific part and collect a proper set of data for it. For a groove in a hardened part, this saves days and sometimes avoids rework.
Put everything into one file that the calculation depends on: the drawing, material, hardness after heat treatment, tolerance for width and depth, surface finish requirements, and batch size. If the part is later ground, say so right away. If the groove works in a fit or under load, include that too.
Then ask the technologist to calculate both routes on the same part. Not in general, but with numbers: how long the carbide end mill will take, how long EDM will take, where a repeat pass is needed, where there is a risk of dimension drift, and how much time finishing will take after machining. Only then can you see the real difference, not just the price of one operation taken out of context.
A common mistake is simple: comparing only the cost of cutting or burning. But money is often lost elsewhere. After EDM, more surface finishing may be needed. After milling, the part may be ready faster, but the tool life and final size must be checked carefully. If the batch is more than a couple of pieces, that difference becomes obvious quickly.
It is helpful to verify the calculation with this short list:
- Is the part hardness and post-heat-treatment condition included in the file
- Is the tolerance clear, not just the nominal groove size
- Are finishing, inspection, and possible scrap included
- Are both routes calculated under the same conditions
- Does the estimate show the time for the full batch, not just one part
If you repeat these tasks often, it makes sense to look not only at the individual operation, but also at the equipment fleet. At EAST CNC, you can discuss machine selection for metalworking, commissioning, and service. This is especially useful when you regularly work with hardened parts and want to calculate lead time and cost in advance, not after the first failure in the shop.