Grinding Dust Near CNC Machines: How to Separate the Zones
Grinding dust near CNC machines can be contained without rebuilding the shop floor: we break down screens, exhaust, walkways, bins, and daily checks.
What the real problem is
When grinding is set up next to a CNC machine, the issue is not just a dirty floor. Abrasive dust acts like fine sandpaper. It settles on guideways, ball screws, enclosures, sensors, and connectors, then mixes with oil and coolant. That creates a paste that wears metal much faster than ordinary dirt.
The worst part is that the problem grows even when grinding happens only occasionally. One short operation per shift is enough for fine particles to spread across the area. Airflow from doors, fans, and even the exhaust itself carries them farther than you might expect. Carts, shoes, bins, and compressed-air blowoff bring the rest to places the dust would never reach on its own.
Coarse dust is visible right away. It sits on the floor, windowsills, and cabinet tops. That is usually what people clean first. But the finer, nearly invisible fraction often does more damage. Those particles stay in the air longer, slip through gaps, and settle in a thin layer where the operator does not look every hour: on scales, limit switches, optical sensors, seals, and the guideway area.
The first losses show up sooner than many expect:
- dimensions start drifting without a clear reason;
- part finish becomes less consistent;
- cleaning takes more and more time for operators and technicians;
- components wear out faster than the maintenance schedule suggests.
Often the shop notices the problem too late. At first the supervisor sees a gray film on the machine base and an extra 15-20 minutes spent on cleaning. Then come false sensor triggers, stiff safety covers, marks on the guideways, and questionable parts that have to be checked again.
Put simply, grinding dust near a CNC machine is dangerous not because there is so much of it, but because it creeps into precision components quietly and constantly. You can sweep the floor in ten minutes. You cannot remove guideway wear and quality issues that quickly.
Where the dust comes from and where it settles
Dust rarely appears in just one place. On the shop floor it is created every time an operator deburrs a part, grinds an edge, cuts with an abrasive wheel, or blows a part off with air. The unpleasant part is that coarse chips are visible at once, while fine abrasive stays in the air longer and reaches places nobody expects.
Most often the source is nearby, but the traces are found at the machine:
- manual grinding and part cleanup
- cutting with abrasive tools
- blowing off parts, bins, and fixtures
- shaking out rags, pallets, and boxes with dust inside
After that, ordinary air movement carries the dust along. Exhaust pulls it, a fan pushes it, an open door brings it in, and even a passing cart can stir it up. If the grinding station sits beside the CNC machine, the dust does not travel in a straight line. It moves along the floor, rises with warm air, clings to cables, walls, and covers, and then settles on the nearest surfaces.
For the machine, the invisible abrasive cloud is more dangerous than the visible gray layer. It gets into gaps and settles where there is oil or grease. That is why cabinet doors and their seals, measuring scales, the spindle, the guideway area, and every spot where grease holds dust like glue are the first to suffer. Even a thin abrasive layer speeds up wear. The outside of the machine may look clean while friction has already started inside where it should not.
Grinding dust near a CNC machine often reaches the machine not through the air, but on wheels. A cart passes through the cleanup area, picks up abrasive on its tires and shelves, then rolls to the machine and drops it near the base. Boxes, pallets, part bins, and even shoes do the same. If the same bin is used both at grinding and at the CNC machine, the abrasive spreads through the entire area quickly.
That is why you should look at more than the dust source itself. Check the air path, the people path, and the bin path. That combination usually explains why the film keeps returning to the guideways even though grinding is supposedly “not nearby.”
How to separate the zones without rebuilding
Start with the shop layout, not with screens. Even a simple sketch on paper often shows right away why grinding dust near a CNC machine still reaches the guideways: people walk through the same passage, carts cut diagonally across the area, and bins sit where the airflow carries abrasive straight toward the machine.
On the sketch, mark not only the grinding station and nearby machines. Also include pedestrian routes, cart paths, scrap storage, finished-part storage, doors, windows, fans, and local exhaust. Then you can see
Where to place the screens
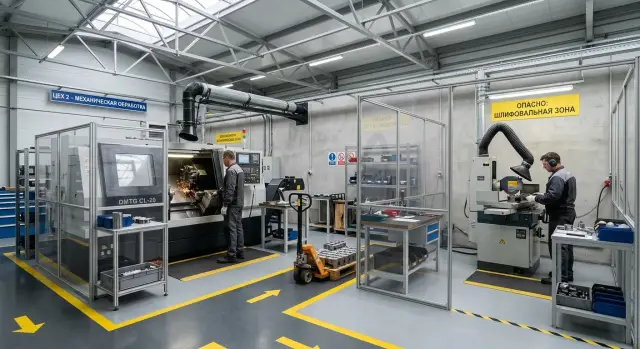
A screen is almost always installed too late - right next to the machine. By then the dust has already passed through the aisle, settled on the floor, the bins, and clothing, and then made its way to the guideways. A screen works better when it is closer to the grinding point and intercepts the direct throw as soon as it appears.
If there are 3-5 meters between the grinding station and the CNC machine, the screen is usually placed at the boundary of the dusty operation, not next to the clean area. That way it cuts off the flow at the start of its path. In a shop where grinding dust is next to CNC machines, this simple solution does more good than a tall barrier placed right by the machine itself.
Height should be set not by eye, but by the trajectory of the dust. Watch where the abrasive goes during normal work: forward, to the side, and a little upward. The screen should fully cover that corridor, with extra height at the top. A low screen will stop coarse dust, but the fine fraction will go over it and still settle where nobody expected it.
Leave openings only where people actually pass or where bins are moved. The more unnecessary gaps there are, the weaker the whole barrier becomes. If a passage is needed, it is better to have one clear corridor than two or three random gaps at the edges.
A good setup usually looks like this:
- the screen is placed close to the dust source;
- its edge blocks the direct line of discharge;
- there is only one passage opening;
- the operator can reach the equipment for maintenance without walking halfway across the shop.
Do not place the screen so that it gets in the way of wheel changes, cleaning, bringing in blanks, or removing bins. If it is inconvenient, people will quickly start moving the barrier, leaving it open, or driving around it any way they can. After that, protection stops working even if the idea itself was right.
Mobile screens for small areas
On a small floor area, a fixed screen is not always convenient. Mobile sections on casters with locks work better there. They can be moved closer to the dusty operation and then opened up for maintenance access.
But a mobile screen is useful only if it has a permanent place. If the barrier is positioned differently every time, the layout falls apart. Choose one working position and one parking position, mark them on the floor, and make sure the cart with bins can pass without touching the screen.
How to set up exhaust without major changes
If grinding dust near the CNC machine is already spreading through the shop, do not start with a major ventilation rebuild. In most cases, local capture right at the point where the wheel removes metal gives you more benefit. The closer the suction point is to the source, the less abrasive spreads across the floor, the bins, and the machine guideways.
A simple rule works well: exhaust should capture the dust where it is created, not after it has already spread through the shop. If air moves from the clean area toward the dirty one, you are pulling fine dust past the CNC machine, control cabinets, and fixture storage. That kind of airflow often feels harmless, but it does its work quickly.
It is better to separate general ventilation and exhaust by purpose. Local exhaust captures heavy and fine dust at the grinding station. General ventilation refreshes the room air and should not pull flow across the whole area. When both systems pull in the same direction without planning, the grinding station starts spreading dust even farther.
Before adjusting anything, it helps to do a simple test. Turn on grinding, the CNC machine, the general ventilation, and open the doors the way they are normally used on shift. Then watch where the airflow goes.
- Use a safe smoke tester or a light ribbon.
- Check the airflow near the grinding wheel.
- See whether the flow is being drawn toward the machines.
- Check walkways, corners, and the area near the doors.
- Repeat the test with doors closed and open.
Often the problem is not a weak fan, but the doors or an axial fan breaking the entire airflow pattern. In the morning the exhaust works fine, but after the doors are opened the dust goes straight to the CNC machine.
A flexible arm or a fixed hood
A flexible arm is more convenient where parts vary in size and the working point shifts often. The operator can move the capture point closer to the grinding area and avoid pulling air from the whole station. For a small floor area, this is often the fastest and cheapest step.
A fixed hood works when the operation changes little and the part is placed in the same spot each time. But if the hood hangs too high, it catches already dispersed dust instead of the actual discharge. In that case, the arm works better.
On floors where metalworking machines are installed and serviced, this approach usually gives a noticeable result without construction work: less dust on housings, cleaner walkways, and lower risk to the guideways.
How to separate people, carts, and bins
Even a good screen will not help if the same cart carries both clean blanks and abrasive waste. Grinding dust near a CNC machine often reaches the clean area not through the air, but on wheels, soles, and dirty bins.
The simplest rule is this: material delivery and waste removal should not use the same route. If the floor has one wide aisle, mark it with floor lines into two short lanes. One is for clean bins and blanks only, the other for waste, used wheels, dirty pallets, and garbage bags.
Complex schemes do not work. People always take shortcuts. That is why routes on the floor must be short and obvious at a glance:
- “clean supply”
- “dirty removal”
- “operator walkway”
- “service cleaning”
That is enough to remove unnecessary crossing of flows. If a cart leaves the grinding area, it should not pass by machines with an open work area, the tool cabinet, or a place where guideways, chucks, and fixtures are kept.
Do not keep pallets near CNC machines if you can avoid it. Dust settles on them quickly, and then it is carried to blanks, bins, and shoes all over the shop. Temporary storage needs a separate pocket outside the clean area, even if it is only 2-3 spots along the wall.
A small cleaning point near the boundary of the zones also helps. Keep brushes, an industrial vacuum, and spare bags there so dirt is not hauled across the whole shop. If a bag gets full, it is changed on the spot instead of being carried open through the aisle.
A simple rule for bins works well too: dirty bins do not enter the clean area. They are either cleaned at the transition point or sent straight to the washing and storage area. On a small floor, that is already enough to keep dust from reaching the machine guideways.
In practice it looks like this: at the CNC lathe, only clean bins for the next batch are kept nearby, while the cart after grinding takes the marked route to the waste collection point. The extra distance is small, but dust settles less where it costs the most.
Example for a small floor area
On a small floor, the picture is often simple: the grinding station sits almost right next to a row of CNC lathes. The nearest machine is 3-4 meters away, the aisle is shared, carts with blanks pass by, and finished parts are sometimes placed on the same bin after cleanup. In that setup, grinding dust near the CNC machine does not seem dangerous until a gray film appears on the covers and guideways.
Imagine a floor with three lathes. The grinder works at the end of the row, and with every metal removal the abrasive flies not only into the station area but also into the aisle. From there it is carried by cart wheels, shoe soles, and the bins themselves. If a machine door is opened nearby, fine dust can easily reach the chuck, the loading area, and everything people touch by hand.
Here a single continuous screen and a moved suction point work well. The screen is placed between the grinding station and the nearest machine, slightly wider than the work area itself. It should block the direct dust throw, not just mark the boundary. The exhaust is moved closer to the dust source, usually to the side and slightly above the point where the wheel contacts the part. Then the airflow goes into the exhaust instead of spreading through the aisle.
After that, simple floor markings are added. One route is left for clean bins along the machines, and another, shorter route is assigned for parts after grinding to a separate cleanup and cooling spot. A brush, a dustpan, and closed bins for abrasive waste are kept there as well. These zones should not be mixed, even if the area is tight.
The daily routine also changes. Cleaning starts at the grinding station, then the aisle is cleaned, and only after that are the outside surfaces of the machines wiped with a separate rag. Before the shift, the operator quickly checks two things: whether there is dust on the door guides and whether the exhaust is pulling past the grinding area. This kind of routine does not require rebuilding the shop, but it noticeably lowers the risk to the machine.
Mistakes that quickly bring the dust back
The most common mistake is simple: grinding is left in the shared aisle between machines. Then grinding dust near the CNC machine does not stay in one place. It is spread by cart wheels, shoes, and airflow from doors, fans, and the crane. Even if the machine is closed, the abrasive still reaches the loading area, settles on the chuck, doors, and guideways.
The second mistake is relying on end-of-shift cleaning. Late cleaning removes only what has already settled on the floor and surfaces. Fine dust has already had time to reach places that are harder to notice: under covers, on cable channels, and on greased components. One day like that rarely causes trouble. A week of that habit does cause wear and extra dirt in maintenance.
Employees often make the problem worse themselves. They want to clean quickly and use compressed air. Near a CNC machine, that is almost always a bad idea. The air jet does not remove the dust; it lifts it into the air and sends it farther than it would have gone on its own. After that
Quick check before the shift
Three minutes before startup often save hours of cleaning and repairs. If there is grinding dust near the CNC machine, it is best to inspect it along the same route each time so nothing is missed.
Start at the machine and walk around it. Do not look at general cleanliness; look for small signs: gray film, shiny abrasive grit, marks on bellows, cables, and the cabinet door. If dust has already settled near the guideways, the grinding zone is not working properly.
Five short actions are enough before the shift:
- Wipe the cover near the guideways, the cable channel, and the lower part of the cabinet with a clean cloth. A mark on the cloth will show right away where the abrasive has reached.
- Look at the bins and carts. If a blank box or pallet is again standing in the aisle between grinding and the machine, dust will ride along with the wheels.
- Check the screen. It is often moved for convenience, and then the airflow goes straight toward the CNC machine.
- Turn on the exhaust and hold a narrow strip of paper or a light chip near the place where the dust is created. The suction should capture it immediately, not half a meter away from the source.
- Write down one note about the area before the shift starts. One line is enough: “screen shifted,” “bin is in the wrong place,” “weak draft at the wheel.”
This walkthrough does not require instruments or long reports. It is meant to catch a small fault before abrasive reaches the guideways, sensors, and connectors.
If the same notes repeat for two or three days in a row, the problem is no longer one operator’s discipline. Then the passage layout, bin location, or exhaust position should be changed. On floors with CNC lathes, this kind of simple control usually brings more value than a large clean-up once a week.
Where to start next
If grinding dust near the CNC machine is already causing trouble, do not try to redesign the whole floor at once. It is faster to choose one grinding station and one boundary between the “dirty” and “clean” zones. On that area, it is easier to see where the screen holds the flow, where the exhaust is weak, and how abrasive gets to the machine through bins or cart wheels.
Lock in the solution not just in conversation, but right on the shop floor. Mark the line on the floor, set a place for clean bins, and hang a simple floor plan where operators and the storekeeper can see it. When the rule is visible at a glance, people follow it much better.
You also need one person responsible. Not “everyone a little bit,” but a specific person who checks three things every day: the screen is in place, the exhaust works as intended, and clean bins have not drifted into the dirty zone. That check takes only a few minutes, but it often saves the machine guideways from extra dust.
Usually this is enough:
- choose one grinding station next to the CNC machine and separate it with a screen;
- mark the people paths and the cart route for bins on the floor;
- assign a place for clean bins and forbid them from returning dirty;
- appoint one person to check the screen, the exhaust, and the order at the start of the shift.
If you later move equipment, do not place machines wherever they happen to fit. First draw two flows: dirty and clean. Mark separately how the bins will move, where people will walk, and from which side service can reach the machine. Otherwise the new layout will quickly break even a good setup.
When you are planning a new machine or moving a line, it is better to have this conversation early, during the selection stage. For jobs like this, it makes sense to discuss not only the machine itself with EAST CNC, but also zoning, service access, exhaust placement, and a safe route for bins. Changing all that later on a finished floor is almost always slower and more expensive.
Start with one corner of the shop. If it is cleaner after two weeks and the operators are following the rules, scaling the solution up becomes much easier.